文章目录
- 【torch.xxx】
- torch.addmm() / torch.addmm_()
- torch.clamp() / torch.clamp_()
- torch.eq() / torch.ne()
- torch.manual_seed()
- torch.unique()
- torch.save() / torch.load()
- torch.view() / torch.permute() / torch. transpose() / torch.reshape()
- 【torch.cuda.xxx】
- torch.cuda.synchronize()
- 【torch.distributed.xxx】
- 【torch.nn.xxx】
- torch.nn.MaxPool2d
- 【torchvision.xxx】
- 【pytorch to caffe】
- 【Pinned Memory】
- 【Parameter 和 buffer】
【torch.xxx】
torch.addmm() / torch.addmm_()
来自 Pytorch里addmm()和addmm_()的用法详解

addmm_() 的操作和 addmm() 函数功能相同,区别就是addmm_()有inplace的操作,也就是在原对象基础上进行修改,即把改变之后的变量再赋给原来的变量。
def addmm(self, beta=1, mat, alpha=1, mat1, mat2, out=None):...
torch.clamp() / torch.clamp_()
来自 pytorch:torch.clamp()
torch.clamp(input, min, max, out=None) → Tensor
      | min, if x_i < min
y_i = | x_i, if min <= x_i <= max| max, if x_i > max
demo
a=torch.randint(low=0,high=10,size=(10,1))
print(a)
a=torch.clamp(a,3,9)
print(a)
这相当于是个框,把框外的拉回来,框内不动
使用场景
但凡是除数,未免是0,都用 torch.clamp(a ,min=1e-6),将除数设置为不小于1e-6的值。
PYTORCH CLAMP 与CLAMP_区别
pytorch clamp 与clamp_ ,有下划线的表示修改并赋给自身,无下划线的表示需要返回处理后的值,比如:
h = k.clamp(min=0) #将结果存入h,k保留原值
k.clamp_(min=0) # 将结果存入k
torch.eq() / torch.ne()
torch.eq(input, other, *, out=None) → Tensor
- input (Tensor) – the tensor to compare
- other (Tensor or float) – the tensor or value to compare
torch.ne(input, other, *, out=None) → Tensor
eg1
torch.eq(torch.tensor([[1, 2], [3, 4]]), torch.tensor([[1, 1], [4, 4]]))
tensor([[ True, False],[False, True]])
eg2
torch.eq(torch.tensor([[1, 2], [3, 4]]), 1)
tensor([[ True, False],[False, False]])
torch.manual_seed()
torch.manual_seed()  #为CPU设置种子用于生成随机数,以使得结果是确定的
torch.cuda.manual_seed() #为当前GPU设置随机种子;
torch.cuda.manual_seed_all() #为所有的GPU设置种子。
torch.unique()
torch.unique(input, sorted=True, return_inverse=False, return_counts=False, dim=None) → Tuple[Tensor, Tensor, Tensor]
Returns the unique elements of the input tensor.
output = torch.unique(torch.tensor([1, 3, 2, 3], dtype=torch.long))
print(output)
output
tensor([1, 2, 3])
eg2
output, inverse_indices = torch.unique(torch.tensor([[1, 3], [2, 3]], dtype=torch.long), sorted=True, return_inverse=True)
print(output)
print(inverse_indices)
output
tensor([1, 2, 3])
tensor([[0, 2],[1, 2]])
torch.save() / torch.load()
import torch
import torch.nn as nn
import torch.nn.functional as F
import torch.optim as optimdevice = torch.device("cuda:2") # run on GPUclass Net(nn.Module):def __init__(self):super(Net,self).__init__()self.conv1 = nn.Conv2d(3,6,5)self.pool = nn.MaxPool2d(2)self.conv2 = nn.Conv2d(6,16,5)self.fc1 = nn.Linear(16*5*5,120)self.fc2 = nn.Linear(120,84)self.fc3 = nn.Linear(84,10)def forward(self,x):x = self.pool(F.relu(self.conv1(x)))x = self.pool(F.relu(self.conv2(x)))x = x.view(x.size(0),-1)x = F.relu(self.fc1(x))x = F.relu(self.fc2(x))x = self.fc3(x)return xnet = Net()
net.to(device)optimizer = optim.SGD(net.parameters(),lr = 0.001,momentum=0.9)print("Model's state_dict")
for para_tensor in net.state_dict():print(para_tensor,'\t',net.state_dict()[para_tensor].size())
"""
conv1.weight 	 torch.Size([6, 3, 5, 5])
conv1.bias 	 torch.Size([6])
conv2.weight 	 torch.Size([16, 6, 5, 5])
conv2.bias 	 torch.Size([16])
fc1.weight 	 torch.Size([120, 400])
fc1.bias 	 torch.Size([120])
fc2.weight 	 torch.Size([84, 120])
fc2.bias 	 torch.Size([84])
fc3.weight 	 torch.Size([10, 84])
fc3.bias 	 torch.Size([10])Process finished with exit code 0
"""
# print(net.fc1.out_features) # can see the input size and output size
# print(net.fc1.in_features) # can see the input size and output size# **********************************************************************# print("Optimizer's state dict:")
#
# for var_name in optimizer.state_dict():
#     print(var_name,"\t",optimizer.state_dict()[var_name])
"""
state 	 {}
param_groups 	 [{'lr': 0.001, 'momentum': 0.9, 'dampening': 0, 'weight_decay': 0, 'nesterov': False, 'params': [140660776619680, 140660585225240, 140660585225312, 140660585225384, 140660585225456, 140660585225528, 140660585225600, 140660585225672, 140660585225744, 140660585225816]}]
"""# save and load: method 1 pth
# save
torch.save(net.state_dict(),"model.pth")
# load
net.load_state_dict(torch.load("model.pth"))
net.eval() # to set dropout and BN as inference manner# save and load: method 2 pth
# save the total model
torch.save(net,"model2.pth")
torch.load("model2.pth")
net.eval()# save and load: method 3 tar
# save the checkpoint
# for exampleepoch = 10
loss = 0.5e-5torch.save({'epoch':epoch,'model_state_dict':net.state_dict(),'optimizer_state_dict':optimizer.state_dict(),'loss':loss
},"model3.tar")checkpoint = torch.load("model3.tar")
net.load_state_dict((checkpoint['model_state_dict']))
optimizer.load_state_dict(checkpoint['optimizer_state_dict'])
epoch = checkpoint['epoch']
loss = checkpoint['loss']
# or
# net.train()
torch.view() / torch.permute() / torch. transpose() / torch.reshape()
transpose是交换两个维度,permute()是交换多个维度。
permute().contiguous().view()相当于reshape
transpose()和view()实现方式不一样,shape 相同但内容不同
view()只能对连续的张量进行操作,并且返回的张量仍然是连续的。
transpose()既可以在连续张量上操作,也可以在非连续张量上操作。与view()不同,返回的张量可能不再是连续的。
来自
- PyTorch的 transpose、permute、view、reshape
- permute()和view()
【torch.cuda.xxx】
torch.cuda.synchronize()
来自
- torch.cuda.synchronize() 的作用: 测试模型运行时间
- pytorch 正确的测试时间的代码 torch.cuda.synchronize()
测试模型运行时间
torch.cuda.synchronize()
start = time.time()
result = model(input)
torch.cuda.synchronize()
end = time.time()
基本等价于
start = time.time()
result = model(input)
print(result)
end = time.time()
不等同
start = time.time()
result = model(input)
end = time.time()
【torch.distributed.xxx】
来自
- [深度学习] 分布式Pytorch介绍(三)
- PyTorch多卡分布式训练DistributedDataParallel 使用方法
- Pytorch 分布式训练
- WRITING DISTRIBUTED APPLICATIONS WITH PYTORCH
优势(相较于 DataParallel)
- 每个进程对应一个独立的训练过程,且只对梯度等少量数据进行信息交换。
在每次迭代中,每个进程具有自己的 optimizer ,并独立完成所有的优化步骤,进程内与一般的训练无异。
在各进程梯度计算完成之后,各进程需要将梯度进行汇总平均,然后再由 rank=0 的进程,将其 broadcast 到所有进程。之后,各进程用该梯度来更新参数。由于各进程中的模型,初始参数一致 (初始时刻进行一次 broadcast),而每次用于更新参数的梯度也一致,因此,各进程的模型参数始终保持一致。
而在 DataParallel 中,全程维护一个 optimizer,对各 GPU 上梯度进行求和,而在主 GPU 进行参数更新,之后再将模型参数 broadcast 到其他 GPU。
相较于 DataParallel,torch.distributed 传输的数据量更少,因此速度更快,效率更高。
- 每个进程包含独立的解释器和 GIL。
由于每个进程拥有独立的解释器和 GIL,消除了来自单个 Python 进程中的多个执行线程,模型副本或 GPU 的额外解释器开销和 GIL-thrashing ,因此可以减少解释器和 GIL 使用冲突。这对于严重依赖 Python runtime 的 models 而言,比如说包含 RNN 层或大量小组件的 models 而言,这尤为重要。
(GIL 全局解释器锁(Global Interpreter Lock)是Python用于同步线程的工具,使得任何时刻仅有一个线程在执行)
1)单机多卡,DataParallel(DP,最常用,最简单,是单进程,多线程)—— single process multi-gpus
2)单机多卡,DistributedDataParallel(DDP,较高级,多进程)——multi-processes multi-gpus
3)多机多卡,DistributedDataParallel(最高级)
1)DP
- 尽管 DataLoader 可以指定 num_worker,增加负责加载数据的线程数量,但是线程的资源受限于父进程,且由于python的GIL机制,不能利用好多核的并行优势
- 模型在 gpu 群组中进行初始化与广播过程依赖单一进程的串行操作
- DP模式相当于将多个GPU卡合并为一个卡进行训练

2)DDP
- 一个进程一个GPU(当然可以让每个进程控制多个GPU,但这显然比每个进程有一个GPU要慢)
- 充分利用多核并行的优势加载数据
- 模型在 gpu 群组中进行初始化的过程由各自的进程负责调度
- 代码可以无缝切换单机多卡与多机多卡训练,因为此时单机单卡成为了单机多卡/多机多卡并行下的一个特例
- GPU可以都在同一个节点上,也可以分布在多个节点上。每个进程都执行相同的任务,并且每个进程都与所有其他进程通信。进程或者说GPU之间只传递梯度,这样网络通信就不再是瓶颈。

all reduce(即汇总不同 GPU 计算所得的梯度,并同步计算结果)

【torch.nn.xxx】
torch.nn.MaxPool2d
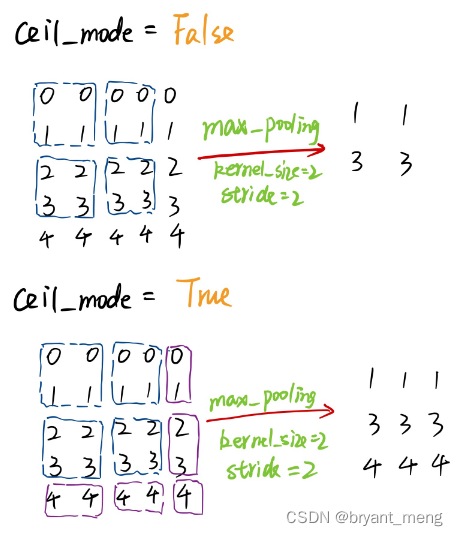
PyTorch中MaxPool的ceil_mode属性
PyTorch中的MaxPool(最大池化)有一个属性:ceil_mode,默认为False(地板模式),为True时是天花板模式。
【torchvision.xxx】
来自:
- torchvision 包的介绍
- torchvision.datasets 的使用(附代码)
- PyTorch 学习笔记:transforms的二十二个方法(transforms用法非常详细)
torchvision 是 PyTorch 中专门用来处理图像的库。这个包中有四个大类。
-
torchvision.datasets
- MNISTCOCO
- Captions
- Detection
- LSUN
- ImageFolder
- Imagenet-12
- CIFAR
- STL10
- SVHN
- PhotoTour
…
test_data = torchvision.datasets.CIFAR10(root='../BigData',transform=torchvision.transforms.ToTensor(),train=False,download=True ) -
torchvision.models
- AlexNet
- VGG
- ResNet
- SqueezeNet
- DenseNet
…
import torchvision.models as models resnet18 = models.resnet18() alexnet = models.alexnet() squeezenet = models.squeezenet1_0() densenet = models.densenet_161() -
torchvision.transforms

transform = transforms.Compose([transforms.Resize(96), # 缩放到 96 * 96 大小transforms.ToTensor(),transforms.Normalize((0.5, 0.5, 0.5), (0.5, 0.5, 0.5)) # 归一化 ]) -
torchvision.utils
torchvision.transforms 方法整理如下
-
裁剪(Crop)
transforms.CenterCrop(size,padding,pad_if_needed,fill,padding_mode)中心裁剪transforms.RandomCrop(size)随机裁剪transforms.RandomResizedCrop(size, scale, ratio, interpolation)随机长宽比裁剪transforms.FiveCrop(size)上下左右中心裁剪transforms.TenCrop(size, vertical_flip)上下左右中心裁剪后翻转
-
翻转和旋转(Flip and Rotation)
transforms.RandomHorizontalFlip(p=0.5)依概率p水平翻转transforms.RandomVerticalFlip(p=0.5)依概率p垂直翻转transforms.RandomRotation(degrees, resample=False, expand=False, center=None)随机旋转
-
图像变换(resize)
transforms.Resize(size, interpolation=2)transforms.Normalize(mean, std)标准化:transforms.ToTensor()转为tensor,并归一化至[0-1]:transforms.Pad(padding, fill=0, padding_mode='constant')填充transforms.ColorJitter(brightness=0, contrast=0, saturation=0, hue=0)修改亮度、对比度和饱和度:transforms.Grayscale(num_output_channels=1)转灰度图:transforms.LinearTransformation(transformation_matrix)线性变换transforms.RandomAffine(degrees, translate=None, scale=None, shear=None, resample=False, fillcolor=0)仿射变换transforms.RandomGrayscale(p=0.1)依概率p转为灰度图transforms.ToPILImage(mode=None)将数据转换为PILImagetransforms.Lambda(lambd),Apply a user-defined lambda as a transform
-
对 transforms 操作,使数据增强更灵活
transforms.RandomChoice(transforms), 从给定的一系列transforms中选一个进行操作transforms.RandomApply(transforms, p=0.5),给一个transform加上概率,依概率进行操作transforms.RandomOrder(transforms),将transforms中的操作随机打乱
【pytorch to caffe】
https://github.com/xxradon/PytorchToCaffe/blob/master/pytorch_to_caffe.py
【Pinned Memory】
来自:
- CUDA 之 Pinned Memory
- 物理内存和虚拟内存
虚拟内存技术定义了一个连续的虚拟地址空间,并把内存扩展到硬盘空间。它使得应用程序认为自己拥有连续的可用的内存(一个连续完整的地址空间),而实际上,它通常是被分隔成多个物理内存碎片,还有部分暂时存储在外部磁盘存储器上,在需要时进行数据交换。
为何使用虚拟内存技术?
电脑中运行的所有程序,都需经过内存来执行,若执行的程序占用内存很大或很多,则会导致内存消耗殆尽。为了解决该问题,Windows 运用了虚拟内存技术,即匀出一部分硬盘空间来充当内存使用。若计算机运行程序或操作所需要的 RAM(随机存储器)不足时,则 Windows 会用这部分虚拟存储器进行补偿,以缓解内存的紧张。
物理内存 VS 虚拟内存
- 作用不同:物理内存是与 CPU 进行沟通的桥梁,而虚拟内存是在物理内存不足时,起到辅助补偿的作用。
- 主体不同:物理内存是指通过插在主板内存槽上的物理内存条而获得的内存空间,虚拟内存是指根据系统需要从硬盘匀出来的用来充当内存的那部分空间。
- 速度不同:物理内存是内存条的读写速度,虚拟内存是硬盘的读写速度,物理内存的处理速度是虚拟内存的30倍以上(即使是固态硬盘,速度也比内存条差很多)。
对于 CUDA 架构而言,主机端的内存可分为两种:
1)可分页内存(Pageable Memory)。
2)页锁定内存(Page-locked Memory),或称固定内存(Pinned Memory)。
对于页锁定内存,操作系统不会对其进行分页和交换操作,一定是存储在物理内存,不会存储在虚拟内存,因此,GPU 可直接通过 DMA 机制,在主机和 GPU 之间快速复制数据。而对于可分页内存,CUDA 驱动会首先将 Pageable Memory 的数据拷贝到临时的 Pinned Memory,然后再通过 DMA 机制进行数据传输。如下图所示:

C++ 中,通过操作系统接口 malloc() 在主机上分配可分页内存,通过 CUDA 函数 cudaHostAlloc() 在主机上分配页锁定内存。
torch.utils.data.DataLoader() 中的 pin_memory 参数同理
【Parameter 和 buffer】
来自:Pytorch模型中的parameter与buffer
If you have parameters in your model, which should be saved and restored in the state_dict, but not trained by the optimizer, you should register them as buffers.Buffers won’t be returned in model.parameters(), so that the optimizer won’t have a change to update them.
模型中需要保存下来的参数包括两种:
- 一种是反向传播需要被 optimizer 更新的,称之为 parameter
- 一种是反向传播不需要被 optimizer 更新,称之为 buffer

模型保存的是 state_dict 返回的 OrderDict
class MyModel(nn.Module):def __init__(self):super(MyModel, self).__init__()buffer = torch.randn(2, 3)  # tensorself.register_buffer('my_buffer', buffer)self.param = nn.Parameter(torch.randn(3, 3))  # 模型的成员变量def forward(self, x):# 可以通过 self.param 和 self.my_buffer 访问pass
model = MyModel()
for param in model.parameters():print(param)
print("----------------")
for buffer in model.buffers():print(buffer)
print("----------------")
print(model.state_dict())


![38 字典名[键名]=值 向字典增加键值对](https://img-blog.csdnimg.cn/dc1838d0e66445dcadb76ae00b07f3bd.png#pic_center)