1. 摘要
这次添加的功能是 个人页图片上传功能和图片详情页评论异步加载功能
传送门:
基于 flask 框架的模拟instagram 图片分享网站的开发 3
基于 flask 框架的模拟instagram 图片分享网站的开发 2
基于 flask 框架的模拟instagram 图片分享网站的开发 1
2. 流程
2.1 添加评论功能
- 首先为点击的空间添加id 方便js 查找
 <section class="discuss-edit">
 <a class="icon-heart-empty"></a>
 <input placeholder="添加评论..." id = "jsCmt" type="text">
 <button class="more-info" id = "jsSubmit">更多选项</button>
 </section>
添加js 响应文件
$(function () {var oExports = {initialize: fInitialize,encode: fEncode};oExports.initialize();function fInitialize() {var that = this;var sImageId = window.imageId;var oCmtIpt = $('#jsCmt');var oListDv = $('ul.js-discuss-list');// 点击添加评论var bSubmit = false;$('#jsSubmit').on('click', function () {var sCmt = $.trim(oCmtIpt.val());// 评论为空不能提交if (!sCmt) {return alert('评论不能为空');}// 上一个提交没结束之前,不再提交新的评论if (bSubmit) {return;}bSubmit = true;$.ajax({url: '/addcomment/',type: 'post',dataType: 'json',data: {image_id: sImageId, content: sCmt}}).done(function (oResult) {if (oResult.code !== 0) {return alert(oResult.msg || '提交失败,请重试');}// 清空输入框oCmtIpt.val('');// 渲染新的评论var sHtml = ['<li>','<a class="_4zhc5 _iqaka" title="', that.encode(oResult.username), '" href="/profile/', oResult.user_id, '">', that.encode(oResult.username), '</a> ','<span><span>', that.encode(sCmt), '</span></span>','</li>'].join('');oListDv.prepend(sHtml);}).fail(function (oResult) {alert(oResult.msg || '提交失败,请重试');}).always(function () {bSubmit = false;});});}function fEncode(sStr, bDecode) {var aReplace =["'", "'", """, '"', " ", " ", ">", ">", "<", "<", "&", "&", "¥", "¥"];!bDecode && aReplace.reverse();for (var i = 0, l = aReplace.length; i < l; i += 2) {sStr = sStr.replace(new RegExp(aReplace[i],'g'), aReplace[i+1]);}return sStr;};});简单的分析一下这段代码:
点击提交之后, 通过 ajax 请求, 将 评论内容和图片id 通过post 方式, 发送到 路由‘ /addcomment/’上面, 后端处理后, 返回所需要的 json 数据 (code, username, user_id), 实现相应html 代码加载添加评论的路由响应
@app.route('/addcomment/', methods=['POST'])
def addcomment():image_id = int(request.values['image_id'])content = request.values['content'].strip()comment = Comment(content, image_id, current_user.id)db.session.add(comment)db.session.commit()map = {'user_id':current_user.id, 'username' : current_user.username, 'code':0}return json.dumps(map)
2.2 图片上传功能
添加相应的前端响应
{% if current_user.id == user.id %}<span class="verified" title="已验证">已验证</span><span class="_jxp6f _e616g" style="display:inline-block;position:relative;"><form method="post" action="/upload/" enctype="multipart/form-data"><button class="btn-success">上传图片</button><input name="file" type="file" onchange="this.parentNode.submit()" style="opacity:0;position:absolute;top:0;left:0;display:block;width:100%;height:100%;"></form></span><button class="more-info">选项</button>{%endif%}同时创建存储路由
这里面逻辑流程很简单, 首先从http的post 请求中获取file文件流, 并将其保存在本地(或者云服务器端), 同时返回一个图片的访问地址, 以及定义一个相应的访问该图片的路由即可
下面是存储本地的代码
def save_to_local(file, file_name):save_dir = app.config['UPLOAD_DIR']file.save(os.path.join(save_dir, file_name))return '/image/' + file_name@app.route('/image/<image_name>')
def view_image(image_name):return send_from_directory(app.config['UPLOAD_DIR'], image_name)@app.route('/upload/', methods=['POST'])
def upload():file = request.files['file']if file.filename.find('.') > 0:file_ext = file.filename.rsplit('.', 1)[1].strip().lower()if file_ext in app.config['ALLOWED_EXT']:file_name = str(uuid.uuid1()).replace('-', '') + '.' + file_extif app.config['SAVE_IN_LOCAL'] == True:url = save_to_local(file, file_name)else:url = save_file_to_cloud(file_name, file)if url != None:db.session.add(Image(url, current_user.id))db.session.commit()return redirect('/profile/%d/' % current_user.id)
这是存储在 云端的api
access_key = app.config['QINIU_ACCESS_KEY']
secret_key = app.config['QINIU_SECRET_KEY']
bucket_name = app.config['QINIU_BUCKET_NAME']q = Auth(access_key, secret_key)def save_file_to_cloud(save_filename, source_file):#生成上传 Token,可以指定过期时间等token = q.upload_token(bucket_name, save_filename)filepath = os.path.join(app.config['UPLOAD_DIR'], save_filename)source_file.save(filepath)ret, info = put_file(token, save_filename, filepath)# ret, info = put_stream(token, save_filename, source_file.stream,#                        "qiniu" ,os.fstat(source_file.stream.fileno()).st_size)print infoif info.status_code == 200:return os.path.join(app.config['QINIU_DOMAIN'], save_filename)return None
3. 运行效果
输入评论前
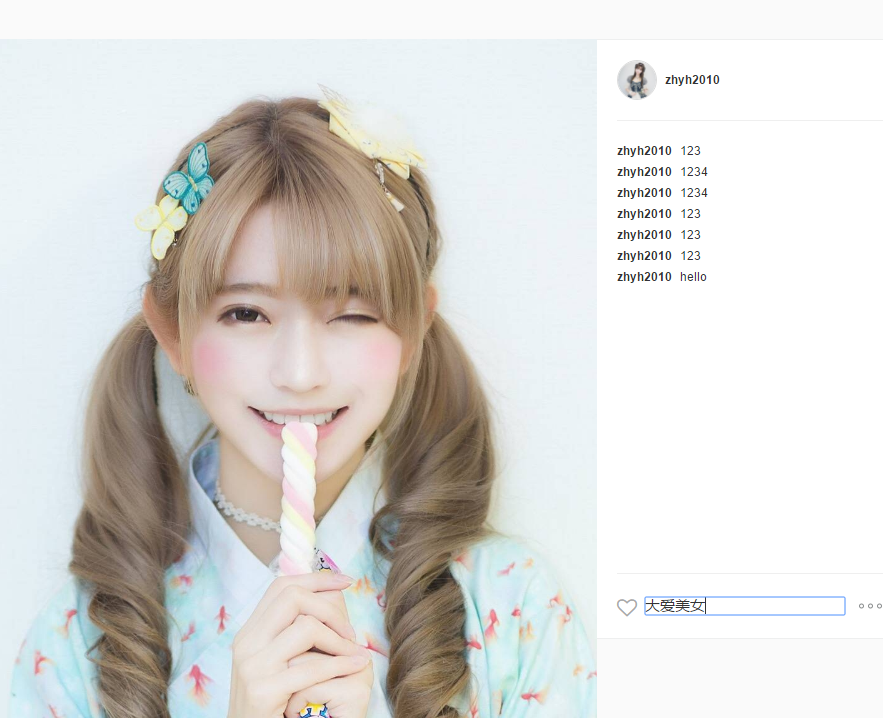
输入评论后

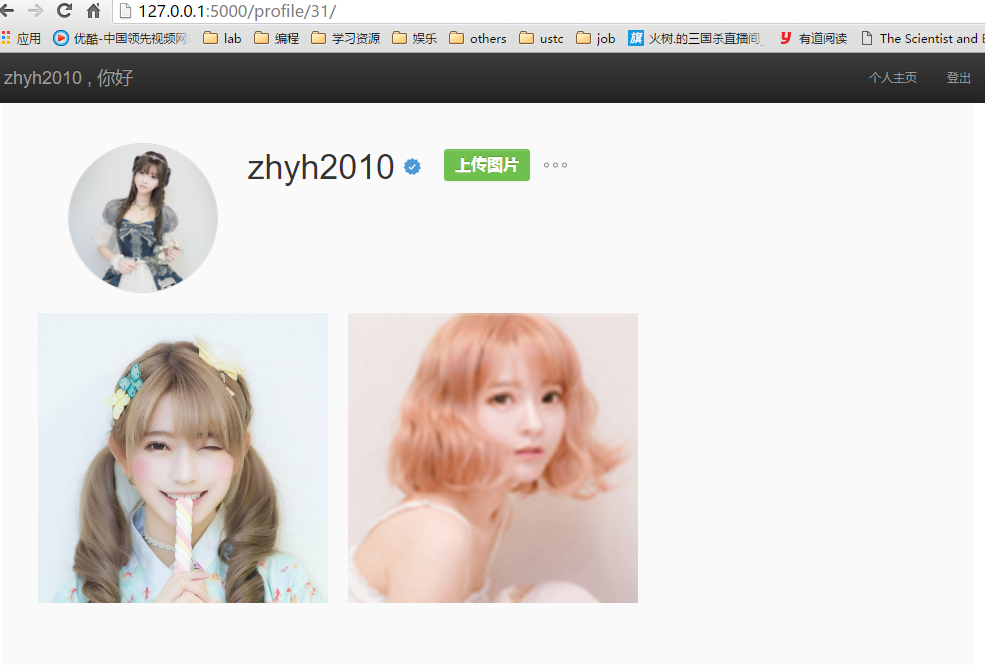
个人主页
4. 工程地址
https://code.csdn.net/zhyh1435589631/instagram_simulation/tree/master


![[.Net Core学习一]网站发布](https://img-blog.csdnimg.cn/20190802152135263.png?x-oss-process=image/watermark,type_ZmFuZ3poZW5naGVpdGk,shadow_10,text_aHR0cHM6Ly9ibG9nLmNzZG4ubmV0L2xpdXppc2hhbmc=,size_16,color_FFFFFF,t_70)