使用LNMP架构部署动态网站环境
实验环境
linux操作系统,本文用的是centos7版本的
实验是需要的安装软件包
链接:https://pan.baidu.com/s/11f4Y6GO0ehQDjc-idUJ5lA
提取码:nxfv
复制这段内容后打开百度网盘手机App,操作更方便哦
下载后上传到 /usr/local/src/文件夹
实验说明
本实验是参照《linux就该这么学》基础下完成的
LNMP动态网站部署架构是一套由Linux+ Nginx + MySQL + PHP组成的动态网站系统解决方案,具有免费、高效、扩展性强且资源消耗低等优良特性。
配置yum软件仓库
备份本地数据
[root@VM_0_17_centos ~]# cd /etc/yum.repos.d/
[root@VM_0_17_centos yum.repos.d]# mkdir CentOS
[root@VM_0_17_centos yum.repos.d]# mv CentOS-* CentOS
[root@VM_0_17_centos yum.repos.d]# ls
CentOS
配置一个163的yum软件仓库
[root@VM_0_17_centos yum.repos.d]# vim 163.repo
[root@VM_0_17_centos yum.repos.d]# cat 163.repo
[163repo]
name=linux redhat 163.repo
baseurl=http://mirrors.163.com/centos/7/os/x86_64/
gpgcheck=0
enabled=1
刷新软件仓库
[root@VM_0_17_centos yum.repos.d]# yum clean all
已加载插件:fastestmirror, langpacks
正在清理软件源: 163repo
Cleaning up everything
[root@VM_0_17_centos yum.repos.d]# yum list
查看lnmp架构使用的软件
[root@VM_0_17_centos src]# cd /usr/local/src/
[root@VM_0_17_centos src]# ls
cmake-2.8.11.2.tar.gz   libpng-1.6.12.tar.gz   php-5.5.14.tar.gz
Discuz_X3.2_SC_GBK.zip  libvpx-v1.3.0.tar.bz2  t1lib-5.1.2.tar.gz
freetype-2.5.3.tar.gz   mysql-5.6.19.tar.gz    tiff-4.0.3.tar.gz
jpegsrc.v9a.tar.gz      nginx-1.6.0.tar.gz     yasm-1.2.0.tar.gz
libgd-2.1.0.tar.gz      openssl-1.0.1h.tar.gz  zlib-1.2.8.tar.gz
libmcrypt-2.5.8.tar.gz  pcre-8.35.tar.gz
部署安装cmake软件
CMake是一个跨平台的工程构建和管理工具,他可以为不同的平台生成各自平台平台标准的工程文件,进而使用本平台标准的编译方法来构建最终的程序。
CMake可以为各平台生成各种工程文件,所以当你要编写一个跨平台的软件,而又不想为每个平台都手工构建一个工程的时候,你可以使用它。要知道一个工程要支持多个平台,源文件和编译配置的管理将是一个麻烦的事情。使用cmake可以让你只劳动一次,就可以在所有平台都享用劳动成果。
[root@VM_0_17_centos src]# tar -zxvf cmake-2.8.11.2.tar.gz   #解压  下同
............ #省略
[root@VM_0_17_centos src]# cd cmake-2.8.11.2/
[root@VM_0_17_centos cmake-2.8.11.2]# ./configure    #配置安装环境,查看是否满足安装要求
..........#省略
[root@VM_0_17_centos cmake-2.8.11.2]# make && make install  #编译安装   下同
..........#省略
到此linux环境基本部署完成
安装mysal
这里我使用的是源码安装,你也可以使用yum直接下载安装
[root@VM_0_17_centos cmake-2.8.11.2]# cd .. #跳转到上级目录 下同
创建mysql用户,用于管理数据库
[root@VM_0_17_centos src]# useradd mysql -s /sbin/nologin #创建用户并指定家目录
创建数据库服务程序和数据的存放位置,并修改用户的所有者
[root@VM_0_17_centos src]# mkdir -p /usr/local/mysql/var   #创建一个树文件夹
[root@VM_0_17_centos src]# chown -Rf mysql:mysql /usr/local/mysql  #修改用户所有者
编译安装mysql
[root@VM_0_17_centos src]# tar -zxvf mysql-5.6.19.tar.gz
[root@VM_0_17_centos src]# cd mysql-5.6.19/
[root@VM_0_17_centos mysql-5.6.19]# cmake . -DCMAKE_INSTALL_PREFIX=/usr/local/mysql -DMYSQL_DATADIR=/usr/local/mysql/var -DSYSCONFDIR=/etc
[root@VM_0_17_centos mysql-5.6.19]# make && make install
| 参数 | 说明 |
|---|---|
| - DCMAKE_INSTALL_PREFIX | 用于定义数据库服务程序的保存目录 |
| - DMYSQL_DATADIR | 用于定义真实数据库文件的目录 |
| - DSYSCONFDIR | 定义MySQL数据库配置文件的保存目录 |
安装完成后进入mysql文件夹,删去默认的mysql配置文件
[root@VM_0_17_centos mysql-5.6.19]# cd /usr/local/mysql/
[root@VM_0_17_centos mysql]# rm /etc/my.cnf
rm:是否删除普通文件 "/etc/my.cnf"?y
然后生成新的配置文件
[root@VM_0_17_centos mysql]# ./scripts/mysql_install_db --user=mysql --basedir=/usr/local/mysql --datadir=/usr/local/mysql/var
修改mysql的环境
[root@VM_0_17_centos mysql]# ln -s my.cnf /etc/my.cnf  #创建软连接   下同
[root@VM_0_17_centos mysql]# cp ./support-files/mysql.server  #复制文件 /etc/rc.d/init.d/mysqld
[root@VM_0_17_centos mysql]# chmod 755 /etc/rc.d/init.d/mysqld   #授予执行权限
编译mysql脚本文件
[root@VM_0_17_centos mysql]# vim /etc/rc.d/init.d/mysqld
..............43 # If you change base dir, you must also change datadir. These may get44 # overwritten by settings in the MySQL configuration files.45 46 basedir=/usr/local/mysql       #修改为mysql数据库程序保存目录47 datadir=/usr/local/mysql/var     #真实数据库的文件内容
..................
重新启动数据库
[root@VM_0_17_centos mysql]# service mysqld start
Starting MySQL.. SUCCESS!
[root@localhost mysql]# chkconfig mysqld on   #加入开机启动选项
配置mysql环境变量:将下面内容加入到文件的最后,可以使用G直接到文件末尾,不建议使用重定向
[root@VM_0_17_centos mysql]# vim /etc/profile
...
#mysql
export PATH=$PATH:/usr/local/mysql/bin
[root@VM_0_17_centos mysql]# source /etc/profile
创建mysql的软链接
[root@VM_0_17_centos mysql]# mkdir /var/lib/mysql
[root@VM_0_17_centost mysql]# ln -s /usr/local/mysql/lib/mysql /usr/lib/mysql
[root@VM_0_17_centos mysql]# ln -s /tmp/mysql.sock /var/lib/mysql/mysql.sock
[root@VM_0_17_centos mysql]# ln -s /usr/local/mysql/include/mysql /usr/include/mysql
初始化数据库
[root@VM_0_17_centos mysql]# mysql_secure_installation NOTE: RUNNING ALL PARTS OF THIS SCRIPT IS RECOMMENDED FOR ALL MySQLSERVERS IN PRODUCTION USE!  PLEASE READ EACH STEP CAREFULLY!In order to log into MySQL to secure it, we'll need the current
password for the root user.  If you've just installed MySQL, and
you haven't set the root password yet, the password will be blank,
so you should just press enter here.Enter current password for root (enter for none):     #按回车键
OK, successfully used password, moving on...Setting the root password ensures that nobody can log into the MySQL
root user without the proper authorisation.Set root password? [Y/n] y    #设置root密码
New password:
Re-enter new password:
Password updated successfully!
Reloading privilege tables..... Success!By default, a MySQL installation has an anonymous user, allowing anyone
to log into MySQL without having to have a user account created for
them.  This is intended only for testing, and to make the installation
go a bit smoother.  You should remove them before moving into a
production environment.Remove anonymous users? [Y/n] y    #删除匿名用户... Success!Normally, root should only be allowed to connect from 'localhost'.  This
ensures that someone cannot guess at the root password from the network.Disallow root login remotely? [Y/n] y    #禁止远程登录... Success!By default, MySQL comes with a database named 'test' that anyone can
access.  This is also intended only for testing, and should be removed
before moving into a production environment.Remove test database and access to it? [Y/n] y    #删除test数据库和数据库的访问权限- Dropping test database...... Success!- Removing privileges on test database...... Success!Reloading the privilege tables will ensure that all changes made so far
will take effect immediately.Reload privilege tables now? [Y/n] y    #刷新权限... Success!All done!  If you've completed all of the above steps, your MySQL
installation should now be secure.Thanks for using MySQL!Cleaning up...
**注意:**源码包安装时突然中断,需先执行命令make clean清理源码包临时文件 ,然后再 make;make install
好了,数据库源码安装完成,安装mysql可以使用yum install 安装会快很多
部署nginx
编译安装pcre、OpenSSL、zlib
安装pcre软件包,用于提供Perl语言兼容的正则表达式库,Nginx服务程序用于实现伪静态功能必不可少的依赖包
[root@VM_0_17_centos mysql]# cd /usr/local/src/
[root@VM_0_17_centos src]# tar -zxvf pcre-8.35.tar.gz
[root@VM_0_17_centos src]# cd pcre-8.35/
[root@VM_0_17_centos pcre-8.35]# ./configure --prefix=/usr/local/pcre
[root@VM_0_17_centos pcre-8.35]# make && make install
安装openssl软件包,用于提供网站加密证书服务的程序文件
[root@VM_0_17_centos pcre-8.35]# cd ..
[root@VM_0_17_centos src]# tar -zxvf openssl-1.0.1h.tar.gz
[root@VM_0_17_centos src]# cd openssl-1.0.1h/
[root@VM_0_17_centos openssl-1.0.1h]# ./config --prefix=/usr/local/openssl
[root@VM_0_17_centos openssl-1.0.1h]# make && make install
设置OpenSSL全局变量,文件最后面加上下面内容,source /etc/profile命令使环境变量立即生效
[root@VM_0_17_centos zlib-1.2.8]# cd ..
[root@VM_0_17_centos src]# vim /etc/profile
...
#openssl
export PATH=$PATH:/usr/local/openssl/bin
[root@VM_0_17_centos src]# source /etc/profile
安装zlib软件包,用于提供压缩功能的函数库文件
[root@VM_0_17_centos openssl-1.0.1h]# cd ..
[root@VM_0_17_centos src]# tar -zxvf zlib-1.2.8.tar.gz
[root@VM_0_17_centos src]# cd zlib-1.2.8/
[root@VM_0_17_centos zlib-1.2.8]# ./configure --prefix=/usr/local/zlib
[root@VM_0_17_centos zlib-1.2.8]# make && make install
编译安装nginx
Nginx是一款相当优秀的用于部署动态网站的服务程序,Nginx最初是为俄罗斯门户站点而设计的网站服务软件,作为作为一款轻量级的网站服务软件,因其稳定性和丰富的功能而深受信赖,但最最最被认可的是低系统资源、占用内存少且并发能力强,目前国内如新浪、网易、腾讯等门户站均在使用,市场占有份额一直保持在15-16%左右。
Nginx程序的稳定性来自于它采用了分阶段的资源分配技术,使得CPU与内存占用率会非常低,所以使用Nginx程序部署动态网站环境不仅十分的稳定、高效,而且消耗更少的系统资源,丰富的模块功能也几乎与Apache程序数量相同,现在已经完全的支持了proxy、rewrite、mod_fcgi、ssl、vhosts等常用模块。而且还支持了热部署技术,即能够可以7*24不间断提供服务,即便运行数月也无须重启,而且还可以在不暂停服务的情况下直接对Nginx服务程序进行升级
创建执行nginx的用户
[root@VM_0_17_centos src]# useradd www -s /sbin/nologin
编译安装
[root@VM_0_17_centos src]# tar -zxvf nginx-1.6.0.tar.gz
[root@VM_0_17_centos src]# cd nginx-1.6.0/
[root@VM_0_17_centos nginx-1.6.0]# ./configure --prefix=/usr/local/nginx --without-http_memcached_module --user=www --group=www --with-http_stub_status_module --with-http_ssl_module --with-http_gzip_static_module --with-openssl=/usr/local/src/openssl-1.0.1h --with-zlib=/usr/local/src/zlib-1.2.8 --with-pcre=/usr/local/src/pcre-8.35
[root@VM_0_17_centos nginx-1.6.0]# make && make install
| 参数 | 说明 |
|---|---|
| –user | 指定执行Nginx服务程序的用户名 |
| –group | 指定执行Nginx服务程序的用户组 |
| –with-openssl | 调用openssl软件包,指的是软件源码包的解压路径 |
编译nginx启动脚本
[root@VM_0_17_centos src]# vim /etc/rc.d/init.d/nginx#!/bin/bash
# nginx - this script starts and stops the nginx daemon
# chkconfig: - 85 15
# description: Nginx is an HTTP(S) server, HTTP(S) reverse \
# proxy and IMAP/POP3 proxy server
# processname: nginx
# config: /etc/nginx/nginx.conf
# config: /usr/local/nginx/conf/nginx.conf
# pidfile: /usr/local/nginx/logs/nginx.pid
# Source function library.
. /etc/rc.d/init.d/functions
# Source networking configuration.
. /etc/sysconfig/network
# Check that networking is up.
[ "$NETWORKING" = "no" ] && exit 0
nginx="/usr/local/nginx/sbin/nginx"
prog=$(basename $nginx)
NGINX_CONF_FILE="/usr/local/nginx/conf/nginx.conf"
[ -f /etc/sysconfig/nginx ] && . /etc/sysconfig/nginx
lockfile=/var/lock/subsys/nginx
make_dirs() {
# make required directories
user=`$nginx -V 2>&1 | grep "configure arguments:" | sed 's/[^*]*--user=\([^ ]*\).
*/\1/g' -`if [ -z "`grep $user /etc/passwd`" ]; thenuseradd -M -s /bin/nologin $userfi
options=`$nginx -V 2>&1 | grep 'configure arguments:'`
for opt in $options; doif [ `echo $opt | grep '.*-temp-path'` ]; thenvalue=`echo $opt | cut -d "=" -f 2`if [ ! -d "$value" ]; then# echo "creating" $valuemkdir -p $value && chown -R $user $valuefifi
done
}
start() {
[ -x $nginx ] || exit 5
[ -f $NGINX_CONF_FILE ] || exit 6
make_dirs
echo -n $"Starting $prog: "
daemon $nginx -c $NGINX_CONF_FILE
retval=$?
echo
[ $retval -eq 0 ] && touch $lockfile
return $retval
}
stop() {
echo -n $"Stopping $prog: "
killproc $prog -QUIT
retval=$?
echo
[ $retval -eq 0 ] && rm -f $lockfile
return $retval
}
restart() {
#configtest || return $?
stop
sleep 1
start
}
reload() {
#configtest || return $?
echo -n $"Reloading $prog: "
killproc $nginx -HUP
RETVAL=$?
echo
}
force_reload() {
restart
}
configtest() {
$nginx -t -c $NGINX_CONF_FILE
}
rh_status() {
status $prog
}
rh_status_q() {
rh_status >/dev/null 2>&1
}
case "$1" in
start)rh_status_q && exit 0$1;;
stop)rh_status_q || exit 0$1;;
restart|configtest)$1;;
reload)rh_status_q || exit 7$1;;
force-reload)force_reload;;
status)rh_status;;
condrestart|try-restart)rh_status_q || exit 0;;
*)
echo $"Usage: $0 {start|stop|status|restart|condrestart|try-restart|reload|force-
reload|configtest}"
exit 2
esac
启动脚本前赋予执行权限
[root@VM_0_17_centos src]# chmod 755 /etc/rc.d/init.d/nginx   #赋予脚本执行权限
[root@VM_0_17_centos src]# /etc/rc.d/init.d/nginx restart
Reloading systemd:                                         [  确定  ]
Restarting nginx (via systemctl):                          [  确定  ]
[root@VM_0_17_centos src]# chkconfig nginx on    #添加到开机启动项
在网页访问nginx

配置php
安装汇编器yasm
[root@VM_0_17_centos src]# tar -zxvf yasm-1.2.0.tar.gz
[root@VM_0_17_centos src]# cd yasm-1.2.0/
[root@VM_0_17_centos yasm-1.2.0]# ./configure
[root@VM_0_17_centos yasm-1.2.0]# make && make install
安装用于加密算法的扩展库程序 libmcrypt-2.5.8.tar.gz
[root@VM_0_17_centos yasm-1.2.0]# cd ..
[root@VM_0_17_centos src]# tar -zxvf libmcrypt-2.5.8.tar.gz
[root@VM_0_17_centos src]# cd libmcrypt-2.5.8/
[root@VM_0_17_centos libmcrypt-2.5.8]# ./configure
[root@VM_0_17_centos libmcrypt-2.5.8]# make && make install
安装用于提供视频编码器的服务程序 libvpx-v1.3.0**.tar.bz2** 源码包,解压的参数为 xjvf
[root@VM_0_17_centos libmcrypt-2.5.8]# cd ..
[root@VM_0_17_centos src]# tar -jxvf libvpx-v1.3.0.tar.bz2
[root@VM_0_17_centos src]# cd libvpx-v1.3.0/
[root@VM_0_17_centos libvpx-v1.3.0]# ./configure --prefix=/usr/local/libvpx --enable-shared --enable-vp9
[root@VM_0_17_centos libvpx-v1.3.0]# make
[root@VM_0_17_centos libvpx-v1.3.0]# make install
安装用于提供png图片格式支持函数库的服务程序 libpng-1.6.12.tar.gz 源码包
[root@VM_0_17_centos libvpx-v1.3.0]# cd ..
[root@VM_0_17_centos src]# tar -zxvf tiff-4.0.3.tar.gz
[root@VM_0_17_centos src]# cd tiff-4.0.3/
[root@VM_0_17_centos tiff-4.0.3]# ./configure --prefix=/usr/local/tiff --enable-shared
[root@VM_0_17_centos tiff-4.0.3]# make && make install
安装用于用于提供字体支持引擎的服务程序 freetype-2.5.3.tar.gz 源码包
[root@VM_0_17_centos tiff-4.0.3]# cd ..
[root@VM_0_17_centos src]# tar -zxvf libpng-1.6.12.tar.gz
[root@VM_0_17_centos src]# cd libpng-1.6.12/
[root@VM_0_17_centos libpng-1.6.12]# ./configure --prefix=/usr/local/libpng --enable-shared
[root@VM_0_17_centos libpng-1.6.12]# make && make install
安装用于提供jpeg图片格式支持函数库的服务程序 jpegsrc.v9a.tar.gz 源码包
[root@VM_0_17_centos libpng-1.6.12]# cd ..
[root@VM_0_17_centos src]# tar -zxvf freetype-2.5.3.tar.gz
[root@VM_0_17_centos src]# cd freetype-2.5.3/
[root@VM_0_17_centos freetype-2.5.3]# ./configure --prefix=/usr/local/freetype -enable-shared
[root@VM_0_17_centos freetype-2.5.3]# make
[root@VM_0_17_centos freetype-2.5.3]# make install
安装用于提供图形处理的服务程序 libgd-2.1.0.tar.gz 源码包
[root@VM_0_17_centos freetype-2.5.3]# cd ..
[root@VM_0_17_centos src]# tar -zxvf jpegsrc.v9a.tar.gz
[root@VM_0_17_centos src]# cd jpeg-9a/
[root@VM_0_17_centos jpeg-9a]# ./configure --prefix=/usr/local/jpeg --enable-shared
[root@VM_0_17_centos jpeg-9a]# make && make install
安装用于提供图片生成函数库的服务程序 t1lib-5.1.2.tar.gz 源码包
[root@VM_0_17_centos libgd-2.1.0]# cd ..
[root@VM_0_17_centos src]# tar -zxvf t1lib-5.1.2.tar.gz
[root@VM_0_17_centos src]# cd t1lib-5.1.2/
[root@VM_0_17_centos t1lib-5.1.2]# ./configure --prefix=/usr/local/t1lib --enable-shared
[root@VM_0_17_centos t1lib-5.1.2]# make
[root@VM_0_17_centos t1lib-5.1.2]# make install
[root@VM_0_17_centos t1lib-5.1.2]# ln -s /usr/lib64/libltdl.so /usr/lib/libltdl.so
[root@VM_0_17_centos t1lib-5.1.2]# cp -frp /usr/lib64/libXpm.so* /usr/lib/
上面的几个软件安装可能会出错,但是不影响我们搭建论坛,好的可能用不到。
安装php文件
编译php服务源码包时,除了定义要安装到的目录以外,还需要依次定义配置php服务程序配置文件的保存目录、MySQL数据库服务程序所在目录、MySQL数据库服务程序配置文件所在目录,以及libpng、jpeg、freetype、libvpx、zlib、t1lib等服务程序的安装目录路径,并通过参数启动php服务程序的诸多默认功能
[root@VM_0_17_centos t1lib-5.1.2]# cd ..
[root@VM_0_17_centos src]# tar -zxvf php-5.5.14.tar.gz
[root@VM_0_17_centos src]# cd php-5.5.14/
[root@VM_0_17_centos php-5.5.14]# export LD_LIBRARY_PATH=/usr/local/libgd/lib
[root@VM_0_17_centos php-5.5.14]# ./configure --prefix=/usr/local/php --with-config-file-path=/usr/local/php/etc --with-mysql=/usr/local/mysql --with-mysqli=/usr/local/mysql/bin/mysql_config --with-mysql-sock=/tmp/mysql.sock --with-pdo-mysql=/usr/local/mysql --with-gd --with-png-dir=/usr/local/libpng --with-jpeg-dir=/usr/local/jpeg --with-freetype-dir=/usr/local/freetype --with-xpm-dir=/usr/ --with-vpx-dir=/usr/local/libvpx/ --with-zlib-dir=/usr/local/zlib --with-t1lib=/usr/local/t1lib--with-iconv --enable-libxml --enable-xml --enable-bcmath --enable-shmop --enable-sysvsem --enable-inline-optimization --enable-opcache --enable-mbregex --enable-fpm --enable-mbstring --enable-ftp --enable-gd-native-ttf --with-openssl --enable-pcntl --enable-sockets --with-xmlrpc --enable-zip --enable-soap --without-pear --with-gettext --enable-session --with-mcrypt --with-curl --enable-ctype
[root@VM_0_17_centos php-5.5.14]# make
[root@VM_0_17_centos php-5.5.14]# make install
配置PHP文件
[root@VM_0_17_centos php-5.5.14]# rm /etc/php.ini
rm:是否删除普通文件 "/etc/php.ini"?y
[root@VM_0_17_centos php-5.5.14]# cp php.ini-production /usr/local/php/etc/php.ini
[root@VM_0_17_centos php-5.5.14]# ln -s /usr/local/php/etc/php.ini /etc/php.ini
[root@VM_0_17_centos php-5.5.14]# cp /usr/local/php/etc/php-fpm.conf.default /usr/local/php/etc/php-fpm.conf
[root@VM_0_17_centos php-5.5.14]# ln -s /usr/local/php/etc/php-fpm.conf /etc/php-fpm.conf
编辑 php 主配置文件 php-fpm.conf (可以使用该命令 :set nu 查看文件的行号)
第25行:启用该配置文件中的pid文件保存目录
第148行:user参数修改为www账户
第149行:group参数修改为www用户组名称
[root@VM_0_17_centos php-5.5.14]# vim /usr/local/php/etc/php-fpm.conf......25 pid = run/php-fpm.pid......148 user = www149 group = www......
完善主配置文件
[root@VM_0_17_centos php-5.5.14]# cp sapi/fpm/init.d.php-fpm /etc/rc.d/init.d/php-fpm             #复制文件
[root@VM_0_17_centos php-5.5.14]# chmod 755 /etc/rc.d/init.d/php-fpm   #赋予权限
[root@VM_0_17_centos php-5.5.14]# chkconfig php-fpm on  #加入开机启动项
php服务程序的配置参数直接会影响到Web服务服务的运行环境,如果默认开启一些不必要且高危的功能(如允许用户在网页中执行Linux命令),则会降低网站被入侵的难度,入侵者甚至可拿到整台Web服务器的管理权限,所以编辑php.ini配置文件,在305行的disable_functions参数后面追加上要禁止的功能
[root@VM_0_17_centos php-5.5.14]# vim /usr/local/php/etc/php.ini   #可以使用:set nu 查看行数
disable_functions=passthru,exec,system,chroot,scandir,chgrp,chown,shell_exec,proc_open,proc_get_status,ini_alter,ini_alter,ini_restor e,dl,openlog,syslog,readlink,symlink,popepassthru,stream_socket_server,escapeshellcmd,dll,popen,disk_free_space,checkdnsrr,checkdnsrr,g etservbyname,getservbyport,disk_total_space,posix_termid,posix_get_last_error,posix_getcwd,posix_getegid,posix_ geteuid,posix_getgid,po six_getgrgid,posix_getgrnam,posix_getgroups,posix_getlogin,posix_getpgid,posix_getpgrp,posix_getpid,posix_getppid,posix_getpwnam,posix_ getpwuid,posix_getrlimit,posix_getsid,posix_getuid,posix_isatty,posix_kill,posix_mkfifo,posix_setegid,posix_seteuid,posix_setgid,posix_ setpgid,posix_setsid,posix_setuid,posix_strerror,posix_times,posix_ttyname,posix_uname
编辑Nginx服务程序的主配置文件,在确认参数信息填写正确后便可重启Nginx服务与php-fpm服务
第2行: 负责运行Nginx服务程序的账户名称和用户组名称;
第45行:index参数后面是网站的首页名称
第65~71行:修改第69行的脚本名称路径参数,$document_root变量即为网站信息存储的根目录路径,若没有设置该变量,则Nginx服务程序无法找到网站信息,会提示“404页面未找到”的报错信息
[root@VM_0_17_centos php-5.5.14]# vim /usr/local/nginx/conf/nginx.conf1 2 user  www www;  3 worker_processes  1;
...45             index  index.html index.htm index.php;
...62 63         # pass the PHP scripts to FastCGI server listening on 127.0.0.1:900064         #65         location ~ \.php$ {66             root           html;67             fastcgi_pass   127.0.0.1:9000;68             fastcgi_index  index.php; 69             fastcgi_param  SCRIPT_FILENAME  $document_root$fastcgi_script_name;70             include        fastcgi_params;71         }
重启nginx和php服务
[root@VM_0_17_centos html]# systemctl restart nginx.service
[root@VM_0_17_centos html]# systemctl restart php-fpm
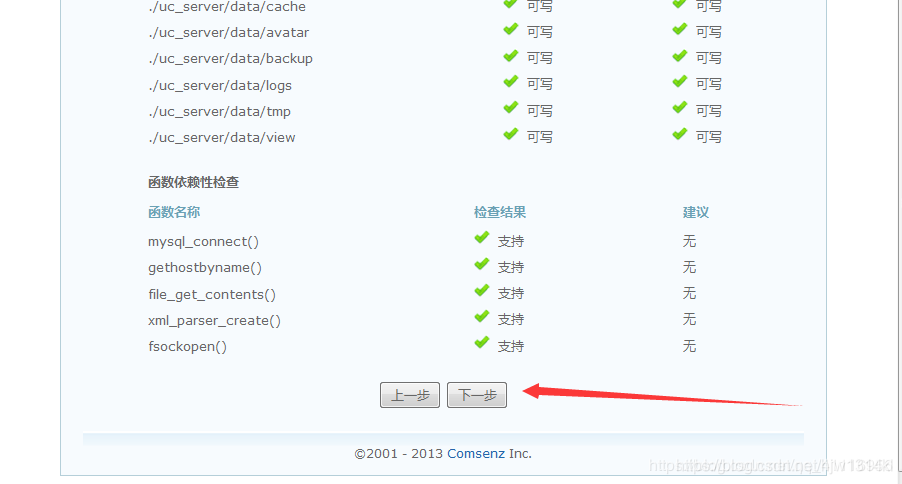
搭建Discuz论坛
unzip命令解压Discuz_X3.2_SC_GBK.zip
将Nginx服务程序网站根目录的内容清空
复制 Discuz!论坛的系统程序即upload目录下的文件 到Nginx服务程序网站根目录
将Nginx服务程序的网站根目录的所有者和所属组修改为本地的www用户,赋予755权限以便于能够读、写、执行该论坛系统内的文件
[root@VM_0_17_centos php-5.5.14]# cd /usr/local/nginx/html/
[root@VM_0_17_centos html]# rm -rf *
[root@VM_0_17_centos html]# cd /usr/local/src/
[root@VM_0_17_centos src]# unzip Discuz_X3.2_SC_GBK.zip
[root@VM_0_17_centos src]# mv upload/* /usr/local/nginx/html/
[root@VM_0_17_centos src]# chown -Rf www:www /usr/local/nginx/html
[root@VM_0_17_centos src]# chmod -Rf 755 /usr/local/nginx/html
打开web页面:输入http://139.199.6.165/install

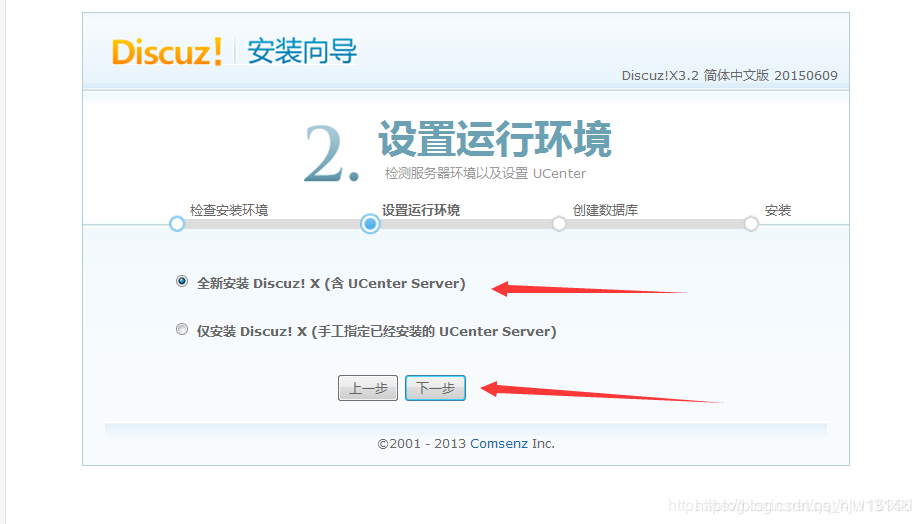
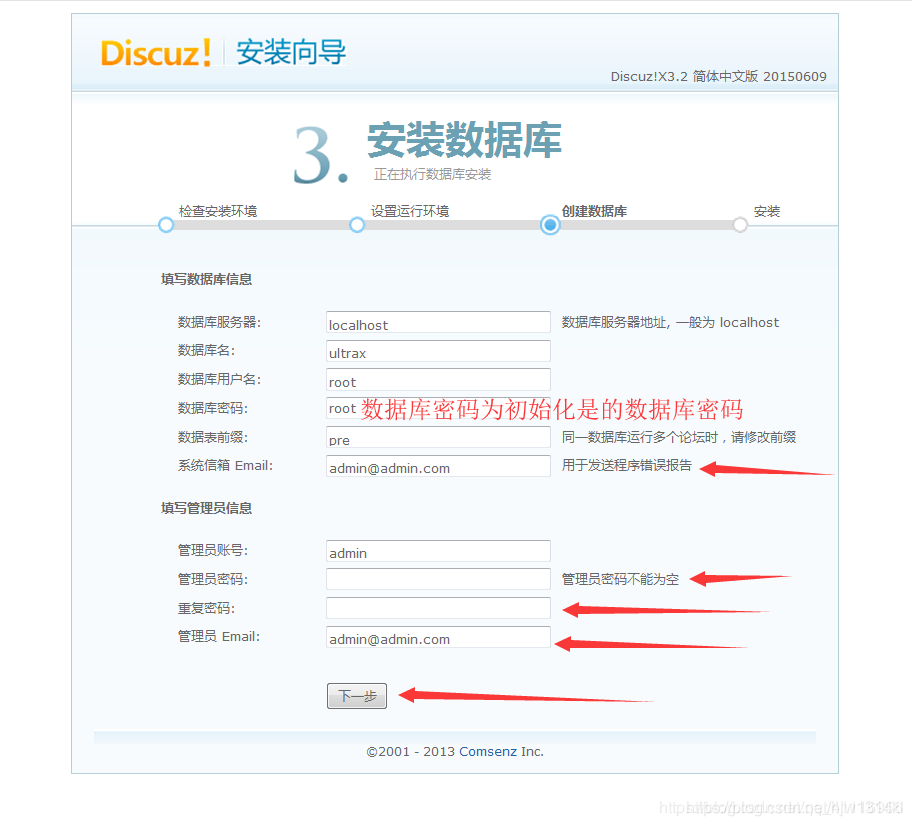

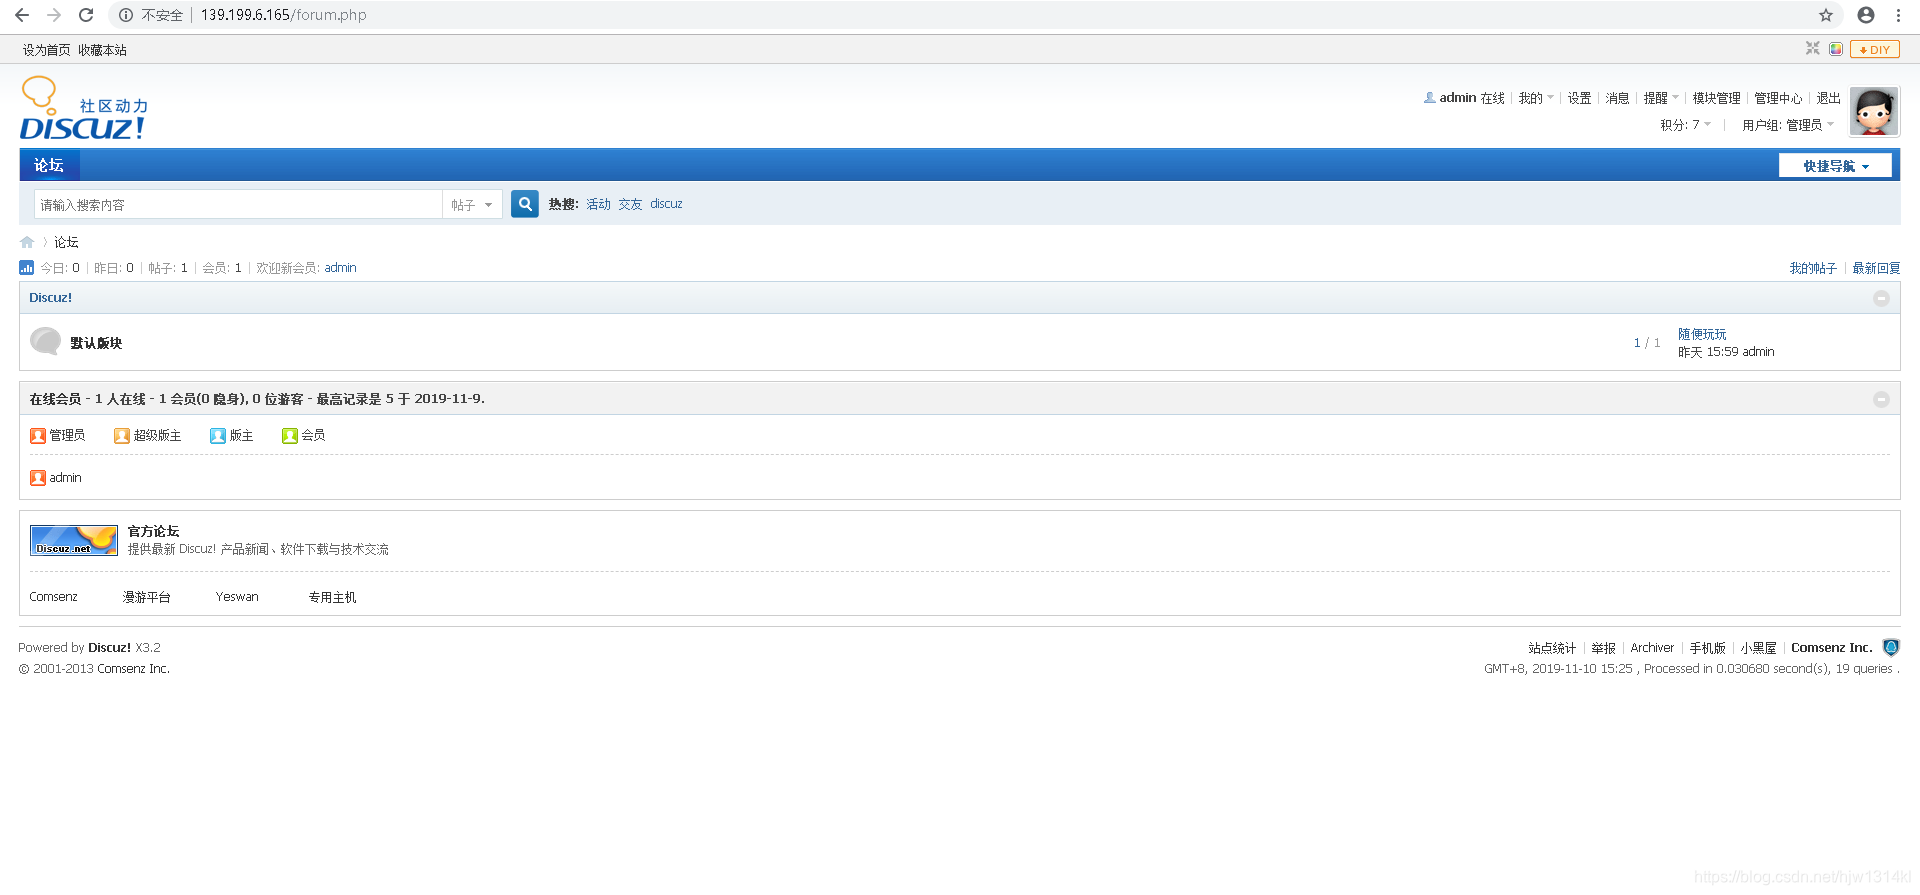
到此搭建成功!