今年3月份在公司的内部k8s培训会上,和研发同事详细探讨了应用部署容器化部署的几个问题,问题简要如下:
1、java应用容器化部署
首先通过自动化部署工具编译出全量的war包,将war包直接编译到docker镜像后推送到私用仓库并版本化控制;其次通过更新deployment的yaml文件来实现部署和后续的滚动更新,应用程序需要进行容器化改造。这里的难点和工作量在于容器的镜像制作以及版本化管理,之后准备采用harbor做企业私有仓库。
2、dashborad面板的权限控制
解决方案参考:http://blog.51cto.com/ylw6006/21135423、应用程序日志的如何收集
解决方案参考:http://blog.51cto.com/ylw6006/21073074、网站动静分离
首先所有的动态应用通过部署tomcat pod的方式来响应,静态的资源统一部署一个nginx pod方式来响应;
其次,动静分离的规则配置交给traefik ingress实现;
最后,静态资源的文件统一存放在pv上,更新静态资源不需要去编译docker镜像.
一、动静分离举例说明
以内网测试环境2的虚拟主机站点配置(底层服务)为例:
域名test2.oprman.com(PS:研发大爷喜欢自己YY域名)的静态资源配置如下
1、/ ——> 对应/usr/local/6.0_files/oprman_test2目录
2、/mfs ——> 对应/mnt/mfs目录(这个实际上是一个分布式文件系统的挂载点)域名test2.oprman.com的动态资源配置如下
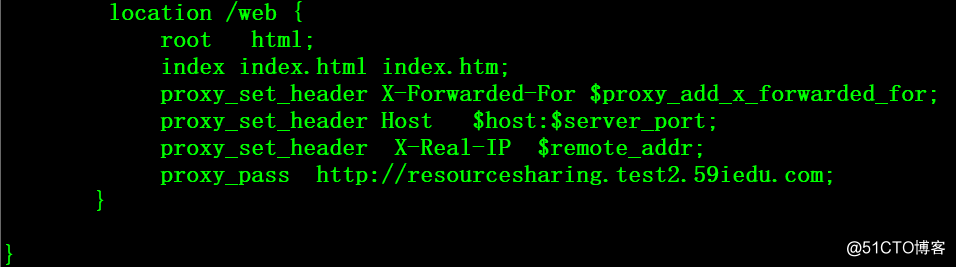
1、/web ——> 后端tomcat进行响应
2、/api ——> 后端tomcat进行响应
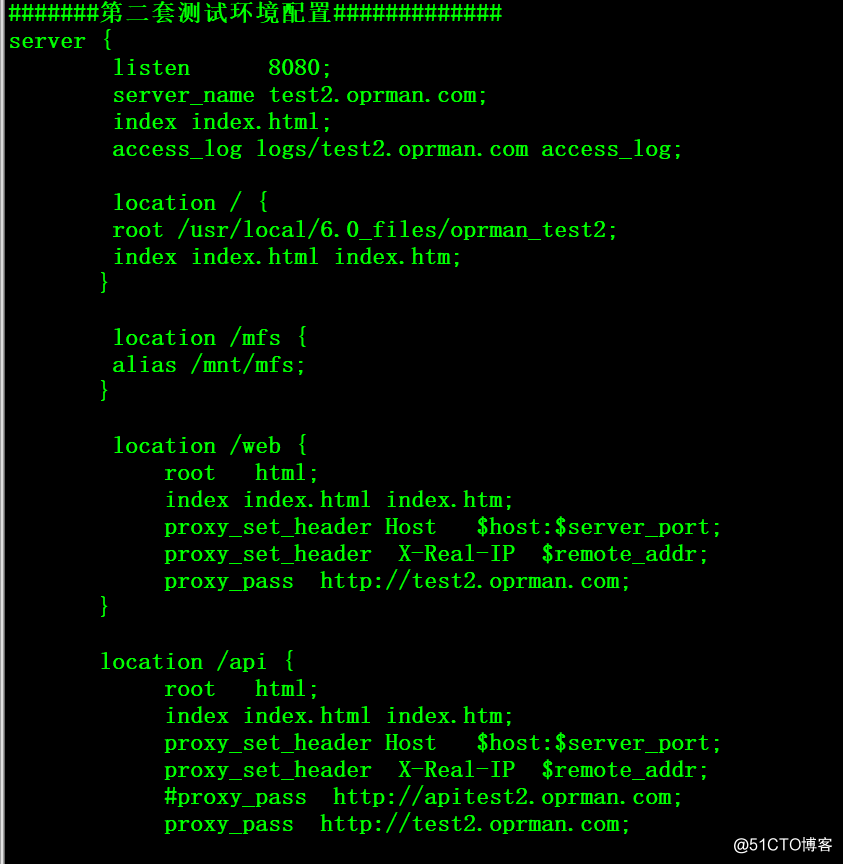
后端的tomcat配置信息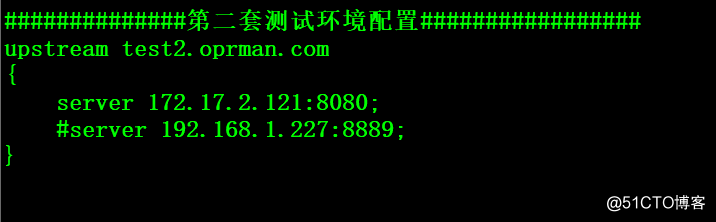
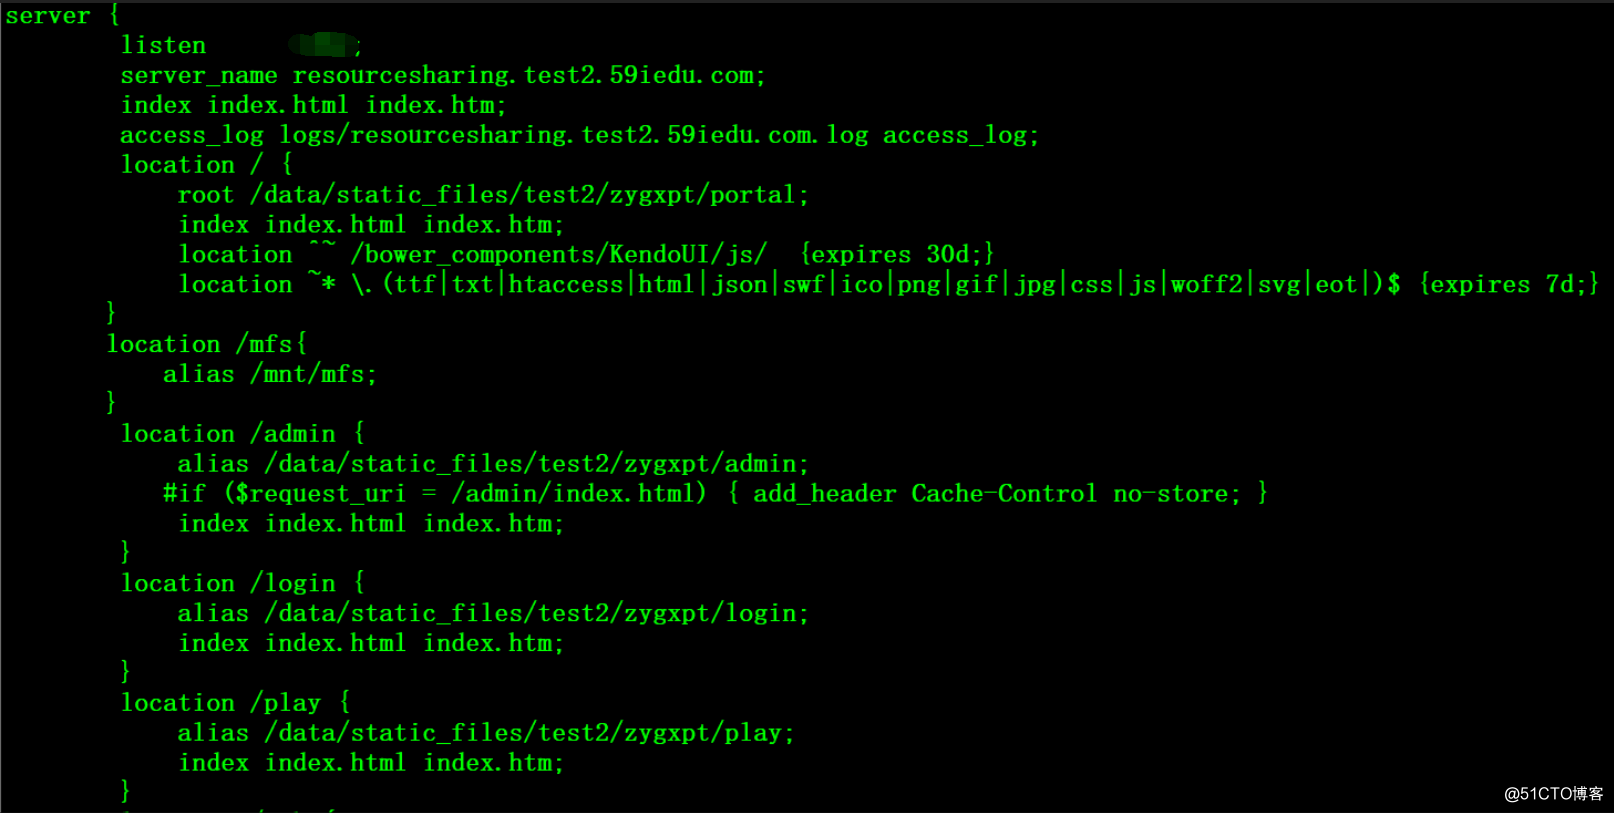
以内网测试环境2的虚拟主机站点配置(平台服务)为例:
域名resourcesharing.test2.59iedu.com的静态资源配置如下
1、/ ——> 对应/data/static_files/test2/zygxpt/portal目录
2、/mfs ——> 对应/mnt/mfs目录(这个实际上是一个分布式文件系统的挂载点)
3、/admin ——> 对应/data/static_files/test2/zygxpt/admin目录
4、/login ——> 对应/data/static_files/test2/zygxpt/login目录
5、/play ——> 对应/data/static_files/test2/zygxpt/play目录域名test2.oprman.com的动态资源配置如下
1、/web ——> 后端tomcat进行响应
后端的tomcat配置信息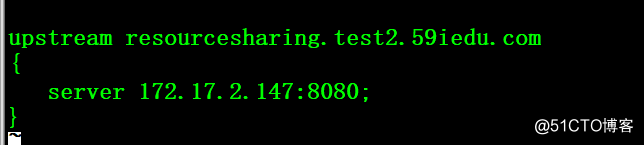
这里补充说明一下,内网存在三套环境
1、开发环境: 主要用于开发人员开发、调试
2、测试环境1:用于测试人员验证
3、测试环境2:用于开发人员自测与验证从网站的类型上可以分为底层服务和平台服务两种类型,大部分的底层服务是通过dobbo进行内部调用的,容器化之后只要POD之间的网络可以互联互通即可相互调用,少部分底层服务需要对外暴露http端口。平台服务都需要对外暴露http端口。
动静分离的nginx规则也主要是上述两类,其中以平台服务的数量居多,底层服务有动静分离规则的较少。
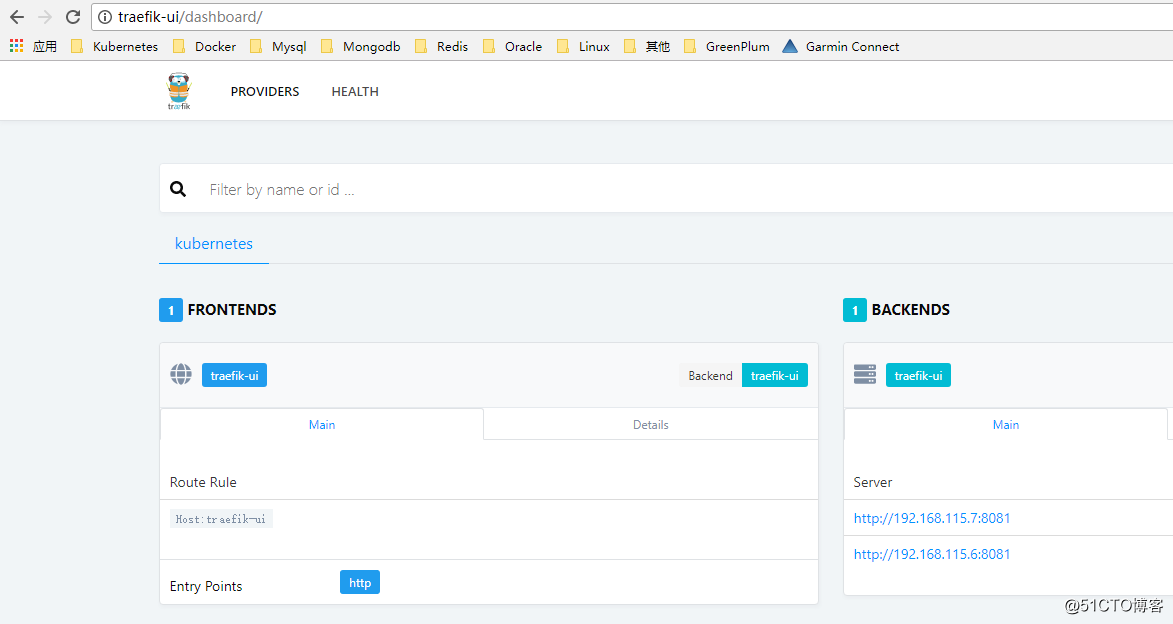
二、部署traefik 入口
traefik具体的部署方法可参考前文,前文传送门:http://blog.51cto.com/ylw6006/2073718
# kubectl get svc,pod,ingress -n kube-system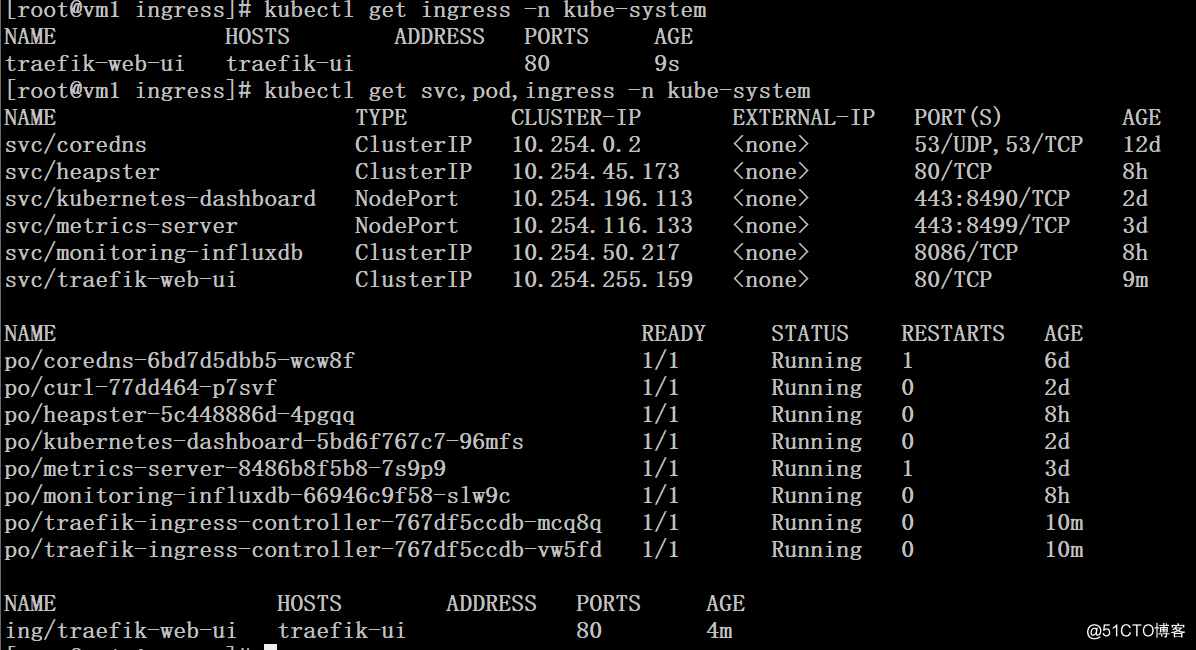
三、创建处理动态的应用
1、build动态部分的镜像并推送至私有仓库
# cat dockerfile
FROM registry.59iedu.com/tomcat_base:v1.0
MAINTAINER yangliangwei "ylw@fjhb.cn"
COPY ROOT-20180509.tgz /home/
RUN tar zxf /home/ROOT-20180509.tgz -C /home/tomcat/webapps/ && rm -rf /home/ROOT-20180509.tgz
# docker build -t oprman-test2:v1 .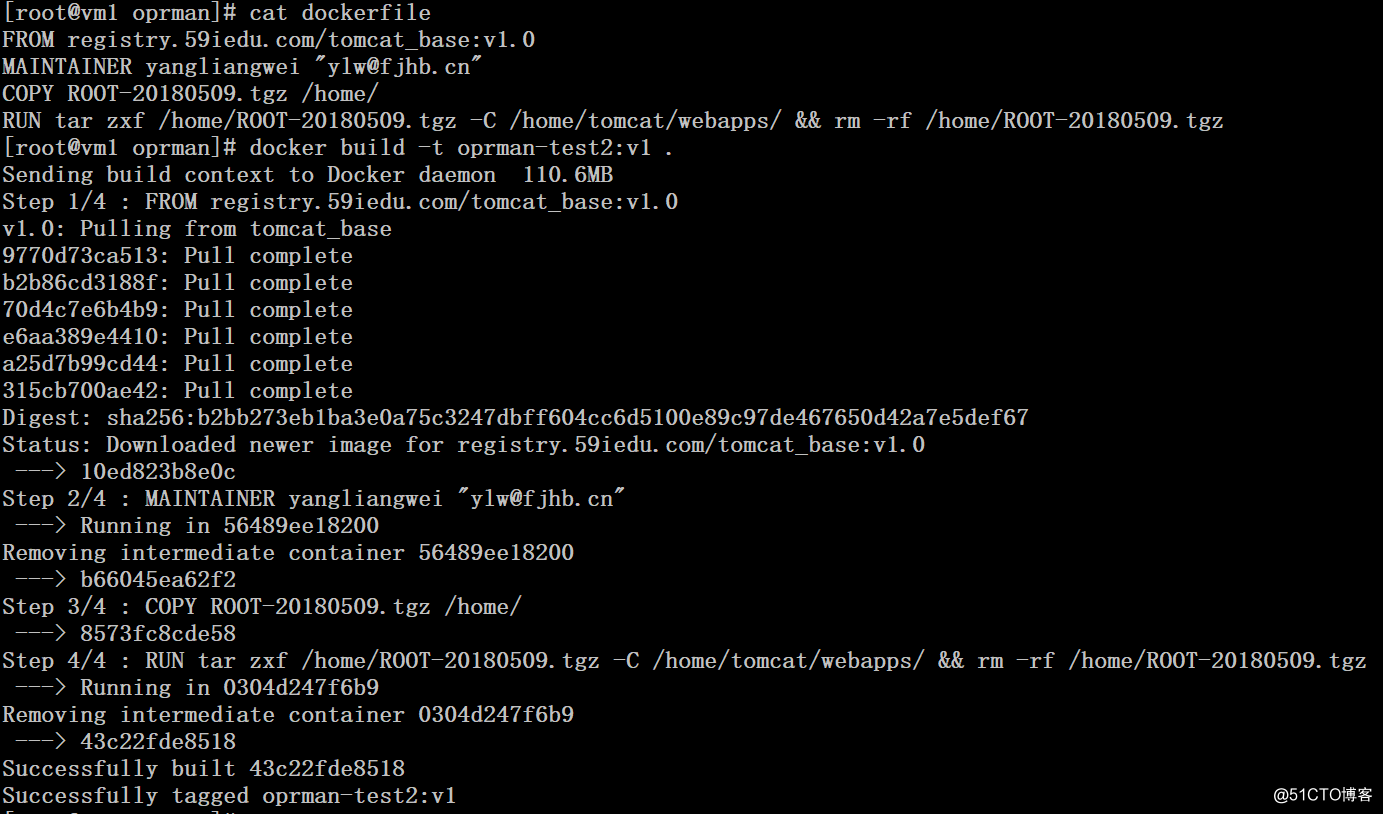
# docker tag oprman-test2:v1 registry.59iedu.com/oprman-test2:v1
# docker push registry.59iedu.com/oprman-test2:v1
2、通过yaml文件创建动态应用
# cat configmap.yaml
apiVersion: v1
kind: ConfigMap
metadata:name: filebeat-oprman-test2-config
data:filebeat.yml: |filebeat.prospectors:- input_type: logpaths:- "/log/*"output.elasticsearch:hosts: ["192.168.1.19:9600"]index: "filebeat-oprman-test2"# kubectl create -f configmap.yaml
# cat oprman-test2-tomcat-dp.yaml
apiVersion: extensions/v1beta1
kind: Deployment
metadata:name: oprman-test2-tomcatnamespace: default
spec:replicas: 1template:metadata:labels:name: oprman-test2-tomcatspec:containers:- image: registry.59iedu.com/filebeat:v5.4.0imagePullPolicy: Alwaysname: filebeatvolumeMounts:- name: app-logsmountPath: /log- name: filebeat-oprman-test2-configmountPath: /etc/filebeat/- image: registry.59iedu.com/oprman-test2:v1name : oprman-test2-tomcat imagePullPolicy: Alwaysenv:- name: JAVA_OPTSvalue: "-Xmx2048m -Xms512m"ports:- containerPort: 8080volumeMounts:- name: app-logsmountPath: /home/tomcat/logsvolumes:- name: app-logsemptyDir: {}- name: filebeat-oprman-test2-configconfigMap:name: filebeat-oprman-test2-config# kubectl create -f oprman-test2-tomcat-dp.yaml # cat oprman-test2-tomcat-svc.yaml
apiVersion: v1
kind: Service
metadata:name: oprman-test2-tomcatlabels:name: oprman-test2-tomcat
spec:ports:- port: 8080protocol: TCPtargetPort: 8080name: httpselector:
name: oprman-test2-tomcat# kubectl create -f oprman-test2-tomcat-svc.yaml 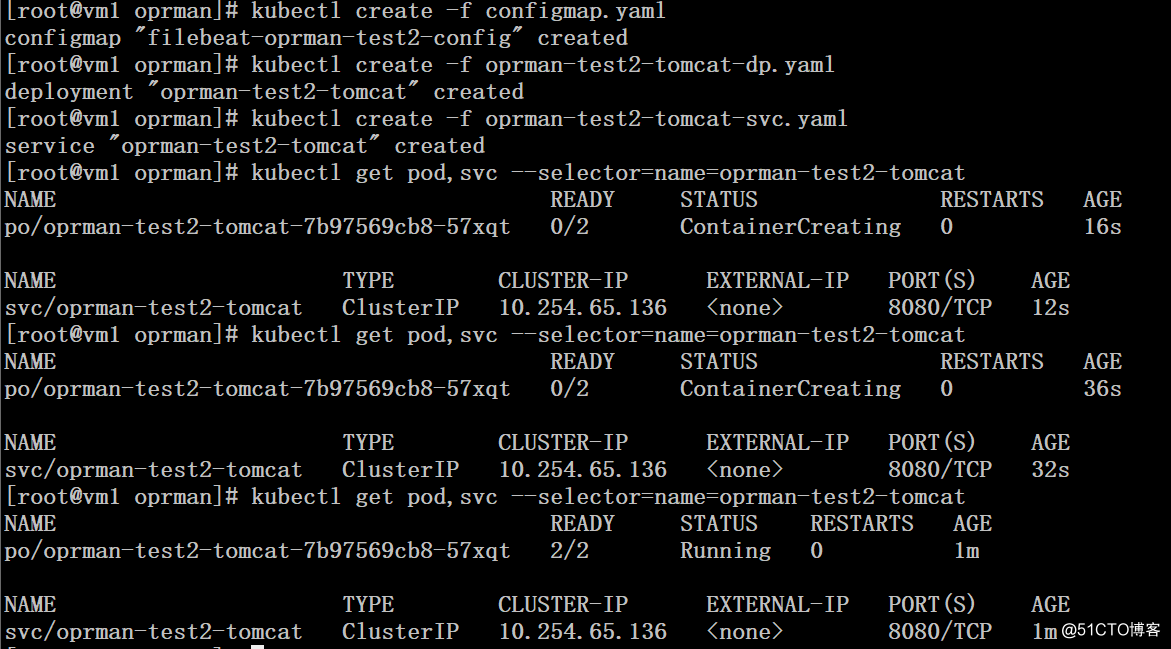
演示仅部署底层服务的后端tomcat处理动态请求,平台的后端tomcat部署办法一样,出于文章篇幅考虑就不再赘述。
四、创建处理静态部分的应用
1、我们采用configmap的方式来处理静态部分的请求路由,动态部分的请求路由将交给
Ingress来实现。nginx配置文件针对平台部分的配置因为路径都一样,所以域名采用$host进行通配,底层的需要单独配置。(好在底层服务需要暴露http的并不多)
# cat nginx.conf
user nginx;
worker_processes auto;
error_log /usr/share/nginx/html/nginx-error.log;
pid /run/nginx.pid;# Load dynamic modules. See /usr/share/nginx/README.dynamic.
include /usr/share/nginx/modules/*.conf;events {worker_connections 102400;use epoll;
}http {log_format  main  '$remote_addr - $remote_user [$time_local] "$request" ''$status $body_bytes_sent "$http_referer" ''"$http_user_agent" "$http_x_forwarded_for"';server_tokens     off;access_log        /usr/share/nginx/html/nginx-default-access.log  main;sendfile            on;tcp_nopush          on;tcp_nodelay         on;keepalive_timeout   65;types_hash_max_size 2048;include             /etc/nginx/mime.types;default_type        application/octet-stream;include /etc/nginx/conf.d/*.conf;include /etc/nginx/conf/extra/*.conf;server {listen       80 default_server;index  index.html index.htm;access_log /usr/share/nginx/html/logs/test2-static-access.log main;location / {root /usr/share/nginx/html/$host/portal;index  index.html index.htm;}location /admin{root /usr/share/nginx/html/$host;index  index.html index.htm;}location /login {root /usr/share/nginx/html/$host;index  index.html index.htm;}location /play {root /usr/share/nginx/html/$host;index  index.html index.htm;}location /mfs {root /mnt/mfs;}}server {listen       80;server_name  test2.oprman.com;index  index.html index.htm;access_log /usr/share/nginx/html/logs/test2-static-access.log main;location / {root /usr/share/nginx/html/test2.oprman.com;index  index.html index.htm;}location /mfs {root /mnt/mfs;}}
}# kubectl create configmap test2-static-etc --from-file nginx.conf
2、创建pv、pvc
# cat test2-static-data-pv-pvc.yaml
apiVersion: v1
kind: PersistentVolume
metadata:name: test2-static-data
spec:capacity:storage: 100Gi accessModes:- ReadWriteMany nfs: path: /home/test2-static-dataserver: 192.168.115.5persistentVolumeReclaimPolicy: Recycle
---
kind: PersistentVolumeClaim
apiVersion: v1
metadata:name: test2-static-data
spec:accessModes:- ReadWriteManyresources:requests:storage: 100Gi# kubectl create -f test2-static-data-pv-pvc.yaml
3、准备静态资源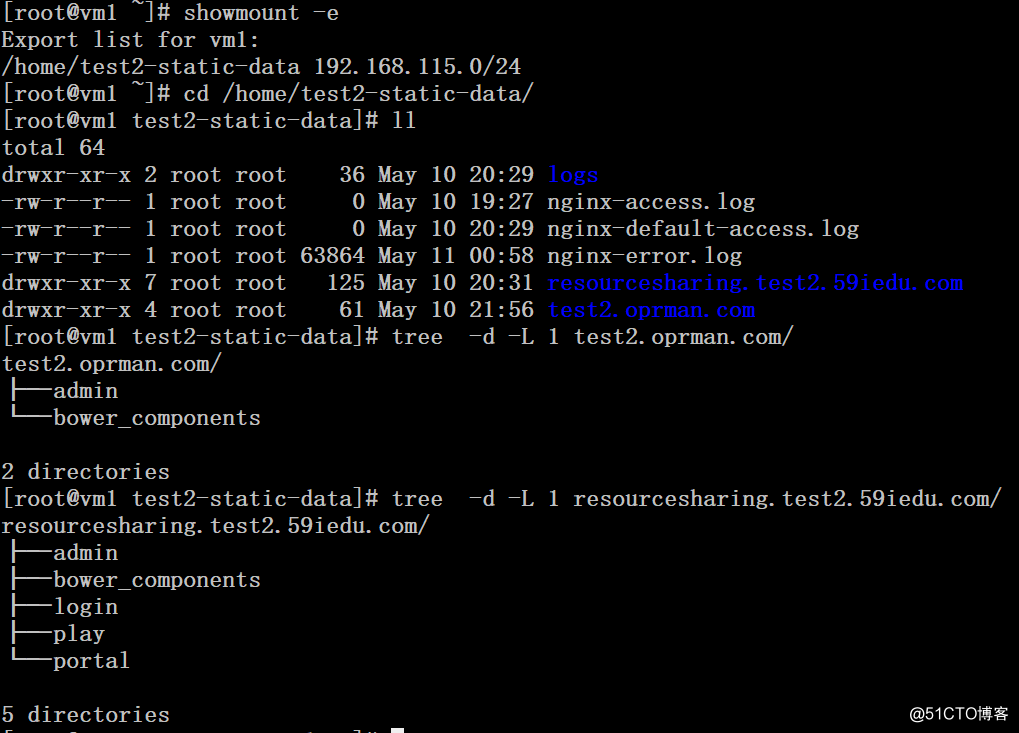
4、创建deployment
# cat test2-static-deployment.yaml
apiVersion: extensions/v1beta1
kind: Deployment
metadata:name: test2-static
apiVersion: extensions/v1beta1
kind: Deployment
metadata:name: test2-staticlabels:name: test2-static
spec:replicas: 2template:metadata:labels:name: test2-staticspec:containers:- name: test2-staticimage: registry.59iedu.com/nginx:latestvolumeMounts:- mountPath: /usr/share/nginx/htmlname: test2-static-data- mountPath: /etc/nginx/nginx.confsubPath: nginx.confname: test2-static-etcports:- containerPort: 80volumes:- name: test2-static-datapersistentVolumeClaim:claimName: test2-static-data- name: test2-static-etcconfigMap:name: test2-static-etcitems:- key: nginx.confpath: nginx.conf # kubectl create -f test2-static-deployment.yaml
五、创建统一入口ingress
# cat test2-ingress.yaml
apiVersion: extensions/v1beta1
kind: Ingress
metadata:name: traefik-oprman-test2namespace: defaultannotations:nginx.ingress.kubernetes.io/rewrite-target: /
spec:rules:- host: resourcesharing.test2.59iedu.comhttp:paths:- path: /backend:serviceName: test2-staticservicePort: 80- host: test2.oprman.comhttp:paths:- path: /backend:serviceName: test2-staticservicePort: 80- path: /webbackend:serviceName: oprman-test2-tomcatservicePort: 8080- path: /apibackend:serviceName: oprman-test2-tomcatservicePort: 8080# kubectl create -f test2-ingress.yaml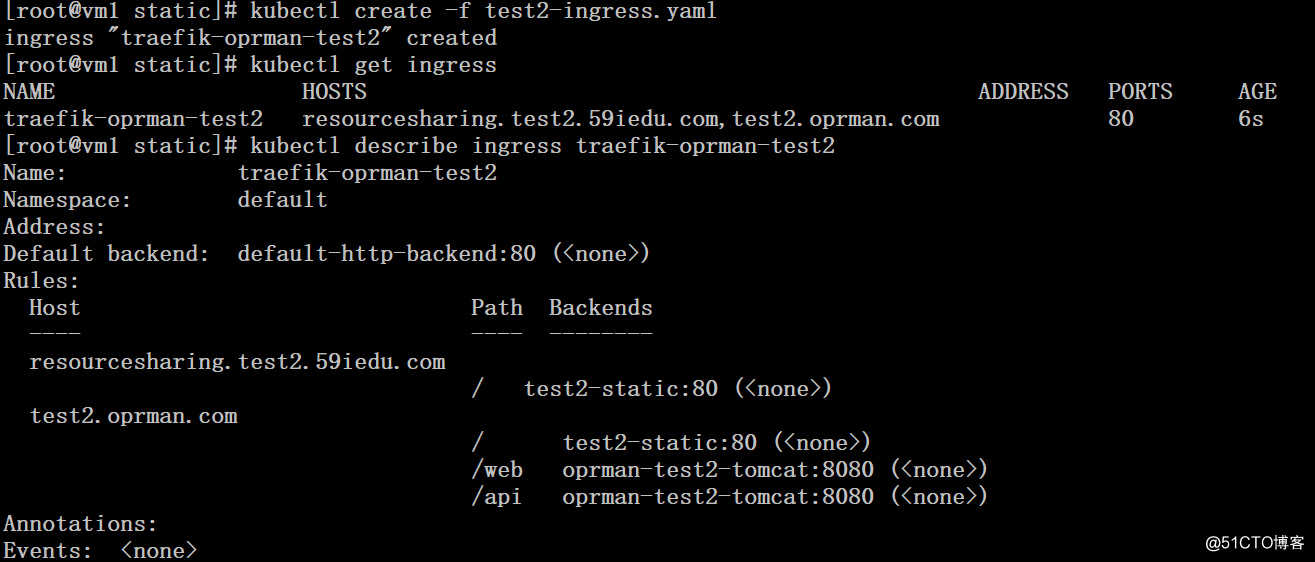
六、访问测试
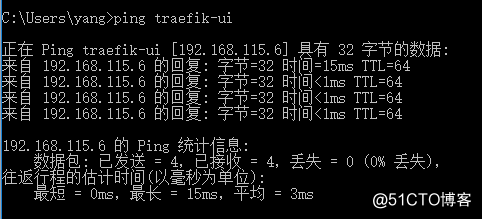
1、修改host解析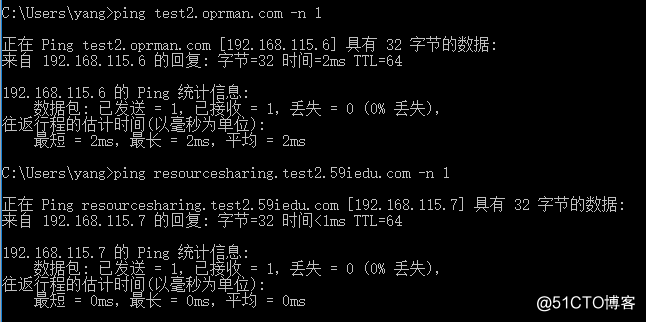
2、底层服务后端tomcat访问测试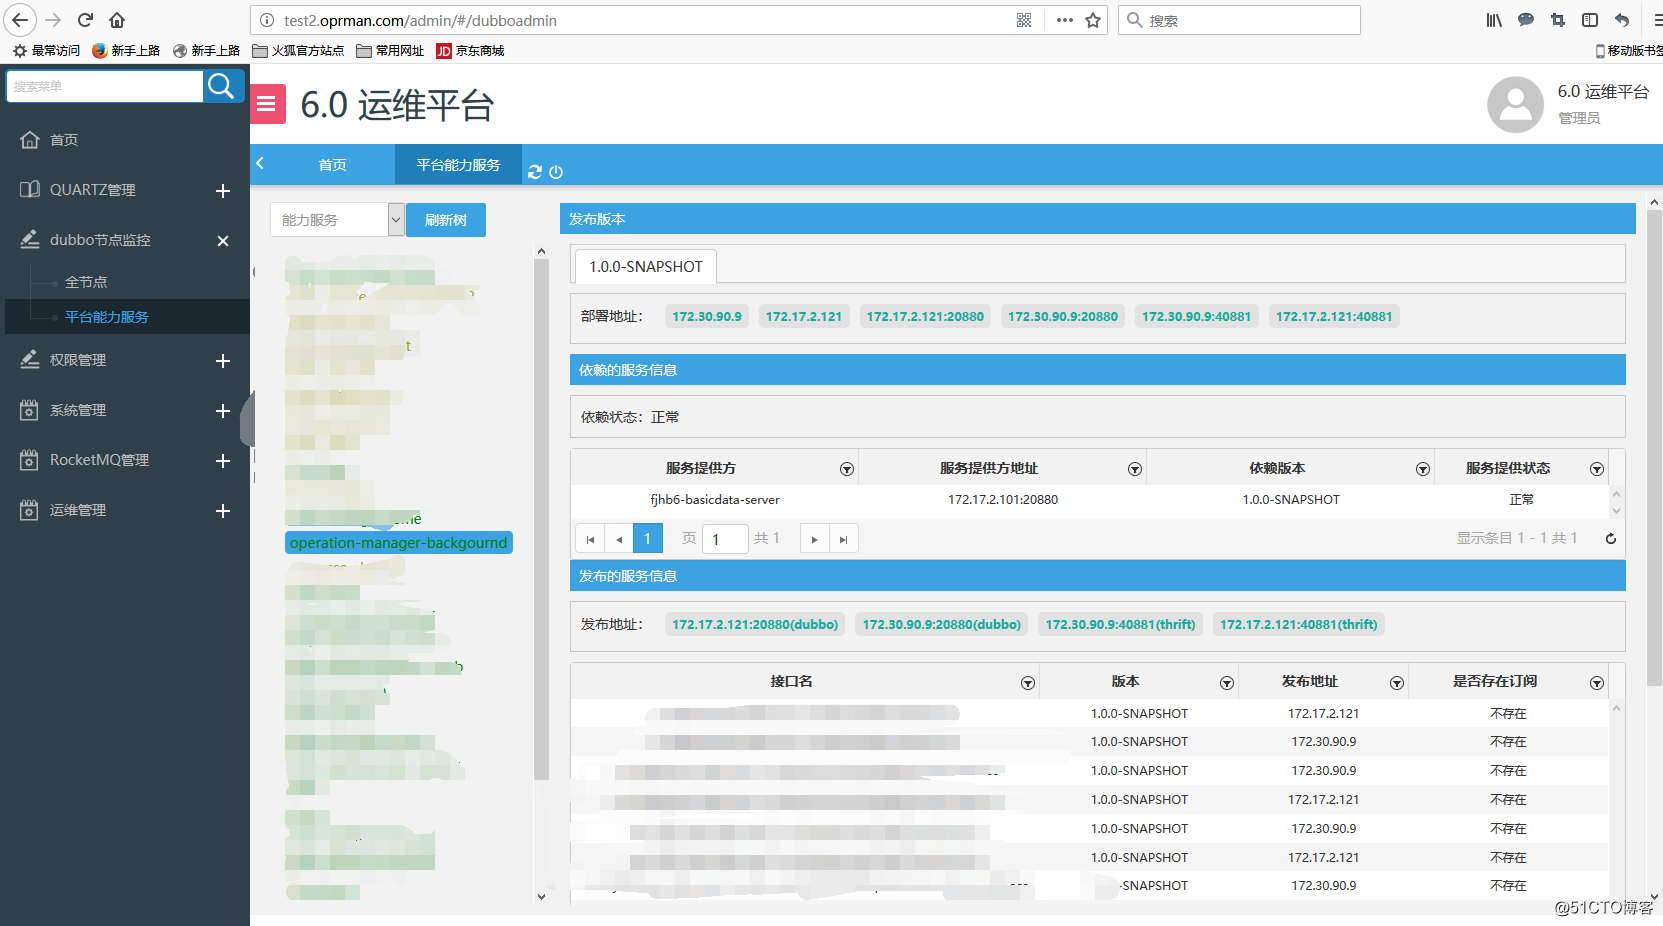
3、平台前端访问测试
4、平台后台入口访问测试(前面的nginx配置/admin部分,实际未静态的内容,输入用户名和密码之后才开始请求到后端的tomcat)
这里要重点说明一下,把分布式文件系统挂载到nginx主机上并发布出去给用户访问,实际上是非常不可取的一种方式,当nginx和mfs master主机之间的网络连接出现问题的时候,会导致nginx请求被堵塞,80、443等端口连接不顺畅,极度影响用户体验,这个后续需要合力改进!