flash 结构
Adobe’s (formerly Macromedia’s) Flash application is, according to them, "The industry’s most advanced authoring environment for creating interactive web sites and digital experiences." However, many users have trouble structuring their site efficiently within Flash.
据他们称,Adobe(以前是Macromedia的)Flash应用程序是“业界最先进的创作环境,用于创建交互式网站和数字体验。” 但是,许多用户在Flash中有效地构建其网站时遇到了麻烦。
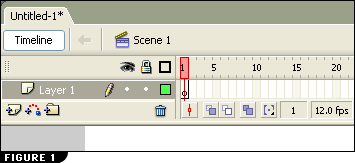
When Flash is opened, a blank canvas appears, and a single layer with multiple blank frames displays, waiting to be used, as you can see in the image below. There’s little guidance on how to proceed, and many different directions that one can take. So it’s easy to see why users can become confused.
打开Flash后,将出现一个空白画布,并显示一个带有多个空白帧的单层,等待使用,如下图所示。 关于如何进行的指导很少,可以采取许多不同的方向。 因此,很容易理解为什么用户会感到困惑。
Over the past six years of working with Flash and helping others with their own Flash projects, one thing has become clear to me: no two Flash web sites are laid out the same. Sadly, over 90% of the Flash sites I’ve seen are not structured efficiently; some are horribly inefficient. While there may be no one right way to structure a Flash web site, some ways certainly are better than others.
在过去的六年中,使用Flash并帮助其他人开发自己的Flash项目,对我来说,一件事情变得很清楚:没有两个Flash网站的布局相同。 令人遗憾的是,我所见过的Flash网站中有超过90%的网站结构不够高效; 有些效率极低。 虽然可能没有一种正确的方法来构建Flash网站,但是某些方法肯定比其他方法更好。
Keep in mind that when I say "structure" I’m not talking about how your web site looks; we don’t care how your web site looks, at least, not in this article. Structure is about setting up your Flash site with Keyframes, ActionScript and MovieClips, and controlling the Flash playhead. Good structure can make your site load faster, make it easier to manage and update, and keep unexpected things from happening. A bad structure can increase load times, make it painful to make changes in future, and cause unexpected headaches. The principles explained in this article apply to all Flash site designs.
请记住,当我说“结构”时,我并不是在谈论您的网站外观。 我们不在乎您的网站的外观,至少不在本文中如此。 结构涉及使用关键帧,ActionScript和MovieClips设置Flash网站,并控制Flash播放头。 良好的结构可以使您的网站加载速度更快,使其更易于管理和更新,并防止意外情况的发生。 不良的结构会增加加载时间,使将来的更改变得痛苦,并导致意外的麻烦。 本文介绍的原理适用于所有Flash网站设计。
In this article, we’ll develop a navigation system. Though it might seem trivial, this will serve as a good example for this article and the techniques can be applied to any project you’re working on, be it a full Flash web site, a Flash poll, or a Flash RSS reader. Incidentally, I’ve created all of these in the last month, and all exhibit the structure that we’ll see here.
在本文中,我们将开发一个导航系统。 尽管看似微不足道,但这将是本文的一个很好的例子,并且该技术可以应用于您正在处理的任何项目,无论是完整的Flash网站,Flash民意调查还是Flash RSS阅读器。 顺便说一句,我在上个月创建了所有这些文件,并且都显示了我们将在这里看到的结构。
Now is a good time to go ahead and download the necessary files so that you can follow along. That code archive contains a Flash FLA file, an XML file, a CSS file and a PNG image.
现在是继续下载所需文件的好时机,以便您可以继续进行。 该代码档案包含Flash FLA文件,XML文件,CSS文件和PNG图像。
在.fla内部 (Inside the .fla)
Once you open the navigation.fla file, you’ll immediately notice how empty it looks. This file contains but 2 layers spanning 4 frames. Almost all my Flash ‘creations’ have a similar structure: typically no more than 5 frames and a handful of layers. If your Flash structure looks like the one shown in the image below, you’re doing something wrong — it’s a good thing you’re reading this article.
一旦打开navigation.fla文件,您将立即注意到它看起来多么空。 该文件仅包含2层,跨越4帧。 我几乎所有的Flash“创作”都具有相似的结构:通常不超过5帧和少量的图层。 如果您的Flash结构看起来像下图所示,则说明您做错了-阅读本文是一件好事。
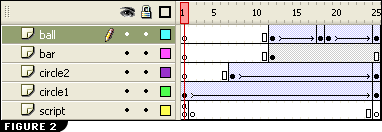
Let’s start with a tip: Never use Scenes. Scenes can cause unexpected results from the playhead. The playhead doesn’t really move from scene-to-scene gracefully. Depending on your Flash site, you may or may not notice this. But, if you’re playing a music file and your playhead moves to another scene, you can witness problems as the song skips. For this reason, you won’t find more than one scene in our file.
让我们从一个提示开始:永远不要使用场景。 场景可能会导致播放头出现意外结果。 播放头实际上并不能很好地从场景移动到场景。 根据您的Flash网站的不同,您可能会注意到,也可能不会注意到。 但是,如果您正在播放音乐文件,并且播放头移至另一个场景,则在跳过歌曲时会遇到问题。 因此,您在我们的文件中找不到多个场景。
Let’s examine each frame one by one.
让我们逐一检查每个帧。
框架1 (Frame 1)
Frame 1 is always — and only — used for setting global variables. This works well, as the playhead hits this frame first, sets our globals and moves on to the next frame. We never return to frame 1, ever. It’s important always to control the Flash playhead and know where it’s located at all times. Now, let’s look at the code:
框架1始终(并且仅)用于设置全局变量。 这很好用,因为播放头首先击中该帧,设置我们的全局对象,然后移至下一帧。 我们永远不会回到第一帧。 始终控制Flash播放头并始终知道其位置很重要。 现在,让我们看一下代码:
var xmlFile:String = "navigation.xml";

var cssFile:String = "navigation.css";

var nCounter:Number = 0;

var yPosition:Number = 0;

var nTotalButtons:Number = 0;

var astrImages:Array = new Array();

var astrText:Array = new Array();

var astrLinks:Array = new Array();

var image_mcl:MovieClipLoader = new MovieClipLoader();

var mclListener:Object = new Object();

// Formats our textField

var my_css = new TextField.StyleSheet();

// fun with filters (new in Flash 8)

import flash.filters.DropShadowFilter;

var distance:Number = 2;

var angleInDegrees:Number = 45;

var color:Number = 0x000000;

var alpha:Number = .8;

var blurX:Number = 2;

var blurY:Number = 2;

var strength:Number = 1;

var quality:Number = 3;

var inner:Boolean = false;

var knockout:Boolean = false;

var hideObject:Boolean = false;

var filter:DropShadowFilter = new DropShadowFilter(distance, angleInDegrees, color, alpha, blurX, blurY, strength, quality, inner, knockout, hideObject);

var filterArray:Array = new Array();

filterArray.push(filter);
Here we see our global variables: some strings, some numbers, and some arrays — your typical variables. But, wait. Some not-so-typical variables are also present: a MovieClipLoader, a StyleSheet and a Filter.
在这里,我们看到了全局变量:一些字符串,一些数字和一些数组-您的典型变量。 可是等等。 还存在一些不太典型的变量:MovieClipLoader,StyleSheet和Filter。
The MovieClipLoader class allows us to implement listener callbacks that provide status information while SWF, JPEG, GIF, and PNG files are being loaded into movie clips. This is a lot handier than the dated loadMovie() class, which failed to provide us with any information on how much of our file had already been downloaded. We’ll use the MovieClipLoader class later to load our button image.
通过MovieClipLoader类,我们可以实现将SWF,JPEG,GIF和PNG文件加载到影片剪辑中时提供状态信息的侦听器回调。 这比过时的loadMovie()类要方便得多,后者无法向我们提供有关已下载多少文件的任何信息。 稍后,我们将使用MovieClipLoader类加载按钮图像。
The StyleSheet class lets you create a StyleSheet object that contains text formatting rules for font size, color, and other styles. We’ll use this StyleSheet in frame 4 to format the text on our navigation buttons.
StyleSheet类使您可以创建一个StyleSheet对象,该对象包含有关字体大小,颜色和其他样式的文本格式设置规则。 我们将在第4帧中使用此StyleSheet来格式化导航按钮上的文本。
Filters are new to Flash 8; they allow us to add some cool effects to our objects. For example, we can apply drop shadows, blurs, glows and bevels to objects. We’ll apply the drop shadow filter to our text field later. Some will say, "Big deal. If I want a drop shadow I could use Photoshop or Fireworks for that." You could, but then your text would no longer be dynamic, as ours is.
过滤器是Flash 8的新增功能; 它们使我们可以为对象添加一些很酷的效果。 例如,我们可以将阴影,模糊,发光和斜角应用于对象。 稍后,我们将阴影过滤器应用于文本字段。 有人会说:“大不了。如果我想要投影,可以使用Photoshop或Fireworks。” 您可以,但是您的文本将不再像我们一样是动态的。
Keep in mind that all the components that make up our Flash site don’t reside in Flash. Perhaps I should have used an exclamation point instead of a period for that last sentence? Let me say it again, "All the components that make up our Flash site don’t reside in Flash!" This approach allows for easy modification later. If, for example, I no longer like the image chosen for my buttons and I want to swap it out, that’s no problem. Or maybe I want to have the button say something different, or perhaps I want to add or remove a button later. Neither will be a problem; in fact, I won’t even have to open Flash to make these changes. That’s very handy indeed, especially when you’re creating a project for someone who doesn’t have Flash, or much in the way of technical knowledge.
请记住,构成我们Flash网站的所有组件都不位于Flash中。 也许我应该在最后一个句子中使用感叹号而不是句号? 让我再说一遍,“构成我们Flash网站的所有组件都不位于Flash中!” 这种方法便于以后进行修改。 例如,如果我不再喜欢为按钮选择的图像,并且希望将其换出,那就没问题了。 或者也许我想让按钮说些不同,或者也许我想稍后添加或删除按钮。 都不是问题。 实际上,我什至无需打开Flash即可进行这些更改。 确实,这非常方便,尤其是当您为没有Flash或没有太多技术知识的人创建项目时。
Before we move on to frame 2, notice our 3 arrays. These arrays will store the data for our buttons. Once our XML file has been parsed successfully, each array will be filled in with the proper data. This happens in frame 2.
在转到第2帧之前,请注意我们的3个数组。 这些数组将存储我们按钮的数据。 成功解析完我们的XML文件后,每个数组都将填充正确的数据。 这发生在第2帧中。
框架2 (Frame 2)
To recap, what was the main purpose of frame 1? If you said, "Global variables", you get a gold star. If not, run down to Starbucks and get some coffee and come back.
回顾一下,第一帧的主要目的是什么? 如果您说“全局变量”,您将获得一颗金星。 如果没有,去星巴克喝点咖啡再回来。
The main purpose of frame 2 is to gather external data — typically, literal files in the form of XML. If you haven’t looked at our navigation XML file, this would be a good time to do so. This article is not intended to teach you XML, so just take a look at the structure and what’s in there. We have a total of 4 buttons; each button is assigned an image, some text and a link.
框架2的主要目的是收集外部数据,通常是XML形式的文字文件。 如果您尚未查看我们的导航XML文件,那么这是个不错的时机。 本文的目的不是要教您XML,因此请看一下它的结构及其内容。 我们总共有4个按钮; 每个按钮都分配有图像,一些文本和链接。
A note to all you non-Flash 8 users: you won’t be able to use a PNG image. You’ll have to use the provided JPEG image and make the changes in the XML file. Previous versions of Flash are only able to load JPEG files.
给所有非Flash 8用户的注释:您将无法使用PNG图像。 您必须使用提供的JPEG图像并在XML文件中进行更改。 早期版本的Flash仅能加载JPEG文件。
Now, let’s look at the code in frame 2. I’ll break it down as we go.
现在,让我们看一下第2帧中的代码。我将继续进行分解。
var xmlData:XML = new XML();We start by instantiating a new XML object and call it xmlData. The XML object contains all the methods and properties we will need in order to work with XML data in Flash.
我们首先实例化一个新的XML对象,并将其xmlData 。 XML对象包含在Flash中处理XML数据所需的所有方法和属性。
xmlData.ignoreWhite = true;Flash will read all spacing contained within the XML file, including empty text nodes. As this is not the desired result, we simply tell Flash to ignore white space.
Flash将读取XML文件中包含的所有间距,包括空文本节点。 由于这不是理想的结果,因此我们只是告诉Flash忽略空格。
xmlData.load( xmlFile );This line loads an XML document from the specified URL. Remember, xmlFile was declared in frame 1 and set to "navigation.xml." Because our FLA file resides in the same directory as our XML file, we need only give the name. Had our XML file been located in a directory other than the one that houses our FLA file, we’d have included a relative path.
此行从指定的URL加载XML文档。 请记住, xmlFile在框架1中声明,并设置为“ navigation.xml”。 由于我们的FLA文件与XML文件位于同一目录中,因此我们只需要提供名称即可。 如果我们的XML文件位于存放FLA文件的目录之外的其他目录中,那么我们将包括一个相对路径。
The load process is asynchronous; it does not finish immediately after the load() method is executed. When the load() method is executed, the XML object property loaded is set to false. When the XML data finishes downloading, the loaded property is set to true, and the onLoad event handler is invoked.
加载过程是异步的; 它不会在执行load()方法后立即完成。 当执行load()方法时, load()的XML对象属性将设置为false。 XML数据完成下载后,将loading属性设置为true,并调用onLoad事件处理程序。
xmlData.onLoad = loadXML;Here we set the onLoad event handler to call our function loadXML. Let’s look at the function:
在这里,我们将onLoad事件处理程序设置为调用函数loadXML。 让我们看一下函数:
function loadXML(loaded) {
if (loaded) {
var xnRootNode:XMLNode = this;
trace( xnRootNode );
// number on buttons
nTotalButtons = xnRootNode.firstChild.childNodes.length;
// fill arrays
for (var i = 0; i<nTotalButtons; i++) {
astrImages.push(xnRootNode.firstChild.childNodes[i]

.childNodes[0].firstChild.nodeValue);
astrText.push(xnRootNode.firstChild.childNodes[i]

.childNodes[1].firstChild.nodeValue);
astrLinks.push(xnRootNode.firstChild.childNodes[i]

.childNodes[2].firstChild.nodeValue);
}
//everthing is loaded; we can move on
gotoAndStop(3);

}
This function runs only when the XML file has finished downloading and the loaded property is set to true.
仅当XML文件下载完成并且loading属性设置为true时,此函数才运行。
If the XML file has completed loading, we execute the following code:
如果XML文件已完成加载,我们将执行以下代码:
var xnRootNode:XMLNode = this;We create an XML node variable (xnRootNode) and set it equal to this; this being the XML data that was just loaded.
我们创建一个XML节点变量( xnRootNode )并使其等于该变量; 这就是刚刚加载的XML数据。
nTotalButtons = xnRootNode.firstChild.childNodes.length;At this point we need to talk about searching our XML to locate the values we need. This is a good time to revisit our navigation XML file.
在这一点上,我们需要讨论搜索XML以找到所需的值。 现在是重新浏览导航XML文件的好时机。
<nav>
<button>
<image>button1.png</image>
<text>Articles</text>
<link>articles.swf</link>
</button>
<button>
<image>button1.png</image>
<text>Books</text>
<link>books.swf</link>
</button>
<button>
<image>button1.png</image>
<text>Blog</text>
<link>blog.swf</link>
</button>
<button>
<image>button1.png</image>
<text>Contact 'company name' today for a free estimate</text>
<link>forum.swf</link>
</button>

</nav>
In order to retrieve values from an XML file, we step through the family tree until you find the desired value. So in our code, xnRootNode.firstChild.childNodes.length;, the first child, is <nav> and it has 4 child nodes — you guessed it, they’re our 4 <button> nodes. So nTotalButtons is now equal to 4.
为了从XML文件中检索值,我们逐步浏览了族谱,直到找到所需的值。 因此在我们的代码中, xnRootNode.firstChild.childNodes.length; ,第一个子节点是<nav> ,它有4个子节点-您猜对了,它们是我们的4个<button>节点。 因此nTotalButtons现在等于4。
Next we use a ‘for loop’ to gather all the data from each of our buttons and add it to our arrays.
接下来,我们使用“ for循环”从每个按钮收集所有数据,并将其添加到数组中。
astrImages.push(xnRootNode.firstChild.childNodes[i]

.childNodes[0].firstChild.nodeValue);astrImagesThis may look scary at first, but let's break it down.
xnRootNode.firstChildis<nav>, its first child is the first occurrence of<button>and<button>'s first child is<image>. So far, so good, but what is<image>'s first child? If you said, "button1.png" then pat yourself on the back: that's correct. Even the text value within the node is considered a child node in Flash. Lastly, we use the nodeValue property to retrieve the node value of the XML object, in this case "button1.png." Have a look at the image below, as it may help.We continue to fill in all our arrays, then move on. Only after our XML data has completed loading and has been pushed into our arrays are we ready to move the playhead onward. Now, we move to our next frame.
Frame 3
Frame 3 is used to load our CSS file. Have a look at our navigation.css file:
It looks like any other CSS file. We use CSS to set the formatting on our buttons, which just keeps with our paradigm of keeping everything external and dynamic.
Now that our CSS has loaded successfully, let's move on to frame 4.
Frame 4
Before we look at the code for frame 4, let's review. When our Flash file loads, it hits frame 1 and sets all the variables that we will need throughout our site. Next, in frame 2, we gather external data. We got a little bonus and learned how to import XML code which we then parsed and stored in 3 arrays that we'll use in frame 4. In frame 3, we imported the CSS that we'll use in frame 4.
What I want you to notice is that we're at our last frame and, at this point, nothing has been built. Up to this point we've only gathered the data that we'll need. We are now at frame 4, where the playhead will rest indefinitely and our Flash file will take form.
We start by tracing our arrays just to reassure ourselves that we have everything we need. If you're not familiar with the
trace()function, then you won't get far in Flash.Trace()is used to display messages in the Output panel while testing your SWF file. Do a CTRL + ENTER right now and it should pop up the Output panel, displaying the data from our arrays.for (var i = 0; i<nTotalButtons; i++) {
navHolder_mc.createEmptyMovieClip("navButton"+i, i );
// make new MovieClip and set to newly created button
var navButton:MovieClip = navHolder_mc["navButton"+i];
// load images
image_mcl.loadClip( astrImages[i], navButton );
}Recall that
nTotalButtonswas set in frame 2 and is equal to 4 -- the total number of buttons. Also notice thatnavHolder_mcis already on our canvas in thenavHolderlayer.Now, we use a 'for loop' to create our 4 buttons. Within
navHolder_mc, we use thecreateEmptyMovieClip()method to create a movie clip that will hold our buttons.This creates a movie clip called
navButtonand sets it equal to your newly created movie clip. This just makes life easier: we can simply refer tonavButton, instead ofnavHolder_mc["navButton"+i], now.image_mcl.loadClip( astrImages[i], navButton );We tell the
loadClip()method to load the button image (from our array) into the newly created movie clip.Now, remember that
image_mclwas defined in frame 1 as a MovieClipLoader, and MovieClipLoader allows us to implement listener callbacks that let us know when our image has completed loading.The
onLoadInithandler is invoked after the actions in the first frame of the clip have executed, so you can begin to manipulate the loaded clip. This handler is called after theonLoadCompletehandler. For most purposes, use theonLoadInithandler.At this point, we have a new movie clip for our button with our image loaded into it. Now let's set some properties.
target_mc.linkURL = astrLinks[nCounter];This attaches a variable called 'linkURL' to
target_mcmovie clip;target_mcis automagically set to the object that called this function; in this case it's our movie clip button. Don't believe me? Trace it!Note: 'Automagically' is a technical term for when something happens automatically without you doing anything and you can't really explain how it happens! Feel free to use it around the office -- it will catch on.
Next, we set
linkURLequal to the first link in our array.This attaches the
onPressevent handler to our button. In other words, when the button is clicked, it will call thebuttonClickfunction.var buttonImgHeight:Number = target_mc._height;
var buttonImgWidth:Number = target_mc._width;We define a couple of variables: one stores our button's height, while the other stores its width.
We move our button's vertical position (y position) down by 3 pixels each time we create a new button.
target_mc.createTextField( "buttonText", nCounter, 0, 0, buttonImgWidth, buttonImgHeight );This creates a new, empty text field within our button movie clip. The
createTextField()method takes 6 parameters:Now that we have created a new text field (
buttonText), we're going to assign it a few properties.target_mc.buttonText.border = false;
target_mc.buttonText.selectable = false;
target_mc.buttonText.wordWrap = true;The border property for our text field is currently set to false; however, during development I often set this to true, as it makes positioning things a little easier. In addition, we want our text to wrap, but we don't want it to be selectable.
This line assigns our CSS style, which we imported already. Notice the next line:
target_mc.buttonText.htmlText = "<.buttonStyle>"+ astrText[nCounter] +"</.buttonStyle>";Here, you can see how to implement our CSS style. Recall that
.buttonStyleis defined in our external CSS file. Also notice that we're using thehtmlTextproperty -- not just text.This line assigns our filter to the text field. Recall that we created a drop shadow filter back in frame 1. If you don't have Flash 8, you won't be using any filters.
These next few lines of code are pretty cool; they come in very handy when trying to align text vertically.
target_mc.buttonText.autoSize = true;
var nMiddle:Number = ( buttonImgHeight/2 );
target_mc.buttonText._y = nMiddle - ( target_mc.buttonText._height/2 );We first set the
autoSizeproperty of our text field to true. This allows the text field size to match the height and width of the text that's placed in it. Next, we find the middle of our button and store it innMiddle. If we dividebuttonImgHeightby 2, we should find the middle of our button. Now we can set the y position of our text field to be in the middle of our button. To do so, takenMiddleand subtract our text field's height divided by 2.Now we've vertically aligned our text in our buttons dynamically.
We increment
nCounterby 1 for each button that's generated.image_mcl.addListener(mclListener);The
addListenermethod attached to our MovieClipLoader object allows it to receive notification when our image is fully loaded.The last bit of code is our button click event handler.
This function executes when a button has been pressed. We run a trace on the button's
LinkURLproperty, which we set earlier. If you CTRL + ENTER to pop up the Output panel, then proceed to click some buttons, you should see the associated SWF file displayed in the Output panel.This is as far as we'll go in this article. If we were to continue, the next step would be to load the SWF file using another MovieClipLoader, just as we did earlier for the image files. However, we've now done enough to get the point. What is the point? Well, let's review.
The Big Picture
We've achieved a lot in this article. We've learned how to import XML into Flash, then parse it and store it in arrays. We learned how to import CSS and assign it to text fields to apply formatting. We also have learned how to use the new filter feature in Flash 8 to apply a drop shadow effect. All this is good, but it's not the main point.
What I want you to take away from this article is the way in which we structured our Flash site. Everything that makes up our Flash site resides outside Flash: our external XML file holds the text that's used for the buttons, the image that's used for the buttons, and the link reference for the buttons. Our external CSS file holds formatting information for the buttons.
Keeping everything outside Flash allows our site to be completely dynamic -- we can make changes at any time and not ever have to touch our Flash file. As a bonus, it also keeps our SWF file extremely small and fast loading.
Also, we were in complete control of the Flash playhead the entire time. We moved the Flash playhead to the next frame on our own terms, not Flash's, which can help to avoid a lot of frustration. Many errors are made in Flash because developers allow the playhead to run wild. We never allowed that to happen; we systematically controlled the playhead. Frame 1 set global variables, then we stopped at frame 2, where we loaded in XML data. Once complete, we stopped at frame 3 and loaded CSS data, and on completion, we stop at frame 4 and build our application.
I hope the principles presented in this article will allow you to better structure your next Flash site.
astrImagesThis may look scary at first, but let's break it down.
xnRootNode.firstChildis<nav>, its first child is the first occurrence of<button>and<button>'s first child is<image>. So far, so good, but what is<image>'s first child? If you said, "button1.png" then pat yourself on the back: that's correct. Even the text value within the node is considered a child node in Flash. Lastly, we use the nodeValue property to retrieve the node value of the XML object, in this case "button1.png." Have a look at the image below, as it may help.We continue to fill in all our arrays, then move on. Only after our XML data has completed loading and has been pushed into our arrays are we ready to move the playhead onward. Now, we move to our next frame.
Frame 3
Frame 3 is used to load our CSS file. Have a look at our navigation.css file:
It looks like any other CSS file. We use CSS to set the formatting on our buttons, which just keeps with our paradigm of keeping everything external and dynamic.
Now that our CSS has loaded successfully, let's move on to frame 4.
Frame 4
Before we look at the code for frame 4, let's review. When our Flash file loads, it hits frame 1 and sets all the variables that we will need throughout our site. Next, in frame 2, we gather external data. We got a little bonus and learned how to import XML code which we then parsed and stored in 3 arrays that we'll use in frame 4. In frame 3, we imported the CSS that we'll use in frame 4.
What I want you to notice is that we're at our last frame and, at this point, nothing has been built. Up to this point we've only gathered the data that we'll need. We are now at frame 4, where the playhead will rest indefinitely and our Flash file will take form.
We start by tracing our arrays just to reassure ourselves that we have everything we need. If you're not familiar with the
trace()function, then you won't get far in Flash.Trace()is used to display messages in the Output panel while testing your SWF file. Do a CTRL + ENTER right now and it should pop up the Output panel, displaying the data from our arrays.for (var i = 0; i<nTotalButtons; i++) {
navHolder_mc.createEmptyMovieClip("navButton"+i, i );
// make new MovieClip and set to newly created button
var navButton:MovieClip = navHolder_mc["navButton"+i];
// load images
image_mcl.loadClip( astrImages[i], navButton );
}Recall that
nTotalButtonswas set in frame 2 and is equal to 4 -- the total number of buttons. Also notice thatnavHolder_mcis already on our canvas in thenavHolderlayer.Now, we use a 'for loop' to create our 4 buttons. Within
navHolder_mc, we use thecreateEmptyMovieClip()method to create a movie clip that will hold our buttons.This creates a movie clip called
navButtonand sets it equal to your newly created movie clip. This just makes life easier: we can simply refer tonavButton, instead ofnavHolder_mc["navButton"+i], now.image_mcl.loadClip( astrImages[i], navButton );We tell the
loadClip()method to load the button image (from our array) into the newly created movie clip.Now, remember that
image_mclwas defined in frame 1 as a MovieClipLoader, and MovieClipLoader allows us to implement listener callbacks that let us know when our image has completed loading.The
onLoadInithandler is invoked after the actions in the first frame of the clip have executed, so you can begin to manipulate the loaded clip. This handler is called after theonLoadCompletehandler. For most purposes, use theonLoadInithandler.At this point, we have a new movie clip for our button with our image loaded into it. Now let's set some properties.
target_mc.linkURL = astrLinks[nCounter];This attaches a variable called 'linkURL' to
target_mcmovie clip;target_mcis automagically set to the object that called this function; in this case it's our movie clip button. Don't believe me? Trace it!Note: 'Automagically' is a technical term for when something happens automatically without you doing anything and you can't really explain how it happens! Feel free to use it around the office -- it will catch on.
Next, we set
linkURLequal to the first link in our array.This attaches the
onPressevent handler to our button. In other words, when the button is clicked, it will call thebuttonClickfunction.var buttonImgHeight:Number = target_mc._height;
var buttonImgWidth:Number = target_mc._width;We define a couple of variables: one stores our button's height, while the other stores its width.
We move our button's vertical position (y position) down by 3 pixels each time we create a new button.
target_mc.createTextField( "buttonText", nCounter, 0, 0, buttonImgWidth, buttonImgHeight );This creates a new, empty text field within our button movie clip. The
createTextField()method takes 6 parameters:Now that we have created a new text field (
buttonText), we're going to assign it a few properties.target_mc.buttonText.border = false;
target_mc.buttonText.selectable = false;
target_mc.buttonText.wordWrap = true;The border property for our text field is currently set to false; however, during development I often set this to true, as it makes positioning things a little easier. In addition, we want our text to wrap, but we don't want it to be selectable.
This line assigns our CSS style, which we imported already. Notice the next line:
target_mc.buttonText.htmlText = "<.buttonStyle>"+ astrText[nCounter] +"</.buttonStyle>";Here, you can see how to implement our CSS style. Recall that
.buttonStyleis defined in our external CSS file. Also notice that we're using thehtmlTextproperty -- not just text.This line assigns our filter to the text field. Recall that we created a drop shadow filter back in frame 1. If you don't have Flash 8, you won't be using any filters.
These next few lines of code are pretty cool; they come in very handy when trying to align text vertically.
target_mc.buttonText.autoSize = true;
var nMiddle:Number = ( buttonImgHeight/2 );
target_mc.buttonText._y = nMiddle - ( target_mc.buttonText._height/2 );We first set the
autoSizeproperty of our text field to true. This allows the text field size to match the height and width of the text that's placed in it. Next, we find the middle of our button and store it innMiddle. If we dividebuttonImgHeightby 2, we should find the middle of our button. Now we can set the y position of our text field to be in the middle of our button. To do so, takenMiddleand subtract our text field's height divided by 2.Now we've vertically aligned our text in our buttons dynamically.
We increment
nCounterby 1 for each button that's generated.image_mcl.addListener(mclListener);The
addListenermethod attached to our MovieClipLoader object allows it to receive notification when our image is fully loaded.The last bit of code is our button click event handler.
This function executes when a button has been pressed. We run a trace on the button's
LinkURLproperty, which we set earlier. If you CTRL + ENTER to pop up the Output panel, then proceed to click some buttons, you should see the associated SWF file displayed in the Output panel.This is as far as we'll go in this article. If we were to continue, the next step would be to load the SWF file using another MovieClipLoader, just as we did earlier for the image files. However, we've now done enough to get the point. What is the point? Well, let's review.
The Big Picture
We've achieved a lot in this article. We've learned how to import XML into Flash, then parse it and store it in arrays. We learned how to import CSS and assign it to text fields to apply formatting. We also have learned how to use the new filter feature in Flash 8 to apply a drop shadow effect. All this is good, but it's not the main point.
What I want you to take away from this article is the way in which we structured our Flash site. Everything that makes up our Flash site resides outside Flash: our external XML file holds the text that's used for the buttons, the image that's used for the buttons, and the link reference for the buttons. Our external CSS file holds formatting information for the buttons.
Keeping everything outside Flash allows our site to be completely dynamic -- we can make changes at any time and not ever have to touch our Flash file. As a bonus, it also keeps our SWF file extremely small and fast loading.
Also, we were in complete control of the Flash playhead the entire time. We moved the Flash playhead to the next frame on our own terms, not Flash's, which can help to avoid a lot of frustration. Many errors are made in Flash because developers allow the playhead to run wild. We never allowed that to happen; we systematically controlled the playhead. Frame 1 set global variables, then we stopped at frame 2, where we loaded in XML data. Once complete, we stopped at frame 3 and loaded CSS data, and on completion, we stop at frame 4 and build our application.
I hope the principles presented in this article will allow you to better structure your next Flash site.
翻译自: https://www.sitepoint.com/structure-flash-site/
flash 结构