七个鲜为人知的搜索网站
Over a year ago I published the original 12 Little-known CSS Facts and, to this day, it has been one of SitePoint’s most popular articles ever. Since that post was published, I’ve been collecting more little CSS tips and tidbits for a new post. Because we all know that every successful movie should spawn a cheesy sequel, right?
一年多以前,我发布了原始的12个鲜为人知CSS事实,并且到目前为止,它一直是SitePoint最受欢迎的文章之一。 自从该文章发布以来,我一直在为新文章收集更多CSS技巧和窍门。 因为我们都知道每部成功的电影都应该产生俗气的续集,对吧?
Artwork by SitePoint/Natalia Balska.
SitePoint / Natalia Balska的作品 。
So let’s get right into this year’s developer’s dozen. I’m sure many of us will know at least some of these, but you can let me know in the comments how many of these were new to you.
因此,让我们进入今年的开发人员之列。 我敢肯定,我们中的许多人至少会了解其中一些,但是您可以在评论中让我知道其中有多少是新手。
1. border-radius属性可以使用“斜杠”语法 (1. The border-radius property can use “slash” syntax)
This is something I’ve written about before more than four years ago on SitePoint, but I still think many beginners and even some experienced developers don’t know this feature exists.
这事我以前写过超过四年前SitePoint,但我仍然认为很多新手,甚至一些有经验的开发人员不知道这个功能的存在。
Believe it or not, the following is valid border-radius code:
信不信由你,以下是有效的border-radius代码:
.box {
border-radius: 35px 25px 30px 20px / 35px 25px 15px 30px;
}
If you’ve never seen that, it might seem a little confusing, so here’s the explanation from the spec:
如果您从未见过,这似乎有点令人困惑,所以这是规格说明:
If values are given before and after the slash, then the values before the slash set the horizontal radius and the values after the slash set the vertical radius. If there is no slash, then the values set both radii equally.
如果在斜线之前和之后给出值,则斜线之前的值设置水平半径,斜线之后的值设置垂直半径。 如果没有斜线,则值将相等地设置两个半径。
The spec also provides the following diagram:
该规范还提供了以下图表:
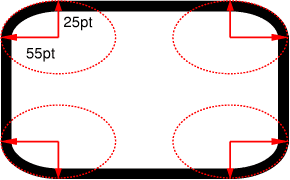
The caption for that image explains: “The two values of border-top-left-radius: 55pt 25pt define the curvature of the corner.”
该图像的标题说明:“ border-top-left-radius: 55pt 25pt的两个值border-top-left-radius: 55pt 25pt定义了拐角的曲率。”
So the use of the slash in the value allows you to create curved corners that are not symmetrical. If you want a more detailed consideration of this, check out my original article linked above, or better yet, try out this handy little interactive demo from MDN:
因此,在值中使用斜杠可以创建不对称的弯角。 如果您需要对此进行更详细的考虑,请查看上面链接的我的原始文章,或者更好的是,尝试使用MDN的这个方便的交互式演示 :
Most border-radius generators do not allow you to set these optional values. The MDN generator is the only one I’ve found that does this.
大多数border-radius生成器不允许您设置这些可选值。 我发现只有MDN生成器可以做到这一点。
2. font-weight属性接受相对关键字 (2. The font-weight property accepts relative keywords)
Normally when you see the font-weight property defined, the value will be either normal or bold. You might also occasionally see an integer value in hundred increments: 100, 200, etc., up to 900.
通常,当您看到定义的font-weight属性时,该值将为normal或bold 。 您也可以偶尔看到一个整数值在百个增量: 100 , 200 ,等等,多达900 。
The two values that are often forgotten, however, are bolder and lighter.
但是,经常被遗忘的两个值bolder , lighter 。
According to the spec, these keywords specify a bolder or lighter weight than the inherited value. This comes into play most significantly when you are dealing with a font that has multiple weights that are bolder than just plain “bold” and lighter than just normal text.
根据规范,这些关键字指定的重量比继承的值粗或轻。 当您处理的字体的粗细比普通的“粗体”大,并且比普通文本更轻时,这种作用最明显。
In the hundred-based values, “bold” maps to 700 and “normal” maps to 400. So if you have a font that has a 300 weight, but nothing lower, a value of “lighter” will produce 300 if the inherited value is 400. If there is no lighter weight (i.e. 400 is the lightest weight) then it will just stay at 400 and thus a value of “lighter” will have no effect.
在基于百的值中,“粗体”映射到700 ,“普通”映射到400 。 因此,如果您使用的字体的粗细为300 ,但没有其他降低,如果继承的值为400 ,则“ lighter”的值将产生300 。 如果没有较轻的重量(即400是最轻的重量),则它将保持在400 ,因此“较轻”的值将无效。
Look at the following CodePen demo:
查看以下CodePen演示:
See the Pen Using font-weight bolder/lighter Keywords by SitePoint (@SitePoint) on CodePen.
请参阅CodePen上使用SitePoint ( @SitePoint )的使用字体粗体/较浅关键字的笔 。
In this example, I’m using a font called Exo 2, which has 18 different styles available. My demo embeds only the non-italic styles, which are enough for each of the hundred-based weights.
在此示例中,我使用的字体叫Exo 2 ,它有18种可用的样式。 我的演示仅嵌入非斜体样式,对于每种基于100的权重而言,这些样式都足够。
Notice that the demo includes 12 nested ‘box’ elements with different font-weight values, including “bolder” and “lighter” so you can see how these affect the weight of the text in different inheritance contexts. Below is the CSS from that example. Notice the comments in the code, and remember that each subsequent “box” is nested inside the previous:
请注意,该演示包含12个嵌套的“框”元素,它们具有不同的font-weight值,包括“粗体”和“较浅”,因此您可以看到它们如何影响不同继承上下文中文本的粗细。 以下是该示例CSS。 请注意代码中的注释,并记住每个后续的“框”都嵌套在前面的框内:
.box {
font-weight: 100;
}
.box-2 {
font-weight: bolder; /* maps to 400 */
}
.box-3 {
font-weight: bolder; /* maps to 700 */
}
.box-4 {
font-weight: 400;
}
.box-5 {
font-weight: bolder; /* maps to 700 */
}
.box-6 {
font-weight: bolder; /* maps to 900 */
}
.box-7 {
font-weight: 700;
}
.box-8 {
font-weight: bolder; /* maps to 900 */
}
.box-9 {
font-weight: bolder; /* maps to 900 */
}
.box-10 {
font-weight: lighter; /* maps to 700 */
}
.box-11 {
font-weight: lighter; /* maps to 400 */
}
.box-12 {
font-weight: lighter; /* maps to 100 */
}
In this case, the “bolder” and “lighter” keywords will map only to the 100, 400, 700, and 900 values. With 9 different styles, these keywords will never map to the 200, 300, 500, 600, and 800 values.
在这种情况下,“更大胆的”和“较轻”的关键字将仅映射到100 , 400 , 700 ,和900的值。 随着9种不同的风格,这些关键词将永远不会映射到200 , 300 , 500 , 600和800的值。
This happens because you’re telling the browser to choose the next font in the series that is considered either ‘bold’ or ‘light’. So it’s not picking the next boldest or the next lightest, but merely a bold or light font relative to what is inherited. If, however, the lightest font started at 300 (as in the case of Open Sans), and the inherited value was 400, then a value of “lighter” would map to 300.
发生这种情况是因为您要告诉浏览器选择系列中被视为“粗体”或“浅色”的下一个字体。 因此,它不是选择下一个最粗体或下一个最浅体,而只是选择相对于继承的粗体或浅体字体。 但是,如果最轻的字体开始于300 (如Open Sans的情况),并且继承的值为400 ,则“轻”的值将映射为300 。
This might all be a bit confusing at first, but you can fiddle around with the demo to see how these keywords work.
刚开始时这可能有点令人困惑,但是您可以在演示中随意摆弄一下这些关键字的工作方式。
3.有一个outline-offset属性 (3. There is an outline-offset property)
The outline property is pretty well known due to its ability to help in debugging (it doesn’t affect page flow). The spec, however, has added an outline-offset property, which does exactly what its name suggests — it lets you define how far the outline should be offset from the element.
outline属性由于其有助于调试的能力而众所周知(它不会影响页面流 )。 但是,该规范添加了outline-offset属性,该属性恰好如其名称所暗示的那样—使您可以定义轮廓应与元素之间的偏移量。
See the Pen The outline-offset property by SitePoint (@SitePoint) on CodePen.
参见Pen CodePen上SitePoint ( @SitePoint ) 的outline-offset属性 。
In the demo above, move the range slider left or right to see the outline offset change. The range in this example covers 0px to 30px, but you could go as large as you want in the CSS. Take note that although the outline property is a shorthand property, it doesn’t include outline-offset, so you always have to define outline-offset separately.
在上面的演示中,向左或向右移动范围滑块以查看轮廓偏移量的变化。 此示例中的范围涵盖0px到30px ,但是您可以在CSS中随意设置。 请注意,尽管outline属性是一个简写属性,但它不包含outline-offset ,因此您始终必须分别定义outline-offset 。
The only major drawback to the outline-offset property is the fact that it’s supported in every browser except Internet Explorer (not even IE11).
outline-offset属性的唯一主要缺点是,除Internet Explorer(甚至IE11)之外,所有浏览器都支持它。
4.有一个table-layout属性 (4. There is a table-layout property)
You’re probably thinking, Old news. I know all about display: table, bruh. Easiest way to vertically center! But that’s not what I’m talking about. Notice I said the table-layout property, not the display property.
您可能在想, 旧消息。 我知道所有关于display: table ,bruh。 垂直居中的最简单方法! 但这不是我要说的。 注意,我说的是table-layout属性,而不是display属性。
The table-layout property isn’t the easiest CSS feature to explain so let’s first go to the spec, and then look at an example. The spec says:
table-layout属性不是最容易解释CSS功能,因此让我们先看一下规范,然后看一个示例。 规格说明:
With this (fast) algorithm, the horizontal layout of the table does not depend on the contents of the cells; it only depends on the table’s width, the width of the columns, and borders or cell spacing.
使用这种(快速)算法,表格的水平布局不取决于单元格的内容; 它仅取决于表格的宽度,列的宽度以及边框或单元格的间距。
That might be the first time in W3C specification history that something is hard to understand. LOL JK.
这可能是W3C规范历史上第一次很难理解的东西。 哈哈JK。
But seriously, as always, a live example will help. In the following demo, the table has table-layout: fixed added in the CSS. Click the toggle button to toggle it off, then on, etc.
但是认真地,像往常一样,一个生动的例子会有所帮助。 在下面的演示中,该表具有table-layout: fixed添加到CSS中。 单击切换按钮将其关闭,然后再打开,依此类推。
See the Pen Using the table-layout property by SitePoint (@SitePoint) on CodePen.
请参阅CodePen上的SitePoint ( @SitePoint )的Pen using table-layout属性 。
You can see in this example the advantage of using table-layout: fixed, as opposed to the default of auto. This won’t always be the best choice and it won’t always be necessary, but it’s a nice one to keep in mind when dealing with tables that have cells with variable-width data.
在此示例中,您可以看到使用table-layout: fixed的优点,而不是默认的auto 。 这并不总是最好的选择,也不一定总是必要的,但是在处理具有可变宽度数据的单元格的表时,要牢记这一点。
Chris Coyier did a great write-up on this property last year, so if you want a much more comprehensive discussion, that’s your best bet.
克里斯·科耶尔(Chris Coyier)去年对该物业进行了出色的撰写 ,因此,如果您想进行更广泛的讨论,那是最好的选择。
5. vertical-align属性在表单元格和其他元素上的工作方式不同 (5. The vertical-align property works differently on table cells vs. other elements)
If you’ve been coding websites since the mid-2000s or earlier, or if you’ve done a lot of HTML emails, then you’ve probably at some point assumed the vertical-align property was the standard upgrade to the old HTML4 valign attribute, which is now listed as an obsolete, non-conforming feature in HTML5.
如果您是从2000年代中期或更早的时候开始编码网站的,或者您已经处理过许多HTML电子邮件,那么您可能在某个时候假设vertical-align属性是对旧HTML4 valign的标准升级属性 ,现在在HTML5中被列为过时的,不符合规范的功能 。
But vertical-align in CSS doesn’t really work that way. Except on tables. Which, I think is kind of weird, but I suppose it makes more sense than the property not working at all on tables.
但是,CSS中的vertical-align实际上并不能那样工作。 除了桌子上。 我认为这有点怪异,但我想这比不完全在表上工作的属性更有意义。
So what’s the difference when this property is applied to regular elements compared to table cells?
那么,与表单元格相比,将此属性应用于常规元素有什么区别?
When not applied to table cells, the vertical-align property follows these basic rules:
当不应用于表单元格时, vertical-align属性遵循以下基本规则:
- It works only on inline or inline-block elements. 它仅适用于内联或内联块元素。
- It has no effect on the contents of an element but instead it changes the alignment of the element itself in relation to other inline or inline-block elements. 它对元素的内容没有影响,但会更改元素本身相对于其他内联或内联块元素的对齐方式。
- It can be affected by text/font settings like line-height and by the size of adjacent inline or inline-block elements. 它可能会受到文本/字体设置(如行高)以及相邻的嵌入式或嵌入式块元素的大小的影响。
Here’s a demo:
这是一个演示:
See the Pen Using the vertical-align property on inline elements by SitePoint (@SitePoint) on CodePen.
请参见CodePen上的SitePoint ( @SitePoint )使用内联元素上的Pen 使用vertical-align属性 。
The vertical-align property is defined on the input element. By pressing one of the buttons, you’ll change the value to what’s written on the button. You’ll notice that each of the values changes the position of the input.
vertical-align属性在input元素上定义。 通过按下其中一个按钮,您可以将值更改为在按钮上写的值。 您会注意到,每个值都会更改input的位置。
Overall, that demo is a really rudimentary look at this property and its values. For a much deeper look, check out Christopher Aue’s 2014 post.
总体而言,该演示是对该属性及其值的真正初步了解。 如需更深入的了解,请查看Christopher Aue在2014年发表的文章 。
When it comes to tables, however, vertical-align works very differently. In such a case, you apply the property/value to one or more table cells, and the content of the table cells is affected by the chosen alignment.
但是,对于表, vertical-align工作方式大不相同。 在这种情况下,请将属性/值应用于一个或多个表格单元,表格单元的内容会受到所选对齐方式的影响。
See the Pen Using vertical-align on table cells by SitePoint (@SitePoint) on CodePen.
请参阅CodePen上的SitePoint ( @SitePoint )在表单元格上使用垂直对齐的笔。
As shown in the above demo, only four of the values work on table cells, and although there is an effect on the sibling cells with a value of baseline, the main effect is on the alignment of content inside the cell on which you’ve applied vertical-align.
如上面的演示所示,只有四个值在表格单元格上起作用,尽管对具有baseline值的同级单元格有影响,但主要影响是对单元格内的内容的对齐方式应用了vertical-align 。
6. ::first-letter伪元素比您想象的要聪明 (6. The ::first-letter pseudo-element is smarter than you think)
The ::first-letter pseudo-element allows you to style the first letter of an element, letting you do a drop-cap effect which has been common in print for many years.
::first-letter伪元素允许您设置元素的第一个字母的样式,从而使您可以使用大写效果,这在印刷中已经很常见了很多年。
The good thing about this one is that browsers seem to have a decent standard for what constitutes the “first letter” of an element. I first saw this when Matt Andrews tweeted about it, although he seemed to imply that it was a bad thing. You can see his examples in the CodePen below.
这样做的好处是,浏览器似乎对构成元素的“首字母”的内容具有不错的标准。 马特·安德鲁斯(Matt Andrews)发推文时,我第一次见到它 ,尽管他似乎暗示这是一件坏事。 您可以在下面的CodePen中查看他的示例。
See the Pen Testing ::first-letter by SitePoint (@SitePoint) on CodePen.
请参阅CodePen上的SitePoint ( @SitePoint )的Pen Testing :: first-letter 。
Looks to me like the four big browsers all handle these the same way, so that’s great because I think this is the correct behavior. It would be a little weird if something like an open parenthesis was treated as a “first letter”. That would be more like “first character”, which I suppose could be a whole new pseudo-class in itself.
在我看来,四个大型浏览器都以相同的方式处理这些问题,所以这很棒,因为我认为这是正确的行为。 如果像开括号这样的东西被当作“第一个字母”,那将有点奇怪。 那将更像是“第一个字符”,我想它本身可能就是一个全新的伪类。
7.您可以在HTML类列表中使用无效字符作为分隔符 (7. You can use invalid characters as delimiters in your HTML class lists)
This concept was discussed in 2013 by Ben Everard, and I think it’s worth expanding on.
Ben Everard在2013年讨论了这个概念,我认为值得扩展。
Ben’s post was about using the slash (“/”) character to separate his HTML classes into groups, to make his code easier to read or scan. As he points out, although the unescaped slash is an invalid character, browsers don’t choke on it, they simply ignore it.
Ben的帖子是关于使用斜杠(“ /”)字符将其HTML类分成多个组,以使其代码更易于阅读或扫描。 正如他指出的那样,尽管未转义的斜杠是无效字符,但浏览器不会对此造成窒息,他们只是忽略了它。
So you might have an HTML example like this one:
因此,您可能会有这样HTML示例:
<div class="col col-4 col-8 c-list bx bx--rounded bx--transparent">With the slashes, it would become:
加上斜线,它将变成:
<div class="col col-4 col-8 / c-list / bx bx--rounded bx--transparent">You can use any characters (invalid or not) to produce the same effect:
您可以使用任何字符(无效或无效)来产生相同的效果:
<div class="col col-4 col-8 ** c-list ** bx bx--rounded bx--transparent">
<div class="col col-4 col-8 || c-list || bx bx--rounded bx--transparent">
<div class="col col-4 col-8 && c-list && bx bx--rounded bx--transparent">
All these variations seem to work fine, which you can test in the demo below.
所有这些变体似乎都可以正常工作,您可以在下面的演示中进行测试。
See the Pen Illegal Characters as HTML Class Delimiters by SitePoint (@SitePoint) on CodePen.
请参阅CodePen上的SitePoint ( @SitePoint )将Pen 非法字符作为HTML类分隔符 。
Of course, those delimiters cannot be used in your stylesheet as classes, which is what I mean by “invalid”. So the following would be illegal and wouldn’t apply the specified style:
当然,这些定界符不能在样式表中用作类,这就是我所说的“无效”。 因此,以下内容将是非法的,并且不会应用指定的样式:
./ {
color: blue;
}
If you must use these kinds of characters in your HTML classes for the purpose of targeting them in your CSS, you can insert them escaped using this tool. So the above example would work only if your CSS looked like this:
如果必须在HTML类中使用这些字符以在CSS中定位它们为目标,则可以使用此工具将它们转义插入 。 因此,上面的示例仅在CSS如下所示时才有效:
.\/ {
color: blue;
}
And taking it even further, Unicode characters don’t have to be escaped at all, so you can do this kind of crazy stuff:
更进一步,Unicode字符根本不需要转义,因此您可以做这种疯狂的事情:
<div class="♥ ★"></div>And then have the following in your CSS:
然后在CSS中添加以下内容:
.♥ {
color: hotpink;
}
.★ {
color: yellow;
}
Alternatively, you can escape these types of characters too, instead of inserting them directly. The following would be equivalent to the previous code block:
另外,您也可以转义这些类型的字符,而不是直接插入它们。 以下内容等同于上一个代码块:
.\2665 {
color: hotpink;
}
.\2605 {
color: yellow;
}
8.动画迭代可以是小数值 (8. Animation iterations can be fractional values)
When writing CSS keyframe animations, you probably know that you can use the animation-iteration-count property to define the number of times to play the animation:
在编写CSS关键帧动画时,您可能知道可以使用animation-iteration-count属性来定义播放动画的次数:
.example {
animation-iteration-count: 3;
}
The integer value in that example will tell the animation to run 3 full times. But maybe you didn’t know that you can use fractional values:
该示例中的整数值将告诉动画完整运行3次。 但是也许您不知道可以使用分数值:
.example {
animation-iteration-count: .5;
}
In this case, the animation will run a half time (that is, it will stop halfway through its first iteration). Let’s look at an example demo that animates two balls on the page. The top ball has an iteration count of “1” while the bottom ball has an iteration count of “.5”.
在这种情况下,动画将运行一半时间(也就是说,它将在第一次迭代中途停止)。 让我们看一个演示示例,该演示使页面上的两个小球动画化。 顶部球的迭代次数为“ 1”,而底部球的迭代次数为“ .5”。
Update: As pointed out in the comments, these demos don’t work correctly in Safari on desktop or mobile. This is because of a bug in relation to the fill mode, which I’ve filed here, and which has since been fixed. It will be corrected in future stable updates.
更新:如评论中所指出,这些演示无法在台式机或移动设备上的Safari中正常工作。 这是由于与填充模式有关的错误, 我已经在此处提交了该错误,此错误已得到修复。 以后的稳定更新中将对其进行纠正。
See the Pen Using a Fractional Iteration Count by SitePoint (@SitePoint) on CodePen.
见笔使用分数迭代次数由SitePoint( @SitePoint上) CodePen 。
What’s interesting about this is that the iteration duration is not based on the property/value that’s animating. In other words, if you animate something 100px, the halfway point is not necessarily at 50px. For example, the previous animation uses a timing function of linear, so this ensures the second ball stops visually at the halfway point.
有趣的是,迭代持续时间不是基于动画的属性/值。 换句话说,如果为100px的物体设置动画,则中间点不一定是50px。 例如,上一个动画使用linear的计时功能,因此可以确保第二个球在中途停留在视觉上。
Here are the same two animations, this time using a timing function of ease:
以下是相同的两个动画,此时使用的计时功能ease :
See the Pen PqRxov by SitePoint (@SitePoint) on CodePen.
请参阅CodePen上的SitePoint( @SitePoint )提供的Pen PqRxov 。
Notice now the second ball passes the halfway point before it stops. Again, this is because of the different timing function.
请注意,第二个球在停止前经过了中点。 同样,这是因为计时功能不同。
If you understand timing functions, then you’ll also realize that a value of ease-in-out will position the ball in the same place as linear. Fiddle around with fractional values and the timing functions to see the different results.
如果您了解计时功能,那么您还将认识到, ease-in-out值将球定位在与linear相同的位置。 在小数数值和计时功能之间随意切换,以查看不同的结果。
9.动画的速记可能会因为动画的名称而中断 (9. Animation shorthand can break because of the animation’s name)
Some developers have discovered this one by accident and there is a warning about it in the spec. Let’s say you have the following animation code:
一些开发人员偶然发现了这个,并且在规范中有关于它的警告。 假设您有以下动画代码:
@keyframes reverse {
from {
left: 0;
}
to {
left: 300px;
}
}
.example {
animation: reverse 2s 1s;
}
Notice I’m using a name of reverse for the animation. This seems fine at first glance, but notice what happens when we use the above code in a live example:
注意,我为动画使用了reverse名称。 乍一看似乎很好,但请注意,在实际示例中使用上述代码时会发生什么:
See the Pen An animation called “reverse” won’t work in shorthand by SitePoint (@SitePoint) on CodePen.
看见钢笔CodePen上的SitePoint ( @SitePoint ) 不能简写为“ reverse”动画 。
The animation doesn’t work because “reverse” is a valid keyword value for the animation-direction property. This will happen for any animation name that matches a valid keyword value that’s used in the shorthand syntax. This will not happen when using longhand.
动画无效,因为“ reverse”是animation-direction属性的有效关键字值。 任何与速记语法中使用的有效关键字值匹配的动画名称都将发生这种情况。 使用正手时不会发生这种情况。
Animation names that will break the shorthand syntax include any of the timing function keywords, as well as infinite, alternate, running, paused, and so forth.
会破坏速记语法的动画名称包括任何计时功能关键字 ,以及infinite , alternate , running , paused等。
10.您可以选择元素范围 (10. You can select ranges of elements)
I don’t know who first used this but I first saw it in this demo by Gunnar Bittersmann. Let’s say you have an ordered list of 20 elements and you want to select elements 7 through 14, inclusive. Here’s how you can do it with a single selector:
我不知道是谁首先使用的,但是我在Gunnar Bittersmann的 演示中首次看到了。 假设您有20个元素的有序列表,并且想要选择7到14个元素(包括7和14)。 使用单个选择器的方法如下:
ol li:nth-child(n+7):nth-child(-n+14) {
background: lightpink;
}
See the Pen Selecting Ranges of Elements with CSS by SitePoint (@SitePoint) on CodePen.
请参见CodePen上的SitePoint ( @SitePoint ) 用CSS用钢笔选择元素的范围 。
Update: As pointed out in the comments, Safari has a bug that prevents this technique from working. Fortunately, a solution proposed by Matt Pomaski seems to fix it: Simply reverse the chain so it looks like ol li:nth-child(-n+14):nth-child(n+7). WebKit nightly doesn’t have this bug, so eventually you’ll be able to get this working normally in Safari.
更新:正如评论中指出的那样,Safari有一个错误使该技术无法正常工作。 幸运的是,马特·波马斯基(Matt Pomaski)提出的一种解决方案似乎可以解决该问题:只需扭转链,使其看起来像ol li:nth-child(-n+14):nth-child(n+7) 。 WebKit每晚没有此错误,因此最终您将能够使其在Safari中正常运行。
This code uses chained structural pseudo-class expressions. Although the expression itself might be a bit confusing, you can see the range you’re targeting by the numbers used in the expression.
该代码使用链式结构的伪类表达式。 尽管表达式本身可能会有些混乱,但是您可以通过表达式中使用的数字来查看要定位的范围。
To explain exactly what this is doing: In the first part of the chain, the expression says “select the 7th element, then every element after that”. The second part says “select the 14th element, and every element before that.” But since the selectors are chained, each limits the previous one’s scope. So the second part of the chain doesn’t allow the first part to go past 14 and the first part of the chain doesn’t allow the second part to go back past 7.
确切解释其作用:在链的第一部分,表达式表示“选择第7个元素,然后选择第7个元素”。 第二部分说“选择第14个元素,以及此之前的每个元素。” 但是由于选择器是链接在一起的,所以每个选择器都限制了前一个选择器的范围。 因此,链的第二部分不允许第一部分超过14,链的第一部分不允许第二部分超过7。
For a more detailed discussion of these types of selectors and expressions, you can read my old post on the subject.
有关这些选择器和表达式类型的详细讨论,您可以阅读有关该主题的老文章 。
11.伪元素可以应用于某些空元素 (11. Pseudo-elements can be applied to some void elements)
If you’re like me, at some point you’ve probably tried to apply a pseudo-element to an image or a form input. This won’t work because pseudo-elements don’t work on replaced elements. I think many developers have the assumption that void elements (that is, elements that don’t have closing tags) all fall under that category. But that’s not true.
如果您像我一样,在某些时候您可能已经尝试将伪元素应用于图像或表单输入。 这将不起作用,因为伪元素不适用于替换的元素。 我认为许多开发人员都假设void元素(即没有结束标签的元素)都属于该类别。 但这不是事实。
You can apply a pseudo-element to some void elements that aren’t replaced elements. This includes hr elements, as in this demo:
您可以将伪元素应用于未替换的某些void元素。 包括hr元素,如本演示中所示:
See the Pen Pseudo-elements on a Horizontal Rule (hr element) by SitePoint (@SitePoint) on CodePen.
请参见CodePen上SitePoint ( @SitePoint ) 编写的 关于水平尺( hr元素)的Pen 伪元素 。
The colored area in that example is a horizontal rule (hr element) and it has both ::before and ::after pseudo-elements applied to it. Interestingly, I couldn’t get the same result using a br element, which is also a non-replaced void element.
在该示例中,彩色区域是水平尺( hr元素),并且对它应用了::before和::after伪元素。 有趣的是,使用br元素(这也是一个不可替代的void元素),我无法获得相同的结果。
You can also add pseudo-elements to meta tags and link elements, if you are crazy enough to convert those to display: block, as shown in the demo below.
如果您很疯狂地将伪元素转换为display: block ,则还可以将伪元素添加到meta标签和link元素,如下面的演示所示。
See the Pen Adding pseudo-elements to meta tags and link (stylesheet) elements by SitePoint (@SitePoint) on CodePen.
请参见CodePen上的Pen通过SitePoint( @SitePoint ) 将伪元素添加到元标记和链接(样式表)元素 。
12.一些属性值在选择器中不区分大小写 (12. Some attribute values are case insensitive in selectors)
Finally, here is a bit of an obscure one. Let’s say you have the following HTML:
最后,这有点晦涩。 假设您有以下HTML:
<div class="box"></div>
<input type="email">
You could style both of those elements using the attribute selector, like this:
您可以使用属性选择器来为这两个元素设置样式,如下所示:
div[class="box"] {
color: blue;
}
input[type="email"] {
border: solid 1px red;
}
That would work fine. But what about this?
那会很好。 但是呢?
div[class="BOX"] {
color: blue;
}
input[type="EMAIL"] {
border: solid 1px red;
}
Notice both attribute values are now in uppercase. In this case, the .box element will not receive the styles, because the class attribute is case sensitive. The email field, on the other hand, will apply the styles because the value of the type attribute is not case sensitive. Nothing necessarily groundbreaking here, but maybe it’s something you hadn’t realized before.
注意,两个属性值现在都是大写的。 在这种情况下, .box元素将不会接收样式,因为class属性区分大小写。 另一方面,电子邮件字段将应用样式,因为type属性的值不区分大小写。 这里不一定具有开创性,但也许这是您之前从未意识到的。
那是包装,人们 (That’s a Wrap, People)
Well, the curtain has officially dropped on this hopefully-not-so-cheesy sequel.
好吧,这个希望不那么俗气的续集正式拉开了帷幕。
It feels like I’m learning unique little CSS tidbits every week and I hope some of this information was new to most of you. What’s your favorite, obscure CSS trick or technique? Is there a property or other feature that you think isn’t very well known, but has good browser support? Let us know in the comments.
感觉就像我每周都在学习独特CSS小窍门,我希望其中的一些信息对大多数人来说都是新的。 您最喜欢的,晦涩CSS技巧或技术是什么? 您是否有一个您不太了解但具有良好浏览器支持的属性或其他功能? 让我们在评论中知道。
翻译自: https://www.sitepoint.com/12-little-known-css-facts-the-sequel/
七个鲜为人知的搜索网站