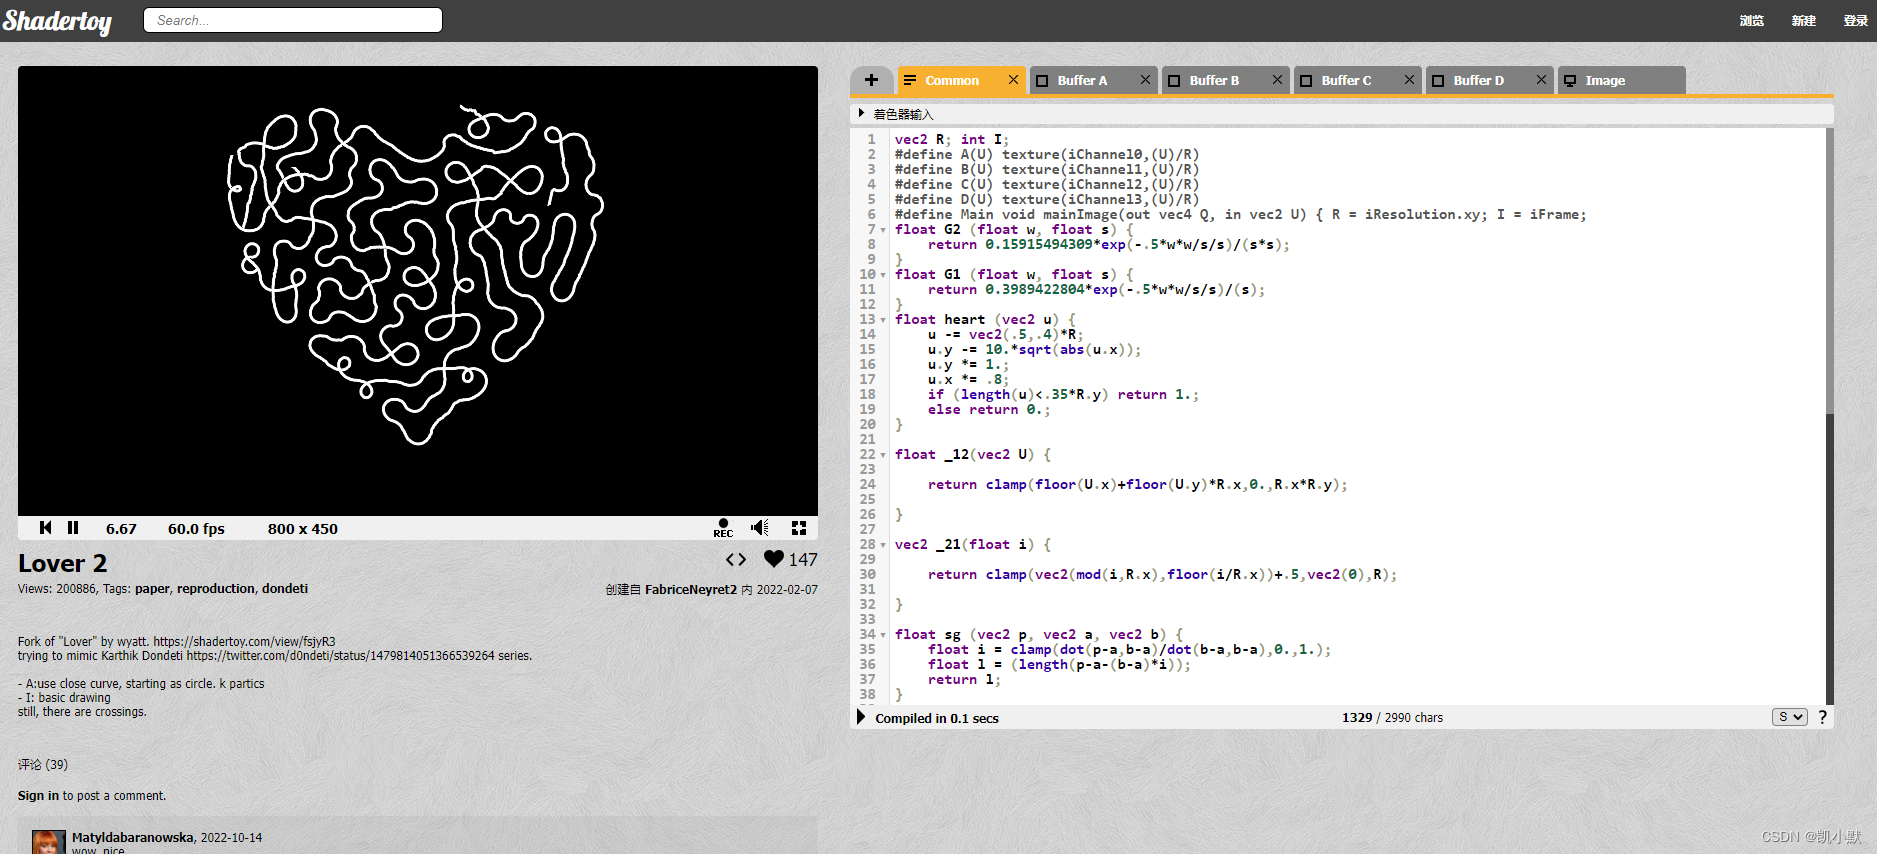
说明
【跟月影学可视化】学习笔记。
如何用片元着色器控制局部颜色?
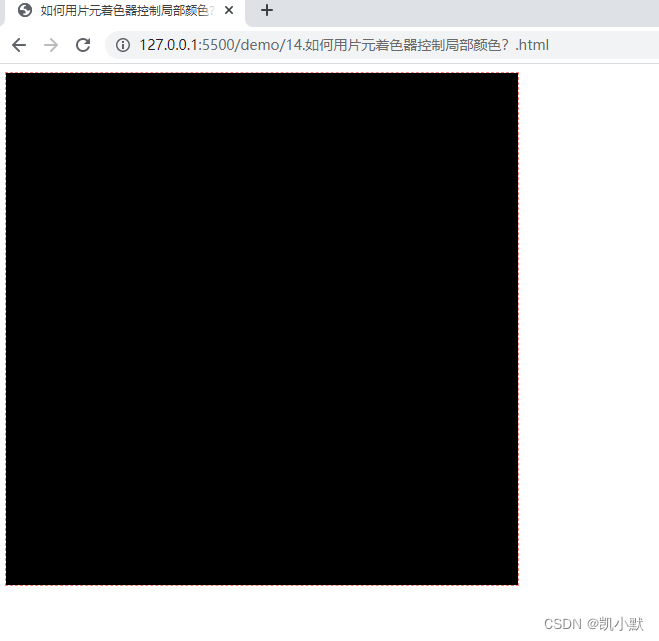
把图片绘制为纯黑色:
const fragment = `#ifdef GL_ESprecision highp float;#endifvarying vec2 vUv;void main() {gl_FragColor = vec4(0, 0, 0, 1);}
`;
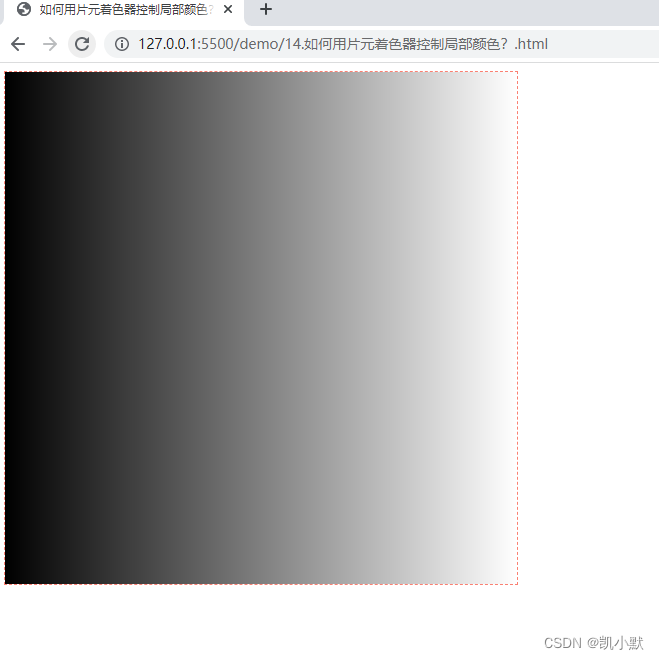
根据纹理坐标值来绘制,让某个图案的颜色,从左到右由黑向白过渡
const fragment = `#ifdef GL_ESprecision highp float;#endifvarying vec2 vUv;void main() {gl_FragColor.rgb = vec3(vUv.x);gl_FragColor.a = 1.0;}
`;
使用乘法创造一个 10*10 的方格,让每个格子左上角是绿色,右下角是红色,中间是过渡色。
const fragment = `#ifdef GL_ESprecision highp float;#endifvarying vec2 vUv;void main() {vec2 st = vUv * 10.0;gl_FragColor.rgb = vec3(fract(st), 0.0);gl_FragColor.a = 1.0;}
`;
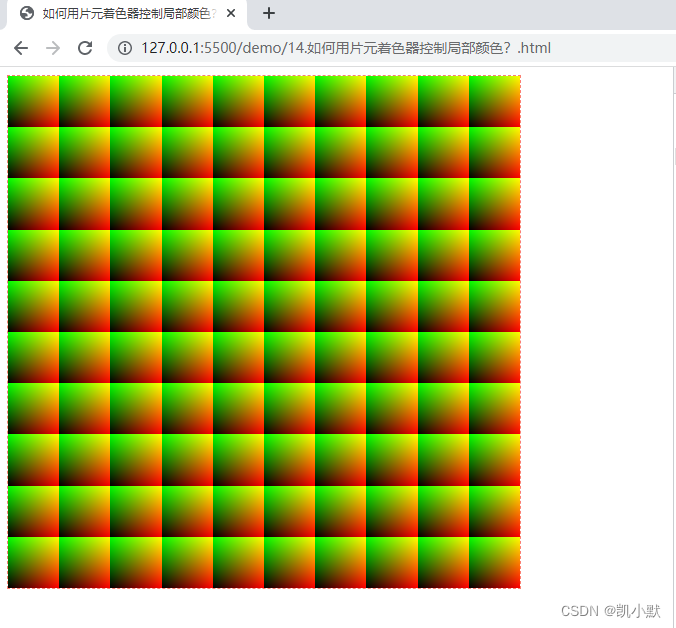
通过 idx = floor(st) 获取网格的索引,判断网格索引除以 2 的余数(奇偶性),根据它来决定是否翻转网格内的 x、y 坐标。
<!DOCTYPE html>
<html lang="en"><head><meta charset="UTF-8" /><meta http-equiv="X-UA-Compatible" content="IE=edge" /><meta name="viewport" content="width=device-width, initial-scale=1.0" /><title>如何用片元着色器控制局部颜色?</title><style>canvas {border: 1px dashed salmon;}</style></head><body><canvas width="512" height="512"></canvas><script src="./common/lib/gl-renderer.js"></script><script>const vertex = `attribute vec2 a_vertexPosition;attribute vec2 uv;varying vec2 vUv;void main() {gl_PointSize = 1.0;vUv = uv;gl_Position = vec4(a_vertexPosition, 1, 1);}`;// // 把图片绘制为纯黑色// const fragment = `//     #ifdef GL_ES//     precision highp float;//     #endif//     varying vec2 vUv;//     void main() {//         gl_FragColor = vec4(0, 0, 0, 1);//     }// `;// // 根据纹理坐标值来绘制,让某个图案的颜色,从左到右由黑向白过渡// const fragment = `//     #ifdef GL_ES//     precision highp float;//     #endif//     varying vec2 vUv;//     void main() {//         gl_FragColor.rgb = vec3(vUv.x);//         gl_FragColor.a = 1.0;//     }// `;// // 使用乘法创造一个 10*10 的方格,让每个格子左上角是绿色,右下角是红色,中间是过渡色。// const fragment = `//     #ifdef GL_ES//     precision highp float;//     #endif//     varying vec2 vUv;//     void main() {//         vec2 st = vUv * 10.0;//         gl_FragColor.rgb = vec3(fract(st), 0.0);//         gl_FragColor.a = 1.0;//     }// `;// 通过 idx = floor(st) 获取网格的索引,判断网格索引除以 2 的余数(奇偶性),根据它来决定是否翻转网格内的 x、y 坐标。const fragment = `#ifdef GL_ESprecision highp float;#endifvarying vec2 vUv;void main() {vec2 st = vUv * 10.0;vec2 idx = floor(st);vec2 grid = fract(st);vec2 t = mod(idx, 2.0);if(t.x == 1.0) {grid.x = 1.0 - grid.x;}if(t.y == 1.0) {grid.y = 1.0 - grid.y;}gl_FragColor.rgb = vec3(grid, 0.0);gl_FragColor.a = 1.0;}`;const canvas = document.querySelector("canvas");const renderer = new GlRenderer(canvas);// 加载片元着色器并创建程序const program = renderer.compileSync(fragment, vertex);renderer.useProgram(program);// 将顶点数据送入缓冲区renderer.setMeshData([{positions: [[-1, -1],[-1, 1],[1, 1],[1, -1],],attributes: {uv: [[0, 0],[0, 1],[1, 1],[1, 0],],},cells: [[0, 1, 2],[2, 0, 3],],},]);// 渲染renderer.render();</script></body>
</html>

如何用片元着色器绘制圆、线段和几何图形
绘制圆
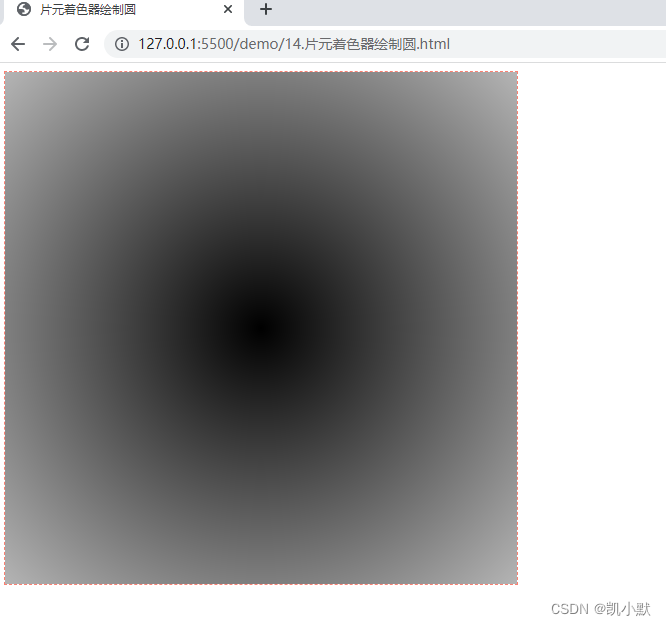
绘制一个模糊的圆
const fragment = `#ifdef GL_ESprecision highp float;#endifvarying vec2 vUv;void main() {floatd = distance(vUv, vec2(0.5));gl_FragColor.rgb = d * vec3(1.0);gl_FragColor.a = 1.0;}
`;
绘制一个清晰的圆
const fragment = `#ifdef GL_ESprecision highp float;#endifvarying vec2 vUv;void main() {float d = distance(vUv, vec2(0.5));gl_FragColor.rgb = step(d, 0.2) * vec3(1.0);gl_FragColor.a = 1.0;}
`;
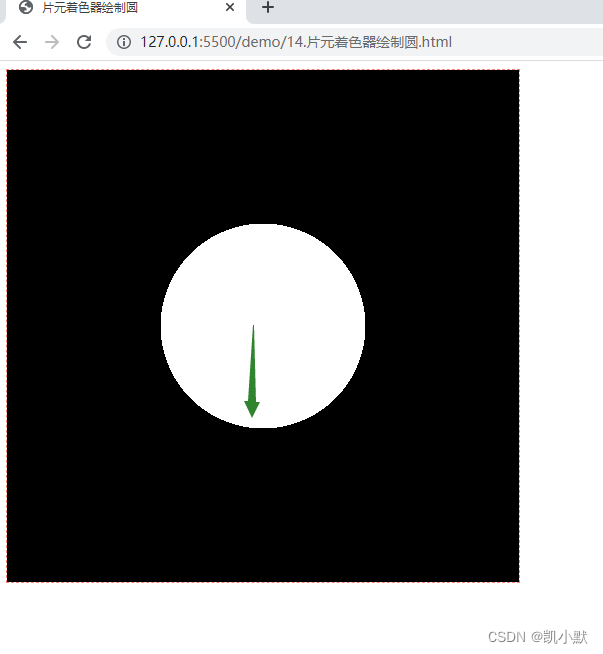
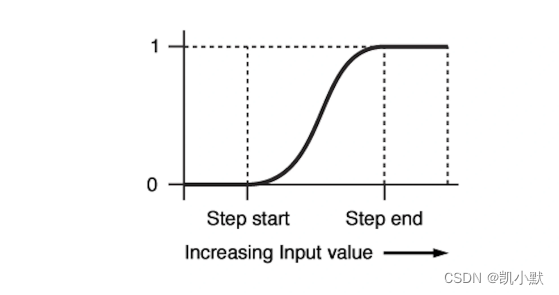
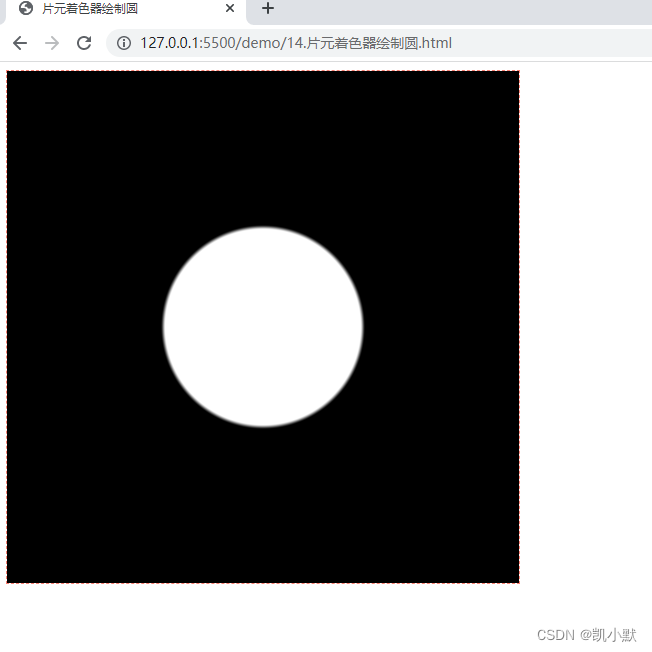
因为浮点数计算的精度导致的锯齿现象。用 smoothstep 代替 step 即可解决这种问题。smoothstep 在 step-start 和 step-end 之间有一个平滑过渡的区间。
<!DOCTYPE html>
<html lang="en"><head><meta charset="UTF-8" /><meta http-equiv="X-UA-Compatible" content="IE=edge" /><meta name="viewport" content="width=device-width, initial-scale=1.0" /><title>片元着色器绘制圆</title><style>canvas {border: 1px dashed salmon;}</style></head><body><canvas width="512" height="512"></canvas><script src="./common/lib/gl-renderer.js"></script><script>const vertex = `attribute vec2 a_vertexPosition;attribute vec2 uv;varying vec2 vUv;void main() {gl_PointSize = 1.0;vUv = uv;gl_Position = vec4(a_vertexPosition, 1, 1);}`;// // 模糊的圆// const fragment = `//     #ifdef GL_ES//     precision highp float;//     #endif//     varying vec2 vUv;//     void main() {//         float d = distance(vUv, vec2(0.5));//         gl_FragColor.rgb = d * vec3(1.0);//         gl_FragColor.a = 1.0;//     }// `;// // 清晰的圆// const fragment = `//     #ifdef GL_ES//     precision highp float;//     #endif//     varying vec2 vUv;//     void main() {//         float d = distance(vUv, vec2(0.5));//         gl_FragColor.rgb = step(d, 0.2) * vec3(1.0);//         gl_FragColor.a = 1.0;//     }// `;// 清晰的圆无锯齿const fragment = `#ifdef GL_ESprecision highp float;#endifvarying vec2 vUv;void main() {float d = distance(vUv, vec2(0.5));gl_FragColor.rgb = smoothstep(d, d + 0.01, 0.2) * vec3(1.0);gl_FragColor.a = 1.0;}`;const canvas = document.querySelector("canvas");const renderer = new GlRenderer(canvas);// 加载片元着色器并创建程序const program = renderer.compileSync(fragment, vertex);renderer.useProgram(program);// 将顶点数据送入缓冲区renderer.setMeshData([{positions: [[-1, -1],[-1, 1],[1, 1],[1, -1],],attributes: {uv: [[0, 0],[0, 1],[1, 1],[1, 0],],},cells: [[0, 1, 2],[2, 0, 3],],},]);// 渲染renderer.render();</script></body>
</html>
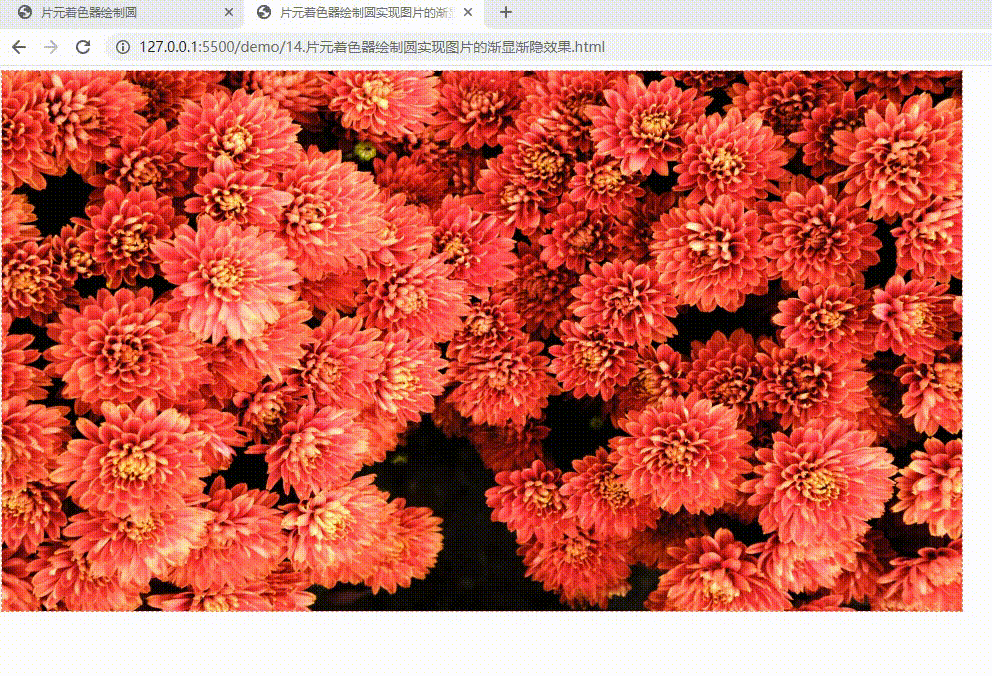
实现图片的渐显渐隐效果
上一节我们实现了图片粒子化,下面利用绘制圆实现图片的渐显渐隐效果
<!DOCTYPE html>
<html lang="en"><head><meta charset="UTF-8" /><meta http-equiv="X-UA-Compatible" content="IE=edge" /><meta name="viewport" content="width=device-width, initial-scale=1.0" /><title>片元着色器绘制圆实现图片的渐显渐隐效果</title><style>canvas {border: 1px dashed salmon;}</style></head><body><canvas width="1920" height="1080"></canvas><script src="./common/lib/gl-renderer.js"></script><script>const vertex = `attribute vec2 a_vertexPosition;attribute vec2 uv;varying vec2 vUv;void main() {gl_PointSize = 1.0;vUv = uv;gl_Position = vec4(a_vertexPosition, 1, 1);}`;const fragment = `#ifdef GL_ESprecision highp float;#endifuniform sampler2D tMap;uniform vec2 uResolution;uniform float uTime;varying vec2 vUv;float random (vec2 st) {return fract(sin(dot(st.xy, vec2(12.9898,78.233)))*43758.5453123);}void main() {vec2 uv = vUv;uv.y *= uResolution.y / uResolution.x;vec2 st = uv * 100.0;float d = distance(fract(st), vec2(0.5));float p = uTime + random(floor(st));float shading = 0.5 + 0.5 * sin(p);d = smoothstep(d, d + 0.01, 1.0 * shading);vec4 color = texture2D(tMap, vUv);gl_FragColor.rgb = color.rgb * clamp(0.5, 1.3, d + 1.0 * shading);gl_FragColor.a = color.a;}`;const canvas = document.querySelector("canvas");const renderer = new GlRenderer(canvas);// 加载片元着色器并创建程序const program = renderer.compileSync(fragment, vertex);renderer.useProgram(program);(async function () {const texture = await renderer.loadTexture('./assets/img/flower.jpg');renderer.uniforms.tMap = texture;renderer.uniforms.uResolution = [canvas.width, canvas.height];renderer.uniforms.uTime = 0;// 将顶点数据送入缓冲区renderer.setMeshData([{positions: [[-1, -1],[-1, 1],[1, 1],[1, -1],],attributes: {uv: [[0, 0],[0, 1],[1, 1],[1, 0],],},cells: [[0, 1, 2], [2, 0, 3]],}]);renderer.render();function update(t) {renderer.uniforms.uTime = t / 500;requestAnimationFrame(update);}update(0);}());</script></body>
</html>
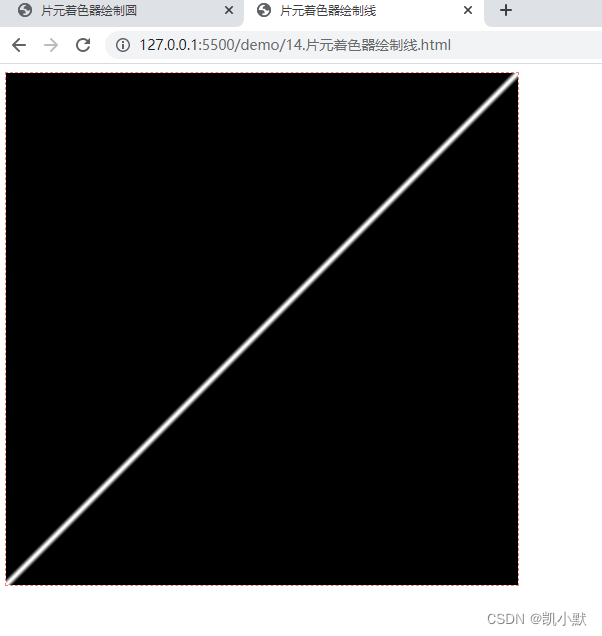
绘制线
计算点到直线(向量)的距离即可。
<!DOCTYPE html>
<html lang="en"><head><meta charset="UTF-8" /><meta http-equiv="X-UA-Compatible" content="IE=edge" /><meta name="viewport" content="width=device-width, initial-scale=1.0" /><title>片元着色器绘制圆</title><style>canvas {border: 1px dashed salmon;}</style></head><body><canvas width="512" height="512"></canvas><script src="./common/lib/gl-renderer.js"></script><script>const vertex = `attribute vec2 a_vertexPosition;attribute vec2 uv;varying vec2 vUv;void main() {gl_PointSize = 1.0;vUv = uv;gl_Position = vec4(a_vertexPosition, 1, 1);}`;// 画出一条斜线const fragment = `#ifdef GL_ESprecision highp float;#endifvarying vec2 vUv;void main() {vec3 line = vec3(1, 1, 0);float d = abs(cross(vec3(vUv,0), normalize(line)).z); gl_FragColor.rgb = (1.0 - smoothstep(0.0, 0.01, d)) * vec3(1.0);gl_FragColor.a = 1.0;}`;const canvas = document.querySelector("canvas");const renderer = new GlRenderer(canvas);// 加载片元着色器并创建程序const program = renderer.compileSync(fragment, vertex);renderer.useProgram(program);// 将顶点数据送入缓冲区renderer.setMeshData([{positions: [[-1, -1],[-1, 1],[1, 1],[1, -1],],attributes: {uv: [[0, 0],[0, 1],[1, 1],[1, 0],],},cells: [[0, 1, 2],[2, 0, 3],],},]);// 渲染renderer.render();</script></body>
</html>
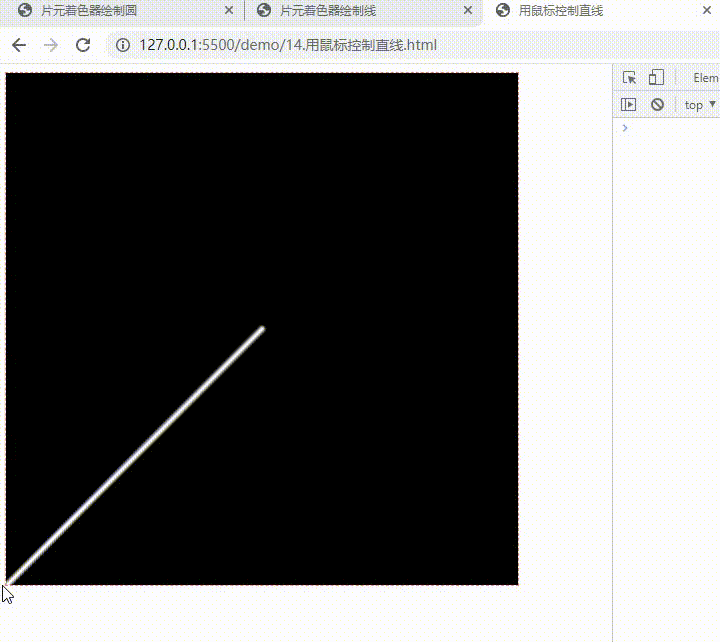
用鼠标控制直线
<!DOCTYPE html>
<html lang="en"><head><meta charset="UTF-8" /><meta http-equiv="X-UA-Compatible" content="IE=edge" /><meta name="viewport" content="width=device-width, initial-scale=1.0" /><title>用鼠标控制直线</title><style>canvas {border: 1px dashed salmon;}</style></head><body><canvas width="512" height="512"></canvas><script src="./common/lib/gl-renderer.js"></script><script>const vertex = `attribute vec2 a_vertexPosition;attribute vec2 uv;varying vec2 vUv;void main() {gl_PointSize = 1.0;vUv = uv;gl_Position = vec4(a_vertexPosition, 1, 1);}`;const fragment = `#ifdef GL_ESprecision highp float;#endifvarying vec2 vUv;uniform vec2 uMouse;uniform vec2 uOrigin;// 返回点到线段的距离float seg_distance(in vec2 st, in vec2 a, in vec2 b) {vec3 ab = vec3(b - a, 0);vec3 p = vec3(st - a, 0);float l = length(ab);float d = abs(cross(p, normalize(ab)).z);float proj = dot(p, ab) / l;if(proj >= 0.0 && proj <= l) return d;return min(distance(st, a), distance(st, b));}void main() {float d = seg_distance(vUv, uMouse, uOrigin); gl_FragColor.rgb = (1.0 - smoothstep(0.0, 0.01, d)) * vec3(1.0);gl_FragColor.a = 1.0;}`;const canvas = document.querySelector("canvas");const renderer = new GlRenderer(canvas);// 加载片元着色器并创建程序const program = renderer.compileSync(fragment, vertex);renderer.useProgram(program);renderer.uniforms.uMouse = [-1, -1];// 直线经过的固定点renderer.uniforms.uOrigin = [0.5, 0.5];canvas.addEventListener("mousemove", (e) => {const { x, y, width, height } =e.target.getBoundingClientRect();renderer.uniforms.uMouse = [(e.x - x) / width,1.0 - (e.y - y) / height,];});// 将顶点数据送入缓冲区renderer.setMeshData([{positions: [[-1, -1],[-1, 1],[1, 1],[1, -1],],attributes: {uv: [[0, 0],[0, 1],[1, 1],[1, 0],],},cells: [[0, 1, 2],[2, 0, 3],],},]);// 渲染renderer.render();</script></body>
</html>
绘制三角形
点到三角形三条边的距离有三个,只要这三个距离的符号都相同,我们就能确定点在三角形内。
<!DOCTYPE html>
<html lang="en"><head><meta charset="UTF-8" /><meta http-equiv="X-UA-Compatible" content="IE=edge" /><meta name="viewport" content="width=device-width, initial-scale=1.0" /><title>片元着色器绘制三角形</title><style>canvas {border: 1px dashed salmon;}</style></head><body><canvas width="512" height="512"></canvas><script src="./common/lib/gl-renderer.js"></script><script>const vertex = `attribute vec2 a_vertexPosition;attribute vec2 uv;varying vec2 vUv;void main() {gl_PointSize = 1.0;vUv = uv;gl_Position = vec4(a_vertexPosition, 1, 1);}`;const fragment = `#ifdef GL_ESprecision highp float;#endifvarying vec2 vUv;float line_distance(in vec2 st, in vec2 a, in vec2 b) {vec3 ab = vec3(b - a, 0);vec3 p = vec3(st - a, 0);float l = length(ab);return cross(p, normalize(ab)).z;}float seg_distance(in vec2 st, in vec2 a, in vec2 b) {vec3 ab = vec3(b - a, 0);vec3 p = vec3(st - a, 0);float l = length(ab);float d = abs(cross(p, normalize(ab)).z);float proj = dot(p, ab) / l;if(proj >= 0.0 && proj <= l) return d;return min(distance(st, a), distance(st, b));}float triangle_distance(in vec2 st, in vec2 a, in vec2 b, in vec2 c) {float d1 = line_distance(st, a, b);float d2 = line_distance(st, b, c);float d3 = line_distance(st, c, a);if(d1 >= 0.0 && d2 >= 0.0 && d3 >= 0.0 || d1 <= 0.0 && d2 <= 0.0 && d3 <= 0.0) {return -min(abs(d1), min(abs(d2), abs(d3))); // 内部距离为负}return min(seg_distance(st, a, b), min(seg_distance(st, b, c), seg_distance(st, c, a))); // 外部为正}void main() {float d = triangle_distance(vUv, vec2(0.3), vec2(0.5, 0.7), vec2(0.7, 0.3));gl_FragColor.rgb = (1.0 - smoothstep(0.0, 0.01, d)) * vec3(1.0);gl_FragColor.a = 1.0;}`;const canvas = document.querySelector("canvas");const renderer = new GlRenderer(canvas);// 加载片元着色器并创建程序const program = renderer.compileSync(fragment, vertex);renderer.useProgram(program);// 将顶点数据送入缓冲区renderer.setMeshData([{positions: [[-1, -1],[-1, 1],[1, 1],[1, -1],],attributes: {uv: [[0, 0],[0, 1],[1, 1],[1, 0],],},cells: [[0, 1, 2],[2, 0, 3],],},]);// 渲染renderer.render();</script></body>
</html>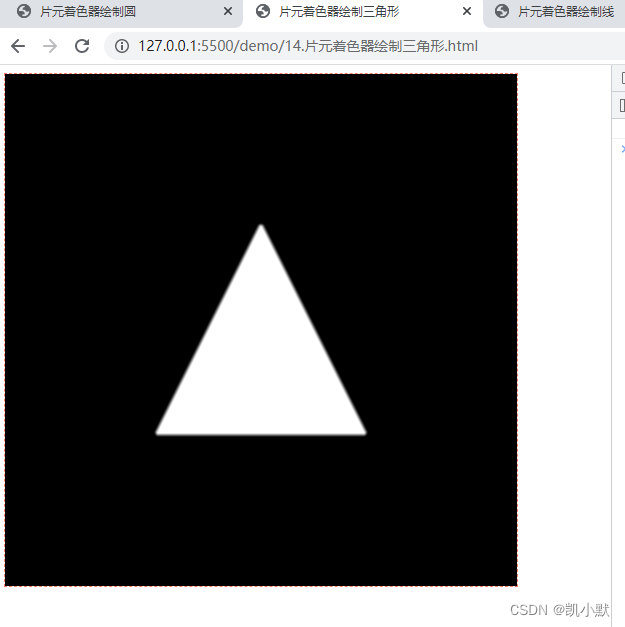
片元着色器绘图方法论:符号距离场渲染
在图形渲染中有一个专有的名称叫做符号距离场渲染(Signed Distance Fields Rendering)。它本质上就是利用空间中的距离分布来着色的。
- 第一步:定义距离。
- 第二步:根据距离着色。
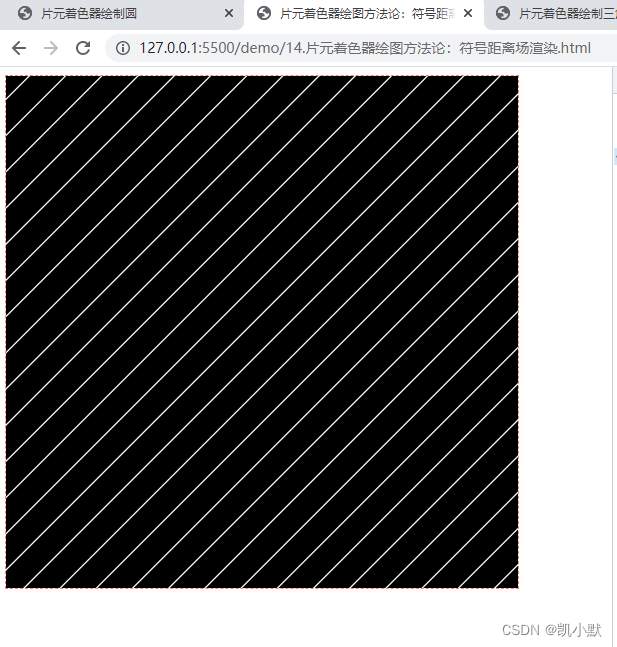
绘制平面分割线
constfragment = `#ifdef GL_ESprecision highp float;#endifvarying vec2 vUv;void main() {vec3 line = vec3(1, 1, 0);float d = abs(cross(vec3(vUv,0), normalize(line)).z);d = fract(20.0 * d);gl_FragColor.rgb = (smoothstep(0.45, 0.5, d) - smoothstep(0.5, 0.55, d)) * vec3(1.0);gl_FragColor.a = 1.0;}
`;
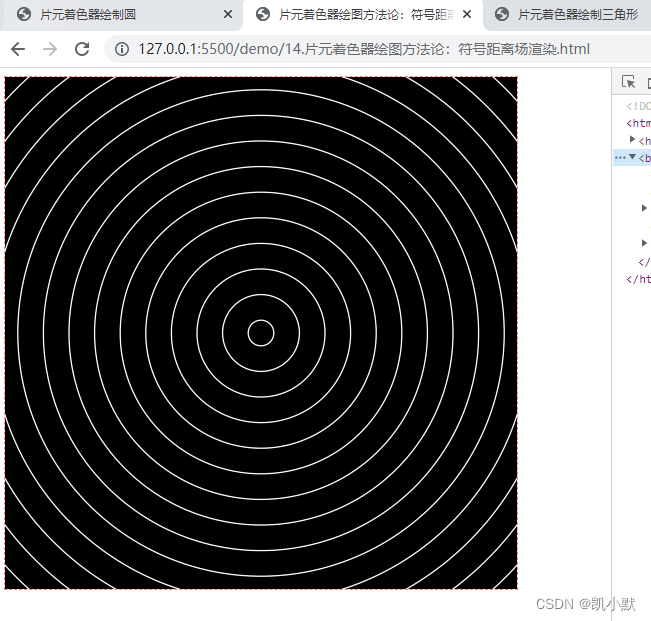
绘制圆环
const fragment = `#ifdef GL_ESprecision highp float;#endifvarying vec2 vUv;void main() {float d = distance(vUv, vec2(0.5));d = fract(20.0 * d);gl_FragColor.rgb = (smoothstep(0.45, 0.5, d) - smoothstep(0.5, 0.55, d)) * vec3(1.0);gl_FragColor.a = 1.0;}
`;
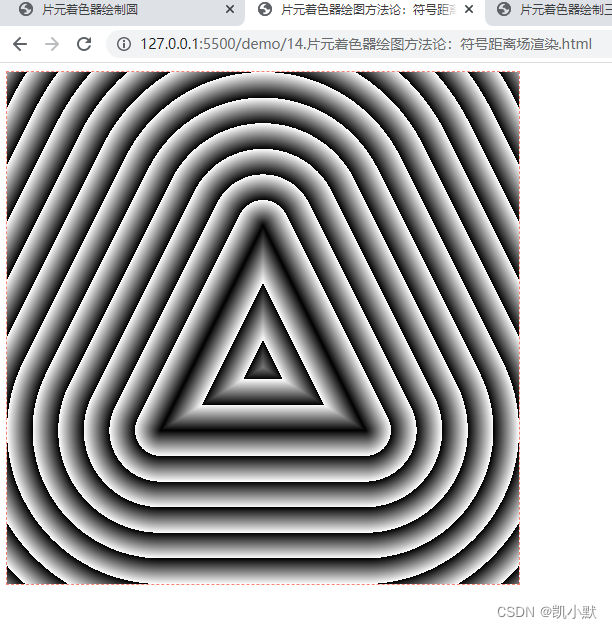
绘制三角环
<!DOCTYPE html>
<html lang="en"><head><meta charset="UTF-8" /><meta http-equiv="X-UA-Compatible" content="IE=edge" /><meta name="viewport" content="width=device-width, initial-scale=1.0" /><title>片元着色器绘图方法论:符号距离场渲染</title><style>canvas {border: 1px dashed salmon;}</style></head><body><canvas width="512" height="512"></canvas><script src="./common/lib/gl-renderer.js"></script><script>const vertex = `attribute vec2 a_vertexPosition;attribute vec2 uv;varying vec2 vUv;void main() {gl_PointSize = 1.0;vUv = uv;gl_Position = vec4(a_vertexPosition, 1, 1);}`;// // 绘制平面分割线// const fragment = `//     #ifdef GL_ES//     precision highp float;//     #endif//     varying vec2 vUv;//     void main() {//         vec3 line = vec3(1, 1, 0);//         float d = abs(cross(vec3(vUv,0), normalize(line)).z);//         d = fract(20.0 * d);//         gl_FragColor.rgb = (smoothstep(0.45, 0.5, d) - smoothstep(0.5, 0.55, d)) * vec3(1.0);//         gl_FragColor.a = 1.0;//     }// `;// // 绘制圆环// const fragment = `//     #ifdef GL_ES//     precision highp float;//     #endif//     varying vec2 vUv;//     void main() {//         float d = distance(vUv, vec2(0.5));//         d = fract(20.0 * d);//         gl_FragColor.rgb = (smoothstep(0.45, 0.5, d) - smoothstep(0.5, 0.55, d)) * vec3(1.0);//         gl_FragColor.a = 1.0;//     }// `;// 绘制三角环const fragment = `#ifdef GL_ESprecision highp float;#endifvarying vec2 vUv;float line_distance(in vec2 st, in vec2 a, in vec2 b) {vec3 ab = vec3(b - a, 0);vec3 p = vec3(st - a, 0);float l = length(ab);return cross(p, normalize(ab)).z;}float seg_distance(in vec2 st, in vec2 a, in vec2 b) {vec3 ab = vec3(b - a, 0);vec3 p = vec3(st - a, 0);float l = length(ab);float d = abs(cross(p, normalize(ab)).z);float proj = dot(p, ab) / l;if(proj >= 0.0 && proj <= l) return d;return min(distance(st, a), distance(st, b));}float triangle_distance(in vec2 st, in vec2 a, in vec2 b, in vec2 c) {float d1 = line_distance(st, a, b);float d2 = line_distance(st, b, c);float d3 = line_distance(st, c, a);if(d1 >= 0.0 && d2 >= 0.0 && d3 >= 0.0 || d1 <= 0.0 && d2 <= 0.0 && d3 <= 0.0) {return -min(abs(d1), min(abs(d2), abs(d3))); // 内部距离为负}return min(seg_distance(st, a, b), min(seg_distance(st, b, c), seg_distance(st, c, a))); // 外部为正}void main() {float d = triangle_distance(vUv, vec2(0.3), vec2(0.5, 0.7), vec2(0.7, 0.3));d = fract(20.0 * abs(d));// gl_FragColor.rgb = vec3(d); // vec3(d) 来渲染颜色gl_FragColor.rgb = (smoothstep(0.45, 0.5, d) - smoothstep(0.5, 0.55, d)) * vec3(1.0);gl_FragColor.a = 1.0;}`;const canvas = document.querySelector("canvas");const renderer = new GlRenderer(canvas);// 加载片元着色器并创建程序const program = renderer.compileSync(fragment, vertex);renderer.useProgram(program);// 将顶点数据送入缓冲区renderer.setMeshData([{positions: [[-1, -1],[-1, 1],[1, 1],[1, -1],],attributes: {uv: [[0, 0],[0, 1],[1, 1],[1, 0],],},cells: [[0, 1, 2],[2, 0, 3],],},]);// 渲染renderer.render();</script></body>
</html>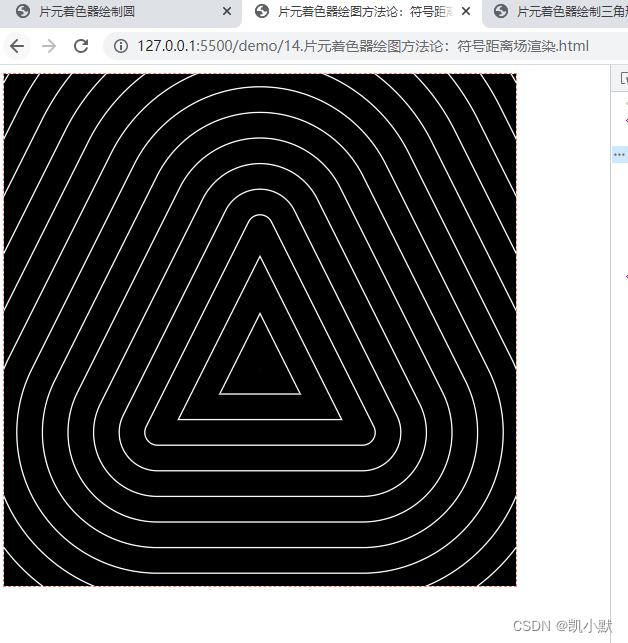
vec3(d) 来渲染颜色
着色器绘制几何图形的用途
- 实现图像的剪裁
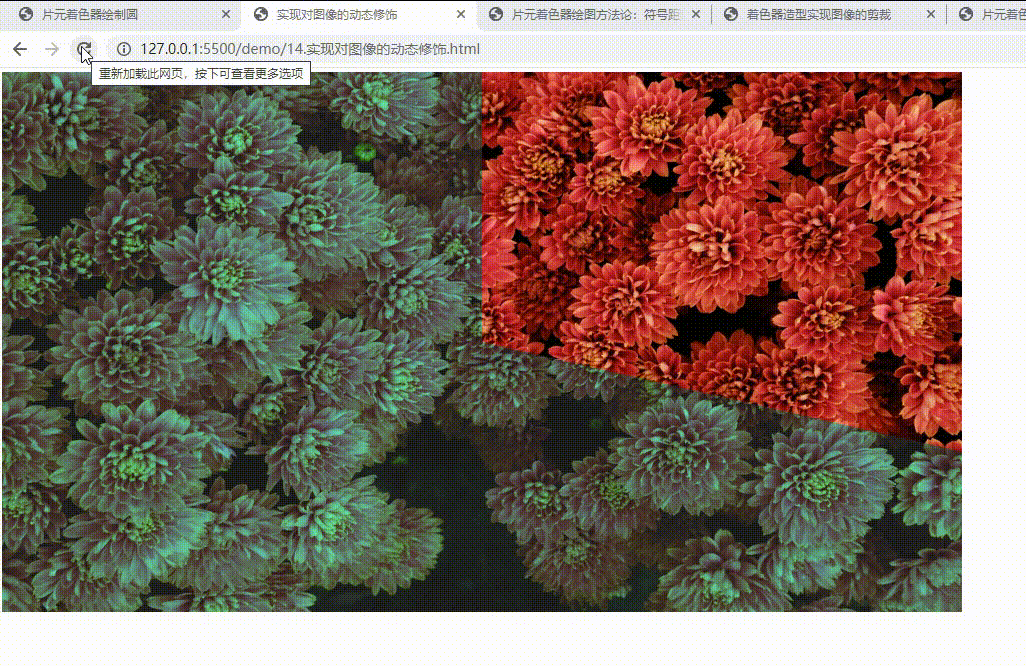
- 实现对图像的动态修饰
- 可以在一些 3D 场景中修饰几何体
实现图像的剪裁
<!DOCTYPE html>
<html lang="en"><head><meta charset="UTF-8" /><meta http-equiv="X-UA-Compatible" content="IE=edge" /><meta name="viewport" content="width=device-width, initial-scale=1.0" /><title>着色器造型实现图像的剪裁</title>
</head><body><canvas width="1920" height="1080"></canvas><script src="./common/lib/gl-renderer.js"></script><script>const vertex = `attribute vec2 a_vertexPosition;attribute vec2 uv;varying vec2 vUv;void main() {gl_PointSize = 1.0;vUv = uv;gl_Position = vec4(a_vertexPosition, 1, 1);}`;const fragment = `#ifdef GL_ESprecision highp float;#endifvarying vec2 vUv;uniform sampler2D tMap;uniform float uTime;float line_distance(in vec2 st, in vec2 a, in vec2 b) {vec3 ab = vec3(b - a, 0);vec3 p = vec3(st - a, 0);float l = length(ab);return cross(p, normalize(ab)).z;}float seg_distance(in vec2 st, in vec2 a, in vec2 b) {vec3 ab = vec3(b - a, 0);vec3 p = vec3(st - a, 0);float l = length(ab);float d = abs(cross(p, normalize(ab)).z);float proj = dot(p, ab) / l;if(proj >= 0.0 && proj <= l) return d;return min(distance(st, a), distance(st, b));}float triangle_distance(in vec2 st, in vec2 a, in vec2 b, in vec2 c) {float d1 = line_distance(st, a, b);float d2 = line_distance(st, b, c);float d3 = line_distance(st, c, a);if(d1 >= 0.0 && d2 >= 0.0 && d3 >= 0.0 || d1 <= 0.0 && d2 <= 0.0 && d3 <= 0.0) {return -min(abs(d1), min(abs(d2), abs(d3))); // 内部距离为负}return min(seg_distance(st, a, b), min(seg_distance(st, b, c), seg_distance(st, c, a))); // 外部为正}void main() {vec4 color = texture2D(tMap, vUv);vec2 uv = vUv - vec2(0.5);vec2 a = vec2(-0.577, 0) - vec2(0.5);vec2 b = vec2(0.5, 1.866) - vec2(0.5);vec2 c = vec2(1.577, 0) - vec2(0.5);float scale = min(1.0, 0.0005 * uTime);float d = triangle_distance(uv, scale * a, scale * b, scale * c);gl_FragColor.rgb = (1.0 - smoothstep(0.0, 0.01, d)) * color.rgb;gl_FragColor.a = 1.0;}`;const canvas = document.querySelector('canvas');const renderer = new GlRenderer(canvas);// load fragment shader and createProgramconst program = renderer.compileSync(fragment, vertex);renderer.useProgram(program);(async function () {const texture = await renderer.loadTexture('./assets/img/flower.jpg');renderer.uniforms.tMap = texture;renderer.uniforms.uTime = 0;renderer.setMeshData([{positions: [[-1, -1],[-1, 1],[1, 1],[1, -1],],attributes: {uv: [[0, 0],[0, 1],[1, 1],[1, 0],],},cells: [[0, 1, 2], [2, 0, 3]],}]);renderer.render();function update(t) {renderer.uniforms.uTime = t / 2;requestAnimationFrame(update);}update(0);}());</script></script>
</body></html>

实现对图像的动态修饰
<!DOCTYPE html>
<html lang="en"><head><meta charset="UTF-8" /><meta http-equiv="X-UA-Compatible" content="IE=edge" /><meta name="viewport" content="width=device-width, initial-scale=1.0" /><title>实现对图像的动态修饰</title>
</head><body><canvas width="1920" height="1080"></canvas><script src="./common/lib/gl-renderer.js"></script><script>const vertex = `attribute vec2 a_vertexPosition;attribute vec2 uv;varying vec2 vUv;void main() {gl_PointSize = 1.0;vUv = uv;gl_Position = vec4(a_vertexPosition, 1, 1);}`;const fragment = `#ifdef GL_ESprecision highp float;#endifvarying vec2 vUv;uniform sampler2D tMap;uniform float uTime;float line_distance(in vec2 st, in vec2 a, in vec2 b) {vec3 ab = vec3(b - a, 0);vec3 p = vec3(st - a, 0);float l = length(ab);return cross(p, normalize(ab)).z;}float seg_distance(in vec2 st, in vec2 a, in vec2 b) {vec3 ab = vec3(b - a, 0);vec3 p = vec3(st - a, 0);float l = length(ab);float d = abs(cross(p, normalize(ab)).z);float proj = dot(p, ab) / l;if(proj >= 0.0 && proj <= l) return d;return min(distance(st, a), distance(st, b));}float triangle_distance(in vec2 st, in vec2 a, in vec2 b, in vec2 c) {float d1 = line_distance(st, a, b);float d2 = line_distance(st, b, c);float d3 = line_distance(st, c, a);if(d1 >= 0.0 && d2 >= 0.0 && d3 >= 0.0 || d1 <= 0.0 && d2 <= 0.0 && d3 <= 0.0) {return -min(abs(d1), min(abs(d2), abs(d3))); // 内部距离为负}return min(seg_distance(st, a, b), min(seg_distance(st, b, c), seg_distance(st, c, a))); // 外部为正}void main() {vec4 color = texture2D(tMap, vUv);vec2 uv = vUv - vec2(0.5);vec2 a = vec2(0, 1);float time = 0.0005 * uTime;vec2 b = vec2(sin(time), cos(time));float d = 0.0;float c0 = cross(vec3(b, 0.0), vec3(a, 0.0)).z;float c1 = cross(vec3(uv, 0.0), vec3(a, 0.0)).z;float c2 = cross(vec3(uv, 0.0), vec3(b, 0.0)).z;if(c0 > 0.0 && c1 > 0.0 && c2 < 0.0) {d = 1.0;}if(c0 < 0.0 && (c1 >= 0.0 || c2 <= 0.0)) {d = 1.0;}gl_FragColor.rgb = color.rgb;gl_FragColor.r *= mix(0.3, 1.0, d);gl_FragColor.a = mix(0.9, 1.0, d);}`;const canvas = document.querySelector('canvas');const renderer = new GlRenderer(canvas);// load fragment shader and createProgramconst program = renderer.compileSync(fragment, vertex);renderer.useProgram(program);(async function () {const texture = await renderer.loadTexture('./assets/img/flower.jpg');renderer.uniforms.tMap = texture;renderer.uniforms.uTime = 0;renderer.setMeshData([{positions: [[-1, -1],[-1, 1],[1, 1],[1, -1],],attributes: {uv: [[0, 0],[0, 1],[1, 1],[1, 0],],},cells: [[0, 1, 2], [2, 0, 3]],}]);renderer.render();function update(t) {renderer.uniforms.uTime = 2*t;requestAnimationFrame(update);}update(0);}());</script></script>
</body></html>
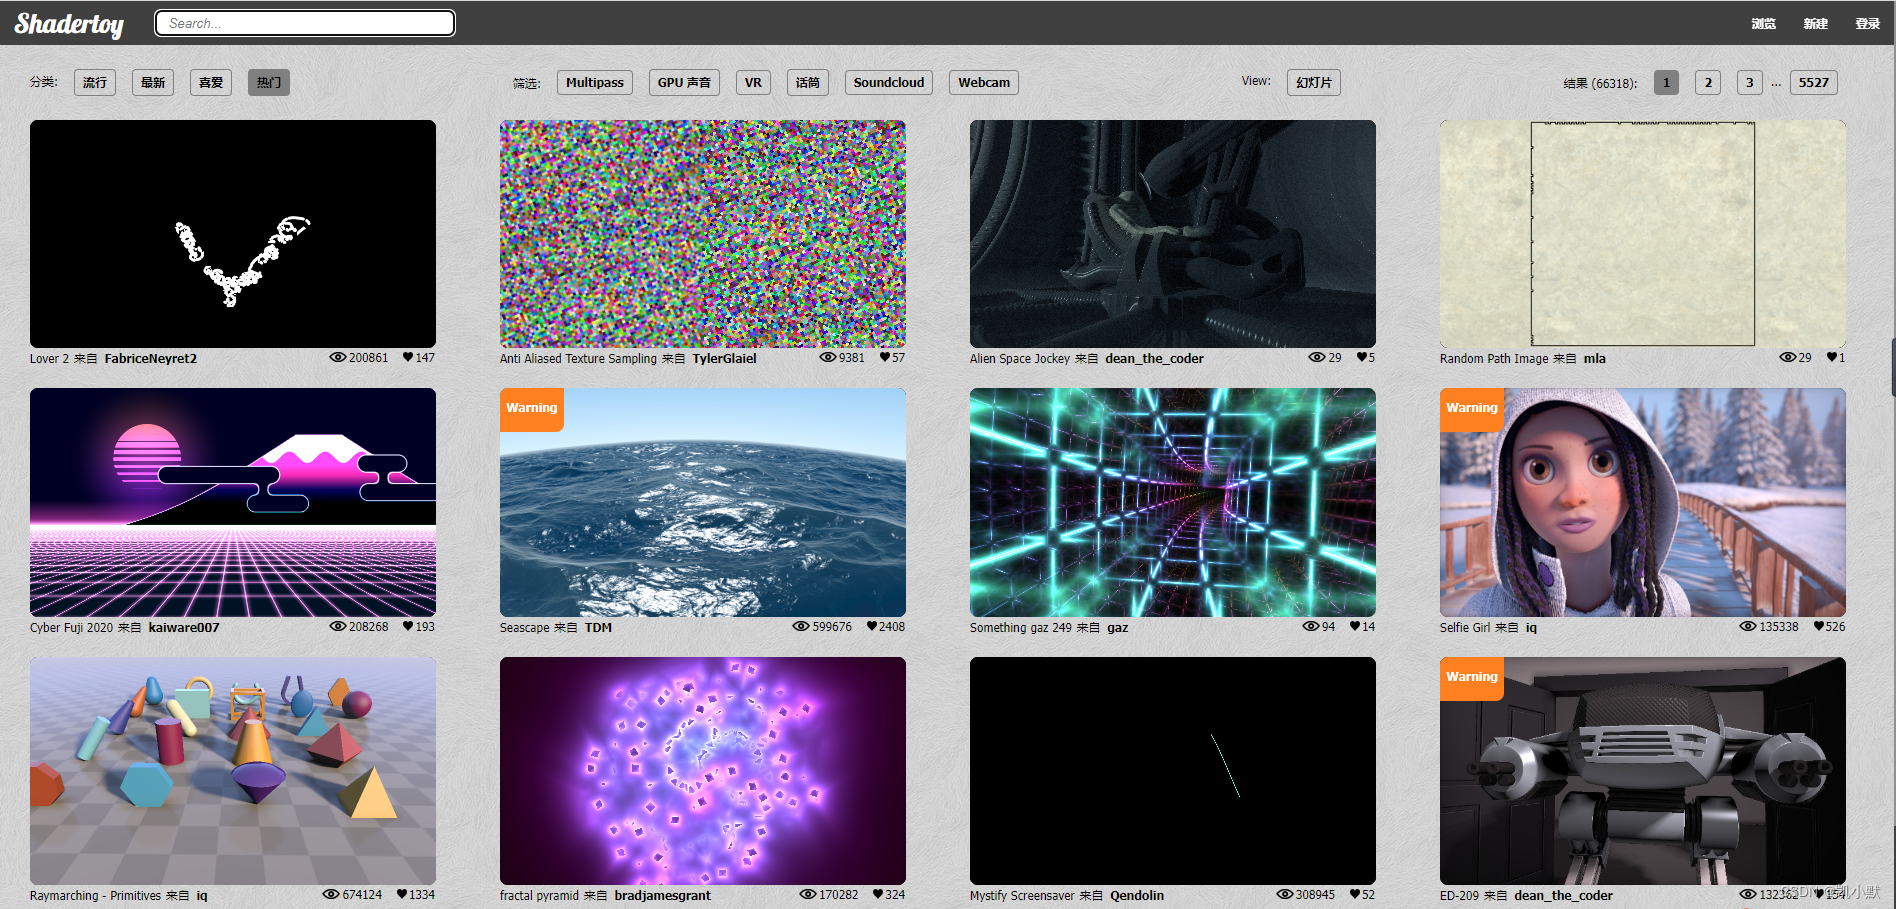
推荐网址
- 构建和分享世界上你最喜欢的着色器并受启发:shadertoy