一、引言
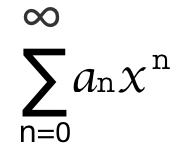
本文将解析activity加载布局文件的setContentView源码,由于会涉及到部分activity的启动流程,这里附上一张activity启动流程图:

关于 setContentView 源码分两种情况,因为我们的 activity 有两个:
一种是继承自 Activity(来自sdk: android.app);另一种是继承自AppCompatActivity (来自support库:如androidx.appcompat.app),而这种的本质也是在 Activity 基础上的扩展,所以先看 Activity。这里的activity指的是根activity,而不是我们通常使用的应用activity。
二. Activity 的 setContentView
1.整体流程
在图中我们看到第8步:ActivityThread 调用 handleLaunchActivity() 方法,执行 Activity 的oncreate() 方法,而我们的 xml布局文件就是在oncreate()中通过:setContentView(R.layout.activity_main); 来加载的。下面就去看一下其内部如何实现的。
(看源码的时候,我们习惯倒着或向上或向内部一步步去追踪代码,这里我们反着以正向来分析)
首先看 ActivityThread 的 handleLaunchActivity() 方法:
/*** Extended implementation of activity launch. Used when server requests a launch or relaunch.*/@Overridepublic Activity handleLaunchActivity(ActivityClientRecord r,PendingTransactionActions pendingActions, Intent customIntent) {// If we are getting ready to gc after going to the background, well// we are back active so skip it.unscheduleGcIdler();mSomeActivitiesChanged = true;if (r.profilerInfo != null) {mProfiler.setProfiler(r.profilerInfo);mProfiler.startProfiling();}// Make sure we are running with the most recent config.handleConfigurationChanged(null, null);if (localLOGV) Slog.v(TAG, "Handling launch of " + r);// Initialize before creating the activityif (!ThreadedRenderer.sRendererDisabled) {GraphicsEnvironment.earlyInitEGL();}WindowManagerGlobal.initialize();final Activity a = performLaunchActivity(r, customIntent);if (a != null) {r.createdConfig = new Configuration(mConfiguration);reportSizeConfigurations(r);if (!r.activity.mFinished && pendingActions != null) {pendingActions.setOldState(r.state);pendingActions.setRestoreInstanceState(true);pendingActions.setCallOnPostCreate(true);}} else {// If there was an error, for any reason, tell the activity manager to stop us.try {ActivityManager.getService().finishActivity(r.token, Activity.RESULT_CANCELED, null,Activity.DONT_FINISH_TASK_WITH_ACTIVITY);} catch (RemoteException ex) {throw ex.rethrowFromSystemServer();}}return a;}
代码简单来说,就是通过 performLaunchActivity()创建了一个activity,然后返回。去看看他如何创建activity:
/** Core implementation of activity launch. */private Activity performLaunchActivity(ActivityClientRecord r, Intent customIntent) {ActivityInfo aInfo = r.activityInfo;if (r.packageInfo == null) {r.packageInfo = getPackageInfo(aInfo.applicationInfo, r.compatInfo,Context.CONTEXT_INCLUDE_CODE);}ComponentName component = r.intent.getComponent();if (component == null) {component = r.intent.resolveActivity(mInitialApplication.getPackageManager());r.intent.setComponent(component);}if (r.activityInfo.targetActivity != null) {component = new ComponentName(r.activityInfo.packageName,r.activityInfo.targetActivity);}ContextImpl appContext = createBaseContextForActivity(r);Activity activity = null;try {java.lang.ClassLoader cl = appContext.getClassLoader();activity = mInstrumentation.newActivity(cl, component.getClassName(), r.intent);StrictMode.incrementExpectedActivityCount(activity.getClass());r.intent.setExtrasClassLoader(cl);r.intent.prepareToEnterProcess();if (r.state != null) {r.state.setClassLoader(cl);}} catch (Exception e) {if (!mInstrumentation.onException(activity, e)) {throw new RuntimeException("Unable to instantiate activity " + component+ ": " + e.toString(), e);}}try {Application app = r.packageInfo.makeApplication(false, mInstrumentation);if (localLOGV) Slog.v(TAG, "Performing launch of " + r);if (localLOGV) Slog.v(TAG, r + ": app=" + app+ ", appName=" + app.getPackageName()+ ", pkg=" + r.packageInfo.getPackageName()+ ", comp=" + r.intent.getComponent().toShortString()+ ", dir=" + r.packageInfo.getAppDir());if (activity != null) {CharSequence title = r.activityInfo.loadLabel(appContext.getPackageManager());Configuration config = new Configuration(mCompatConfiguration);if (r.overrideConfig != null) {config.updateFrom(r.overrideConfig);}if (DEBUG_CONFIGURATION) Slog.v(TAG, "Launching activity "+ r.activityInfo.name + " with config " + config);Window window = null;if (r.mPendingRemoveWindow != null && r.mPreserveWindow) {window = r.mPendingRemoveWindow;r.mPendingRemoveWindow = null;r.mPendingRemoveWindowManager = null;}appContext.setOuterContext(activity);activity.attach(appContext, this, getInstrumentation(), r.token,r.ident, app, r.intent, r.activityInfo, title, r.parent,r.embeddedID, r.lastNonConfigurationInstances, config,r.referrer, r.voiceInteractor, window, r.configCallback);if (customIntent != null) {activity.mIntent = customIntent;}r.lastNonConfigurationInstances = null;checkAndBlockForNetworkAccess();activity.mStartedActivity = false;int theme = r.activityInfo.getThemeResource();if (theme != 0) {activity.setTheme(theme);}activity.mCalled = false;if (r.isPersistable()) {mInstrumentation.callActivityOnCreate(activity, r.state, r.persistentState);} else {mInstrumentation.callActivityOnCreate(activity, r.state);}if (!activity.mCalled) {throw new SuperNotCalledException("Activity " + r.intent.getComponent().toShortString() +" did not call through to super.onCreate()");}r.activity = activity;}r.setState(ON_CREATE);mActivities.put(r.token, r);} catch (SuperNotCalledException e) {throw e;} catch (Exception e) {if (!mInstrumentation.onException(activity, e)) {throw new RuntimeException("Unable to start activity " + component+ ": " + e.toString(), e);}}return activity;}总的来说就是通过反射创建了activity,然后执行了activity的attach方法(在attach方法中初始化了 PhoneWindow ),再然后回调activity的onCreate方法,在oncreate方法中再通过PhoneWindow 的 setContentView 方法加载布局。
2. activity的attach方法
内部初始化了 mWindow :
final void attach(Context context, ActivityThread aThread,Instrumentation instr, IBinder token, int ident,Application application, Intent intent, ActivityInfo info,CharSequence title, Activity parent, String id,NonConfigurationInstances lastNonConfigurationInstances,Configuration config, String referrer, IVoiceInteractor voiceInteractor,Window window, ActivityConfigCallback activityConfigCallback) {attachBaseContext(context);mFragments.attachHost(null /*parent*/);// 初始化 mWindow mWindow = new PhoneWindow(this, window, activityConfigCallback);mWindow.setWindowControllerCallback(this);mWindow.setCallback(this);mWindow.setOnWindowDismissedCallback(this);mWindow.getLayoutInflater().setPrivateFactory(this);if (info.softInputMode != WindowManager.LayoutParams.SOFT_INPUT_STATE_UNSPECIFIED) {mWindow.setSoftInputMode(info.softInputMode);}if (info.uiOptions != 0) {mWindow.setUiOptions(info.uiOptions);}mUiThread = Thread.currentThread();mMainThread = aThread;mInstrumentation = instr;mToken = token;mIdent = ident;mApplication = application;mIntent = intent;mReferrer = referrer;mComponent = intent.getComponent();mActivityInfo = info;mTitle = title;mParent = parent;mEmbeddedID = id;mLastNonConfigurationInstances = lastNonConfigurationInstances;if (voiceInteractor != null) {if (lastNonConfigurationInstances != null) {mVoiceInteractor = lastNonConfigurationInstances.voiceInteractor;} else {mVoiceInteractor = new VoiceInteractor(voiceInteractor, this, this,Looper.myLooper());}}mWindow.setWindowManager((WindowManager)context.getSystemService(Context.WINDOW_SERVICE),mToken, mComponent.flattenToString(),(info.flags & ActivityInfo.FLAG_HARDWARE_ACCELERATED) != 0);if (mParent != null) {mWindow.setContainer(mParent.getWindow());}mWindowManager = mWindow.getWindowManager();mCurrentConfig = config;mWindow.setColorMode(info.colorMode);setAutofillCompatibilityEnabled(application.isAutofillCompatibilityEnabled());enableAutofillCompatibilityIfNeeded();}performLaunchActivity()中回调activity的onCreate方法
if (r.isPersistable()) {mInstrumentation.callActivityOnCreate(activity, r.state, r.persistentState);
} else {mInstrumentation.callActivityOnCreate(activity, r.state);
}
mInstrumentation的callActivityOnCreate方法(关于mInstrumentation单独去学习):
/*** Perform calling of an activity's {@link Activity#onCreate}* method. The default implementation simply calls through to that method.* @param activity The activity being created.* @param icicle The previously frozen state (or null) to pass through to* @param persistentState The previously persisted state (or null)*/public void callActivityOnCreate(Activity activity, Bundle icicle,PersistableBundle persistentState) {prePerformCreate(activity);activity.performCreate(icicle, persistentState);postPerformCreate(activity);}callActivityOnCreate 中的 performCreate 方法:
final void performCreate(Bundle icicle) {performCreate(icicle, null);}final void performCreate(Bundle icicle, PersistableBundle persistentState) {mCanEnterPictureInPicture = true;restoreHasCurrentPermissionRequest(icicle);if (persistentState != null) {onCreate(icicle, persistentState);} else {onCreate(icicle);}writeEventLog(LOG_AM_ON_CREATE_CALLED, "performCreate");mActivityTransitionState.readState(icicle);mVisibleFromClient = !mWindow.getWindowStyle().getBoolean(com.android.internal.R.styleable.Window_windowNoDisplay, false);mFragments.dispatchActivityCreated();mActivityTransitionState.setEnterActivityOptions(this, getActivityOptions());}然后在activity的oncreate方法中去调用 setContentView方法,这是 onCreate 的注释:
Called when the activity is starting.  This is where most initialization
should go: calling {@link #setContentView(int)} to inflate the
activity's UI, using {@link #findViewById} to programmatically interact
with widgets in the UI, calling
{@link #managedQuery(android.net.Uri , String[], String, String[], String)} to retrievecursors for data being displayed, etc.
3. 去看 activity 的 setContentView 方法(注意我们看的是参数为int的方法):
/*** Set the activity content from a layout resource. The resource will be* inflated, adding all top-level views to the activity.** @param layoutResID Resource ID to be inflated.** @see #setContentView(android.view.View)* @see #setContentView(android.view.View, android.view.ViewGroup.LayoutParams)*/public void setContentView(@LayoutRes int layoutResID) {getWindow().setContentView(layoutResID);initWindowDecorActionBar();}/*** Set the activity content to an explicit view. This view is placed* directly into the activity's view hierarchy. It can itself be a complex* view hierarchy. When calling this method, the layout parameters of the* specified view are ignored. Both the width and the height of the view are* set by default to {@link ViewGroup.LayoutParams#MATCH_PARENT}. To use* your own layout parameters, invoke* {@link #setContentView(android.view.View, android.view.ViewGroup.LayoutParams)}* instead.** @param view The desired content to display.** @see #setContentView(int)* @see #setContentView(android.view.View, android.view.ViewGroup.LayoutParams)*/public void setContentView(View view) {getWindow().setContentView(view);initWindowDecorActionBar();}/*** Set the activity content to an explicit view. This view is placed* directly into the activity's view hierarchy. It can itself be a complex* view hierarchy.** @param view The desired content to display.* @param params Layout parameters for the view.** @see #setContentView(android.view.View)* @see #setContentView(int)*/public void setContentView(View view, ViewGroup.LayoutParams params) {getWindow().setContentView(view, params);initWindowDecorActionBar();}这个 getWindow() 就是在attach方法中初始化的PhoneWindow对象,那去PhoneWindow看下他的 setContentView 方法:
@Overridepublic void setContentView(int layoutResID) {// Note: FEATURE_CONTENT_TRANSITIONS may be set in the process of installing the window// decor, when theme attributes and the like are crystalized. Do not check the feature// before this happens.if (mContentParent == null) {installDecor();} else if (!hasFeature(FEATURE_CONTENT_TRANSITIONS)) {mContentParent.removeAllViews();}if (hasFeature(FEATURE_CONTENT_TRANSITIONS)) {final Scene newScene = Scene.getSceneForLayout(mContentParent, layoutResID,getContext());transitionTo(newScene);} else {mLayoutInflater.inflate(layoutResID, mContentParent);}mContentParent.requestApplyInsets();final Callback cb = getCallback();if (cb != null && !isDestroyed()) {cb.onContentChanged();}mContentParentExplicitlySet = true;}他内部主要做了这几件事:
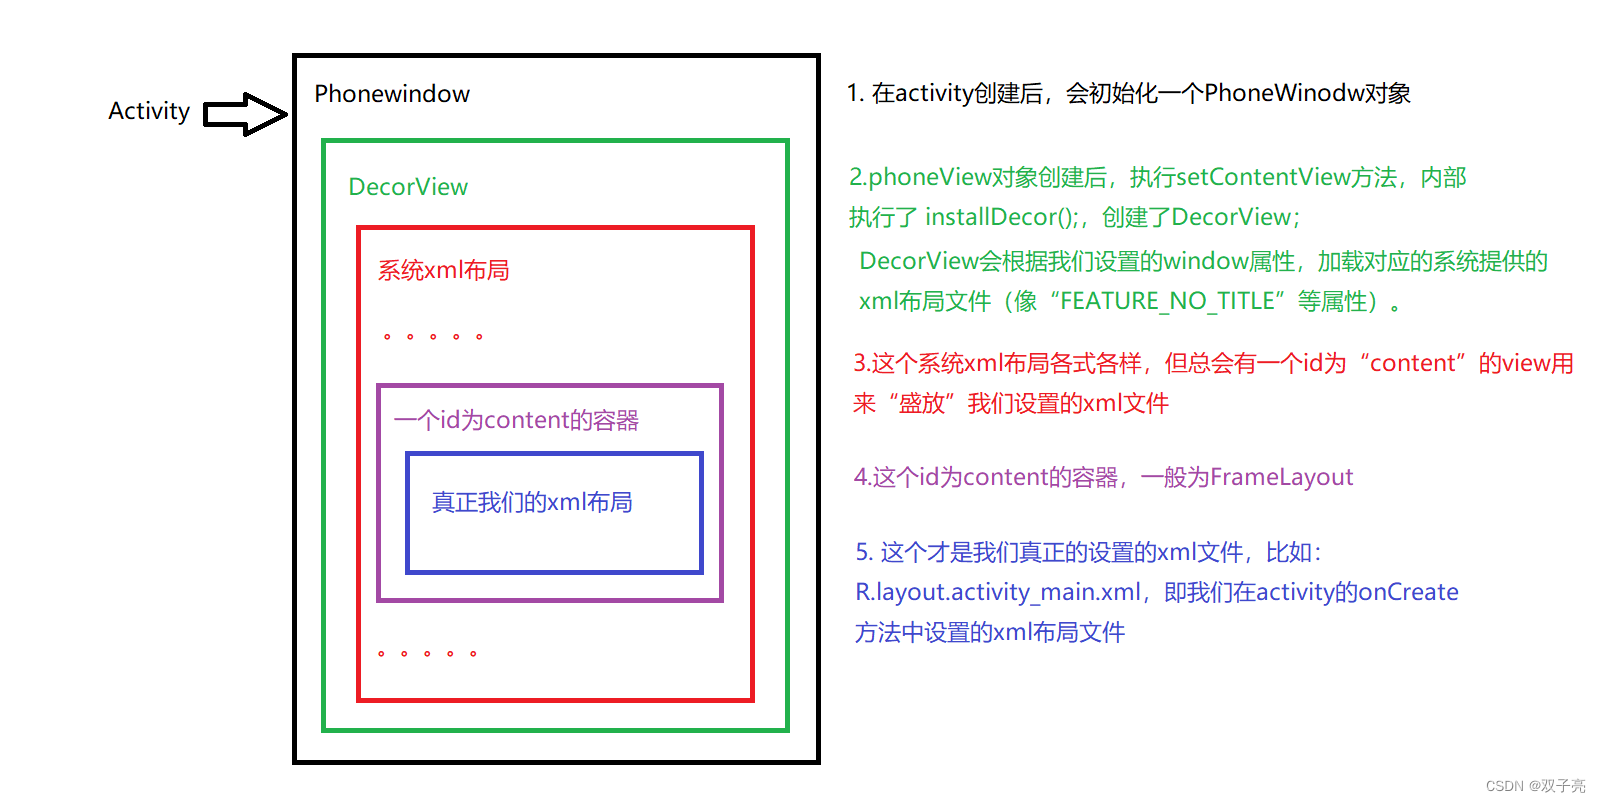
1. 创建 DecorView,拿到 mContentParent: installDecor();
2. 将我们的界面xml渲染到mContentParent :
mLayoutInflater.inflate(layoutResID, mContentParent);
3.将mContentParentExplicitlySet 置为 true(这个重要,下面会有解释)
3.1 下面一个一个进去看看:首先是 installDecor();
private void installDecor() {mForceDecorInstall = false;if (mDecor == null) {mDecor = generateDecor(-1);mDecor.setDescendantFocusability(ViewGroup.FOCUS_AFTER_DESCENDANTS);mDecor.setIsRootNamespace(true);if (!mInvalidatePanelMenuPosted && mInvalidatePanelMenuFeatures != 0) {mDecor.postOnAnimation(mInvalidatePanelMenuRunnable);}} else {mDecor.setWindow(this);}if (mContentParent == null) {mContentParent = generateLayout(mDecor);// Set up decor part of UI to ignore fitsSystemWindows if appropriate.mDecor.makeOptionalFitsSystemWindows();final DecorContentParent decorContentParent = (DecorContentParent) mDecor.findViewById(R.id.decor_content_parent);if (decorContentParent != null) {mDecorContentParent = decorContentParent;mDecorContentParent.setWindowCallback(getCallback());if (mDecorContentParent.getTitle() == null) {mDecorContentParent.setWindowTitle(mTitle);}final int localFeatures = getLocalFeatures();for (int i = 0; i < FEATURE_MAX; i++) {if ((localFeatures & (1 << i)) != 0) {mDecorContentParent.initFeature(i);}}mDecorContentParent.setUiOptions(mUiOptions);if ((mResourcesSetFlags & FLAG_RESOURCE_SET_ICON) != 0 ||(mIconRes != 0 && !mDecorContentParent.hasIcon())) {mDecorContentParent.setIcon(mIconRes);} else if ((mResourcesSetFlags & FLAG_RESOURCE_SET_ICON) == 0 &&mIconRes == 0 && !mDecorContentParent.hasIcon()) {mDecorContentParent.setIcon(getContext().getPackageManager().getDefaultActivityIcon());mResourcesSetFlags |= FLAG_RESOURCE_SET_ICON_FALLBACK;}if ((mResourcesSetFlags & FLAG_RESOURCE_SET_LOGO) != 0 ||(mLogoRes != 0 && !mDecorContentParent.hasLogo())) {mDecorContentParent.setLogo(mLogoRes);}// Invalidate if the panel menu hasn't been created before this.// Panel menu invalidation is deferred avoiding application onCreateOptionsMenu// being called in the middle of onCreate or similar.// A pending invalidation will typically be resolved before the posted message// would run normally in order to satisfy instance state restoration.PanelFeatureState st = getPanelState(FEATURE_OPTIONS_PANEL, false);if (!isDestroyed() && (st == null || st.menu == null) && !mIsStartingWindow) {invalidatePanelMenu(FEATURE_ACTION_BAR);}} else {mTitleView = findViewById(R.id.title);if (mTitleView != null) {if ((getLocalFeatures() & (1 << FEATURE_NO_TITLE)) != 0) {final View titleContainer = findViewById(R.id.title_container);if (titleContainer != null) {titleContainer.setVisibility(View.GONE);} else {mTitleView.setVisibility(View.GONE);}mContentParent.setForeground(null);} else {mTitleView.setText(mTitle);}}}if (mDecor.getBackground() == null && mBackgroundFallbackResource != 0) {mDecor.setBackgroundFallback(mBackgroundFallbackResource);}// Only inflate or create a new TransitionManager if the caller hasn't// already set a custom one.if (hasFeature(FEATURE_ACTIVITY_TRANSITIONS)) {if (mTransitionManager == null) {final int transitionRes = getWindowStyle().getResourceId(R.styleable.Window_windowContentTransitionManager,0);if (transitionRes != 0) {final TransitionInflater inflater = TransitionInflater.from(getContext());mTransitionManager = inflater.inflateTransitionManager(transitionRes,mContentParent);} else {mTransitionManager = new TransitionManager();}}mEnterTransition = getTransition(mEnterTransition, null,R.styleable.Window_windowEnterTransition);mReturnTransition = getTransition(mReturnTransition, USE_DEFAULT_TRANSITION,R.styleable.Window_windowReturnTransition);mExitTransition = getTransition(mExitTransition, null,R.styleable.Window_windowExitTransition);mReenterTransition = getTransition(mReenterTransition, USE_DEFAULT_TRANSITION,R.styleable.Window_windowReenterTransition);mSharedElementEnterTransition = getTransition(mSharedElementEnterTransition, null,R.styleable.Window_windowSharedElementEnterTransition);mSharedElementReturnTransition = getTransition(mSharedElementReturnTransition,USE_DEFAULT_TRANSITION,R.styleable.Window_windowSharedElementReturnTransition);mSharedElementExitTransition = getTransition(mSharedElementExitTransition, null,R.styleable.Window_windowSharedElementExitTransition);mSharedElementReenterTransition = getTransition(mSharedElementReenterTransition,USE_DEFAULT_TRANSITION,R.styleable.Window_windowSharedElementReenterTransition);if (mAllowEnterTransitionOverlap == null) {mAllowEnterTransitionOverlap = getWindowStyle().getBoolean(R.styleable.Window_windowAllowEnterTransitionOverlap, true);}if (mAllowReturnTransitionOverlap == null) {mAllowReturnTransitionOverlap = getWindowStyle().getBoolean(R.styleable.Window_windowAllowReturnTransitionOverlap, true);}if (mBackgroundFadeDurationMillis < 0) {mBackgroundFadeDurationMillis = getWindowStyle().getInteger(R.styleable.Window_windowTransitionBackgroundFadeDuration,DEFAULT_BACKGROUND_FADE_DURATION_MS);}if (mSharedElementsUseOverlay == null) {mSharedElementsUseOverlay = getWindowStyle().getBoolean(R.styleable.Window_windowSharedElementsUseOverlay, true);}}}}里面重点看两个方法:
mDecor = generateDecor(-1); 和 mContentParent = generateLayout(mDecor);
protected DecorView generateDecor(int featureId) {// System process doesn't have application context and in that case we need to directly use// the context we have. Otherwise we want the application context, so we don't cling to the// activity.Context context;if (mUseDecorContext) {Context applicationContext = getContext().getApplicationContext();if (applicationContext == null) {context = getContext();} else {context = new DecorContext(applicationContext, getContext());if (mTheme != -1) {context.setTheme(mTheme);}}} else {context = getContext();}return new DecorView(context, featureId, this, getAttributes());}
创建了DecorView,然后返回。
protected ViewGroup generateLayout(DecorView decor) {// Apply data from current theme.TypedArray a = getWindowStyle();if (false) {System.out.println("From style:");String s = "Attrs:";for (int i = 0; i < R.styleable.Window.length; i++) {s = s + " " + Integer.toHexString(R.styleable.Window[i]) + "="+ a.getString(i);}System.out.println(s);}mIsFloating = a.getBoolean(R.styleable.Window_windowIsFloating, false);int flagsToUpdate = (FLAG_LAYOUT_IN_SCREEN|FLAG_LAYOUT_INSET_DECOR)& (~getForcedWindowFlags());if (mIsFloating) {setLayout(WRAP_CONTENT, WRAP_CONTENT);setFlags(0, flagsToUpdate);} else {setFlags(FLAG_LAYOUT_IN_SCREEN|FLAG_LAYOUT_INSET_DECOR, flagsToUpdate);}if (a.getBoolean(R.styleable.Window_windowNoTitle, false)) {requestFeature(FEATURE_NO_TITLE);} else if (a.getBoolean(R.styleable.Window_windowActionBar, false)) {// Don't allow an action bar if there is no title.requestFeature(FEATURE_ACTION_BAR);}if (a.getBoolean(R.styleable.Window_windowActionBarOverlay, false)) {requestFeature(FEATURE_ACTION_BAR_OVERLAY);}if (a.getBoolean(R.styleable.Window_windowActionModeOverlay, false)) {requestFeature(FEATURE_ACTION_MODE_OVERLAY);}if (a.getBoolean(R.styleable.Window_windowSwipeToDismiss, false)) {requestFeature(FEATURE_SWIPE_TO_DISMISS);}if (a.getBoolean(R.styleable.Window_windowFullscreen, false)) {setFlags(FLAG_FULLSCREEN, FLAG_FULLSCREEN & (~getForcedWindowFlags()));}if (a.getBoolean(R.styleable.Window_windowTranslucentStatus,false)) {setFlags(FLAG_TRANSLUCENT_STATUS, FLAG_TRANSLUCENT_STATUS& (~getForcedWindowFlags()));}if (a.getBoolean(R.styleable.Window_windowTranslucentNavigation,false)) {setFlags(FLAG_TRANSLUCENT_NAVIGATION, FLAG_TRANSLUCENT_NAVIGATION& (~getForcedWindowFlags()));}if (a.getBoolean(R.styleable.Window_windowOverscan, false)) {setFlags(FLAG_LAYOUT_IN_OVERSCAN, FLAG_LAYOUT_IN_OVERSCAN&(~getForcedWindowFlags()));}if (a.getBoolean(R.styleable.Window_windowShowWallpaper, false)) {setFlags(FLAG_SHOW_WALLPAPER, FLAG_SHOW_WALLPAPER&(~getForcedWindowFlags()));}if (a.getBoolean(R.styleable.Window_windowEnableSplitTouch,getContext().getApplicationInfo().targetSdkVersion>= android.os.Build.VERSION_CODES.HONEYCOMB)) {setFlags(FLAG_SPLIT_TOUCH, FLAG_SPLIT_TOUCH&(~getForcedWindowFlags()));}a.getValue(R.styleable.Window_windowMinWidthMajor, mMinWidthMajor);a.getValue(R.styleable.Window_windowMinWidthMinor, mMinWidthMinor);if (DEBUG) Log.d(TAG, "Min width minor: " + mMinWidthMinor.coerceToString()+ ", major: " + mMinWidthMajor.coerceToString());if (a.hasValue(R.styleable.Window_windowFixedWidthMajor)) {if (mFixedWidthMajor == null) mFixedWidthMajor = new TypedValue();a.getValue(R.styleable.Window_windowFixedWidthMajor,mFixedWidthMajor);}if (a.hasValue(R.styleable.Window_windowFixedWidthMinor)) {if (mFixedWidthMinor == null) mFixedWidthMinor = new TypedValue();a.getValue(R.styleable.Window_windowFixedWidthMinor,mFixedWidthMinor);}if (a.hasValue(R.styleable.Window_windowFixedHeightMajor)) {if (mFixedHeightMajor == null) mFixedHeightMajor = new TypedValue();a.getValue(R.styleable.Window_windowFixedHeightMajor,mFixedHeightMajor);}if (a.hasValue(R.styleable.Window_windowFixedHeightMinor)) {if (mFixedHeightMinor == null) mFixedHeightMinor = new TypedValue();a.getValue(R.styleable.Window_windowFixedHeightMinor,mFixedHeightMinor);}if (a.getBoolean(R.styleable.Window_windowContentTransitions, false)) {requestFeature(FEATURE_CONTENT_TRANSITIONS);}if (a.getBoolean(R.styleable.Window_windowActivityTransitions, false)) {requestFeature(FEATURE_ACTIVITY_TRANSITIONS);}mIsTranslucent = a.getBoolean(R.styleable.Window_windowIsTranslucent, false);final Context context = getContext();final int targetSdk = context.getApplicationInfo().targetSdkVersion;final boolean targetPreHoneycomb = targetSdk < android.os.Build.VERSION_CODES.HONEYCOMB;final boolean targetPreIcs = targetSdk < android.os.Build.VERSION_CODES.ICE_CREAM_SANDWICH;final boolean targetPreL = targetSdk < android.os.Build.VERSION_CODES.LOLLIPOP;final boolean targetHcNeedsOptions = context.getResources().getBoolean(R.bool.target_honeycomb_needs_options_menu);final boolean noActionBar = !hasFeature(FEATURE_ACTION_BAR) || hasFeature(FEATURE_NO_TITLE);if (targetPreHoneycomb || (targetPreIcs && targetHcNeedsOptions && noActionBar)) {setNeedsMenuKey(WindowManager.LayoutParams.NEEDS_MENU_SET_TRUE);} else {setNeedsMenuKey(WindowManager.LayoutParams.NEEDS_MENU_SET_FALSE);}if (!mForcedStatusBarColor) {mStatusBarColor = a.getColor(R.styleable.Window_statusBarColor, 0xFF000000);}if (!mForcedNavigationBarColor) {mNavigationBarColor = a.getColor(R.styleable.Window_navigationBarColor, 0xFF000000);mNavigationBarDividerColor = a.getColor(R.styleable.Window_navigationBarDividerColor,0x00000000);}WindowManager.LayoutParams params = getAttributes();// Non-floating windows on high end devices must put up decor beneath the system bars and// therefore must know about visibility changes of those.if (!mIsFloating) {if (!targetPreL && a.getBoolean(R.styleable.Window_windowDrawsSystemBarBackgrounds,false)) {setFlags(FLAG_DRAWS_SYSTEM_BAR_BACKGROUNDS,FLAG_DRAWS_SYSTEM_BAR_BACKGROUNDS & ~getForcedWindowFlags());}if (mDecor.mForceWindowDrawsStatusBarBackground) {params.privateFlags |= PRIVATE_FLAG_FORCE_DRAW_STATUS_BAR_BACKGROUND;}}if (a.getBoolean(R.styleable.Window_windowLightStatusBar, false)) {decor.setSystemUiVisibility(decor.getSystemUiVisibility() | View.SYSTEM_UI_FLAG_LIGHT_STATUS_BAR);}if (a.getBoolean(R.styleable.Window_windowLightNavigationBar, false)) {decor.setSystemUiVisibility(decor.getSystemUiVisibility() | View.SYSTEM_UI_FLAG_LIGHT_NAVIGATION_BAR);}if (a.hasValue(R.styleable.Window_windowLayoutInDisplayCutoutMode)) {int mode = a.getInt(R.styleable.Window_windowLayoutInDisplayCutoutMode, -1);if (mode < LAYOUT_IN_DISPLAY_CUTOUT_MODE_DEFAULT|| mode > LAYOUT_IN_DISPLAY_CUTOUT_MODE_NEVER) {throw new UnsupportedOperationException("Unknown windowLayoutInDisplayCutoutMode: "+ a.getString(R.styleable.Window_windowLayoutInDisplayCutoutMode));}params.layoutInDisplayCutoutMode = mode;}if (mAlwaysReadCloseOnTouchAttr || getContext().getApplicationInfo().targetSdkVersion>= android.os.Build.VERSION_CODES.HONEYCOMB) {if (a.getBoolean(R.styleable.Window_windowCloseOnTouchOutside,false)) {setCloseOnTouchOutsideIfNotSet(true);}}if (!hasSoftInputMode()) {params.softInputMode = a.getInt(R.styleable.Window_windowSoftInputMode,params.softInputMode);}if (a.getBoolean(R.styleable.Window_backgroundDimEnabled,mIsFloating)) {/* All dialogs should have the window dimmed */if ((getForcedWindowFlags()&WindowManager.LayoutParams.FLAG_DIM_BEHIND) == 0) {params.flags |= WindowManager.LayoutParams.FLAG_DIM_BEHIND;}if (!haveDimAmount()) {params.dimAmount = a.getFloat(android.R.styleable.Window_backgroundDimAmount, 0.5f);}}if (params.windowAnimations == 0) {params.windowAnimations = a.getResourceId(R.styleable.Window_windowAnimationStyle, 0);}// The rest are only done if this window is not embedded; otherwise,// the values are inherited from our container.if (getContainer() == null) {if (mBackgroundDrawable == null) {if (mBackgroundResource == 0) {mBackgroundResource = a.getResourceId(R.styleable.Window_windowBackground, 0);}if (mFrameResource == 0) {mFrameResource = a.getResourceId(R.styleable.Window_windowFrame, 0);}mBackgroundFallbackResource = a.getResourceId(R.styleable.Window_windowBackgroundFallback, 0);if (false) {System.out.println("Background: "+ Integer.toHexString(mBackgroundResource) + " Frame: "+ Integer.toHexString(mFrameResource));}}if (mLoadElevation) {mElevation = a.getDimension(R.styleable.Window_windowElevation, 0);}mClipToOutline = a.getBoolean(R.styleable.Window_windowClipToOutline, false);mTextColor = a.getColor(R.styleable.Window_textColor, Color.TRANSPARENT);}// Inflate the window decor.int layoutResource;int features = getLocalFeatures();// System.out.println("Features: 0x" + Integer.toHexString(features));if ((features & (1 << FEATURE_SWIPE_TO_DISMISS)) != 0) {layoutResource = R.layout.screen_swipe_dismiss;setCloseOnSwipeEnabled(true);} else if ((features & ((1 << FEATURE_LEFT_ICON) | (1 << FEATURE_RIGHT_ICON))) != 0) {if (mIsFloating) {TypedValue res = new TypedValue();getContext().getTheme().resolveAttribute(R.attr.dialogTitleIconsDecorLayout, res, true);layoutResource = res.resourceId;} else {layoutResource = R.layout.screen_title_icons;}// XXX Remove this once action bar supports these features.removeFeature(FEATURE_ACTION_BAR);// System.out.println("Title Icons!");} else if ((features & ((1 << FEATURE_PROGRESS) | (1 << FEATURE_INDETERMINATE_PROGRESS))) != 0&& (features & (1 << FEATURE_ACTION_BAR)) == 0) {// Special case for a window with only a progress bar (and title).// XXX Need to have a no-title version of embedded windows.layoutResource = R.layout.screen_progress;// System.out.println("Progress!");} else if ((features & (1 << FEATURE_CUSTOM_TITLE)) != 0) {// Special case for a window with a custom title.// If the window is floating, we need a dialog layoutif (mIsFloating) {TypedValue res = new TypedValue();getContext().getTheme().resolveAttribute(R.attr.dialogCustomTitleDecorLayout, res, true);layoutResource = res.resourceId;} else {layoutResource = R.layout.screen_custom_title;}// XXX Remove this once action bar supports these features.removeFeature(FEATURE_ACTION_BAR);} else if ((features & (1 << FEATURE_NO_TITLE)) == 0) {// If no other features and not embedded, only need a title.// If the window is floating, we need a dialog layoutif (mIsFloating) {TypedValue res = new TypedValue();getContext().getTheme().resolveAttribute(R.attr.dialogTitleDecorLayout, res, true);layoutResource = res.resourceId;} else if ((features & (1 << FEATURE_ACTION_BAR)) != 0) {layoutResource = a.getResourceId(R.styleable.Window_windowActionBarFullscreenDecorLayout,R.layout.screen_action_bar);} else {layoutResource = R.layout.screen_title;}// System.out.println("Title!");} else if ((features & (1 << FEATURE_ACTION_MODE_OVERLAY)) != 0) {layoutResource = R.layout.screen_simple_overlay_action_mode;} else {// Embedded, so no decoration is needed.layoutResource = R.layout.screen_simple;// System.out.println("Simple!");}mDecor.startChanging();mDecor.onResourcesLoaded(mLayoutInflater, layoutResource);ViewGroup contentParent = (ViewGroup)findViewById(ID_ANDROID_CONTENT);if (contentParent == null) {throw new RuntimeException("Window couldn't find content container view");}if ((features & (1 << FEATURE_INDETERMINATE_PROGRESS)) != 0) {ProgressBar progress = getCircularProgressBar(false);if (progress != null) {progress.setIndeterminate(true);}}if ((features & (1 << FEATURE_SWIPE_TO_DISMISS)) != 0) {registerSwipeCallbacks(contentParent);}// Remaining setup -- of background and title -- that only applies// to top-level windows.if (getContainer() == null) {final Drawable background;if (mBackgroundResource != 0) {background = getContext().getDrawable(mBackgroundResource);} else {background = mBackgroundDrawable;}mDecor.setWindowBackground(background);final Drawable frame;if (mFrameResource != 0) {frame = getContext().getDrawable(mFrameResource);} else {frame = null;}mDecor.setWindowFrame(frame);mDecor.setElevation(mElevation);mDecor.setClipToOutline(mClipToOutline);if (mTitle != null) {setTitle(mTitle);}if (mTitleColor == 0) {mTitleColor = mTextColor;}setTitleColor(mTitleColor);}mDecor.finishChanging();return contentParent;}
代码长了点,实际也简单,
1.和我们自定义view有些相似,通过获取自定义属性来设置 mDecor 的状态。 像我们常设置的 “FEATURE_NO_TITLE” 就在这里,这也是我们要把这个属性设置在setContentView之前的原因:
setContentView 在加载布局时会通过 requestFeature() 加载我们设置的属性。
2. 把我们的xml布局文件添加到 decorView (decorView本质是一个FrameLayout):
mDecor.onResourcesLoaded(mLayoutInflater, layoutResource);
3.2 将界面的xml布局加载到mContentParent
mLayoutInflater.inflate(layoutResID, mContentParent);
3.3 将mContentParentExplicitlySet 置为 true
注意这个标记:mContentParentExplicitlySet 是“不能设置decorView属性”的一个标记,在 setContentView 完成后会把这个变量标记为true,之后再通过 requestFeature() 设置 window的属性会报错:requestFeature() must be called before adding content 。 如下:
if (mContentParentExplicitlySet) {throw new AndroidRuntimeException("requestFeature() must be called before adding content");} 他内部对标记:mContentParentExplicitlySet 做了一个判断。
所以我们平时想要隐藏标题栏需要将:
getWindow().requestFeature(Window.FEATURE_NO_TITLE);设置到 setContentView()之前的原因。
4.下面图示一下setContentView的整个流程:
三. AppCompatActivity的 setContentView