微服务 分片 运维管理
- 分片
- 分片的概念
- 分片案例环境搭建
- 案例改造成任务分片
- Dataflow类型调度
- 代码示例
- 运维管理
- 事件追踪
- 运维平台
- 搭建步骤
- 使用步骤
分片
分片的概念
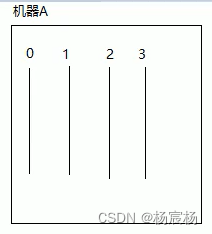
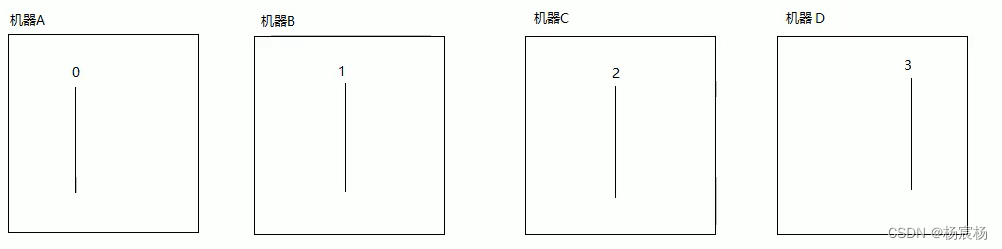
当只有一台机器的情况下,给定时任务分片四个,在机器A启动四个线程,分别处理四个分片的内容
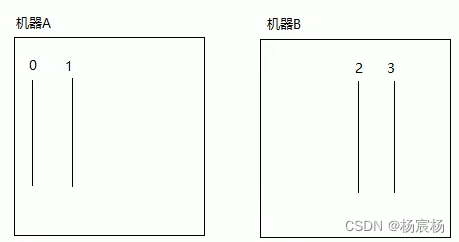
当有两台机器的情况下,分片由两个机器进行分配,机器A负责索引为0,1分片内容,机器B负责2,3分片内容
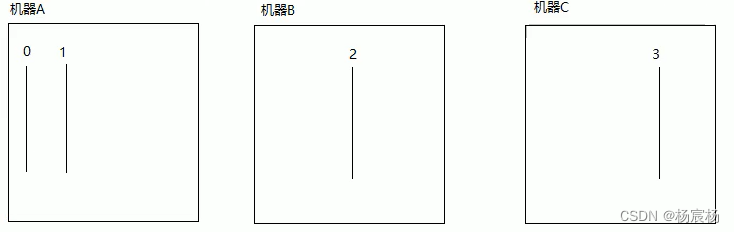
当有三台机器的时候,情况如图所示
当有四台机器的时候
当有五台机器的时候

当分片消耗资源少的时候,第一种情况和第二种情况没有太大区别,反之,如果消耗资源很大的时候,CPU的利用率效率会降低
分片数建议服务器个数倍数
分片案例环境搭建
案例需求
数据库中有一些列的数据,需要对这些数据进行备份操作,备份完之后,修改数据的状态,标记已经备份了
第一步:添加依赖
<dependency><groupId>com.alibaba</groupId><artifactId>druid</artifactId><version>1.1.10</version>
</dependency>
<dependency><groupId>org.mybatis.spring.boot</groupId><artifactId>mybatis-spring-boot-starter</artifactId><version>1.2.0</version>
</dependency>
<!--mysql驱动-->
<dependency><groupId>mysql</groupId><artifactId>mysql-connector-java</artifactId>
</dependency>
第二步:添加配置
spring:datasource:url: jdbc:mysql://localhost:3306/elastic-job-demo?serverTimezone=GMT%2B8driverClassName: com.mysql.cj.jdbc.Drivertype: com.alibaba.druid.pool.DruidDataSourceusername: rootpassword: 2022
第三步:添加实体类
@Datapublic class FileCustom {//唯⼀标识private Long id;//⽂件名private String name;//⽂件类型private String type;//⽂件内容private String content;//是否已备份private Boolean backedUp = false;public FileCustom(){}public FileCustom(Long id, String name, String type, String content){this.id = id;this.name = name;this.type = type;this.content = content;}}
第四步:添加任务类
@Autowiredprivate FileCustomMapper fileCustomMapper;@Overridepublic void execute(ShardingContext shardingContext) {doWork();}private void doWork() {//查询出所有的备份任务List<FileCustom> fileCustoms = fileCustomMapper.selectAll();for (FileCustom custom:fileCustoms){backUp(custom);}}private void backUp(FileCustom custom){System.out.println("备份的方法名:"+custom.getName()+"备份的类型:"+custom.getType());System.out.println("=======================");//模拟进行备份操作try {TimeUnit.SECONDS.sleep(1);} catch (InterruptedException e) {e.printStackTrace();}fileCustomMapper.changeState(custom.getId(),1);}}
第五步: 添加任务调度配置
@Bean(initMethod = "init")public SpringJobScheduler fileScheduler(FileCustomElasticjob job, CoordinatorRegistryCenter registryCenter){LiteJobConfiguration jobConfiguration = createJobConfiguration(job.getClass(),"0/5 * * * * ?",1);return new SpringJobScheduler(job,registryCenter,jobConfiguration);}
案例改造成任务分片
第一步:修改任务配置类
@Configurationpublic class JobConfig {@Beanpublic static CoordinatorRegistryCenter registryCenter(@Value("${zookeeper.url}") String url, @Value("${zookeeper.groupName}") String groupName) {ZookeeperConfiguration zookeeperConfiguration = new ZookeeperConfiguration(url, groupName);//设置节点超时时间zookeeperConfiguration.setSessionTimeoutMilliseconds(100);//zookeeperConfiguration("zookeeper地址","项目名")CoordinatorRegistryCenter regCenter = new ZookeeperRegistryCenter(zookeeperConfiguration);regCenter.init();return regCenter;}//功能的方法private static LiteJobConfiguration createJobConfiguration(Class clazz, String corn, int shardingCount,String shardingParam) {JobCoreConfiguration.Builder jobBuilder = JobCoreConfiguration.newBuilder(clazz.getSimpleName(), corn, shardingCount);if(!StringUtils.isEmpty(shardingParam)){jobBuilder.shardingItemParameters(shardingParam);}//定义作业核心配置newBuilder("任务名称","corn表达式","分片数量")JobCoreConfiguration simpleCoreConfig = jobBuilder.build();// 定义SIMPLE类型配置 cn.wolfcode.MyElasticJobSystem.out.println("MyElasticJob.class.getCanonicalName---->"+ MyElasticJob.class.getCanonicalName());SimpleJobConfiguration simpleJobConfig = new SimpleJobConfiguration(simpleCoreConfig,clazz.getCanonicalName());//定义Lite作业根配置LiteJobConfiguration simpleJobRootConfig = LiteJobConfiguration.newBuilder(simpleJobConfig).overwrite(true).build();return simpleJobRootConfig;}@Bean(initMethod = "init")public SpringJobScheduler fileScheduler(FileCustomElasticjob job, CoordinatorRegistryCenter registryCenter){LiteJobConfiguration jobConfiguration = createJobConfiguration(job.getClass(),"0/10 * * * * ?",4,"0=text,1=image,2=radio,3=vedio");return new SpringJobScheduler(job,registryCenter,jobConfiguration);}}
第二步:修改任务类
@Component@Slf4jpublic class FileCustomElasticjob implements SimpleJob {@Autowiredprivate FileCustomMapper fileCustomMapper;@Overridepublic void execute(ShardingContext shardingContext) {doWork(shardingContext.getShardingParameter());log.info("线程ID:{},任务的名称:{},任务的参数:{},分片个数:{},分片索引号:{},分片参数:{}",Thread.currentThread().getId(),shardingContext.getJobName(),shardingContext.getJobParameter(),shardingContext.getShardingTotalCount(),shardingContext.getShardingItem(),shardingContext.getShardingParameter());}private void doWork(String shardingParameter) {//查询出所有的备份任务List<FileCustom> fileCustoms = fileCustomMapper.selectByType(shardingParameter);for (FileCustom custom:fileCustoms){backUp(custom);}}private void backUp(FileCustom custom){System.out.println("备份的方法名:"+custom.getName()+"备份的类型:"+custom.getType());System.out.println("=======================");//模拟进行备份操作try {TimeUnit.SECONDS.sleep(1);} catch (InterruptedException e) {e.printStackTrace();}fileCustomMapper.changeState(custom.getId(),1);}}
第三步:修改Mapper映射文件
@Mapperpublic interface FileCustomMapper {@Select("select * from t_file_custom where backedUp = 0")List<FileCustom> selectAll();@Update("update t_file_custom set backedUp = #{state} where id = #{id}")int changeState(@Param("id") Long id, @Param("state")int state);@Select("select * from t_file_custom where backedUp = 0 and type = #{type}")List<FileCustom> selectByType(String shardingParameter);}
Dataflow类型调度
Dataflow类型的定时任务需要实现Dataflowjob接口,该接口提供2个方法供覆盖,分别用于抓取(fetchData)和处理( processData)数据,我们继续对例子进行改造。
Dataflow类型用于处理数据流,他和SimpleJob不同,它以数据流的方式执行,调用fetchData抓取数据,知道抓取不到数据才停止作业。
定时任务开始的时候,先抓取数据,判断数据是否为空,若不为空则进行处理数据
代码示例
第一步:创建任务类
@Componentpublic class FileDataflowJob implements DataflowJob<FileCustom> {@Autowiredprivate FileCustomMapper fileCustomMapper;//抓取数据@Overridepublic List<FileCustom> fetchData(ShardingContext shardingContext) {System.out.println("开始抓取数据......");List<FileCustom> fileCustoms = fileCustomMapper.selectLimit(2);return fileCustoms;}//处理数据@Overridepublic void processData(ShardingContext shardingContext, List<FileCustom> data) {for(FileCustom custom:data){backUp(custom);}}private void backUp(FileCustom custom){System.out.println("备份的方法名:"+custom.getName()+"备份的类型:"+custom.getType());System.out.println("=======================");//模拟进行备份操作try {TimeUnit.SECONDS.sleep(1);} catch (InterruptedException e) {e.printStackTrace();}fileCustomMapper.changeState(custom.getId(),1);}}
第二步:创建任务配置类
@Configurationpublic class JobConfig {@Beanpublic static CoordinatorRegistryCenter registryCenter(@Value("${zookeeper.url}") String url, @Value("${zookeeper.groupName}") String groupName) {ZookeeperConfiguration zookeeperConfiguration = new ZookeeperConfiguration(url, groupName);//设置节点超时时间zookeeperConfiguration.setSessionTimeoutMilliseconds(100);//zookeeperConfiguration("zookeeper地址","项目名")CoordinatorRegistryCenter regCenter = new ZookeeperRegistryCenter(zookeeperConfiguration);regCenter.init();return regCenter;}//功能的方法private static LiteJobConfiguration createJobConfiguration(Class clazz, String corn, int shardingCount,String shardingParam,boolean isDateFlowJob) {JobCoreConfiguration.Builder jobBuilder = JobCoreConfiguration.newBuilder(clazz.getSimpleName(), corn, shardingCount);if(!StringUtils.isEmpty(shardingParam)){jobBuilder.shardingItemParameters(shardingParam);}//定义作业核心配置newBuilder("任务名称","corn表达式","分片数量")JobCoreConfiguration simpleCoreConfig = jobBuilder.build();// 定义SIMPLE类型配置 cn.wolfcode.MyElasticJobJobTypeConfiguration jobConfiguration;if(isDateFlowJob){jobConfiguration = new DataflowJobConfiguration(simpleCoreConfig,clazz.getCanonicalName(),true);}else{jobConfiguration = new SimpleJobConfiguration(simpleCoreConfig,clazz.getCanonicalName());}//定义Lite作业根配置LiteJobConfiguration simpleJobRootConfig = LiteJobConfiguration.newBuilder(jobConfiguration).overwrite(true).build();return simpleJobRootConfig;}@Bean(initMethod = "init")public SpringJobScheduler fileDatFlowaScheduler(FileDataflowJob job, CoordinatorRegistryCenter registryCenter){LiteJobConfiguration jobConfiguration = createJobConfiguration(job.getClass(),"0/10 * * * * ?",1,null,true);return new SpringJobScheduler(job,registryCenter,jobConfiguration);}}第三步:创建Mapper映射文件
@Mapperpublic interface FileCustomMapper {@Update("update t_file_custom set backedUp = #{state} where id = #{id}")int changeState(@Param("id") Long id, @Param("state")int state);@Select("select * from t_file_custom where backedUp = 0 limit #{count}")List<FileCustom> selectLimit(int count);}
运维管理
事件追踪
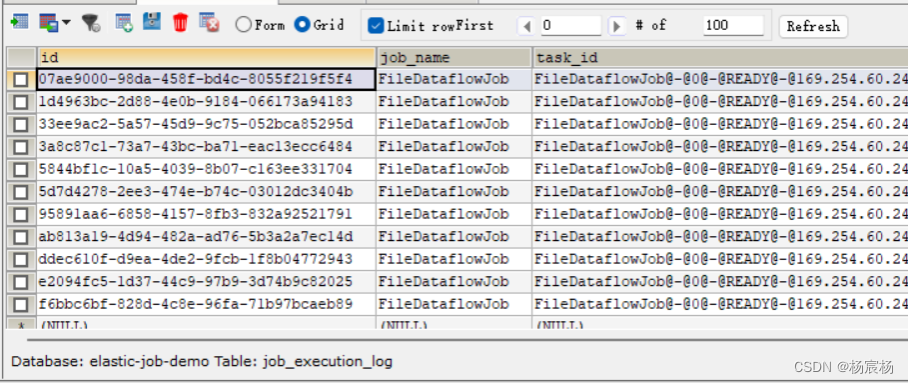
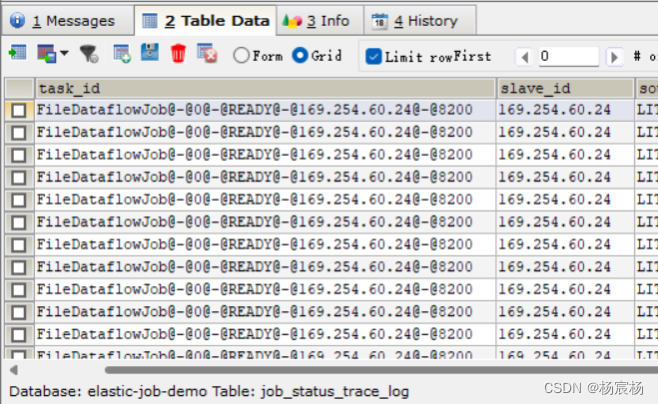
Elastic-Job-Lite在配置中提供了JobEventConfiguration,支持数据库方式配置,会在数据库中自动创建JOB_EXECUTION_LOG和JOB_STATUS_TRACE_LOG两张表以及若干索引来近路作业的相关信息。
修改Elastic-job配置类
第一步:在ElasticJobConfig配置类中注入DataSource

第二步:在任务配置中增加事件追踪配置

运行结果
该表记录每次作业的执行历史,分为两个步骤:
1.作业开始执行时间想数据库插入数据
2.作业完成执行时向数据库更新数据,更新is_success,complete_time和failure_cause(如果任务执行失败)
该表记录作业状态变更痕迹表,可通过每次作业运行的task_id查询作业状态变化的生命轨迹和运行轨迹
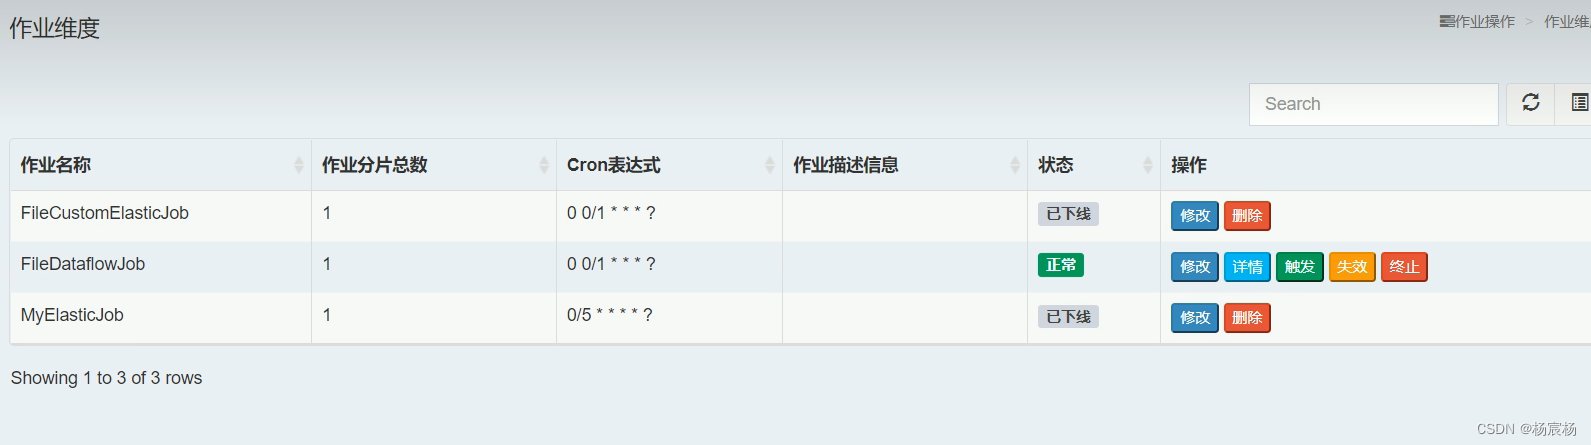
运维平台
搭建步骤
1.解压缩

2.进入bin目录,并执行
bin\start.bat
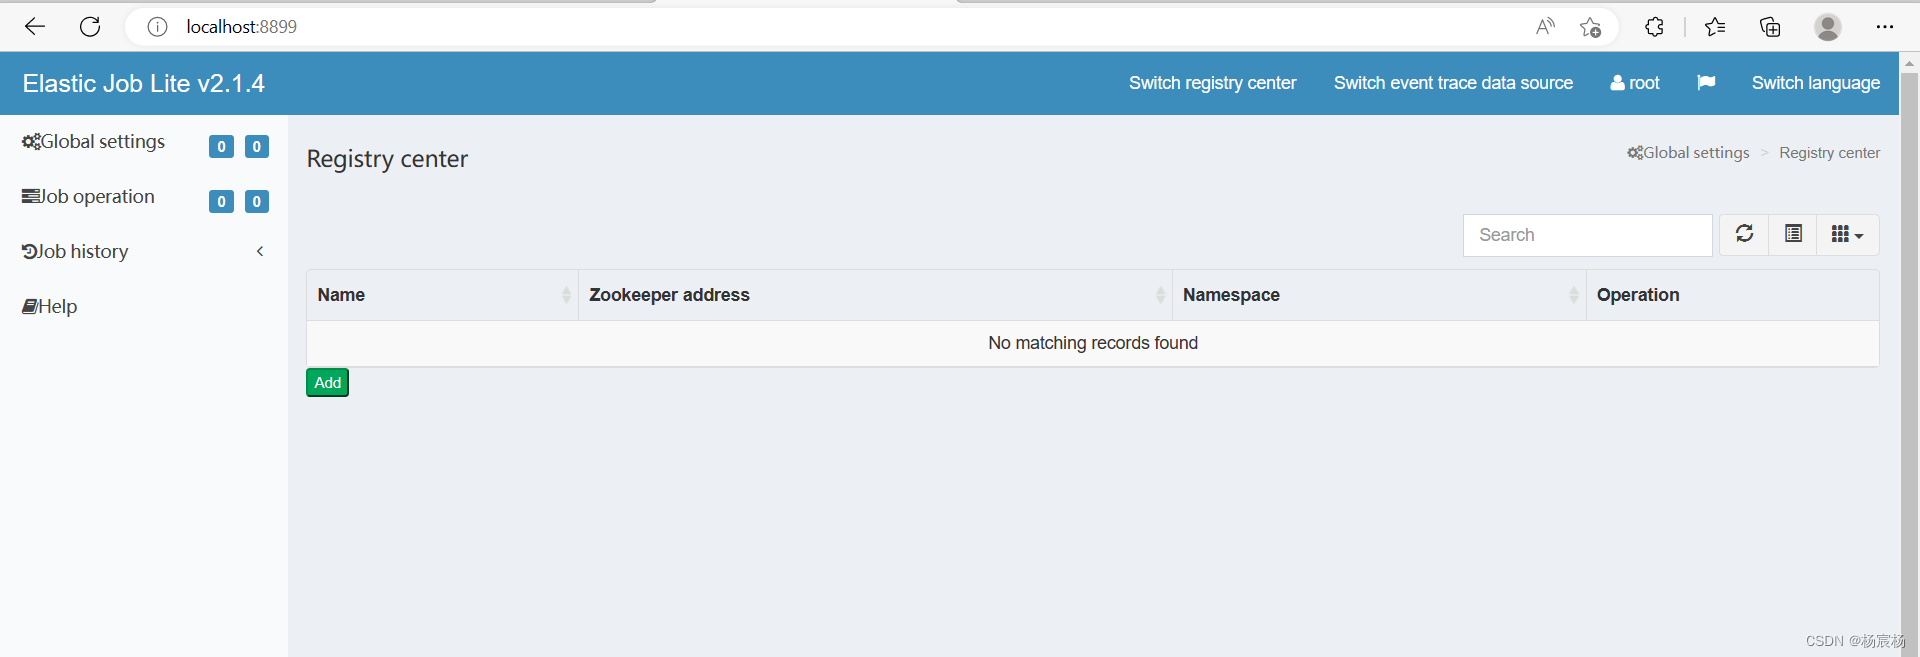
3.打开浏览器访问http://localhost:8899
用户名:root 密码:root
使用步骤
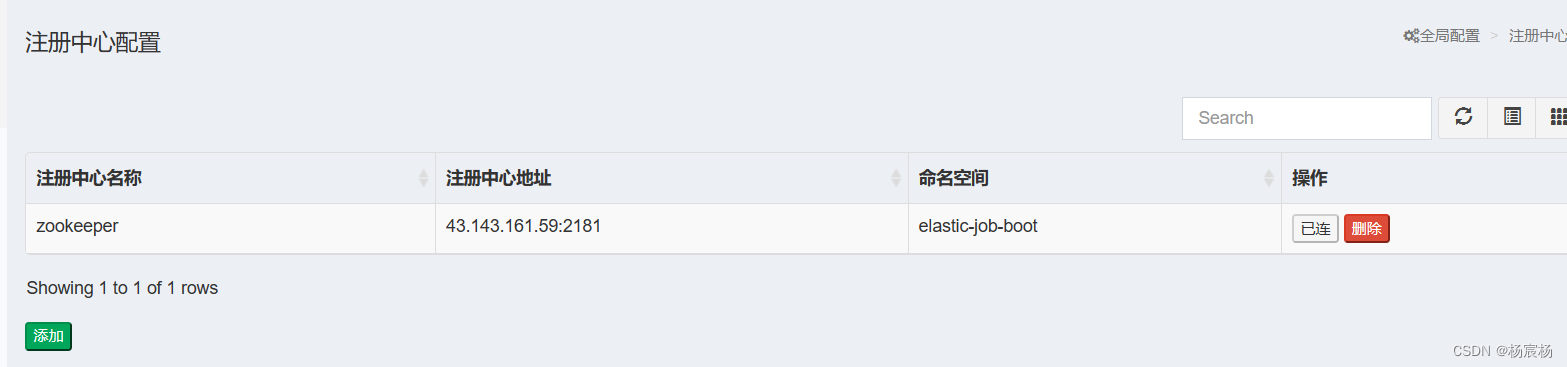
第一步:注册中心配置
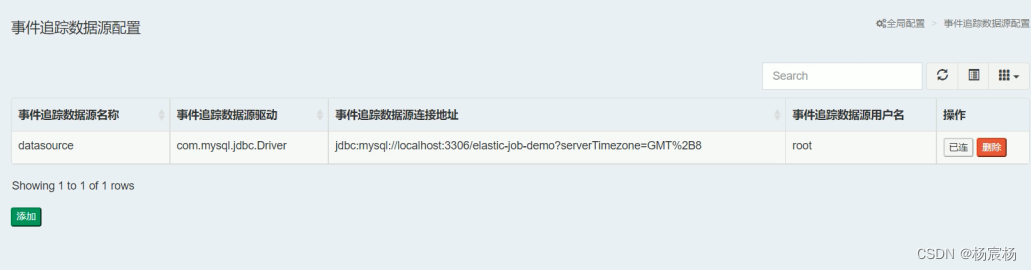
第二步:事件追踪数据源配置
之后就可以使用了