🍅 视频学习:文末有免费的配套视频可观看
🍅 关注公众号【互联网杂货铺】,回复 1 ,免费获取软件测试全套资料,资料在手,涨薪更快
1、核心库
-
requests request请求
-
openpyxl excel文件操作
-
loggin 日志
-
smtplib 发送邮件
-
configparser
-
unittest.mock mock服务
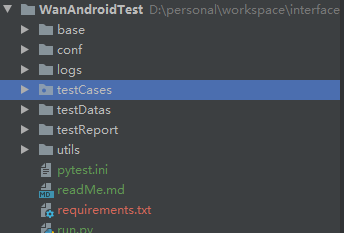
2、目录结构
-
base
-
utils
-
testDatas
-
conf
-
testCases
-
testReport
-
logs
-
其他
2.1base
-
base_path.py 存放绝对路径,dos命令或Jenkins执行时,防止报错
-
base_requests.py 封装requests,根据method选择不同的方法执行脚本,同时处理请求异常
2.1.1 base_path.py
import os# 项目根路径
_root_path = os.path.split(os.path.split(os.path.realpath(__file__))[0])[0]# 报告路径
report_path = os.path.join(_root_path, 'testReport', 'report.html')# 日志路径
log_path = os.path.join(_root_path, 'logs/')# 配置文件路径
conf_path = os.path.join(_root_path, 'conf', 'auto_test.conf')# 测试数据路径
testdatas_path = os.path.join(_root_path, 'testDatas')# allure 相关配置
_result_path = os.path.join(_root_path, 'testReport', 'result')
_allure_html_path = os.path.join(_root_path, 'testReport', 'allure_html')
allure_command = 'allure generate {} -o {} --clean'.format(_result_path, _allure_html_path)
2.1.2 base_requests.py
import json
import allure
import urllib3
import requests
import warnings
from bs4 import BeautifulSoup
from base.base_path import *
from requests.adapters import HTTPAdapter
from utils.handle_logger import logger
from utils.handle_config import handle_config as hcclass BaseRequests:def __init__(self, case, proxies=None, headers=None, cookies=None, timeout=15, max_retries=3):''':param case: 测试用例:param proxies: The result is displayed in fiddler:{"http": "http://127.0.0.1:8888", "https": "https://127.0.0.1:8888"}:param headers: 请求头:param cookies: cookies:param timeout: 请求默认超时时间15s:param max_retries: 请求超时后默认重试3次'''self.case = caseself.proxies = proxiesself.headers = headersself.cookies = cookiesself.timeout = timeoutself.max_retries = max_retriesself.base_url = hc.operation_config(conf_path, 'BASEURL', 'base_url')def get_response(self):'''获取请求结果'''response = self._run_main()return responsedef _run_main(self):'''发送请求'''method = self.case['method']url = self.base_url + self.case['url']if self.case['parameter']:data = eval(self.case['parameter'])else:data = Nones = requests.session()s.mount('http://', HTTPAdapter(max_retries=self.max_retries))s.mount('https://', HTTPAdapter(max_retries=self.max_retries))urllib3.disable_warnings()  # 忽略浏览器认证(https认证)警告warnings.simplefilter('ignore', ResourceWarning)    # 忽略 ResourceWarning警告res=''if method.upper() == 'POST':try:res = s.request(method='post', url=url, data=data, verify=False, proxies=self.proxies, headers=self.headers, cookies=self.cookies, timeout=self.timeout)except Exception as e:logger.error('POST请求出错,错误信息为:{0}'.format(e))elif method.upper() == 'GET':try:res = s.request(method='get', url=url, params=data, verify=False,proxies=self.proxies, headers=self.headers, cookies=self.cookies, timeout=self.timeout)except Exception as e:logger.error('GET请求出错,错误信息为:{0}'.format(e))else:raise ValueError('method方法为get和post')logger.info(f'请求方法:{method},请求路径:{url}, 请求参数:{data}, 请求头:{self.headers}, cookies:{self.cookies}')# with allure.step('接口请求信息:'):#     allure.attach(f'请求方法:{method},请求路径:{url}, 请求参数:{data}, 请求头:{headers}')# 拓展:是否需要做全量契约验证?响应结果是不同类型时,如何处理响应?return resif __name__ == '__main__':# case = {'method': 'get', 'url': '/article/top/json', 'parameter': ''}case = {'method': 'post', 'url': '/user/login', 'parameter': '{"username": "xbc", "password": "123456"}'}response = BaseRequests(case).get_response()print(response.json())
2.2 utils
(只取核心部分)
-
handle_excel.py
- excel的操作,框架要求,最终读取的数据需要保存列表嵌套字典的格式[{},{}]
- 其他操作 -
handle_sendEmail.py
- python发送邮件使用smtp协议,接收邮件使用pop3
- 需要开启pop3服务功能,这里的password为授权码,启用服务自行百度 -
handle_logger.py 日志处理
-
handle_config.py
配置文件处理,这里只将域名可配置化,切换环境时改域名即可 -
handle_allure.py
allure生成的报告需要调用命令行再打开,这里直接封装命令 -
handle_cookies.py(略)
在git中补充,处理cookiesJar对象 -
handle_mock.py(略)
在git中补充,框架未使用到,但是也封装成了方法 -
param_replace(略)
将常用的参数化操作封装成类
2.2.1 handle_excel.py
import openpyxl
from base.base_path import *class HandleExcel:def __init__(self, file_name=None, sheet_name=None):'''没有传路径时,默认使用 wanadriod接口测试用例.xlsx 文件:param file_name:  用例文件:param sheet_name: 表单名'''if file_name:self.file_path = os.path.join(testdatas_path, file_name)self.sheet_name = sheet_nameelse:self.file_path = os.path.join(testdatas_path, 'wanadriod接口测试用例.xlsx')self.sheet_name = 'case'# 创建工作簿,定位表单self.wb = openpyxl.load_workbook(self.file_path)self.sheet = self.wb[self.sheet_name]# 列总数,行总数self.ncols = self.sheet.max_columnself.nrows = self.sheet.max_rowdef cell_value(self, row=1, column=1):'''获取表中数据,默认取出第一行第一列的值'''return self.sheet.cell(row, column).valuedef _get_title(self):'''私有函数, 返回表头列表'''title = []for column in range(1, self.ncols+1):title.append(self.cell_value(1, column))return titledef get_excel_data(self):''':return: 返回字典套列表的方式 [{title_url:value1, title_method:value1}, {title_url:value2, title_method:value2}...]'''finally_data = []for row in range(2, self.nrows+1):result_dict = {}for column in range(1, self.ncols+1):result_dict[self._get_title()[column-1]] = self.cell_value(row, column)finally_data.append(result_dict)return finally_datadef get_pytestParametrizeData(self):'''选用这种参数方式,需要使用数据格式 列表套列表 @pytest.mark.parametrize('', [[], []]), 如 @pytest.mark.parametrize(*get_pytestParametrizeData)将 finally_data 中的 title 取出,以字符串形式保存,每个title用逗号(,)隔开将 finally_data 中的 value 取出,每行数据保存在一个列表,再集合在一个大列表内:return: title, data'''finally_data = self.get_excel_data()data = []title = ''for i in finally_data:value_list = []key_list = []for key, value in i.items():value_list.append(value)key_list.append(key)title = ','.join(key_list)data.append(value_list)return title, datadef rewrite_value(self, new_value, case_id, title):'''写入excel,存储使用过的数据(参数化后的数据)'''row = self.get_row(case_id)column = self.get_column(title)self.sheet.cell(row, column).value = new_valueself.wb.save(self.file_path)def get_row(self, case_id):'''通过执行的 case_id 获取当前的行号'''for row in range(1, self.nrows+1):if self.cell_value(row, 1) == case_id:return int(row)def get_column(self, title):'''通过表头给定字段,获取表头所在列'''for column in range(1, self.ncols+1):if self.cell_value(1, column) == title:return int(column)if __name__ == '__main__':r = HandleExcel()print(r.get_excel_data())
2.2.2 handle_sendEmail.py
import smtplib
from utils.handle_logger import logger
from email.mime.text import MIMEText    # 专门发送正文邮件
from email.mime.multipart import MIMEMultipart  # 发送正文、附件等
from email.mime.application import MIMEApplication  # 发送附件class HandleSendEmail:def __init__(self, part_text, attachment_list, password, user_list, subject='interface_autoTestReport', smtp_server='smtp.163.com', from_user='hu_chunpu@163.com', filename='unit_test_report.html'):''':param part_text: 正文:param attachment_list: 附件列表:param password: 邮箱服务器第三方密码:param user_list: 收件人列表:param subject: 主题:param smtp_server: 邮箱服务器:param from_user: 发件人:param filename: 附件名称'''self.subject = subjectself.attachment_list = attachment_listself.password = passwordself.user_list = ';'.join(user_list)    # 多个收件人self.part_text = part_textself.smtp_server = smtp_serverself.from_user = from_userself.filename = filenamedef _part(self):'''构建邮件内容'''# 1) 构造邮件集合体:msg = MIMEMultipart()msg['Subject'] = self.subjectmsg['From'] = self.from_usermsg['To'] = self.user_list# 2) 构造邮件正文:text = MIMEText(self.part_text)msg.attach(text)  # 把正文加到邮件体里面# 3) 构造邮件附件:for item in self.attachment_list:with open(item, 'rb+') as file:attachment = MIMEApplication(file.read())# 给附件命名:attachment.add_header('Content-Disposition', 'attachment', filename=item)msg.attach(attachment)# 4) 得到完整的邮件内容:full_text = msg.as_string()return full_textdef send_email(self):'''发送邮件'''# qq邮箱必须加上SSLif self.smtp_server == 'smtp.qq.com':smtp = smtplib.SMTP_SSL(self.smtp_server)else:smtp = smtplib.SMTP(self.smtp_server)# 登录服务器:.login(user=email_address,password=第三方授权码)smtp.login(self.from_user, self.password)logger.info('--------邮件发送中--------')try:logger.info('--------邮件发送成功--------')smtp.sendmail(self.from_user, self.user_list, self._part())except Exception as e:logger.error('发送邮件出错,错误信息为:{0}'.format(e))else:smtp.close()    # 关闭连接if __name__ == '__main__':from base.base_path import *part_text = '附件为自动化测试报告,框架使用了pytest+allure'attachment_list = [report_path]password = ''user_list = ['']HandleSendEmail(part_text, attachment_list, password, user_list).send_email()
2.2.3 handle_logger.py
import sys
import logging
from time import strftime
from base.base_path import *class Logger:def __init__(self):# 日志格式custom_format = '%(asctime)s %(filename)s [line:%(lineno)d] %(levelname)s: %(message)s'# 日期格式date_format = '%a, %d %b %Y %H:%M:%S'self._logger = logging.getLogger()  # 实例化self.filename = '{0}{1}.log'.format(log_path, strftime("%Y-%m-%d")) # 日志文件名self.formatter = logging.Formatter(fmt=custom_format, datefmt=date_format)self._logger.addHandler(self._get_file_handler(self.filename))self._logger.addHandler(self._get_console_handler())self._logger.setLevel(logging.INFO)  # 默认等级def _get_file_handler(self, filename):'''输出到日志文件'''filehandler = logging.FileHandler(filename, encoding="utf-8")filehandler.setFormatter(self.formatter)return filehandlerdef _get_console_handler(self):'''输出到控制台'''console_handler = logging.StreamHandler(sys.stdout)console_handler.setFormatter(self.formatter)return console_handler@propertydef logger(self):return self._logger'''
日志级别:
critical    严重错误,会导致程序退出
error        可控范围内的错误
warning        警告信息
info        提示信息
debug        调试程序时详细输出的记录
'''
# 实例
logger = Logger().loggerif __name__ == '__main__':import datetimelogger.info(u"{}:开始XXX操作".format(datetime.datetime.now()))
2.2.4 handle_config.py
import configparser# 配置文件类
class HandleConfig:def operation_config(self, conf_file, section, option):cf = configparser.ConfigParser()    # 实例化cf.read(conf_file)value = cf.get(section, option)    # 定位return valuehandle_config = HandleConfig()
if __name__ == '__main__':from base.base_path import *base_url = handle_config.operation_config(conf_path, 'BASEURL', 'base_url')print(base_url)
2.2.5 handle_allure.py
import subprocess
from base.base_path import *class HandleAllure(object):def execute_command(self):subprocess.call(allure_command, shell=True)handle_allure = HandleAllure()
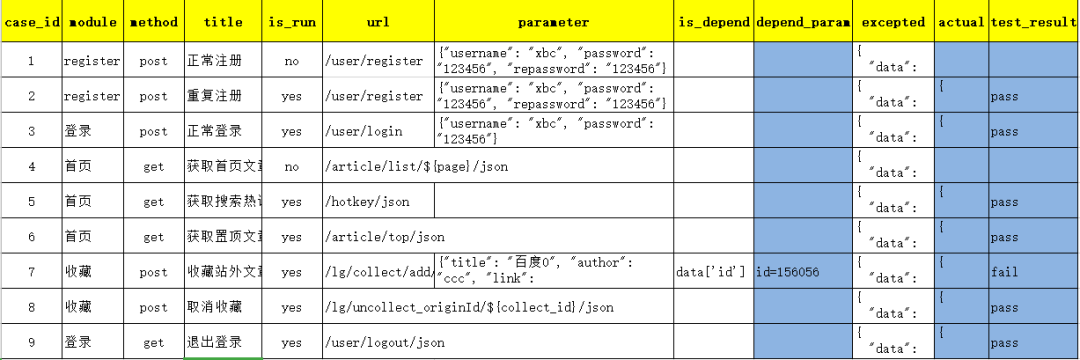
2.3testDatas
excel测试用例文件,必须是.xlsx结尾,用例结构如下:
2.4conf
放置配置文件 .conf结尾
2.5 testCases
-
conftest.py
- fixture功能,用例前置后置操作
- 构造测试数据
- 其他高级操作
- 注意邮件中的password和user_list需要换成自己测试的邮箱及服务密码 -
test_wanAndroid.py 测试用例脚本
- 参数化: pytest.mark.parametrize('case',[{},{}])
- 接口关联:
- 将关联的参数配置成全局变量
- 在用例执行前使用全局变量替换参数
- 使用 is_run 参数指明有参数化的用例,并取出,再赋值给全局变量
- cookies:
- 和接口关联的处理方式一样处理cookies
- 步骤
- 收集用例
- 执行用例
- 断言
- 构造测试报告
- 发送邮件
2.5.1 conftest.py
import pytest
from base.base_path import *
from utils.handle_logger import logger
from utils.handle_allure import handle_allure
from utils.handle_sendEmail import HandleSendEmail'''
1. 构造测试数据??
2. fixture 替代 setup,teardown
3. 配置 pytest
'''def pytest_collection_modifyitems(items):"""测试用例收集完成时,将收集到的item的name和nodeid的中文显示在控制台上"""for item in items:item.name = item.name.encode("utf-8").decode("unicode_escape")item._nodeid = item.nodeid.encode("utf-8").decode("unicode_escape")# print(item.nodeid)@pytest.fixture(scope='session', autouse=True)
def send_email():logger.info('-----session级,执行wanAndroid测试用例-----')yieldlogger.info('-----session级,wanAndroid用例执行结束,发送邮件:-----')"""执行alllure命令 """handle_allure.execute_command()# 发邮件part_text = '附件为自动化测试报告,框架使用了pytest+allure'attachment_list = [report_path]password = ''user_list = ['']HandleSendEmail(part_text, attachment_list, password, user_list).send_email()
2.5.2 test_wanAndroid.py
import json
import pytest
import allure
from base.base_requests import BaseRequests
from utils.handle_logger import logger
from utils.handle_excel import HandleExcel
from utils.param_replace import pr
from utils.handle_cookies import get_cookieshandle_excel = HandleExcel()
get_excel_data = HandleExcel().get_excel_data()
ID = ''
COOKIES = {}
PAGE = ''class TestWanAndroid:@pytest.mark.parametrize('case', get_excel_data)def test_wanAndroid(self, case):global IDglobal COOKIES# 参数替换case['url'] = pr.relevant_parameter(case['url'], '${collect_id}', str(ID))if case['is_run'].lower() == 'yes':logger.info('------执行用例的id为:{0},用例标题为:{1}------'.format(case['case_id'], case['title']))res = BaseRequests(case, cookies=COOKIES).get_response()res_json = res.json()# 获取登录后的cookiesif case['case_id'] == 3:COOKIES = get_cookies.get_cookies(res)if case['is_depend']:try:ID = res_json['data']['id']# 将使用的参数化后的数据写入excelhandle_excel.rewrite_value('id={}'.format(ID), case['case_id'], 'depend_param')except Exception as e:logger.error(f'获取id失败,错误信息为{e}')ID = 0# 制作 allure 报告allure.dynamic.title(case['title'])allure.dynamic.description('<font color="red">请求URL:</font>{}<br />''<font color="red">期望值:</font>{}'.format(case['url'], case['excepted']))allure.dynamic.feature(case['module'])allure.dynamic.story(case['method'])result=''try:assert eval(case['excepted'])['errorCode'] == res_json['errorCode']result = 'pass'except AssertionError as e:logger.error('Assert Error:{0}'.format(e))result = 'fail'raise efinally:# 将实际结果格式化写入excelhandle_excel.rewrite_value(json.dumps(res_json, ensure_ascii=False, indent=2, sort_keys=True), case['case_id'], 'actual')# 将用例执行结果写入excelhandle_excel.rewrite_value(result, case['case_id'], 'test_result')def test_get_articleList(self):'''翻页,将page参数化'''global PAGEpassdef test_mock_demo(self):'''使用mock服务模拟服务器响应'''passif __name__ == '__main__':pytest.main(['-q', 'test_wanAndroid.py'])
2.6 testReport
-
存放html测试报告,安装插件pip install pytest-html
-
存放allure测试报告,插件安装pip install allure-pytest
2.7 logs
存放日志文件
2.8 其他文件
-
run.py 主运行文件
-
pytest.ini 配置pytest的默认行为,运行规则等
-
requirements.txt 依赖环境
- 自动生成 pip freeze
- 安装 pip -r install requirements.
3、总结
-
allure有很多有趣的操作,甚至控制用例执行行为,有兴趣可以拓展
-
实现框架的难点在接口依赖
-
接口自动化应避免复杂的接口依赖,复杂的依赖只会造成测试的不可控性
-
注意频繁的操作excel会消耗性能
-
有兴趣可以将本框架集合在Jenkins中
同时,在这我也准备了一份软件测试视频教程(含接口、自动化、性能等),需要的可以直接在下方观看就行,希望对你有所帮助!
7天Python自动化测试速成课,小白也能快速上手(项目实战)


![离线数仓(五) [ 从数据仓库概述到建模 ]](https://img-blog.csdnimg.cn/direct/a153a03d12d4400e9a2e63cf8ded4f3c.png)