🍨 本文为[🔗365天深度学习训练营学习记录博客 🍦 参考文章:365天深度学习训练营 🍖 原作者:[K同学啊 | 接辅导、项目定制]\n🚀 文章来源:[K同学的学习圈子](https://www.yuque.com/mingtian-fkmxf/zxwb45)一、前期准备
from __future__ import unicode_literals, print_function, division
from io import open
import unicodedata
import string
import re
import randomimport torch
import torch.nn as nn
from torch import optim
import torch.nn.functional as Fdevice = torch.device("cuda" if torch.cuda.is_available() else "cpu")
print(device)
1.1 搭建语言类
定义了两个常量 SOS_token 和 EOS_token,其分别代表序列的开始和结束。 Lang 类,用于方便对语料库进行操作:
●word2index 是一个字典,将单词映射到索引
●word2count 是一个字典,记录单词出现的次数
●index2word 是一个字典,将索引映射到单词
●n_words 是单词的数量,初始值为 2,因为序列开始和结束的单词已经被添加
SOS_token = 0
EOS_token = 1# 语言类,方便对语料库进行操作
class Lang:def __init__(self, name):self.name = nameself.word2index = {}self.word2count = {}self.index2word = {0: "SOS", 1: "EOS"}self.n_words    = 2  # Count SOS and EOSdef addSentence(self, sentence):for word in sentence.split(' '):self.addWord(word)def addWord(self, word):if word not in self.word2index:self.word2index[word] = self.n_wordsself.word2count[word] = 1self.index2word[self.n_words] = wordself.n_words += 1else:self.word2count[word] += 1
1.2 文本处理函数
def unicodeToAscii(s):return ''.join(c for c in unicodedata.normalize('NFD', s)if unicodedata.category(c) != 'Mn')# 小写化,剔除标点与非字母符号
def normalizeString(s):s = unicodeToAscii(s.lower().strip())s = re.sub(r"([.!?])", r" \1", s)s = re.sub(r"[^a-zA-Z.!?]+", r" ", s)return s
1.3 文件读取函数
def readLangs(lang1, lang2, reverse=False):print("Reading lines...")# 以行为单位读取文件lines = open('%s-%s.txt' % (lang1, lang2), encoding='utf-8'). \read().strip().split('\n')# 将每一行放入一个列表中# 一个列表中有两个元素,A语言文本与B语言文本pairs = [[normalizeString(s) for s in l.split('\t')] for l in lines]# 创建Lang实例,并确认是否反转语言顺序if reverse:pairs = [list(reversed(p)) for p in pairs]input_lang = Lang(lang2)output_lang = Lang(lang1)else:input_lang = Lang(lang1)output_lang = Lang(lang2)return input_lang, output_lang, pairsMAX_LENGTH = 10 # 定义语料最长长度eng_prefixes = ("i am ", "i m ","he is", "he s ","she is", "she s ","you are", "you re ","we are", "we re ","they are", "they re "
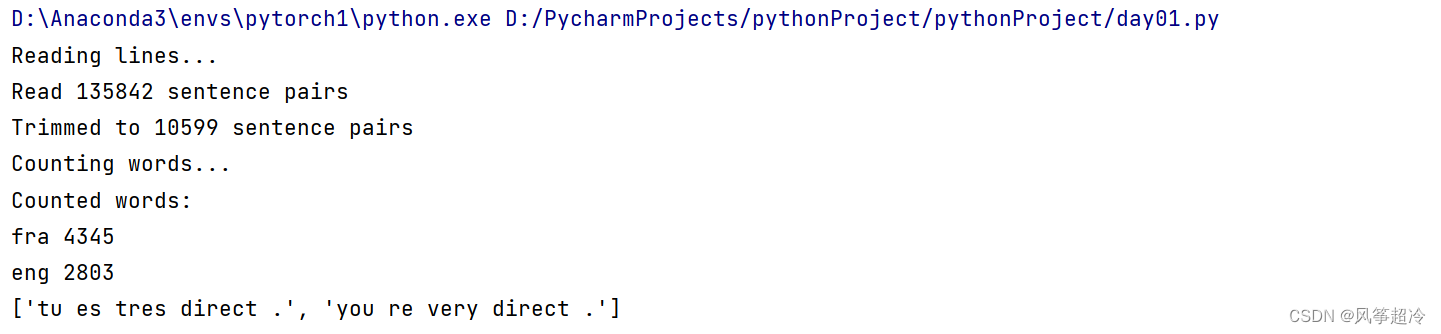
)def filterPair(p):return len(p[0].split(' ')) < MAX_LENGTH and \len(p[1].split(' ')) < MAX_LENGTH and p[1].startswith(eng_prefixes)def filterPairs(pairs):# 选取仅仅包含 eng_prefixes 开头的语料return [pair for pair in pairs if filterPair(pair)]def prepareData(lang1, lang2, reverse=False):# 读取文件中的数据input_lang, output_lang, pairs = readLangs(lang1, lang2, reverse)print("Read %s sentence pairs" % len(pairs))# 按条件选取语料pairs = filterPairs(pairs[:])print("Trimmed to %s sentence pairs" % len(pairs))print("Counting words...")# 将语料保存至相应的语言类for pair in pairs:input_lang.addSentence(pair[0])output_lang.addSentence(pair[1])# 打印语言类的信息print("Counted words:")print(input_lang.name, input_lang.n_words)print(output_lang.name, output_lang.n_words)return input_lang, output_lang, pairsinput_lang, output_lang, pairs = prepareData('eng', 'fra', True)
print(random.choice(pairs))常量 MAX_LENGTH,表示语料中句子的最大长度。
元组 eng_prefixes,包含一些英语句子的前缀。这些前缀用于筛选语料,只选择以这些前缀开头的句子
filterPair 函数用于过滤语料对。它的返回值是一个布尔值,表示是否保留该语料对。这里的条件是:两个句子的长度都不超过 MAX_LENGTH,并且输出语句(第二个句子)以 eng_prefixes 中的某个前缀开头
filterPairs 函数接受一个语料对列表,然后调用 filterPair 函数过滤掉不符合条件的语料对,返回一个新的语料对列表。
prepareData 函数是主要的数据准备函数。它调用了之前定义的 readLangs 函数来读取语言对,然后使用 filterPairs 函数按条件过滤语料对。接着,它打印读取的句子对数、过滤后的句子对数,并统计语料中的词汇量。最后,它将语料保存到相应的语言类中,并返回这些语言类对象以及过滤后的语料对。
二、Seq2Seq 模型
2.1 编码器(Encoder)
class EncoderRNN(nn.Module):def __init__(self, input_size, hidden_size):super(EncoderRNN, self).__init__()self.hidden_size = hidden_sizeself.embedding = nn.Embedding(input_size, hidden_size)self.gru = nn.GRU(hidden_size, hidden_size)def forward(self, input, hidden):embedded = self.embedding(input).view(1, 1, -1)output = embeddedoutput, hidden = self.gru(output, hidden)return output, hiddendef initHidden(self):return torch.zeros(1, 1, self.hidden_size, device=device)2.2 解码器(Decoder)
class DecoderRNN(nn.Module):def __init__(self, hidden_size, output_size):super(DecoderRNN, self).__init__()self.hidden_size = hidden_sizeself.embedding = nn.Embedding(output_size, hidden_size)self.gru = nn.GRU(hidden_size, hidden_size)self.out = nn.Linear(hidden_size, output_size)self.softmax = nn.LogSoftmax(dim=1)def forward(self, input, hidden):output = self.embedding(input).view(1, 1, -1)output = F.relu(output)output, hidden = self.gru(output, hidden)output = self.softmax(self.out(output[0]))return output, hiddendef initHidden(self):return torch.zeros(1, 1, self.hidden_size, device=device)三、训练
3.1 数据预处理
def indexesFromSentence(lang, sentence):return [lang.word2index[word] for word in sentence.split(' ')]# 将数字化的文本,转化为tensor数据
def tensorFromSentence(lang, sentence):indexes = indexesFromSentence(lang, sentence)indexes.append(EOS_token)return torch.tensor(indexes, dtype=torch.long, device=device).view(-1, 1)# 输入pair文本,输出预处理好的数据
def tensorsFromPair(pair):input_tensor  = tensorFromSentence(input_lang, pair[0])target_tensor = tensorFromSentence(output_lang, pair[1])return (input_tensor, target_tensor)
3.2 训练函数
使用use_teacher_forcing 的目的是在训练过程中平衡解码器的预测能力和稳定性。以下是对两种策略的解释:
1. Teacher Forcing:在每个时间步(di循环中),解码器的输入都是目标序列中的真实标签。这样做的好处是,解码器可以直接获得正确的输入信息,加快训练速度,并且在训练早期提供更准确的梯度信号,帮助解码器更好地学习。然而,过度依赖目标序列可能会导致模型过于敏感,一旦目标序列中出现错误,可能会在解码器中产生累积的误差。
2. Without Teacher Forcing:在每个时间步,解码器的输入是前一个时间步的预测输出。这样做的好处是,解码器需要依靠自身的预测能力来生成下一个输入,从而更好地适应真实应用场景中可能出现的输入变化。这种策略可以提高模型的稳定性,但可能会导致训练过程更加困难,特别是在初始阶段。一般来说,Teacher Forcing策略在训练过程中可以帮助模型快速收敛,而Without Teacher Forcing策略则更接近真实应用中的生成场景。通常会使用一定比例的Teacher Forcing,在训练过程中逐渐减小这个比例,以便模型逐渐过渡到更自主的生成模式。
综上所述,通过使用use_teacher_forcing 来选择不同的策略,可以在训练解码器时平衡模型的预测能力和稳定性,同时也提供了更灵活的生成模式选择。
teacher_forcing_ratio = 0.5def train(input_tensor, target_tensor, encoder, decoder, encoder_optimizer, decoder_optimizer, criterion, max_length=MAX_LENGTH):# 编码器初始化encoder_hidden = encoder.initHidden()# grad属性归零encoder_optimizer.zero_grad()decoder_optimizer.zero_grad()input_length  = input_tensor.size(0)target_length = target_tensor.size(0)# 用于创建一个指定大小的全零张量(tensor),用作默认编码器输出encoder_outputs = torch.zeros(max_length, encoder.hidden_size, device=device)loss = 0# 将处理好的语料送入编码器for ei in range(input_length):encoder_output, encoder_hidden = encoder(input_tensor[ei], encoder_hidden)encoder_outputs[ei]            = encoder_output[0, 0]# 解码器默认输出decoder_input  = torch.tensor([[SOS_token]], device=device)decoder_hidden = encoder_hiddenuse_teacher_forcing = True if random.random() < teacher_forcing_ratio else False# 将编码器处理好的输出送入解码器if use_teacher_forcing:# Teacher forcing: Feed the target as the next inputfor di in range(target_length):decoder_output, decoder_hidden = decoder(decoder_input, decoder_hidden)loss         += criterion(decoder_output, target_tensor[di])decoder_input = target_tensor[di]  # Teacher forcingelse:# Without teacher forcing: use its own predictions as the next inputfor di in range(target_length):decoder_output, decoder_hidden = decoder(decoder_input, decoder_hidden)topv, topi    = decoder_output.topk(1)decoder_input = topi.squeeze().detach()  # detach from history as inputloss         += criterion(decoder_output, target_tensor[di])if decoder_input.item() == EOS_token:breakloss.backward()encoder_optimizer.step()decoder_optimizer.step()return loss.item() / target_lengthimport time
import mathdef asMinutes(s):m = math.floor(s / 60)s -= m * 60return '%dm %ds' % (m, s)def timeSince(since, percent):now = time.time()s = now - sincees = s / (percent)rs = es - sreturn '%s (- %s)' % (asMinutes(s), asMinutes(rs))def trainIters(encoder,decoder,n_iters,print_every=1000,plot_every=100,learning_rate=0.01):start = time.time()plot_losses      = []print_loss_total = 0  # Reset every print_everyplot_loss_total  = 0  # Reset every plot_everyencoder_optimizer = optim.SGD(encoder.parameters(), lr=learning_rate)decoder_optimizer = optim.SGD(decoder.parameters(), lr=learning_rate)# 在 pairs 中随机选取 n_iters 条数据用作训练集training_pairs    = [tensorsFromPair(random.choice(pairs)) for i in range(n_iters)]criterion         = nn.NLLLoss()for iter in range(1, n_iters + 1):training_pair = training_pairs[iter - 1]input_tensor  = training_pair[0]target_tensor = training_pair[1]loss = train(input_tensor, target_tensor, encoder,decoder, encoder_optimizer, decoder_optimizer, criterion)print_loss_total += lossplot_loss_total  += lossif iter % print_every == 0:print_loss_avg   = print_loss_total / print_everyprint_loss_total = 0print('%s (%d %d%%) %.4f' % (timeSince(start, iter / n_iters),iter, iter / n_iters * 100, print_loss_avg))if iter % plot_every == 0:plot_loss_avg = plot_loss_total / plot_everyplot_losses.append(plot_loss_avg)plot_loss_total = 0return plot_losses
四、训练与评估
hidden_size   = 256
encoder1      = EncoderRNN(input_lang.n_words, hidden_size).to(device)
attn_decoder1 = DecoderRNN(hidden_size, output_lang.n_words).to(device)plot_losses = trainIters(encoder1, attn_decoder1, 100000, print_every=5000) 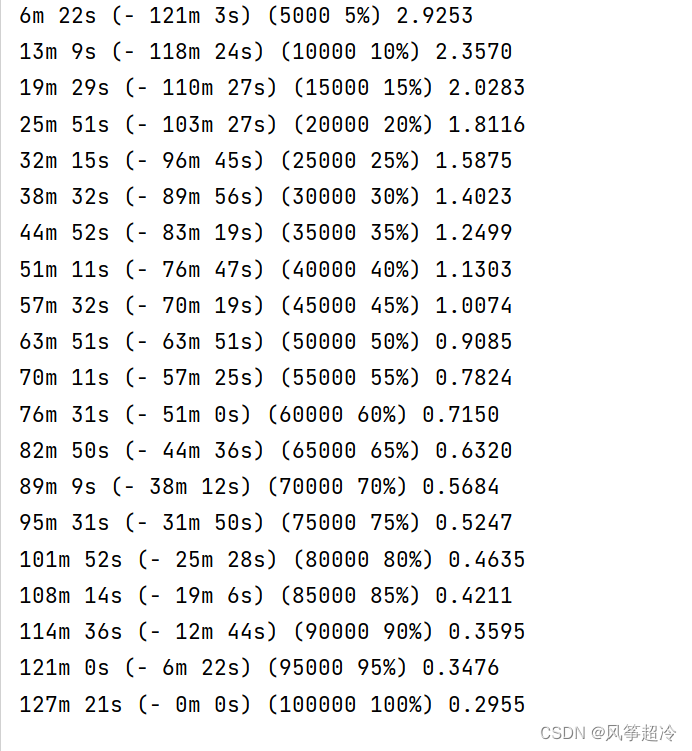
import matplotlib.pyplot as plt
#隐藏警告
import warnings
warnings.filterwarnings("ignore") # 忽略警告信息
# plt.rcParams['font.sans-serif'] = ['SimHei'] # 用来正常显示中文标签
plt.rcParams['axes.unicode_minus'] = False # 用来正常显示负号
plt.rcParams['figure.dpi'] = 100 # 分辨率epochs_range = range(len(plot_losses))plt.figure(figsize=(8, 3))plt.subplot(1, 1, 1)
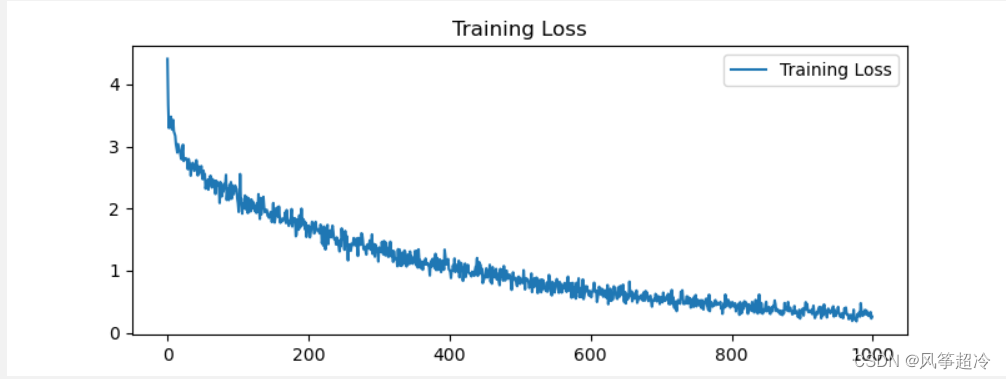
plt.plot(epochs_range, plot_losses, label='Training Loss')
plt.legend(loc='upper right')
plt.title('Training Loss')
plt.show()