Future模式
Future模式是高并发设计和开发过程中常见的设计模式。它的核心思想是异步调用,对于Future模式来说,它不是立即返回我们所需要的结果,但是它会返回一个异步任务,将来我们可以通过这个异步任务获取到我们所需要的结果。
在进行传统的RPC调用时,同步RPC调用是一段相当耗时的过程。当前客户端发出RPC请求,服务端处理客户端的RPC请求并返回服务端的过程需要一定的时间,在这个过程中客户端一直在等待,直到服务端结果的返回。如下图:
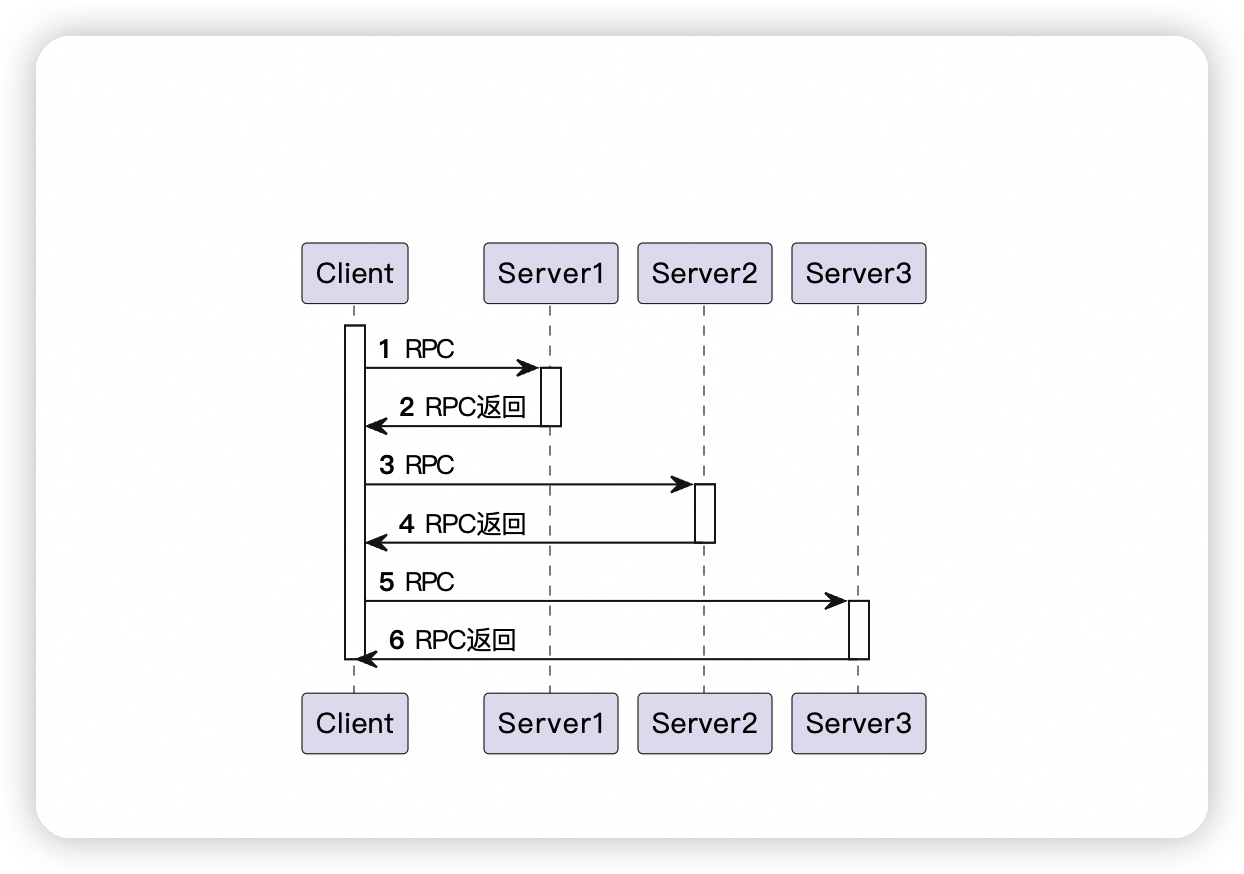
假设一次远程调用的时间为500毫秒,则一个Client同步对三个Server进行RPC调用的时间为1500毫秒。可以使用Future模式对其进行改造,将同步的RPC调用改为异步的RPC调用,一个Client异步对三个Server调用的流程如下

假设一次远程调用的时间为500,600,700毫秒,则一个Client异步并发对三个Server分别进行一次RPC调用的总时间只要耗费700毫秒。使用Future模式异步并发地进行RPC调用,客户端在得到一个RPC的返回结果前并不急于获取该结果,而是充分利用等待时间去执行其他的耗时操作(如其他RPC调用),这就是Future模式的核心所在。
Java的Future实现类并没有支持异步回调,仍然需要主动获取异步执行的结果,而Java8的CompletableFuture组件实现了异步回调的功能
在Java中,Future只是一个泛型接口,位于Java.util.concurrent包下,其中定义了5个方法,主要包括一下几个功能
public interface Future<V> {//取消异步执行boolean cancel(boolean mayInterruptIfRunning);//获取异步任务的取消状态boolean isCancelled();//判断异步任务是否执行完成boolean isDone();//获取异步任务完成后的执行结果(阻塞获取)V get() throws InterruptedException, ExecutionException;//设置时限,获取异步任务完成后的执行结果V get(long timeout, TimeUnit unit)throws InterruptedException, ExecutionException, TimeoutException;
}
总体来说,Future是一个对异步任务进行交互、操作的接口。但是Future仅仅是一个接口,通过它没有办法直接对异步任务操作,JDK提供了一个默认的实现类--FutureTask。
CompletableFuture详解
CompletableFuture是JDK8引入的实现类,实现了Future和CompletionStage接口。该实现类的实例作为一个异步任务,可以在自己的异步任务执行完成之后再出发其他的异步任务,从而达到异步回调的目的。
1.CompletableFuture的UML类关系
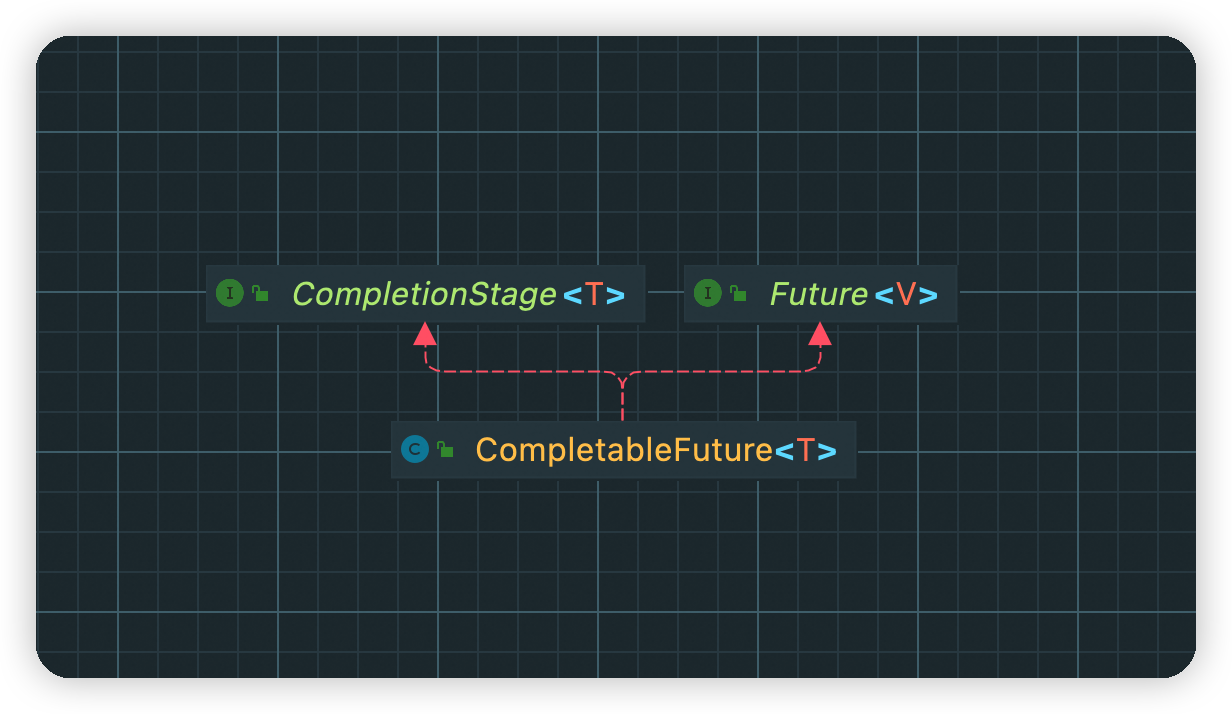
其中ComCompletionStage代表计算过程中的某个阶段(异步任务),一个阶段完成之后可以进入下一个阶段。一个阶段可以理解为一个异步任务,其中每一个异步任务都封装了函数式接口,表示该异步任务需要执行的操作。
2.CompletionStage接口
CompletionStage代表某个同步或异步计算的一个阶段,或者一系列异步任务中的一个子任务(或者阶段性任务)。
每个CompletionStage子任务所包装的可以是一个Function、Consumer或者Runnable函数式接口实例。这三个常用的函数式接口的特点如下:
(1)Function
Function接口的特点是:有输入、有输出。包装了Function实例的CompletionStage子任务需要一个输入参数,并会产生一个输出结果到下一步。
(2)Runnable
Runnable接口的特点是:无输入、无输出。包装了Runnable实例的CompletionStage子任务既不需要任何输入参数,又不会产生任何输出。
(3)Consumer
Consumer接口的特点是:有输入、无输出。包装了Consumer实例的CompletinStage子任务需要一个输入参数,但不会产生任何输出。
CompletionStage代表异步计算过程中的某一个阶段,一个阶段完成以后可能会触发另一个阶段。虽然一个子任务可以触发其他子任务,但是并不能保证后续子任务的执行顺序。
3.使用runAsync和supplyAcync创建子任务
CompletionStage子任务是通过创建CompletableFuture完成的。CompletableFuture提供了非常强大的Future扩展功能来帮助使用者简化异步编程的复杂性,提供了函数式编程的能力来帮助回调,也提供了转换和组合CompletionStage的能力。
CompletableFuture定义了一组创建CompletionStage子任务的方法,基础使用如下
  	//子任务包装一个Supplier实例,并调用ForkJoinPool.commonPool()线程来执行public static <U> CompletableFuture<U> supplyAsync(Supplier<U> supplier)//子任务包装一个Supplier实例,并使用指定的executor线程池来执行public static <U> CompletableFuture<U> supplyAsync(Supplier<U> supplier,Executor executor)//子任务包装一个Runnable实例,并调用ForkJoinPool.commonPool()线程来执行public static CompletableFuture<Void> runAsync(Runnable runnable)//子任务包装一个Runnable实例,并使用指定的executor线程池来执行public static CompletableFuture<Void> runAsync(Runnable runnable,Executor executor)
//在使用CompletableFuture创建CompletionStage子任务时,
//如果没有指定Executor线程池,在默认情况下CompletionStage会使用公共的ForkJoinPool线程池。
两个创建CompletionStage子任务的示例如下:
public class CompletableFutureDemo {//创建一个无消耗值(无输入值)、无返回值的异步子任务public static void runAsyncDemo() throws Exception {CompletableFuture<Void> future = CompletableFuture.runAsync(() -> {try {Thread.sleep(2000);System.out.println("run end...");} catch (InterruptedException e) {throw new RuntimeException(e);}});//等待异步任务执行完成,限时等待1秒://等待时间完成之后,判断异步任务是否执行完成,如果未完成则抛出超时异常future.get(1, TimeUnit.SECONDS);}//创建一个无消耗值(无输入值)、有返回值的异步子任务public static void supplyAsyncDemo() throws Exception {CompletableFuture<Long> future = CompletableFuture.supplyAsync(() -> {long start = System.currentTimeMillis();try {Thread.sleep(1000);} catch (InterruptedException e) {throw new RuntimeException(e);}System.out.println("run end...");return System.currentTimeMillis() - start;});//等待异步任务执行完成,限时等待2秒long time = future.get(2, TimeUnit.SECONDS);System.out.println("异步执行耗时(秒):" + time / 1000);}public static void main(String[] args) throws Exception {runAsyncDemo();supplyAsyncDemo();}
}
4.设置子任务回调钩子
可以为CompletionStage设置回调钩子,当计算完成或任务抛出异常时执行这些回调钩子。
设置子任务回调钩子的主要函数如下
//设置子任务完成时的回调钩子
public CompletableFuture<T> whenComplete(BiConsumer<? super T, ? super Throwable> action)
//设置子任务完成时的回调钩子,可能不在同一线程执行
public CompletableFuture<T> whenCompleteAsync(BiConsumer<? super T, ? super Throwable> action)
//设置子任务完成时的回调钩子,提交给线程池executor执行
public CompletableFuture<T> whenCompleteAsync(BiConsumer<? super T, ? super Throwable> action, Executor executor)
//设置异常处理的回调钩子
public CompletableFuture<T> exceptionally(Function<Throwable, ? extends T> fn)
下面是一个CompletionStage子任务设置完成钩子和异常钩子的简单示例:
public class CompletableFutureDemo1 {public static void whenCompleteDemo() throws Exception {//创建异步任务CompletableFuture<Void> future = CompletableFuture.runAsync(() -> {try {//模拟执行一秒Thread.sleep(1000);} catch (InterruptedException e) {throw new RuntimeException(e);}System.out.println(Thread.currentThread().getName()+":抛出异常");throw new RuntimeException(Thread.currentThread().getName()+":发生异常");});//设置异步任务执行完成后的回调钩子future.whenComplete(new BiConsumer<Void, Throwable>() {@Overridepublic void accept(Void unused, Throwable throwable) {System.out.println(Thread.currentThread().getName()+":执行完成!");}});//设置异步任务发生异常后的回调钩子future.exceptionally(new Function<Throwable, Void>() {@Overridepublic Void apply(Throwable throwable) {System.out.println(Thread.currentThread().getName()+":执行失败!" + throwable.getMessage());return null;}});//获取异步任务的结果//回调的触发来源异步任务结果的获取,就算异步任务内存在异常,但是没有获取异步任务的结果也不会回调异常钩子或者抛出异常future.get();}public static void main(String[] args) throws Exception {whenCompleteDemo();}
}
调用cancel()方法取消CompletableFuture时,任务被视为异常完成,completeExceptionally()方法所设置的异常回调钩子也会被执行。
如果没有设置异常回调钩子,发生内部异常时会有两种情况发生:
(1)在调用get()和get(long,TimeUnit)方法启动任务时,如果遇到内部异常,get()方法就会抛出ExecutionException(执行异常)。
(2)在调用join()和getNow(T)启动任务时(大多数情况下都是如此),如果遇到内部异常,join()和getNow(T)方法就会抛出CompletionException。
5.调用handle()方法统一处理异常和结果
除了分别通过whenComplete、exceptionally设置完成钩子、异常钩子之外,还可以调用handle()方法统一处理结果和异常。
handle方法有三个重载版本如下:
//在执行任务的同一个线程中处理异常和结果
public <U> CompletableFuture<U> handle(BiFunction<? super T, Throwable, ? extends U> fn)
//可能不在执行任务的同一个线程中处理异常和结果
public <U> CompletableFuture<U> handleAsync(BiFunction<? super T, Throwable, ? extends U> fn)
//在指定线程池executor中处理异常和结果
public <U> CompletableFuture<U> handleAsync(BiFunction<? super T, Throwable, ? extends U> fn, Executor executor)
handle()方法的示例代码如下:
public class CompletableDemo2 {public static void handleDemo() throws Exception {CompletableFuture<Void> future = CompletableFuture.runAsync(() -> {try {//模拟执行1秒Thread.sleep(1000);} catch (InterruptedException e) {throw new RuntimeException(e);}System.out.println(Thread.currentThread().getName()+":抛出异常");throw new RuntimeException(Thread.currentThread().getName()+":发生异常");});//统一处理异常和结果future.handle(new BiFunction<Void, Throwable, Void>() {@Overridepublic Void apply(Void unused, Throwable throwable) {if (throwable == null) {System.out.println(Thread.currentThread().getName()+":没有发生异常!");} else {System.out.println(Thread.currentThread().getName()+":sorry,发生了异常!");}return null;}});future.get();}public static void main(String[] args) throws Exception {handleDemo();}
}
6.异步任务的串行执行
如果两个异步任务需要串行(一个任务依赖另一个任务)执行,可以通过CompletionStage接口的thenApply()、thenAccept()、thenRun()和thenCompose()四个方法来实现。
thenApply()
//后一个任务与前一个任务在同一个线程中执行
public <U> CompletableFuture<U> thenApply(Function<? super T,? extends U> fn)
//后一个任务与前一个任务不在同一个线程中执行
public <U> CompletableFuture<U> thenApplyAsync(Function<? super T,? extends U> fn)
//后一个任务在指定的executor线程池中执行
public <U> CompletableFuture<U> thenApplyAsync(Function<? super T,? extends U> fn, Executor executor)
thenApply的三个重载版本有一个共同的参数fn,该参数表示要串行执行的第二个异步任务,它的类型为Function。fn的类型声明涉及两个泛型参数,具体如下:
- 泛型参数T:上一个任务所返回结果的类型。
- 泛型参数U:当前任务的返回值类型。
调用thenApply分两步计算(10+10)*2:
//调用thenApply分两步计算(10+10)*2
public class ThenApplyDemo {public static void main(String[] args) throws ExecutionException, InterruptedException {CompletableFuture<Long> future = CompletableFuture.supplyAsync(new Supplier<Long>() {@Overridepublic Long get() {long firstStep = 10L + 10L;System.out.println(Thread.currentThread().getName()+":firstStep out is " + firstStep);return firstStep;}}).thenApplyAsync(new Function<Long, Long>() {@Overridepublic Long apply(Long firstStepOut) {long secondStep = firstStepOut * 2;System.out.println(Thread.currentThread().getName()+":secondStep out is " + secondStep);return secondStep;}});Long result = future.get();System.out.println(Thread.currentThread().getName()+":out is " + result);}
}
thenRun()方法
thenRun()方法与thenApply()方法不同的是,不关心任务的处理结果。只要前一个任务执行完成,就开始执行后一个串行任务。
//后一个任务与前一个任务在同一个线程中执行
public CompletableFuture<Void> thenRun(Runnable action)
//后一个任务与前一个任务不在同一个线程中执行
public CompletableFuture<Void> thenRunAsync(Runnable action)
//后一个任务在指定的executor线程池中执行
public CompletableFuture<Void> thenRunAsync(Runnable action,Executor executor)
从方法的声明可以看出,thenRun()方法同thenApply()方法类似,不同的是前一个任务处理完成后,thenRun()并不会把计算的结果传给后一个任务,而且后一个任务也没有结果输出。
thenAccept()方法
调用thenAccept()方法时后一个任务可以接收(或消费)前一个任务的处理结果,但是后一个任务没有结果输出。
//后一个任务与前一个任务在同一个线程中执行
public CompletableFuture<Void> thenAccept(Consumer<? super T> action)
//后一个任务与前一个任务不在同一个线程中执行
public CompletableFuture<Void> thenAcceptAsync(Consumer<? super T> action)
//后一个任务在指定的executor线程池中执行
public CompletableFuture<Void> thenAcceptAsync(Consumer<? super T> action,Executor executor)
thenCompose()方法
thenCompose方法在功能上与thenApply()、thenAccept()、thenRun()一样,可以对两个任务进行串行的调度操作,第一个任务操作完成时,将它的结果作为参数传递给第二个任务。
public <U> CompletableFuture<U> thenCompose(Function<? super T, ? extends CompletionStage<U>> fn)
public <U> CompletableFuture<U> thenComposeAsync(Function<? super T, ? extends CompletionStage<U>> fn) public <U> CompletableFuture<U> thenComposeAsync(Function<? super T, ? extends CompletionStage<U>> fn,Executor executor)
thenCompose()方法要求第二个任务的返回值是一个CompletionStage异步实例。因此,可以调用CompletableFuture.supplyAsync()方法将第二个任务所要调用的普通异步方法包装成一个CompletionStage实例。
这里使用thenCompose()分两步计算(10+10)*2
public class ThenComposeDemo {public static void main(String[] args) throws ExecutionException, InterruptedException {CompletableFuture<Long> future = CompletableFuture.supplyAsync(new Supplier<Long>() {@Overridepublic Long get() {long firstStep = 10 + 10;System.out.println(Thread.currentThread().getName()+":first out is " + firstStep);return firstStep;}}).thenCompose(new Function<Long, CompletionStage<Long>>() {@Overridepublic CompletionStage<Long> apply(Long firstStepOut) {//将第二个任务所要调用的普通异步方法包装成一个CompletionState异步实例return CompletableFuture.supplyAsync(new Supplier<Long>() {//两个任务所要调用的普通异步方法@Overridepublic Long get() {long secondStep = firstStepOut * 2;System.out.println(Thread.currentThread().getName()+":second Step out is " + secondStep);return secondStep;}});}});Long result = future.get();System.out.println(Thread.currentThread().getName()+":out is " + result);}
}
四个任务串行方法的区别
thenApply()、thenRun()、thenAccept()这三个方法的不同之处主要在于其核心参数fn、action、consumer的类型不同,分别为Function<T,R>、Runnable、Consumer<? super T>类型。
但是,thenCompose()方法与thenApply()方法有本质的不同:
- thenCompose()的返回值是一个新的CompletionStage实例,可以持续用来进行下一轮CompletionStage任务的调度。
- thenApply()的返回值就是第二个任务的普通异步方法的执行结果,它的返回类型与第二不执行的普通异步方法的返回类型相同,通过thenApply()所返回的值不能进行下一轮CompletionStage链式(或者流式)调用。
7.异步任务的合并执行
如果某个任务同时依赖另外两个异步任务的执行结果,就需要对另外两个异步任务进行合并。以泡茶为例,“泡茶喝”任务需要对“烧水”任务与“清洗”任务进行合并。
thenCombine()方法
thenCombine()会在两个CompletionStage任务都执行完成后,把两个任务的结果一起交给thenCombine()来处理。
//合并代表第二步任务(参数other)的CompletionStage实例,返回第三步任务的CompletionStage
public <U,V> CompletableFuture<V> thenCombine(CompletionStage<? extends U> other,BiFunction<? super T,? super U,? extends V> fn)
//不一定在同一个线程中执行第三步任务的CompletionStage实例
public <U,V> CompletableFuture<V> thenCombineAsync(CompletionStage<? extends U> other,BiFunction<? super T,? super U,? extends V> fn)
//第三步任务的CompletionStage实例在指定的executor线程池中执行
public <U,V> CompletableFuture<V> thenCombineAsync(CompletionStage<? extends U> other,BiFunction<? super T,? super U,? extends V> fn, Executor executor)
thenCombine()方法的调用者为第一步的CompletionStage实例,该方法的第一个参数为第二步的CompletionStage实例,该方法的返回值为第三步的CompletioStage实例。在逻辑上,thenCombine()方法的功能是将第一步、第二步的结果合并到第三步上。
thenCombine()系列方法有两个核心参数:
- other参数:表示待合并的第二步任务的CompletionStage实例。
- fn参数:表示第一个任务和第二个任务执行完成后,第三步需要执行的逻辑。
fn参数的类型为BiFunction<? super T,? super U,? extends V>,该类型的声明涉及三个泛型参数:
- T:表示第一个任务所返回结果的类型
- U:表示第二个任务所返回结果的类型
- V:表示第三个任务所返回结果的类型
//使用thenCombine()计算(10+10)*(10+10)
public class ThenCombineDemo {public static void main(String[] args) throws ExecutionException, InterruptedException {CompletableFuture<Integer> future1 = CompletableFuture.supplyAsync(new Supplier<Integer>() {@Overridepublic Integer get() {Integer firstStep = 10 + 10;System.out.println(Thread.currentThread().getName()+":firstStep out is " + firstStep);return firstStep;}});CompletableFuture<Integer> future2 = CompletableFuture.supplyAsync(new Supplier<Integer>() {@Overridepublic Integer get() {Integer secondStep = 10 + 10;System.out.println(Thread.currentThread().getName()+":secondStep out is " + secondStep);return secondStep;}});CompletableFuture<Integer> future3 = future1.thenCombine(future2, new BiFunction<Integer, Integer, Integer>() {@Overridepublic Integer apply(Integer step1Out, Integer step2Out) {return step1Out * step2Out;}});Integer result = future3.get();System.out.println(Thread.currentThread().getName()+":out is " + result);}
}
runAfterBoth()方法
runAfterBoth()方法不关心每一步任务的输入参数和处理结果。
//合并第二步任务的CompletionStage实例,返回第三步任务的CompletionStage
public CompletableFuture<Void> runAfterBoth(CompletionStage<?> other,Runnable action)
//不一定在同一个线程中执行第三步任务的CompletionStage实例
public CompletableFuture<Void> runAfterBothAsync(CompletionStage<?> other,Runnable action)
//第三步任务的CompletionStage实例在指定的executor线程池中执行
public CompletableFuture<Void> runAfterBothAsync(CompletionStage<?> other,Runnable action,Executor executor)
thenAcceptBoth()方法
该方法是对runAfterBoth()方法和thenCombine()方法的特点进行了折中,调用thenAcceptBoth()方法,第三个任务可以接收其合并过来的第一个任务、第二个任务的处理结果,但是第三个任务(合并任务)却不能返回结果。
public <U> CompletableFuture<Void> thenAcceptBoth(CompletionStage<? extends U> other,BiConsumer<? super T, ? super U> action)
public <U> CompletableFuture<Void> thenAcceptBothAsync(CompletionStage<? extends U> other,BiConsumer<? super T, ? super U> action)
public <U> CompletableFuture<Void> thenAcceptBothAsync(CompletionStage<? extends U> other,BiConsumer<? super T, ? super U> action, Executor executor)
allOf()等待所有的任务结束
CompletionStage接口的allOf()会等待所有的任务结束,以合并所有的任务。thenCombine()只能合并两个任务,如果需要合并多个异步任务,那么可以调用allOf()。阻塞所有任务执行完成之后,才可以往下执行。
//allOF()会等待所有的任务结束,以合并所有的任务
public class AllOfDemo {public static void main(String[] args) {CompletableFuture<Void> future1 = CompletableFuture.runAsync(() -> System.out.println(Thread.currentThread().getName()+":模拟异步任务1"));CompletableFuture<Void> future2 = CompletableFuture.runAsync(() -> System.out.println(Thread.currentThread().getName()+":模拟异步任务2"));CompletableFuture<Void> future3 = CompletableFuture.runAsync(() -> System.out.println(Thread.currentThread().getName()+":模拟异步任务3"));CompletableFuture<Void> future4 = CompletableFuture.runAsync(() -> System.out.println(Thread.currentThread().getName()+":模拟异步任务4"));CompletableFuture<Void> all = CompletableFuture.allOf(future1, future2, future3, future4);all.join();System.out.println(Thread.currentThread().getName()+":所有异步任务都已经执行完毕");}
}
8.采摘果园实例
为了异步执行整个排查流程,分别设计三个线程:运输果实线程(MainThread,主线程)、采苹果线程(HotWaterThread)和采橘子线程(WashThread)。
- 运输果实线程的工作是:启动采苹果线程、启动采橘子线程,等采苹果、采橘子的工作完成后,运输到仓库;
- 采苹果线程的工作是:找到苹果、采苹果、放到框里;
- 采橘子线程的工作是:找到橘子、采橘子、放到框里;
我们使用CompletableFuture实现整个采摘果园程序。我们分3个任务:
任务1负责采苹果
任务2负责采橘子
任务3负责运输
public class DrinkTea {public static final int SLEEP_GAP = 3000;public static void main(String[] args) throws ExecutionException, InterruptedException {//任务1:采苹果CompletableFuture<Boolean> hotJob = CompletableFuture.supplyAsync(() -> {for (int i = 1; i <= 10; i++) {System.out.println(Thread.currentThread().getName() + ":找到苹果"+i);System.out.println(Thread.currentThread().getName() + ":采苹果"+i);System.out.println(Thread.currentThread().getName() + ":框里"+i+"苹果");}//线程睡眠一段时间,代表采苹果中try {Thread.sleep(SLEEP_GAP);} catch (InterruptedException e) {throw new RuntimeException(e);}System.out.println(Thread.currentThread().getName() + ":框满了");return true;});//任务2:采橘子CompletableFuture<Boolean> washJob = CompletableFuture.supplyAsync(() -> {for (int i = 1; i <= 10; i++) {System.out.println(Thread.currentThread().getName() + ":找到橘子"+i);System.out.println(Thread.currentThread().getName() + ":采橘子"+i);System.out.println(Thread.currentThread().getName() + ":框里有"+i+"橘子");}//线程睡眠一段时间,代表采橘子中try {Thread.sleep(SLEEP_GAP);} catch (InterruptedException e) {throw new RuntimeException(e);}System.out.println(Thread.currentThread().getName() + ":框满了");return true;});//任务3:任务1和任务2完成后执行运输CompletableFuture<String> drinkJob = hotJob.thenCombine(washJob, new BiFunction<Boolean, Boolean, String>() {@Overridepublic String apply(Boolean hotOK, Boolean washOK) {if (hotOK && washOK) {System.out.println(Thread.currentThread().getName() + ":苹果框满了,橘子框满了。开始运输");return "运输完成";}return "苹果框或者橘子框未满";}});//等待任务3执行结果System.out.println(Thread.currentThread().getName() + ":" + drinkJob.get());}
}


![[Docker] Docker为什么出现](https://img-blog.csdnimg.cn/direct/eb8c99a6ce3049ea8d0d7a26c5f8ed28.png)