apache简介
Apache HTTP Server(简称Apache)是Apache软件基金会的一个开放源码的网页服务器,可以在大多数计算机操作系统中运行,由于其多平台和安全性被广泛使用,是最流行的Web服务器端软件之一。它快速、可靠并且可通过简单的API扩展,将Perl/Python等解释器编译到服务器中。
Apache HTTP服务器是一个模块化的服务器,源于NCSAhttpd服务器,经过多次修改,成为世界使用排名第一的Web服务器软件。它可以运行在几乎所有广泛使用的计算机平台上。
Apache源于NCSAhttpd服务器,经过多次修改,成为世界上最流行的Web服务器软件之一。Apache取自“a patchy server”的读音,意思是充满补丁的服务器,因为它是自由软件,所以不断有人来为它开发新的功能、新的特性、修改原来的缺陷。Apache的特点是简单、速度快、性能稳定,并可做代理服务器来使用。
Apacheweb服务器软件拥有以下特性:
1.支持最新的HTTP/1.1通信协议
2.拥有简单而强有力的基于文件的配置过程
3.支持通用网关接口
4.支持基于IP和基于域名的虚拟主机
5.支持多种方式的HTTP认证
6.集成Perl处理模块
7.集成代理服务器模块
8.支持实时监视服务器状态和定制服务器日志
9.支持服务器端包含指令(SSI)
10.支持安全Socket层(SSL)
11.提供用户会话过程的跟踪
12.支持FastCGI
13.通过第三方模块可以支持JavaServlets
修改apache的默认参数
apache的基础信息:
主配置目录   /etc/httpd/conf
主配置文件    /etc/httpd/conf/httpd.conf
子配置目录    /etc/httpd/conf.d
子配置文件    /etc/httpd/conf.d/*.conf
默认发布的端口  80
默认发布目录   /var/www/html
默认发布文件  /var/www/html/index
默认安全上下文    httpd_sys_content_t
程序开启默认用户   apache
apache日志    /etc/httpd/logs/*
1.修改默认的端口
selinux=enforcing下的允许端口如下:
[root@apache-server conf]# semanage port -l |grep http
http_cache_port_t              tcp      8080, 8118, 8123, 10001-10010
http_cache_port_t              udp      3130
http_port_t                    tcp      80, 81, 443, 488, 8008, 8009, 8443, 9000
pegasus_http_port_t            tcp      5988
pegasus_https_port_t           tcp      5989
第一种:将默认端口修改成selinux允许的端口
第一步:在/etc/httpd/conf/httpd.conf 文件中更改端口号为8080
Listen 8080第二步:在火墙中添加端口8080/tcp
[root@apache-server conf]# firewall-cmd --permanent --add-port=8080/tcp
success
[root@apache-server conf]# firewall-cmd --reload
success
测试:重启服务,在浏览器中输入http://172.25.254.222:8080

第二种:将默认端口改成修改行为selinux下不允许的端口6666
第一步:在/etc/httpd/conf/httpd.conf 文件中更改端口号
Listen 6666第二步:在火墙中添加端口6666/tcp
[root@apache-server conf]# firewall-cmd --permanent --add-port=6666/tcp
success
[root@apache-server conf]# firewall-cmd --reload
success
第三步:将6666这个端口添加到selinux给http服务分配的可用端口中
semanage port -l | grep http   ##查看selinux给http分配了哪些端口
semanage port -a -t http_port_t -p tcp 6666
参数用法意义:
######################################################
#optional arguments:-a, --add             Add a record of the port object type-d, --delete          Delete a record of the port object type-m, --modify          Modify a record of the port object type-D, --deleteall       Remove all port objects local customizations-t TYPE, --type TYPE  SELinux Type for the object-p PROTO, --proto PROTOProtocol for the specified port (tcp|udp) or internet
######################################################
测试:重启服务,在浏览器中输入172.25.254.222:6666

2.更改默认发布文件
第一步:编辑主配置文件/etc/httpd/conf/httpd.conf
163 <IfModule dir_module>
164     DirectoryIndex westos.html  index.html
165 </IfModule>
第二步:编辑发布文件/var/www/html/westos.html
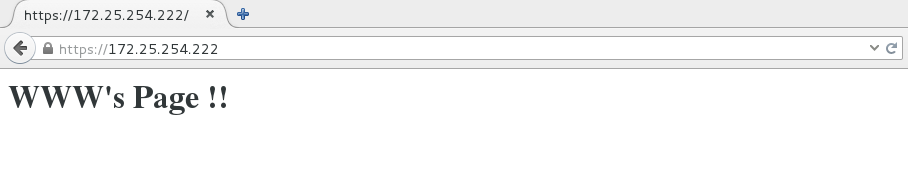
<h1>westos's page</h1>测试:重启服务,在浏览器中输入http://172.25.254.222

3.更改默认发布目录
第一步:创建一个目录/westos/web/html,并编辑/westos/web/html/westos.html文件
<h1>Hello Westos !!</h1>第二步:编辑 主配置文件/etc/httpd/conf/httpd.conf ,更改默认发布目录和给这个目录授权
120 DocumentRoot "/westos/web/html"    ##更改默认发布目录
121 <Directory "/westos/web/html">     ##给这个目录授权
122      Require all granted
123 </Directory>
第三步:更改目录及目录中的文件安全上下文
注意:一定要更改为http的默认安全上下文,否则测试的时候会出错
[root@apacheserver html]# semanage fcontext -a -t httpd_sys_content_t '/westos(/.*)?'
[root@apacheserver html]# restorecon -RvvF /westos   ##刷新安全上下文
测试:重启服务,在浏览器中输入http://172.25.254.222

apache的安装部署
第一步:安装apache软件和apache的手册,并开启服务
yum install httpd -y
yum install httpd-manual
systemct  start httpd
systemctl enable httpd
第二步:设置火墙,将http和https这两个服务永久添加到火墙中
firewall-cmd --permanent  --add-service=http
firewall-cmd --permanent  --add-service=https
firewall-cmd --reload
第三步:编辑默认发布文件/var/www/html/index
<h1>Hello Westos !!<h1>测试:在浏览器中输入http://172.25.254.222/

错误:
在安装软件的过程中,如果没有安装完全,突然间电脑重启,则软件的文件内容可能会出错,造成实验结果的错误
解决办法:
rpm -qc httpd-manual 查找相关的文件,删除,然后用yum reinstall 重新安装,重新安装后重启httpd服务
[root@apache-server html]# rpm -qc httpd-manual
/etc/httpd/conf.d/manual.conf
[root@apache-server conf.d]# rm -fr manual.conf
[root@apache-server conf.d]# yum reinstall httpd-manual
[root@apache-server conf.d]# systemctl restart httpd
apache的虚拟主机配置
第一步:为了保证实验环境的纯净,我们先恢复主配置文件
[root@apacheserver html]# rm -fr  /etc/httpd/conf/httpd.conf
[root@apacheserver html]# yum reinstall httpd
重启服务
[root@apacheserver html]# systemctl restart httpd
[root@apacheserver html]# systemctl status httpd
第二步:创建/var/www/westos.com/news/html和/var/www/westos.com/music/html目录
[root@apacheserver www]# mkdir westos.com/news/html -p
[root@apacheserver www]# mkdir westos.com/music/html -p
编辑三个文件/var/www/html/index.html,/var/www/westos.com/music/html/index.html,/var/www/westos.com/news/html/index.html
[root@apacheserver www]# cat /var/www/html/index.html
<h1>hello word !</h1>
[root@apacheserver html]# cat /var/www/westos.com/music/html/index.html
<h1>music's page</h1>
[root@apacheserver html]# cat /var/www/westos.com/news/html/index.html
<h1>news's page</h1>
第三步:进入/etc/httpd/conf.d/目录下,编辑其他参数的子配置文件
注意:在主配置文件中,IncludeOptional指令会将/etc/httpd/conf.d/*.conf文件的内容作为主配置文件的一部分
编辑默认目录的参数配置文件
<VirtualHost _default_:80>DocumentRoot /var/www/htmlCustomLog logs/default.log combined
</VirtualHost>
编辑/var/www/westos.com/news/html目录的参数配置文件
<VirtualHost *:80>ServerName news.westos.com    ##指定站点名称为news.westos.com时,访问80端口的默认目录为下边的默认目录DocumentRoot /var/www/westos.com/news/html    ##站点默认发布目录CustomLog logs/news.log combined    ##站点日志combined标示四种日志的集合
</VirtualHost>
<Directory "/var/www/westos.com/news/html">Require all granted
</Directory>
编辑/var/www/westos.com/music/html目录的参数配置文件
<VirtualHost *:80>ServerName music.westos.comDocumentRoot /var/www/westos.com/music/htmlCustomLog logs/music.log combined
</VirtualHost>
<Directory "/var/www/westos.com/music/html">Require all granted
</Directory>
注意:要给这两个不是默认目录的目录权限
测试:在真机的/etc/hosts文件中添加域名解析,在浏览器中分别访问www.westos.com music.westos.com news.westos.com
172.25.254.222 www.westos.com music.westos.com news.westos.com访问www.westos.com

访问news.westos.com

访问music.westos.com

注意:访问不同的域名时解析出相同的主机,但是访问不同的发布目录和发布文件,得到不同的页面!!!
apache的访问控制
1.针对主机ip的访问控制
编辑/etc/httpd/conf.d/a_default.conf文件
1 <VirtualHost _default_:80>2 DocumentRoot /var/www/html3 CustomLog logs/default.log combined4 </VirtualHost>5 <Directory "/var/www/html">6 Order Allow,Deny ##列表的读取顺序,哪个在前先读哪个,后边的会把前边的覆盖掉7 Allow from 172.25。254.608 Deny from 172.25.254.122 ##不允许9 </Directory>测试:在172.25.254.60这台主机的浏览器中输入http://172.25.254.222进行访问

而在172.25.254.122这台主机访问172.25.254.222则被拒绝,只是显示apche的测试页

2.针对用户名和密码用户方式的访问控制
第一步:生成apche的用户名和密码

#####################################################
Usage:-c  Create a new file.-i  Read password from stdin without verification (for script usage).-m  Force MD5 encryption of the password (default).-B  Force bcrypt encryption of the password (very secure).-d  Force CRYPT encryption of the password (8 chars max, insecure).-s  Force SHA encryption of the password (insecure).-p  Do not encrypt the password (plaintext, insecure).-D  Delete the specified user.-v  Verify password for the specified user.
#####################################################
第二步:编辑 a_default.conf文件
1 <VirtualHost _default_:80>2 DocumentRoot /var/www/html ##默认目录位置3 CustomLog logs/default.log combined ##日志文件4 </VirtualHost>10 <Directory "/var/www/html">11 AuthUserFile /etc/httpd/conf.d/http_userlist ##认证用户文件12 AuthName "Please input username ang password !!" ##认证页面提示13 AuthType basic ##认证为基础认证14 Require valid-user ##允许认证文件中的所有用户# Require user admin ##只允许admin用户15 </Directory>ctrl + shift + delete 删除缓存
测试:访问网页时,输入用户名和密码才可以访问

apache支持的语言
1.html
测试:172.25.254.222

2.php
编辑发布文件/var/www/html/index.php
1 <?php2 phpinfo();3 ?>注意:apche不能自动识别php语言,要安装能够使apache识别php的插件
yum install php -y测试:172.25.254.222/index.php得到php的测试页

3.cgi
CGI 是Web 服务器运行时外部程序的规范,按CGI 编写的程序可以扩展服务器功能。CGI 应用程序能与浏览器进行交互,还可通过数据库API 与数据库服务器等外部数据源进行通信,从数据库服务器中获取数据。格式化为HTML文档后,发送给浏览器,也可以将从浏览器获得的数据放到数据库中。几乎所有服务器都支持CGI,可用任何语言编写CGI,包括流行的C、C ++、VB 和Delphi 等。CGI 分为标准CGI 和间接CGI两种。标准CGI 使用命令行参数或环境变量表示服务器的详细请求,服务器与浏览器通信采用标准输入输出方式。间接CGI 又称缓冲CGI,在CGI 程序和CGI 接口之间插入一个缓冲程序,缓冲程序与CGI 接口间用标准输入输出进行通信。
第一种:在/var/www/html/cgi-bin目录下创建.cgi文件,可以直接识别cgi
1 #!/usr/bin/perl2 print "Content-type: text/html\n\n";3 print `date`;注意:一定要更改文件的执行权限,否则会出现访问错误
chmod +x .cgi
先执行脚本,确保脚本可以正常运行
测试:172.25.254.222/cgi-bin/index.cgi

第二种:创建别的目录下的.cgi文件
第一步:创建 /var/www/html/cgi目录
第二步:编辑index.cgi文件
#!/usr/bin/perl
print "Content-type: text/html\n\n";
print `date`;
第三步:编辑 /etc/httpd/conf.d/a_default.conf文件,给上述目录授权
<VirtualHost _default_:80>DocumentRoot /var/www/htmlCustomLog logs/default.log combined
</VirtualHost>
<Directory "/var/www/html/cgi">Options ExecCGI     ##这个目录支持CGIAddHandler cgi-script .cgi     ##支持的类型
</Directory>
注意:一定要检查selinux,更改安全上下文为httpd_sys_script_exec_t,否则 访问会被拒绝出现“Internal Swrver Error”
[root@apache-server conf.d]# semanage fcontext -a -t httpd_sys_script_exec_t '/var/www/html/cgi(/.*)?'
[root@apache-server conf.d]# restorecon -RvvF /var/www/html/cgi/
测试:172.25.254.222/cgi/index.cgi

apache的加密传输https
第一步:安装提供https服务的软件,通过mod_ssl 模块来实现对SSL的支持。
yum install mod_ssl -y测试:https://172.25.254.222 可以生成锁,但是和本机并没有关系


得到锁后可以加密传输获得 172.25.254.222的页面

注意:这一步生成的密钥和认证和本服务器没有关联,若要有关联,则要自己生成密钥和认证。
第二步:安装生成密钥的软件,执行命令,生成密钥
 yum install crypto-utils -ygenkey www.westos.com
生成两个文件
output will be written to /etc/pki/tls/certs/www.westos.com.crt     ##认证文件
output key written to /etc/pki/tls/private/www.westos.com.key     ##加密文件
第三步:编辑 /etc/httpd/conf.d/ssl.conf文件,将密钥替换

测试:重启服务 systemctl restart httpd,在浏览器中输入https://172.25.254.122,获取锁,然后加密传输

网页重写
设定http虚拟主机并设定网页重写,网站强制客户走443https,自动走加密
第一步:编辑/var/www/westos.com/login/html/index.html文件
<h1>login's page</h1>第二步:编辑/etc/httpd/conf.d/login.conf文件
  1 <VirtualHost *:443>    ##当访问login.westos.com时,访问的是443端口2         SSlEngine on      ##开启加密软件3         ServerName login.westos.com4         DocumentRoot /var/www/westos.com/login/html   访问的文件的根5         CustomLog logs/login.log combined6         SSLCertificateFile /etc/pki/tls/certs/www.westos.com.crt   加密认证文件7         SSLCertificateKeyFile /etc/pki/tls/private/www.westos.com.key  加密密钥文件   89 </VirtualHost>10 <Directory "/var/www/westos.com/login/html">11         Require all granted12 </Directory>13 <VirtualHost *:80>     ##当访问login.westos.com时,访问的是80端口14         ServerName login.westos.com15         RewriteEngine on       ##开启重写软件16         RewriteRule ^(/.*)$ https://%{HTTP_HOST}$1 [redirect=301]   ##重写规则17 </VirtualHost>^(/.*)$   ##客户端在浏览器地址栏中输入的所有字符https://   ##强制客户加密访问
%{HTTP_HOST}    ##客户请求主机
$1            ##"$1"标示^(/.*)$的值[redirect=301]   ##临时重写    302临时转换
测试:在浏览器中的输入172.25.254.222,会自动切换成https://172.25.254.222
使apache能够识别python语言
1.安装能够使apache识别python的软件
WSGI提供python语言支持
yum search wsgiyum install mod_wsgi.x86_64 -y
2.编辑/etc/httpd/conf.d/webapp.conf文件
vim webapp.conf
  1 <VirtualHost *:80>2        ServerName webapp.westos.com3        DocumentRoot /var/www/cgi-bin4        CustomLog logs/webapp.log combined5        WSGIScriptAlias / /var/www/cgi-bin/webapp.wsgi   ##当访问网站的根的时候,直接切换到/var/www/cgi-bin/webapp.wsgi
注意:如果没有这句,则访问页面时,只会把webapp.wsgi中的内容输出到网页上,而不能执行文件中的内容6 </VirtualHost>
3.重启服务
systemctl restart httpd
错误检查:selinux安全上下文问题
火墙起不来,关掉虚拟化设备,重启