刚工作那会用的还是tomcat、springMVC、hibernate、mybatis、html、jsp……搭个项目可真是麻烦,各种复杂的结构还得打个war包配置web.xml,启动tomcat……后来也没做网站开发了,最近又看了看springboot,比之前那种开发web项目简单多了,开发效率高;一边学习一边做笔记;
maven导入:
<dependency><groupId>org.springframework.boot</groupId><artifactId>spring-boot</artifactId><version>2.2.0.RELEASE</version></dependency><dependency><groupId>org.springframework.boot</groupId><artifactId>spring-boot-starter</artifactId><version>2.2.0.RELEASE</version></dependency><dependency><groupId>org.springframework.boot</groupId><artifactId>spring-boot-starter-parent</artifactId><version>2.2.0.RELEASE</version><type>pom</type></dependency><dependency><groupId>org.springframework.boot</groupId><artifactId>spring-boot-starter-web</artifactId><version>2.2.0.RELEASE</version></dependency>为了方便开发学习,还导入了:
<dependency><groupId>org.springframework.boot</groupId><artifactId>spring-boot-devtools</artifactId><version>2.2.0.RELEASE</version></dependency>devtools可以在一些代码变动时自动编译重启项目,也可以手动修改配置指定代码变动生效或者禁用;
启动springboot
在main方法里调用SpringApplication.run()方法,并传入一个class,并在这个class类前加上@SpringBootApplication注解,就可以启动一个没有controller的默认配置的web服务;(通常情况main方法也放在这个class类里启动)
/*** 2022年10月20日下午3:50:18*/
package testspringboot.test1;import org.springframework.boot.SpringApplication;
import org.springframework.boot.autoconfigure.SpringBootApplication;/*** @author XWF**/
@SpringBootApplication
public class Test1Main {/*** @param args*/public static void main(String[] args) {SpringApplication.run(Test1Main.class, args);}}
启动服务:

默认端口是8080,默认项目上下文路径是“/”,没有controller访问返回错误页:

添加配置文件
默认配置文件名字是application.properties或者application.yml,默认可以放在四个位置:classpath/下、classpath/config/下、根目录/下、根目录/config/下;(也可以通过@PropertySource指定位置和自定义配置文件名字)
最简单的在application.properties里指定端口和上下文路径:
server.port=8888
server.servlet.context-path=/testspringboot
再次启动,端口和上下文路径改变了:

增加controller:
@SpringBootApplication是个组合注解,默认扫描当前类包下以及子包的bean;(也可以用@ComponentScan设置扫描路径)
需要在controller类前加@Controller或者@RestController注解;(@RestController的controller返回字符串或者json数据,@Controller默认返回视图,在@Controller下使用@ResponseBody等同于@RestController功能)
/*** 2022年10月21日下午3:01:39*/
package testspringboot.test1;import org.springframework.web.bind.annotation.RequestMapping;
import org.springframework.web.bind.annotation.RestController;/*** @author XWF**/
@RestController
public class Test1Controller {@RequestMapping("/test1")public String test1() {return "Test1Controller.test1()";}}
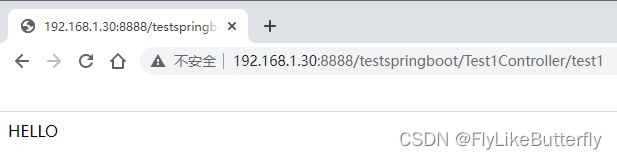
访问结果:

也可以在controller类前再加一个总的@RequestMapping
/*** 2022年10月21日下午3:01:39*/
package testspringboot.test1;import org.springframework.web.bind.annotation.RequestMapping;
import org.springframework.web.bind.annotation.RestController;/*** @author XWF**/
@RestController
@RequestMapping("/Test1Controller")
public class Test1Controller {@RequestMapping("/test1")public String test1() {return "HELLO";}}