Reinforcement Learning with Code 【Code 1. Tabular Q-learning】
This note records how the author begin to learn RL. Both theoretical understanding and code practice are presented. Many material are referenced such as ZhaoShiyu’s Mathematical Foundation of Reinforcement Learning.
This code refers to Mofan’s reinforcement learning course.
文章目录
- Reinforcement Learning with Code 【Code 1. Tabular Q-learning】
- 1.1 Problem and result
- 1.2 Environment
- 1.3 Tabular Q-learning Algorithm
- 1.3 Run this main
- Reference
1.1 Problem and result
Please consider the problem that a little mouse (denoted by red block) wants to avoid trap (denoted by black block) to get the cheese (denoted by yellow circle). As the figure shows.
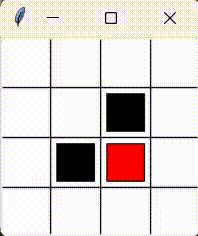
This chapter aims to realize tabular Q-learning algorithm sovle this problem.
1.2 Environment
We use the tkinter package of python to build our environment to interact with agent.
import numpy as np
import time
import sys
import tkinter as tk
# if sys.version_info.major == 2: # 检查python版本是否是python2
#     import Tkinter as tk
# else:
#     import tkinter as tkUNIT = 40   # pixels
MAZE_H = 4  # grid height
MAZE_W = 4  # grid widthclass Maze(tk.Tk, object):def __init__(self):super(Maze, self).__init__()# Action Spaceself.action_space = ['up', 'down', 'right', 'left'] # action space self.n_actions = len(self.action_space)# 绘制GUIself.title('Maze env')self.geometry('{0}x{1}'.format(MAZE_W * UNIT, MAZE_H * UNIT))   # 指定窗口大小 "width x height"self._build_maze()def _build_maze(self):self.canvas = tk.Canvas(self, bg='white',height=MAZE_H * UNIT,width=MAZE_W * UNIT)     # 创建背景画布# create gridsfor c in range(UNIT, MAZE_W * UNIT, UNIT): # 绘制列分隔线x0, y0, x1, y1 = c, 0, c, MAZE_H * UNITself.canvas.create_line(x0, y0, x1, y1)for r in range(UNIT, MAZE_H * UNIT, UNIT): # 绘制行分隔线x0, y0, x1, y1 = 0, r, MAZE_W * UNIT, rself.canvas.create_line(x0, y0, x1, y1)# create origin 第一个方格的中心,origin = np.array([UNIT/2, UNIT/2]) # hellhell1_center = origin + np.array([UNIT * 2, UNIT])self.hell1 = self.canvas.create_rectangle(hell1_center[0] - (UNIT/2 - 5), hell1_center[1] - (UNIT/2 - 5),hell1_center[0] + (UNIT/2 - 5), hell1_center[1] + (UNIT/2 - 5),fill='black')# hellhell2_center = origin + np.array([UNIT, UNIT * 2])self.hell2 = self.canvas.create_rectangle(hell2_center[0] - (UNIT/2 - 5), hell2_center[1] - (UNIT/2 - 5),hell2_center[0] + (UNIT/2 - 5), hell2_center[1] + (UNIT/2 - 5),fill='black')# create oval 绘制终点圆形oval_center = origin + np.array([UNIT*2, UNIT*2])self.oval = self.canvas.create_oval(oval_center[0] - (UNIT/2 - 5), oval_center[1] - (UNIT/2 - 5),oval_center[0] + (UNIT/2 - 5), oval_center[1] + (UNIT/2 - 5),fill='yellow')# create red rect 绘制agent红色方块,初始在方格左上角self.rect = self.canvas.create_rectangle(origin[0] - (UNIT/2 - 5), origin[1] - (UNIT/2 - 5),origin[0] + (UNIT/2 - 5), origin[1] + (UNIT/2 - 5),fill='red')# pack all 显示所有canvasself.canvas.pack()def get_state(self, rect):# convert the coordinate observation to state tuple# use the uniformed center as the state such as # |(1,1)|(2,1)|(3,1)|...# |(1,2)|(2,2)|(3,2)|...# |(1,3)|(2,3)|(3,3)|...# |....x0,y0,x1,y1 = self.canvas.coords(rect)x_center = (x0+x1)/2y_center = (y0+y1)/2state = ((x_center-(UNIT/2))/UNIT + 1, (y_center-(UNIT/2))/UNIT + 1)return statedef reset(self):self.update()self.after(500) # delay 500msself.canvas.delete(self.rect)   # delete origin rectangleorigin = np.array([UNIT/2, UNIT/2])self.rect = self.canvas.create_rectangle(origin[0] - (UNIT/2 - 5), origin[1] - (UNIT/2 - 5),origin[0] + (UNIT/2 - 5), origin[1] + (UNIT/2 - 5),fill='red')# return observation return self.get_state(self.rect)   def step(self, action):# agent和环境进行一次交互s = self.get_state(self.rect)   # 获得智能体的坐标base_action = np.array([0, 0])if action == self.action_space[0]:   # upif s[1] > 1:base_action[1] -= UNITelif action == self.action_space[1]:   # downif s[1] < MAZE_H:base_action[1] += UNITelif action == self.action_space[2]:   # rightif s[0] < MAZE_W:base_action[0] += UNITelif action == self.action_space[3]:   # leftif s[0] > 1:base_action[0] -= UNITself.canvas.move(self.rect, base_action[0], base_action[1])  # move agents_ = self.get_state(self.rect)  # next state# reward functionif s_ == self.get_state(self.oval):     # reach the terminalreward = 1done = Trues_ = 'terminal'elif s_ in [self.get_state(self.hell1), self.get_state(self.hell2)]: # reach the blockreward = -1done = Trues_ = 'terminal'else:reward = 0done = Falsereturn s_, reward, donedef render(self): # 显示函数self.after(300) # delay 300msself.update()   # update the windowif __name__ == '__main__':def test():for t in range(10):s = env.reset()print(s)while True:env.render()a = 'right's, r, done = env.step(a)print(s)if done:breakenv = Maze()env.after(100, test)      # 在延迟100ms后调用函数testenv.mainloop()
This part is important that the reward function design is include, which is as follows
reward = { 1 , if reach the cheese − 1 , if reach the trap 0 , others \text{reward} = \left \{ \begin{aligned} & 1, \quad \text{if reach the cheese} \\ & -1, \quad \text{if reach the trap} \\ & 0, \quad \text{others} \end{aligned} \right. reward=⎩ ⎨ ⎧1,if reach the cheese−1,if reach the trap0,others
We need to explan some function of the class Maze.
- First, the function
_build_mazecreates the inital maze location.
In this example we use the left up coordination of each grid as the state of each block. - Second, the function
get_stateconverts the coordination of each grid to numerical representation such as ( 1 , 1 ) , ( 1 , 2 ) , ⋯ (1,1),(1,2),\cdots (1,1),(1,2),⋯. - Third, the function
resetrenew the state which means placing the mouse in the original grid. - Then, the function
stepwe let the agent interact with envrionment for one step, ang get the reward after the action. - Then, the function
rendercontrols updating the window.
1.3 Tabular Q-learning Algorithm
import numpy as np
import pandas as pdclass QLearningTable():def __init__(self, actions, learning_rate=0.01, reward_decay=0.9, e_greedy=0.9):self.actions = actions  # action listself.lr = learning_rateself.gamma = reward_decayself.epsilon = e_greedy # epsilon greedy update policyself.q_table = pd.DataFrame(columns=self.actions, dtype=np.float64)def check_state_exist(self, state):if state not in self.q_table.index:# append new state to q table, use the coordinate as the observation# self.q_table = self.q_table.append(       # DataFrame.append is invalid#     pd.Series(#         [0]*len(self.actions),#         index=self.q_table.columns,#         name=state,#     )# )self.q_table = pd.concat([self.q_table,pd.DataFrame(data=np.zeros((1,len(self.actions))),columns = self.q_table.columns,index = [state])])def choose_action(self, observation):self.check_state_exist(observation)# action selection# epsilon greedy algorithmif np.random.uniform() < self.epsilon:state_action = self.q_table.loc[observation, :]# some actions may have the same value, randomly choose on in these actions# state_action == np.max(state_action) generate bool mask# choose best actionaction = np.random.choice(state_action[state_action == np.max(state_action)].index)else:# choose random actionaction = np.random.choice(self.actions)return actiondef learn(self, s, a, r, s_):self.check_state_exist(s_)q_predict = self.q_table.loc[s, a]if s_ != 'terminal':q_target = r + self.gamma * self.q_table.loc[s_, :].max()  # next state is not terminalelse:q_target = r  # next state is terminalself.q_table.loc[s, a] += self.lr * (q_target - q_predict)  # update
We store the Q-table as a DataFrame of pandas. The explanation of the functions are as follows.
- First, the function
check_state_existcheck the existence of one state, if not we append it to the Q-table. This is because once the state-action pair is visited, then we update it into the Q-table. - Second, the function
choose_actionis following the ϵ \epsilon ϵ-greedy algorithm
π ( a ∣ s ) = { 1 − ϵ ∣ A ( s ) ∣ ( ∣ A ( s ) ∣ − 1 ) , for the geedy action ϵ ∣ A ( s ) ∣ , for the other ∣ A ( s ) ∣ − 1 actions \pi(a|s) = \left \{ \begin{aligned} 1 - \frac{\epsilon}{|\mathcal{A}(s)|}(|\mathcal{A(s)}|-1), & \quad \text{for the geedy action} \\ \frac{\epsilon}{|\mathcal{A}(s)|}, & \quad \text{for the other } |\mathcal{A}(s)|-1 \text{ actions} \end{aligned} \right. π(a∣s)=⎩ ⎨ ⎧1−∣A(s)∣ϵ(∣A(s)∣−1),∣A(s)∣ϵ,for the geedy actionfor the other ∣A(s)∣−1 actions
- Third, the function
learnis update the q value as Q-learning algorithm purposed.
Q-learning : { q t + 1 ( s t , a t ) = q t ( s t , a t ) − α t ( s t , a t ) [ q t ( s t , a t ) − ( r t + 1 + γ max a ∈ A ( s t + 1 ) q t ( s t + 1 , a ) ) ] q t + 1 ( s , a ) = q t ( s , a ) , for all ( s , a ) ≠ ( s t , a t ) \text{Q-learning} : \left \{ \begin{aligned} \textcolor{red}{q_{t+1}(s_t,a_t)} & \textcolor{red}{= q_t(s_t,a_t) - \alpha_t(s_t,a_t) \Big[q_t(s_t,a_t) - (r_{t+1}+ \gamma \max_{a\in\mathcal{A}(s_{t+1})} q_t(s_{t+1},a)) \Big]} \\ \textcolor{red}{q_{t+1}(s,a)} & \textcolor{red}{= q_t(s,a)}, \quad \text{for all } (s,a) \ne (s_t,a_t) \end{aligned} \right. Q-learning:⎩ ⎨ ⎧qt+1(st,at)qt+1(s,a)=qt(st,at)−αt(st,at)[qt(st,at)−(rt+1+γa∈A(st+1)maxqt(st+1,a))]=qt(s,a),for all (s,a)=(st,at)
1.3 Run this main
Run this main script that we can run the all codes.
from maze_env_custom import Maze
from RL_brain import QLearningTableMAX_EPISODE = 10def update():for episode in range(MAX_EPISODE):# initial observation, observation is the rect's coordiante# observation is [x0,y0, x1,y1]observation = env.reset()   while True:# fresh envenv.render()# RL choose action based on observation ['up', 'down', 'right', 'left']action = RL.choose_action(str(observation))# RL take action and get next observation and rewardobservation_, reward, done = env.step(action)# RL learn from this transitionRL.learn(str(observation), action, reward, str(observation_))# swap observationobservation = observation_# break while loop when end of this episodeif done:break# show q_tableprint(RL.q_table)print('\n')# end of gameprint('game over')env.destroy()if __name__ == "__main__":env = Maze()RL = QLearningTable(env.action_space)env.after(100, update)env.mainloop()
Reference
赵世钰老师的课程
莫烦ReinforcementLearning course