参考资料:
《Tomcat源码解析系列(一)Bootstrap》
《Tomcat源码解析系列(二)Catalina》
《Tomcat - 启动过程:初始化和启动流程》
《Tomcat - 启动过程:类加载机制详解》
《Tomcat - 启动过程:Catalina的加载》
相关资料:
《Tomcat:servlet与servlet容器》
写在开头:本文为个人学习笔记,内容比较随意,夹杂个人理解,如有错误,欢迎指正。
前言
本文开始我们将会介绍tomcat的源码,整个流程会按照tomcat的启动顺序来开展,在此之前建议先阅读下前文理清servlet与servlet容器之间的关系。
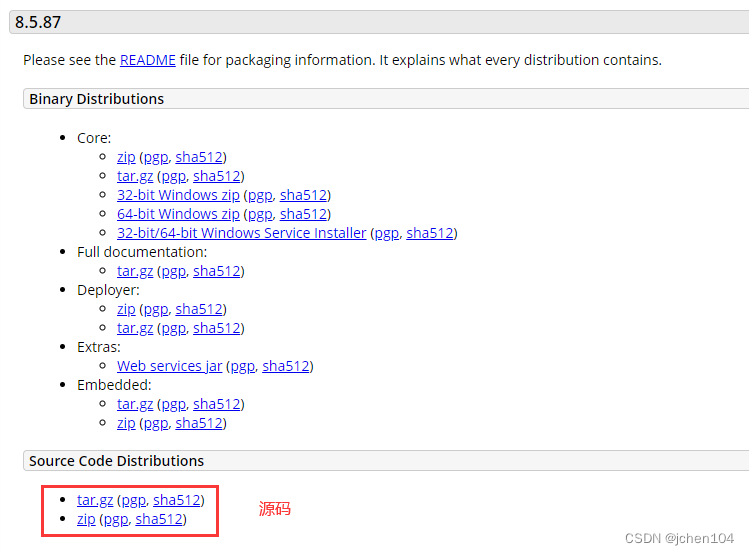
tomcat的源码可以在管网下载:传送门
在tomcat的bin目录下有两个启动tomcat的文件, 一个是startup.bat, 它用于windows环境下启动tomcat; 另一个是startup.sh, 它用于linux环境下tomcat的启动. 两个文件中的逻辑是一样的, 我们只分析其中的startup.bat。而startup.bat文件实际上就做了一件事情: 启动catalina.bat。
catalina.bat中下面这段指定了tomcat的启动类为Bootstrap这个类,catalina.bat最终执行了Bootstrap类中的main方法来启动tomcat。(catalina.bat的详细内容可以参考这篇文章《详解Tomcat系列(一)-从源码分析Tomcat的启动》,本文就不做深入解析了)
set _EXECJAVA=%_RUNJAVA%
set MAINCLASS=org.apache.catalina.startup.Bootstrap
set ACTION=start
目录
一、启动类Bootstrap
1、main
2、类加载器的初始化
2.1、commonLoader
3、init
4、load与start
二、Catalina初始化
1、load
1.1、第一段
1.2、第三段
2、start
补充
tomcat的类加载器模式
一、启动类Bootstrap
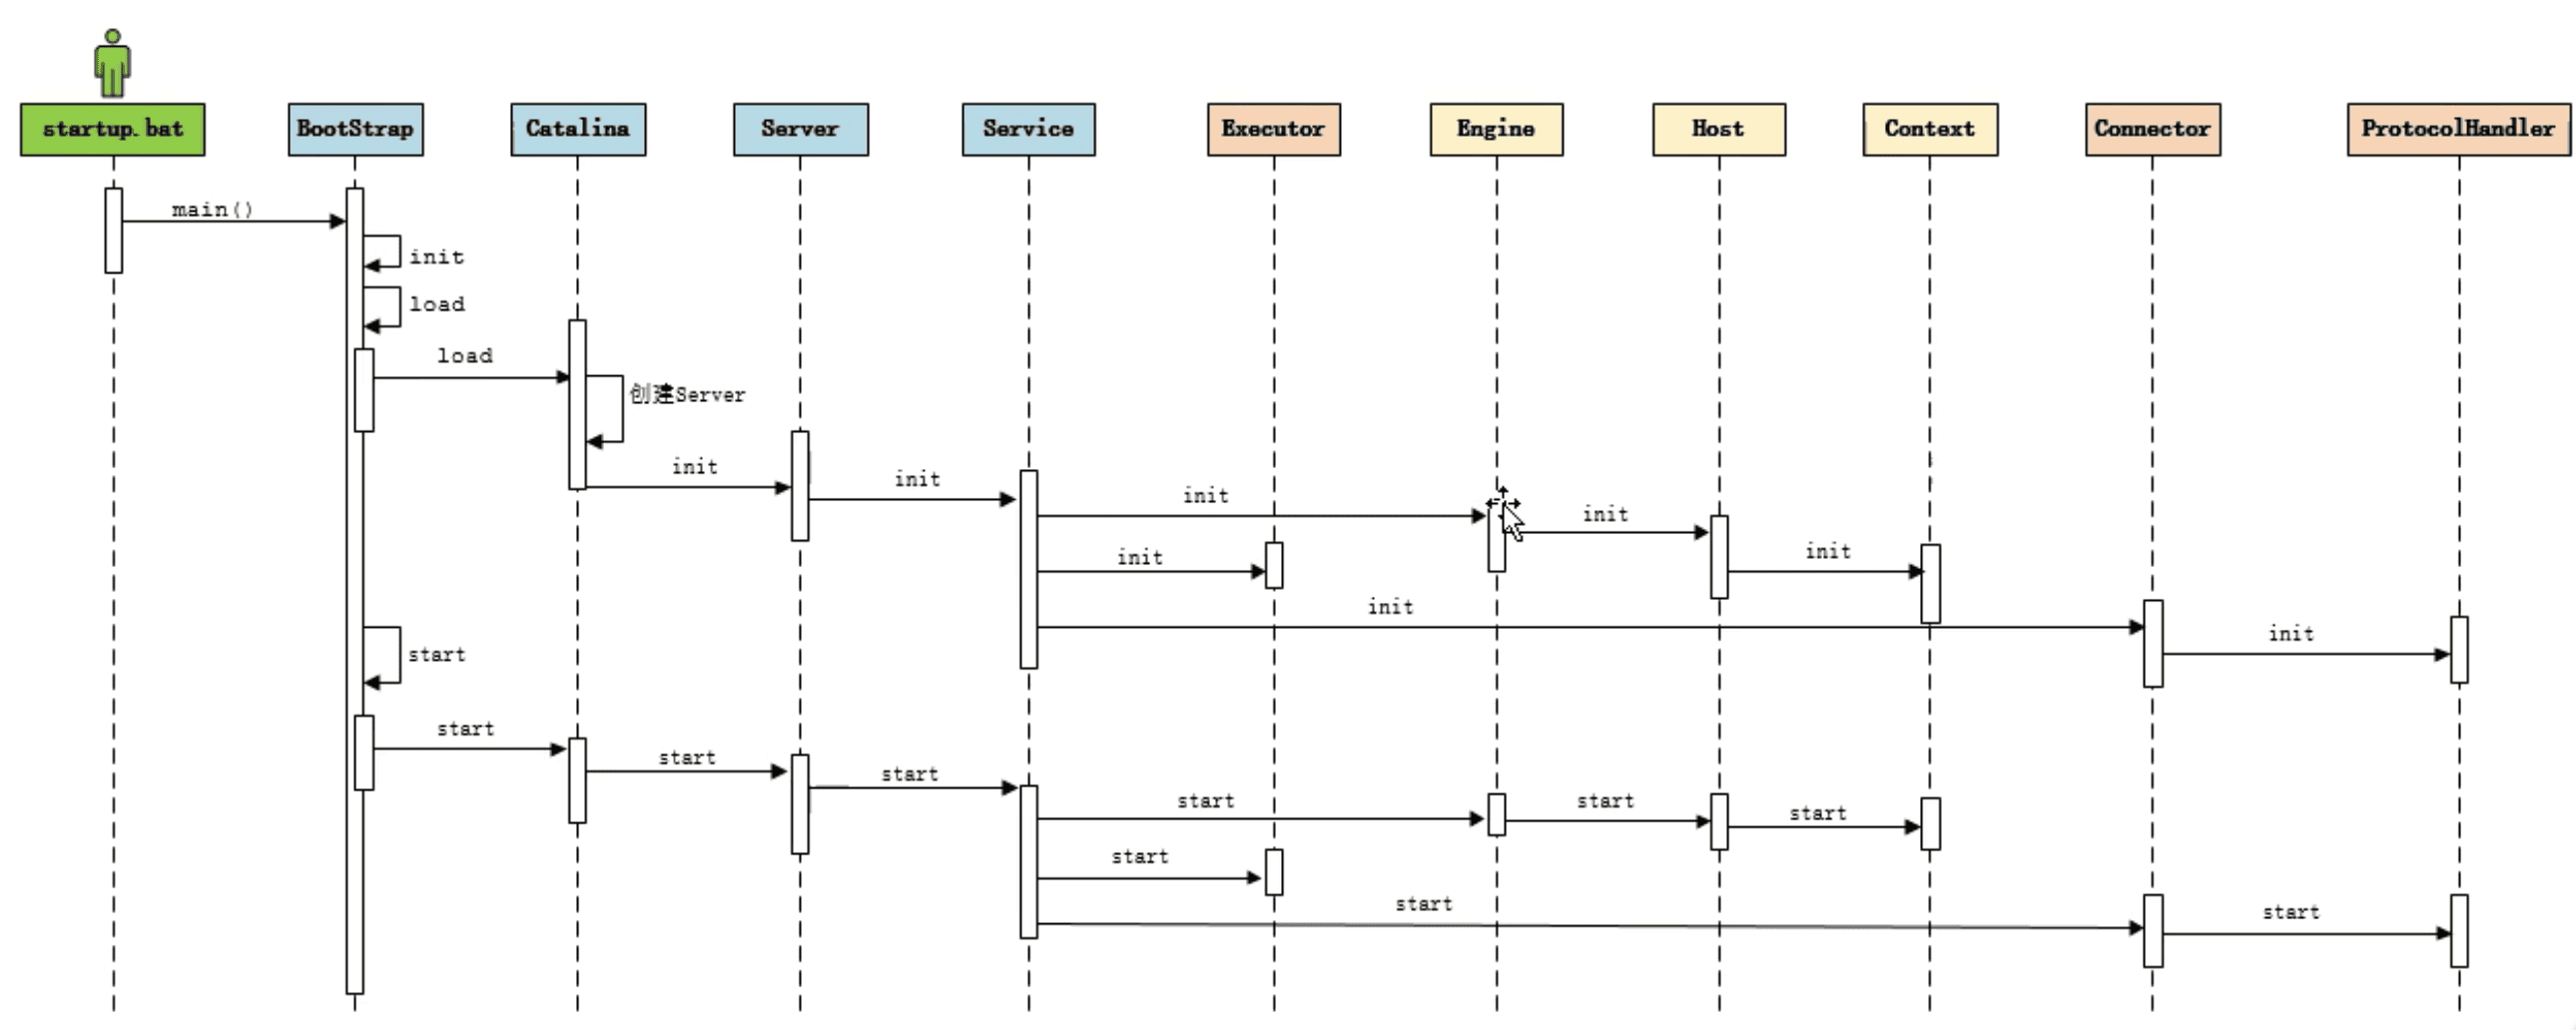
首先来看下整个启动过程,我们可以看到Bootstrap作为启动入口首先进行了初始化方法init然后load方法加载了Catalina,下面我们就开始介绍Bootstrap。
1、main
Bootstrap的main方法首先会创建一个 Bootstrap 对象,调用它的 init 方法初始化,然后根据启动参数,调用Bootstrap对象的不同方法,默认模式为start,该模式下将会先后调用load与start方法。
    private static final Object daemonLock = new Object();private static volatile Bootstrap daemon = null;public static void main(String args[]) {// 创建一个 Bootstrap 对象synchronized (daemonLock) {if (daemon == null) {Bootstrap bootstrap = new Bootstrap();try {// 调用init方法初始化bootstrap.init();} catch (Throwable t) {handleThrowable(t);t.printStackTrace();return;}daemon = bootstrap;} else {Thread.currentThread().setContextClassLoader(daemon.catalinaLoader);}}// 根据启动参数,分别调用 Bootstrap 对象的不同方法try {// 默认参数为startString command = "start"; if (args.length > 0) {command = args[args.length - 1];}if (command.equals("startd")) {...} else if (command.equals("stopd")) {...} else if (command.equals("start")) {daemon.setAwait(true);daemon.load(args);daemon.start();if (null == daemon.getServer()) {System.exit(1);}} else if (command.equals("stop")) {...} else if (command.equals("configtest")) {...                    } else {log.warn("Bootstrap: command \"" + command + "\" does not exist.");}} catch (Throwable t) {if (t instanceof InvocationTargetException &&t.getCause() != null) {t = t.getCause();}handleThrowable(t);t.printStackTrace();System.exit(1);}}
}
2、类加载器的初始化
2.1、commonLoader
init方法内部首先调用了initClassLoaders方法,看名字可以得得知这里将要进行的便是类加载器的初始化,类加载器的内容在我的《Java8之类的加载》、《Java8之类加载机制class源码分析》中有过详细介绍,这里就不做赘述了,不了解的朋友可以先看完这两篇文章在继续看本文。
public void init() throws Exception {// 初始化classloader(包括catalinaLoader),下文将具体分析initClassLoaders();// 其余代码
}
而在initClassLoaders中,又调用了createClassLoader进行了类加载器的创建,这里我们关注下传入的参数为common与null,下文将会用到。
ClassLoader commonLoader = null;
ClassLoader catalinaLoader = null;
ClassLoader sharedLoader = null;private void initClassLoaders() {commonLoader = createClassLoader("common", null);if (commonLoader == null) {commonLoader = this.getClass().getClassLoader();}// 其余代码
}
来到createClassLoader方法,方法中第一步就是根据传入的参数name从Catalina.Properties文件里找对应的loader,上文传入的参数为common,因此这里寻找的是common.loader。
我们找到catalina.property文件,其中对应的值如下,可以看到是个路径。
# Note: Values are enclosed in double quotes ("...") in case either the
#       ${catalina.base} path or the ${catalina.home} path contains a comma.
#       Because double quotes are used for quoting, the double quote character
#       may not appear in a path.
common.loader="${catalina.base}/lib","${catalina.base}/lib/*.jar","${catalina.home}/lib","${catalina.home}/lib/*.jar"
获取到common.loader后再将其构造成Repository列表,再将Repository列表传入ClassLoaderFactory.createClassLoader 方法。
private ClassLoader createClassLoader(String name, ClassLoader parent)throws Exception {// 从CatalinaProperties文件里找common.loader,String value = CatalinaProperties.getProperty(name + ".loader");// 如果name+.loader对应值为空,直接返回父类加载器,后文将会用到if ((value == null) || (value.equals("")))return parent;value = replace(value);List<Repository> repositories = new ArrayList<>();// 构造Repository列表String[] repositoryPaths = getPaths(value);for (String repository : repositoryPaths) {try {@SuppressWarnings("unused")URL url = new URL(repository);repositories.add(new Repository(repository, RepositoryType.URL));continue;} catch (MalformedURLException e) {}if (repository.endsWith("*.jar")) {repository = repository.substring(0, repository.length() - "*.jar".length());repositories.add(new Repository(repository, RepositoryType.GLOB));} else if (repository.endsWith(".jar")) {repositories.add(new Repository(repository, RepositoryType.JAR));} else {repositories.add(new Repository(repository, RepositoryType.DIR));}}// 将Repository列表传入ClassLoaderFactory.createClassLoaderreturn ClassLoaderFactory.createClassLoader(repositories, parent);
}
ClassLoaderFactory.createClassLoader中将会根据不同的类型采用不同的处理方案,最终创建URLClassLoader对象。
public static ClassLoader createClassLoader(List<Repository> repositories,final ClassLoader parent)throws Exception {// 路径集合Set<URL> set = new LinkedHashSet<>();if (repositories != null) {// 遍历传入的路径for (Repository repository : repositories) {// 根据不同的类型采用不同的处理方案,这里仅展示DIR与JAR的处理if (repository.getType() == RepositoryType.URL) {...} else if (repository.getType() == RepositoryType.DIR) {File directory = new File(repository.getLocation());directory = directory.getCanonicalFile();if (!validateFile(directory, RepositoryType.DIR)) {continue;}URL url = buildClassLoaderUrl(directory);if (log.isDebugEnabled()) {log.debug(" Including directory " + url);}set.add(url);} else if (repository.getType() == RepositoryType.JAR) {File file=new File(repository.getLocation());file = file.getCanonicalFile();if (!validateFile(file, RepositoryType.JAR)) {continue;}URL url = buildClassLoaderUrl(file);if (log.isDebugEnabled()) {log.debug(" Including jar file " + url);}set.add(url);} else if (repository.getType() == RepositoryType.GLOB) {...}}}final URL[] array = set.toArray(new URL[0]);// 使用URLClassLoader加载这些路径下的类return AccessController.doPrivileged(new PrivilegedAction<URLClassLoader>() {@Overridepublic URLClassLoader run() {if (parent == null) {return new URLClassLoader(array);} else {return new URLClassLoader(array, parent);}}});}到这里我们就走完了commonLoader的创建过程,其内容为URLClassLoader对象。
2.2、catalinaLoader与sharedLoader
回到initClassLoaders方法,我们继续看catalinaLoader与sharedLoader的初始化,同样是调用createClassLoader方法,但父类加载器参数此时由null变为了commonLoader。
private void initClassLoaders() {try {commonLoader = createClassLoader("common", null);if (commonLoader == null) {commonLoader = this.getClass().getClassLoader();}catalinaLoader = createClassLoader("server", commonLoader);sharedLoader = createClassLoader("shared", commonLoader);} catch (Throwable t) {handleThrowable(t);log.error("Class loader creation threw exception", t);System.exit(1);}}
Catalina.Properties中server.loader、shared.loader值为空,结合createClassLoader的内容这里将传入的父类加载器传了回去,因此实际上这三个类加载器都是同一个URLClassLoader对象。
server.loader=
shared.loader=
private ClassLoader createClassLoader(String name, ClassLoader parent)throws Exception {// 从CatalinaProperties文件里找common.loader,String value = CatalinaProperties.getProperty(name + ".loader");// 如果name+.loader对应值为空,直接返回父类加载器,后文将会用到if ((value == null) || (value.equals("")))return parent;// 其余代码
}至此,Bootstrap类中的类加载器初始化完毕。
3、init
使用上一步创建的catalinaClassLoader 加载了org.apache.catalina.startup.Catalina类,并创建了一个对象catalinaDaemon,然后通过反射调用这个对象的 setParentClassLoader 方法,传入的参数是 sharedClassLoader。
public void init() throws Exception {// 初始化classloader(包括catalinaLoader),下文将具体分析initClassLoaders();// 设置当前的线程的contextClassLoader为catalinaLoaderThread.currentThread().setContextClassLoader(catalinaLoader);SecurityClassLoad.securityClassLoad(catalinaLoader);// 通过catalinaLoader加载Catalina,并初始化startupInstance 对象Class<?> startupClass = catalinaLoader.loadClass("org.apache.catalina.startup.Catalina");Object startupInstance = startupClass.getConstructor().newInstance();// 通过反射调用了setParentClassLoader 方法String methodName = "setParentClassLoader";Class<?> paramTypes[] = new Class[1];paramTypes[0] = Class.forName("java.lang.ClassLoader");Object paramValues[] = new Object[1];paramValues[0] = sharedLoader;Method method =startupInstance.getClass().getMethod(methodName, paramTypes);method.invoke(startupInstance, paramValues);catalinaDaemon = startupInstance;
}
4、load与start
load与start都是通过上一步获取到的catalinaDaemon对象反射调用catalina类的load与start方法,这两个过程我们会在后续的catalina内容中介绍。
private void load(String[] arguments) throws Exception {String methodName = "load";Object param[];Class<?> paramTypes[];if (arguments==null || arguments.length==0) {paramTypes = null;param = null;} else {paramTypes = new Class[1];paramTypes[0] = arguments.getClass();param = new Object[1];param[0] = arguments;}Method method =catalinaDaemon.getClass().getMethod(methodName, paramTypes); // 反射调用catalina的load方法method.invoke(catalinaDaemon, param);
}
public void start() throws Exception {if (catalinaDaemon == null) {init();}Method method = catalinaDaemon.getClass().getMethod("start", (Class [])null);method.invoke(catalinaDaemon, (Object [])null);}二、Catalina初始化
上文中Bootstrap类的load与start方法实质上就是反射调用catalina类的load与start方法,本节我们来介绍下该类。
1、load
load(String[])本质上还是调用了load方法
public void load(String args[]) {try {// 处理命令行的参数if (arguments(args)) { load();}} catch (Exception e) {e.printStackTrace(System.out);}
}
load() 方法的逻辑挺清晰的,大概可以分为三段,第一个 try-catch 之前算一段,第一个 try-catch 算第二段,第一个 try-catch 到第二个 try-catch 结束算第三段。
public void load() {// 如果已经加载则退出if (loaded) {return;}loaded = true;long t1 = System.nanoTime();initDirs();initNaming();ConfigFileLoader.setSource(new CatalinaBaseConfigurationSource(Bootstrap.getCatalinaBaseFile(), getConfigFile()));File file = configFile();// 创建digester对象,用于解析server.xmlDigester digester = createStartDigester();try (ConfigurationSource.Resource resource = ConfigFileLoader.getSource().getServerXml()) {InputStream inputStream = resource.getInputStream();InputSource inputSource = new InputSource(resource.getURI().toURL().toString());inputSource.setByteStream(inputStream);digester.push(this);// 解析server.xmldigester.parse(inputSource);} catch (Exception e) {// ...}return;}getServer().setCatalina(this);getServer().setCatalinaHome(Bootstrap.getCatalinaHomeFile());getServer().setCatalinaBase(Bootstrap.getCatalinaBaseFile());initStreams();// 调用StandardServer.init启动Servertry {getServer().init();} catch (LifecycleException e) {// ...}long t2 = System.nanoTime();}1.1、第一段
首先是initDirs与initNaming,其中initDirs无内容,且备注为“Will be removed in Tomcat 10 onwards”,initNaming方法主要是些额外系统变量的设置,因此都无需关注。
这一行代码代码的作用是设置Tomcat要加载的配置的配置源,也就是 conf 目录下的 server.xml 文件。
ConfigFileLoader.setSource(new CatalinaBaseConfigurationSource(Bootstrap.getCatalinaBaseFile(), getConfigFile()));接下来这一行创建了一个 Digester对象,这个对象是用来解析 server.xml 文件的
Digester digester = createStartDigester();从注释和大部分相似的代码可以看出,Digester 就是用来解析 server.xml 并创建对应的默认实现类对象的。比如碰到 <Server> 标签就创建默认的 StarndardServer 类对象。
protected Digester createStartDigester() {long t1=System.currentTimeMillis();Digester digester = new Digester();digester.setValidating(false);digester.setRulesValidation(true);……digester.addObjectCreate("Server","org.apache.catalina.core.StandardServer","className");digester.addSetProperties("Server");digester.addSetNext("Server","setServer","org.apache.catalina.Server");digester.addObjectCreate("Server/GlobalNamingResources","org.apache.catalina.deploy.NamingResourcesImpl");digester.addSetProperties("Server/GlobalNamingResources");digester.addSetNext("Server/GlobalNamingResources","setGlobalNamingResources","org.apache.catalina.deploy.NamingResourcesImpl");……return digester;}第二段中的内容其实就是调用Digester对象来解析server.xml,内部使用了SAXParser来解析 ,解析完了之后,xml 里定义的各种标签就有对应的实现类对象了。
1.2、第三段
第三段中使用了getServer()方法,其获取的是catalina类中的成员变量,其赋值是在 digester.parse解析xml的时候完成的。
protected Server server = null;最后调用了server实现类中的init方法,server的内容我们会在后续进行介绍。
getServer().setCatalina(this);getServer().setCatalinaHome(Bootstrap.getCatalinaHomeFile());getServer().setCatalinaBase(Bootstrap.getCatalinaBaseFile());initStreams();try {getServer().init();} catch (LifecycleException e) {// ...}2、start
在 load 方法之后,Tomcat 就初始化了一系列的组件,接着就可以调用 start 方法进行启动了。
public void start() {if (getServer() == null) {load();}if (getServer() == null) {log.fatal(sm.getString("catalina.noServer"));return;}long t1 = System.nanoTime();try {getServer().start();} catch (LifecycleException e) {// ...return;}long t2 = System.nanoTime();if (useShutdownHook) {if (shutdownHook == null) {shutdownHook = new CatalinaShutdownHook();}Runtime.getRuntime().addShutdownHook(shutdownHook);LogManager logManager = LogManager.getLogManager();if (logManager instanceof ClassLoaderLogManager) {((ClassLoaderLogManager) logManager).setUseShutdownHook(false);}}if (await) {await();stop();}}整段代码逻辑还是比较好理解的,核心过程就是getServer().start()调用Server对象的 start() 方法来启动 Tomcat。Server相关的内容我们会在后续进行介绍,本文暂不做讨论。
这里提一下ShutDownHook关闭钩子,关闭钩子的内容我之前有过介绍,可以看下这篇文章《java8:关闭钩子shutdown hook》,这里实际上是调用 Catalina 对象的 stop 方法来停止 tomcat,而其内部又继续调用了Server对象的stop方法。
最后就进入 if 语句了,await 是在 Bootstrap 里调用的时候设置为 true 的,也就是本文开头的时候提到的三个方法中的一个。await 方法的作用是停住主线程,等待用户输入shutdown 命令之后,停止等待,之后 main 线程就调用 stop 方法来停止Tomcat。
补充
tomcat的类加载器模式
了解类加载器的朋友都知道Java默认的类加载机制是通过双亲委派模型来实现的(不了解的可以看下我这篇文章《Java8之类的加载》、《Java8之类加载机制class源码分析》),不过tomcat却没有使用这种模式,下面我们来简单说明下原因。
原因在于一个Tomcat容器允许同时运行多个Web程序,每个Web程序依赖的类又必须是相互隔离的。
如果Tomcat使用双亲委派模式来加载类的话,将导致Web程序依赖的类变为共享的。举个例子,假如我们有两个Web程序,一个依赖A库的1.0版本,另一个依赖A库的2.0版本,他们都使用了类xxx.xx.Clazz,其实现的逻辑因类库版本的不同而结构完全不同。那么这两个Web程序的其中一个必然因为加载的Clazz不是所使用的Clazz而出现问题。
为了解决这个问题,tomcat采用了如下的设计方式
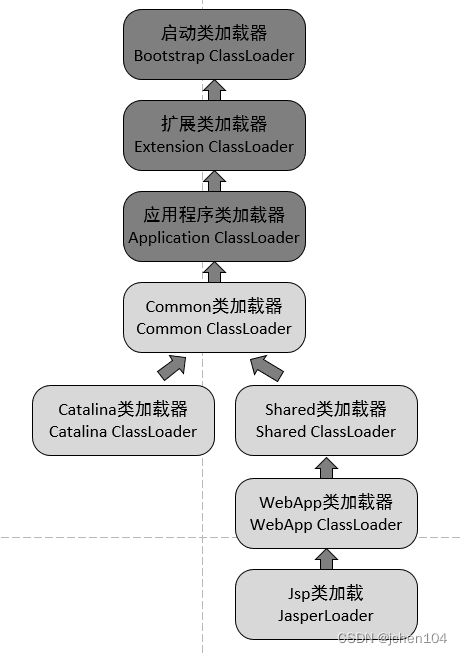
最上面的三个类加载器我们已经了解过了,重点在于下面这些,即我们在initClassLoaders方法中创建的三个类加载器,其作用分别如下:
Common类加载器,负责加载Tomcat和Web应用都复用的类
(1)Catalina类加载器,负责加载Tomcat专用的类,而这些被加载的类在Web应用中将不可见
(2)Shared类加载器,负责加载Tomcat下所有的Web应用程序都复用的类,而这些被加载的类在Tomcat中将不可见
(2.1)WebApp类加载器,负责加载具体的某个Web应用程序所使用到的类,而这些被加载的类在Tomcat和其他的Web应用程序都将不可见
(2.2)Jsp类加载器,每个jsp页面一个类加载器,不同的jsp页面有不同的类加载器,方便实现jsp页面的热插拔


![[vue问题]Uncaught SyntaxError: Not available in legacy mode](https://img-blog.csdnimg.cn/4c63b9855196450b86f9178d7f921c7a.png)