三、SpringBoot自动配置原理
我们通过编写SpringBoot HelloWorld程序,体会到了其强大与便捷,它的这些功能都是基于SpringBoot的依赖管理与自动配置。
3.1 核心特性
依赖管理
-
父项目做依赖管理
<!-- 当前项目的父项目:依赖管理 --> <parent><groupId>org.springframework.boot</groupId><artifactId>spring-boot-starter-parent</artifactId><version>2.7.14</version><relativePath/> <!-- lookup parent from repository --> </parent><!-- 父项目的父项目:几乎声明了所有开发中常用的依赖的版本号 --> <parent><groupId>org.springframework.boot</groupId><artifactId>spring-boot-dependencies</artifactId><version>2.7.14</version> </parent> -
开发导入starter场景启动器
Springboot将所有的功能场景都抽取出来,做成一个个的Starters(启动器),只需要在项目里面引入这些Starters相关场景的所有依赖都会导入进来。要用什么功能就导入什么场景的启动器。
-
在后续的课程中,会见到很多 spring-boot-starter-*,*代表某种场景;
- spring-boot-starter-web:帮我们导入了web场景正常运行所依赖的组件。
-
只要引入starter,这个场景的所有常规需要的依赖都自动引入;
SpringBoot所有支持的场景:
https://docs.spring.io/spring-boot/docs/2.7.14/reference/html/using.html#using.build-systems.starters
-
*-spring-boot-starter,第三方为我们提供的简化开发的场景启动器;
- 例如:druid-spring-boot-starter、mybatis-spring-boot-starter;
-
所有场景启动器最底层的依赖;
<dependency><groupId>org.springframework.boot</groupId><artifactId>spring-boot-starter</artifactId><version>2.7.14</version><scope>compile</scope>
</dependency>
-
-
无需关注版本号,自动版本仲裁
- 引入版本仲裁的jar,都可以不写版本;
- 引入非版本仲裁的jar,要写版本号;
-
可以修改默认版本号
-
查看spring-boot-dependencies里面规定当前依赖的版本用的 key;
-
在当前项目里面重写配置:
<properties><mysql.version>5.1.49</mysql.version>
</properties>
-
自动配置
-
自动配好Tomcat
-
引入Tomcat依赖,web场景启动器依赖了Tomcat的场景启动器;
-
配置Tomcat
<dependency><groupId>org.springframework.boot</groupId><artifactId>spring-boot-starter-tomcat</artifactId><version>2.7.14</version><scope>compile</scope>
</dependency>
-
-
自动配好SpringMVC
-
引入SpringMVC全套组件,web场景启动器依赖了Spring和SpringWeb相关的所有组件;
-
自动配好SpringMVC常用组件(功能),比如DispatcherServlet、CharacterEncodingFilter、MultipartResolver…;
public static void main(String[] args) {// 1、run()返回IOC容器ConfigurableApplicationContext context = SpringApplication.run(Springboot01HelloworldApplication.class, args);// 2、查看容器里面的组件String[] names = context.getBeanDefinitionNames(); // 获取IOC容器中所有Bean定义的名称for (String name : names) {System.out.println(name);}
}
-
-
自动配好Web常见功能,如:字符编码问题
- SpringBoot帮我们配置好了所有web开发的常见场景;
-
默认的包结构
-
主程序所在包及其下面的所有子包里面的组件都会被默认扫描进来;
https://docs.spring.io/spring-boot/docs/2.7.14/reference/html/using.html#using.structuring-your-code.locating-the-main-class
-
无需以前的包扫描配置;
-
想要改变扫描路径,
@SpringBootApplication(scanBasePackages="com.gs");-
或者@ComponentScan 指定扫描路径
package com.gs;/* * 该组件不会被默认扫描进来,除非修改包扫描规则 * */ @RestController public class WorldController {@RequestMapping("/world")public String home(){return "World, SpringBoot!";} }@SpringBootApplication(scanBasePackages = "com.gs") // 等价于 @SpringBootConfiguration @EnableAutoConfiguration @ComponentScan(basePackages = "com.gs")
-
-
-
-
各种配置拥有默认值
- 默认配置最终都是映射到某个类上,如:MultipartProperties;
- 修改默认值,配置文件的值最终也会绑定某个类上,这个类会在容器中创建对象;
-
按需加载所有自动配置项
- 非常多的starter;
- 引入了哪些场景这个场景的自动配置才会开启;
- SpringBoot所有的自动配置功能都在 spring-boot-autoconfigure 包里面;
-
…
3.2 底层注解
组件添加
@Configuration
-
定义 JavaConfig 类,在类上使用@Configuration 注解,将会使当前类作为一个 Spring 的容器来使用(等价于XML配置文件),用于完成 Bean 的创建。在该 JavaConfig 的方法上使用@Bean,将会使一个普通方法所返回的结果变为指定名称的 Bean 实例。
-
Full模式与Lite模式
- 最佳实战:
- 配置类组件之间无依赖关系,用Lite模式加速容器启动过程,减少判断;
- 配置类组件之间有依赖关系,方法会被调用得到之前单实例组件,用Full模式;
- 最佳实战:
-
示例代码
public class Dept {private int deptno;private String dname;//...
}public class Emp {private int empno;private String ename;private Dept dept;//...
}
/** 1、通过@Configuration注解,让该类成为Spring的配置类* 2、配置类本身也是组件* 3、proxyBeanMethods:代理bean的方法* Full模式(proxyBeanMethods = true):保证每个@Bean方法被调用多少次返回的组件都是单实例的* Lite模式(proxyBeanMethods = false):每个@Bean方法被调用多少次返回的组件都是新创建的* 组件依赖必须使用Full模式默认。其他使用Lite模式*/ //@Configuration @Configuration(proxyBeanMethods = false) public class MyConfig {/** 配置类里面使用@Bean标注在方法上用来给容器注册组件,默认是单实例的* 实现方式:自定义方法+@Bean注解* 自定义方法的返回值:Bean的类型和实例* 自定义方法的名称:Bean的id*/@Beanpublic Dept getDept() {Dept dept = new Dept();dept.setDeptno(10);dept.setDname("研发部");return dept;}@Bean(name = "emp")public Emp getEmp() {Emp emp = new Emp();emp.setEmpno(1001);emp.setEname("张三");// 依赖注入:emp组件依赖了dept组件// 在@Configuration注解的配置类中,如果直接调用@Bean标注的方法,相当于从IOC容器中获取该bean并依赖注入emp.setDept(getDept());return emp;} }public static void main(String[] args) {// 1、run()返回IOC容器ConfigurableApplicationContext context = SpringApplication.run(Springboot01HelloworldApplication.class, args);// 2、查看容器里面的组件String[] names = context.getBeanDefinitionNames(); // 获取IOC容器中所有Bean定义的名称for (String name : names) {System.out.println(name);}// 3、从容器中获取组件Emp emp1 = context.getBean("emp", Emp.class);Emp emp2 = context.getBean("emp", Emp.class);// 测试配置类注册的组件是否是单例的System.out.println("组件是否是单例:" + (emp1 == emp2)); // 默认情况下为true// 4、配置类本身也是组件: com.gs.boot.config.MyConfig$$EnhancerBySpringCGLIB$$b1dd7e88@375b5b7fMyConfig myConfig = context.getBean(MyConfig.class);System.out.println(myConfig);// 5、测试@Configuration(proxyBeanMethods = true)代理对象调用方法。SpringBoot总会检查这个组件是否在容器中有。保持组件单实例Dept dept1 = myConfig.getDept();Dept dept2 = myConfig.getDept();// Full模式: true; Lite模式: falseSystem.out.println("Full模式:" + (dept1 == dept2));// 6、Full模式和Lite模式测试依赖注入Emp emp = context.getBean("emp", Emp.class);Dept dept = context.getBean(Dept.class);// Full模式: true; Lite模式: falseSystem.out.println("测试依赖注入的是否是容器中的Bean:" + (emp.getDept() == dept)); }
@Component、@Controller、@Service、@Repository
- @Component:该注解用于描述 Spring 中的 Bean,它是一个泛化的概念,仅仅表示容器中的一个组件(Bean),并且可以作用在应用的任何层次,例如 Service 层、Dao 层等。 使用时只需将该注解标注在相应类上即可。
- @Controller:该注解通常作用在控制层(如 Struts2 的 Action、SpringMVC 的 Controller),用于将控制层的类标识为 Spring 中的 Bean,其功能与 @Component 相同。
- @Service:该注解通常作用在业务层(Service 层),用于将业务层的类标识为 Spring 中的 Bean,其功能与 @Component 相同。
- @Repository:该注解用于将数据访问层(Dao 层)的类标识为 Spring 中的 Bean,其功能与 @Component 相同。
@Import
- @Import注解通过快速导入的方式实现把实例加入Spring的IOC容器中。
- @Import可以用于导入第三方包,当然@Bean注解也可以,但是@Import注解快速导入的方式更加便捷。
- @Import的三种用法主要包括:
- Class数组方式;
- ImportSelector方式;
- ImportBeanDefinitionRegistrar方式;
Class数组方式
-
直接填写class数组,Class数组可以有0到多个。
-
示例代码
public class Dog {
}public class Cat {
}
在配置类/组件类中导入:
// @Import({Dog.class, Cat.class}):给容器中自动创建出这两个类型的组件、默认组件的名字就是全类名
@Configuration
@Import({Dog.class, Cat.class})
public class MyConfig {}
ImportSelector方式
-
通过@Import注解导入的是ImportSelector接口的实现类,在其抽象方法selectImports中定义需要注册的Bean对象。
-
示例代码
public class Student {
}public class Teacher {
}
ImportSelector接口的实现类:
/**
* ImportSelector接口的selectImports方法:
* 	返回值String[]:表示注册到容器中的组件全类名的字符串数组。
*	参数AnnotationMetadata:表示当前被@Import注解给标注的所有注解信息。
*/
public class MyImportSelector implements ImportSelector {@Overridepublic String[] selectImports(AnnotationMetadata importingClassMetadata) {return new String[]{"com.gs.boot.bean.Student", "com.gs.boot.bean.Teacher"};}
在配置类/组件类中导入:
@Configuration
@Import({Dog.class, Cat.class, MyImportSelector.class})
public class MyConfig {}
注意:selectImports方法可以返回空数组但是不能返回null,否则会报空指针异常。
ImportBeanDefinitionRegistrar方式
-
通过@Import注解导入的是ImportBeanDefinitionRegistrar接口的实现类,在其抽象方法registerBeanDefinitions中定义需要注册的Bean对象。与ImportSelector用法类似,只不过这种用法可自定义注册Bean。
-
示例代码
public class Users {
}
ImportBeanDefinitionRegistrar接口的实现类:
/**
* ImportBeanDefinitionRegistrar接口的registerBeanDefinitions方法:
*	参数AnnotationMetadata:表示当前被@Import注解给标注的所有注解信息。
*	参数BeanDefinitionRegistry:表示用于注册定义一个Bean。
*/
public class MyImportBeanDefinitionRegistrar implements ImportBeanDefinitionRegistrar {@Overridepublic void registerBeanDefinitions(AnnotationMetadata importingClassMetadata, BeanDefinitionRegistry registry) {//指定Bean定义信息RootBeanDefinition rootBeanDefinition = new RootBeanDefinition(Users.class);//注册一个Bean指定bean名称registry.registerBeanDefinition("users", rootBeanDefinition);}
}
在配置类/组件类中导入:
@Configuration
@Import({Dog.class, Cat.class, MyImportSelector.class, MyImportBeanDefinitionRegistrar.class})
public class MyConfig {}
@Conditional
-
条件装配:满足Conditional指定的条件,则进行组件注入。
-
@Conditional注解可以用在任何类或者方法上面,通过@Conditional注解可以配置一些条件判断,当所有条件都满足的时候,被@Conditional标注的目标才会被spring容器处理。
-
@Conditional派生注解及用法
@Conditional派生注解 作用(都是判断是否符合指定的条件) @ConditionalOnJava 系统的java版本是否符合要求 @ConditionalOnBean 有指定的Bean @ConditionalOnMissingBean 没有指定的Bean @ConditionalOnExpression 符合指定的SpEL表达式 @ConditionalOnClass 有指定的类 @ConditionalOnMissingClass 没有指定的类 @ConditionalOnSingleCandidate 容器只有一个指定的bean,或者这个bean是首选bean @ConditionalOnProperty 指定的property属性有指定的值 @ConditionalOnResource 路径下存在指定的资源 @ConditionalOnWebApplication 系统环境是web环境 @ConditionalOnNotWebApplication 系统环境不是web环境 @ConditionalOnjndi JNDI存在指定的项 -
示例代码
public class Color {
}public class Red {
}public class Green {
}
@Configuration @Import({Dog.class, Cat.class, MyImportSelector.class, MyImportBeanDefinitionRegistrar.class}) public class MyConfig {//...@Bean("color")public Color getColor(){return new Color();}@ConditionalOnBean(name = "color")@Bean("red")public Red getRed(){return new Red();}@ConditionalOnMissingBean(name = "color")@Bean("green")public Green getGreen(){return new Green();} }public static void main(String[] args) {// 1、run()返回IOC容器ConfigurableApplicationContext context = SpringApplication.run(Springboot01HelloworldApplication.class, args);// 2、查看容器里面的组件String[] names = context.getBeanDefinitionNames(); // 获取IOC容器中所有Bean定义的名称for (String name : names) {System.out.println(name);}// 3、测试条件装配boolean color = context.containsBean("color");System.out.println("容器中是否包含color组件:" + color);boolean red = context.containsBean("red");System.out.println("容器中是否包含red组件:" + red);boolean green = context.containsBean("green");System.out.println("容器中是否包含green组件:" + green); }
配置绑定
如何使用Java读取到properties文件中的内容,并且把它封装到JavaBean中,以供随时使用;
public class getProperties {public static void main(String[] args) throws FileNotFoundException, IOException {Properties pps = new Properties();pps.load(new FileInputStream("a.properties"));Enumeration enum1 = pps.propertyNames();//得到配置文件的名字while(enum1.hasMoreElements()) {String strKey = (String) enum1.nextElement();String strValue = pps.getProperty(strKey);System.out.println(strKey + "=" + strValue);//封装到JavaBean。}}}
@ConfigurationProperties
- @ConfigurationProperties:只要在 Bean 上添加上了这个注解,指定好配置文件的前缀,那么对应的配置文件数据就会自动填充到 Bean 中。
方式一:@Component + @ConfigurationProperties
-
application.properties:
mycar.brand=Porsche mycar.price=300 -
示例代码:
/*** 只有在容器中的组件,才会拥有SpringBoot提供的强大功能*/
@Component
@ConfigurationProperties(prefix = "mycar")
public class Car {private String brand;private Integer price;public String getBrand() {return brand;}public void setBrand(String brand) {this.brand = brand;}public Integer getPrice() {return price;}public void setPrice(Integer price) {this.price = price;}@Overridepublic String toString() {return "Car{" +"brand='" + brand + '\'' +", price=" + price +'}';}
}
方式二:@EnableConfigurationProperties + @ConfigurationProperties
-
@EnableConfigurationProperties:使 使用 @ConfigurationProperties 注解的类生效。
//1、开启Car配置绑定功能
//2、把这个Car这个组件自动注册到容器中
@Configuration
@EnableConfigurationProperties(Car.class)
public class MyConfig {}@ConfigurationProperties(prefix = "mycar")
public class Car {}
3.3 自动配置原理
主程序
-
在一个普通的Java类上面添加一个注解@SpringBootApplication,将自动识别为一个Springboot的应用程序,该类中的main方法也是Springboot程序的入口方法。
/*** 主程序类* @SpringBootApplication:这是一个SpringBoot应用*/
@SpringBootApplication
public class Springboot01HelloworldApplication {public static void main(String[] args) {// 启动SpringBoot应用SpringApplication.run(Springboot01HelloworldApplication.class, args);}
}
@SpringBootApplication
-
@SpringBootApplication:SpringBoot程序的主程序注解,当前类也是Springboot的主配置类。
-
@SpringBootApplication注解的源码:
@SpringBootConfiguration
@EnableAutoConfiguration
@ComponentScan(excludeFilters = { @Filter(type = FilterType.CUSTOM, classes = TypeExcludeFilter.class),@Filter(type = FilterType.CUSTOM, classes = AutoConfigurationExcludeFilter.class) })
public @interface SpringBootApplication {}
这里又涉及到三个注解@SpringBootConfiguration、@ComponentScan和@EnableAutoConfiguration。
@SpringBootConfiguration
-
@SpringBootConfiguration是Springboot程序的配置类注解。
-
@SpringBootConfiguration注解的源码:
@Target({ElementType.TYPE})
@Retention(RetentionPolicy.RUNTIME)
@Documented
@Configuration
@Indexed
public @interface SpringBootConfiguration {}
@Configuration注解的源码:
@Target({ElementType.TYPE}) @Retention(RetentionPolicy.RUNTIME) @Documented @Component public @interface Configuration {} -
分析:
- @Configuration注解是Spring框架提供的注解,用来标识一个类为配置类。
- @SpringBootConfiguration是Springboot提供的注解,表示这是一个Springboot的配置类。
- 配置类也是容器中的一个组件,就是@Component注解的作用。
@ComponentScan
-
@ComponentScan:指定扫描包,并扫描包下的类以及其子包。
-
@ComponentScan注解的源码:
@Retention(RetentionPolicy.RUNTIME) @Target({ElementType.TYPE}) @Documented @Repeatable(ComponentScans.class) public @interface ComponentScan {} -
分析:
- @Repeatable(ComponentScans.class):表示在没有@Repeatable标注的注解中,在同一个地方使用相同的注解会报错,有了此元注解标注的注解,就可以在同一个地方使用相同的注解。@ComponentScan注解可以在@ComponentScans注解中使用多次。
@EnableAutoConfiguration
-
开启自动配置功能。之前Spring的时代,需要配置的xml内容;现在Springboot帮我们自动配置,@EnableAutoConfiguration告诉SpringBoot开启自动配置功能。
-
@EnableAutoConfiguration注解的源码:
@Target({ElementType.TYPE})
@Retention(RetentionPolicy.RUNTIME)
@Documented
@Inherited
@AutoConfigurationPackage
@Import({AutoConfigurationImportSelector.class})
public @interface EnableAutoConfiguration {}
这里又涉及到两个注解@AutoConfigurationPackage和@Import(AutoConfigurationImportSelector.class)。
@AutoConfigurationPackage
-
自动配置包,指定了默认的包规则。
-
@AutoConfigurationPackage注解的源码:
@Target({ElementType.TYPE})
@Retention(RetentionPolicy.RUNTIME)
@Documented
@Inherited
@Import({AutoConfigurationPackages.Registrar.class})
public @interface AutoConfigurationPackage {}
这里又涉及到@Import(AutoConfigurationPackages.Registrar.class)注解。
@Import(AutoConfigurationPackages.Registrar.class)
-
使用@Import注解导入一个AutoConfigurationPackages.Registrar的类,给容器中注册一系列组件。
-
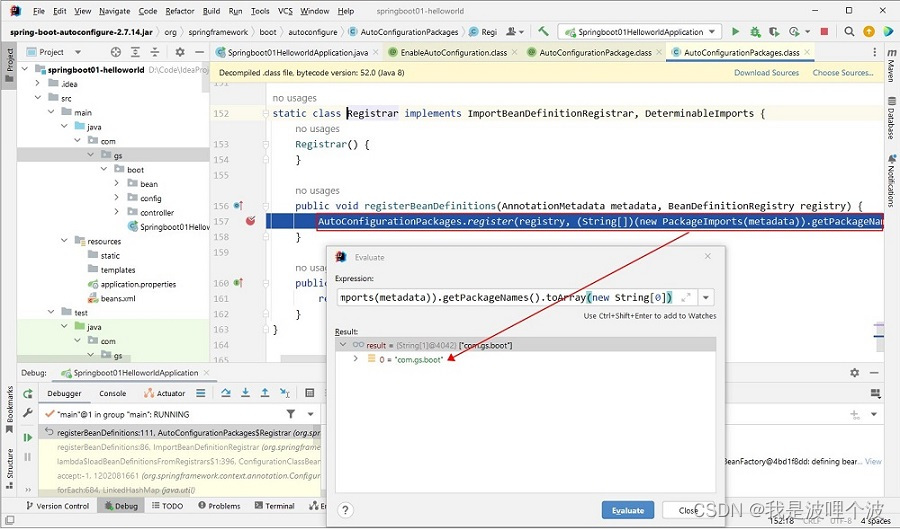
AutoConfigurationPackages.Registrar的源码:
static class Registrar implements ImportBeanDefinitionRegistrar, DeterminableImports {Registrar() {}public void registerBeanDefinitions(AnnotationMetadata metadata, BeanDefinitionRegistry registry) {AutoConfigurationPackages.register(registry, (String[])(new PackageImports(metadata)).getPackageNames().toArray(new String[0]));}public Set<Object> determineImports(AnnotationMetadata metadata) {return Collections.singleton(new PackageImports(metadata));} } -
利用断点调试功能,可得知使用@SpringBootApplication注解标识的类所在的包以及所在子包下的所有类,自动扫描注册到Spring容器中。跟之前学习Spring时,使用的xml文件中,组件扫描基础包的功能一样。
@Import({AutoConfigurationImportSelector.class})
-
使用@Import注解导入一个AutoConfigurationImportSelector的类,给容器中注册一系列组件。
-
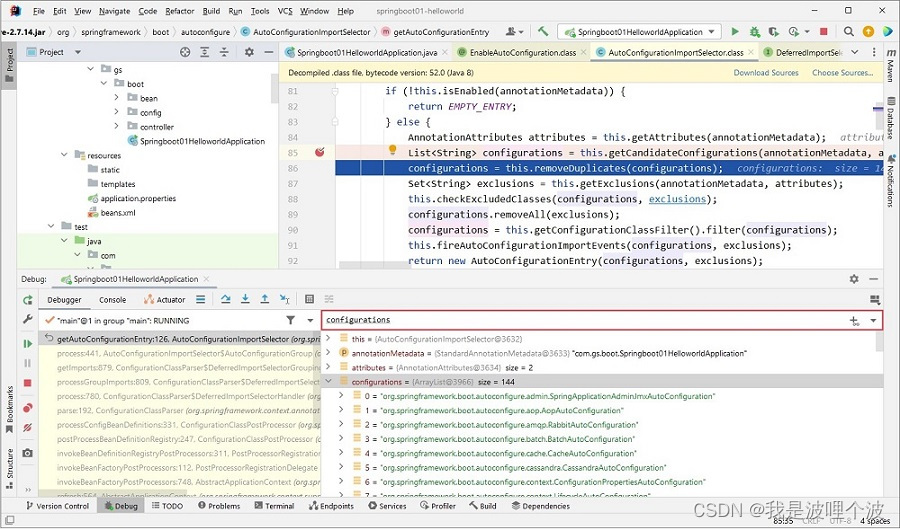
AutoConfigurationImportSelector的部分源码:
public class AutoConfigurationImportSelector implements DeferredImportSelector, BeanClassLoaderAware, ResourceLoaderAware, BeanFactoryAware, EnvironmentAware, Ordered {// 通过@Import注解导入的是ImportSelector接口的实现类,在其抽象方法selectImports中定义需要注册的Bean对象。public String[] selectImports(AnnotationMetadata annotationMetadata) {if (!this.isEnabled(annotationMetadata)) {return NO_IMPORTS;} else {// 利用 getAutoConfigurationEntry(annotationMetadata); 给容器中批量导入一些组件。AutoConfigurationEntry autoConfigurationEntry = this.getAutoConfigurationEntry(annotationMetadata);return StringUtils.toStringArray(autoConfigurationEntry.getConfigurations());}}protected AutoConfigurationEntry getAutoConfigurationEntry(AnnotationMetadata annotationMetadata) {if (!this.isEnabled(annotationMetadata)) {return EMPTY_ENTRY;} else {AnnotationAttributes attributes = this.getAttributes(annotationMetadata);/** 调用List<String> configurations = getCandidateConfigurations(annotationMetadata, attributes);获取到所有准备导入到容器中的组件。* 这些组件就是自动配置类,就是给容器中导入某个场景(Starter)需要的所有组件,并配置好这些组件。有了自动配置类,免去了我们手动编写配置注入功能组件等的工作。*/List<String> configurations = this.getCandidateConfigurations(annotationMetadata, attributes);// 移除重复的configurations = this.removeDuplicates(configurations);// 移除需要排除的Set<String> exclusions = this.getExclusions(annotationMetadata, attributes);this.checkExcludedClasses(configurations, exclusions);configurations.removeAll(exclusions);configurations = this.getConfigurationClassFilter().filter(configurations);this.fireAutoConfigurationImportEvents(configurations, exclusions);// 最终得到需要加载的自动配置类return new AutoConfigurationEntry(configurations, exclusions);}}protected List<String> getCandidateConfigurations(AnnotationMetadata metadata, AnnotationAttributes attributes) {// 利用工厂加载获取到所有组件。List<String> configurations = new ArrayList(SpringFactoriesLoader.loadFactoryNames(this.getSpringFactoriesLoaderFactoryClass(), this.getBeanClassLoader()));ImportCandidates.load(AutoConfiguration.class, this.getBeanClassLoader()).forEach(configurations::add);Assert.notEmpty(configurations, "No auto configuration classes found in META-INF/spring.factories nor in META-INF/spring/org.springframework.boot.autoconfigure.AutoConfiguration.imports. If you are using a custom packaging, make sure that file is correct.");return configurations;}
}
-
工厂加载器
-
利用工厂加载
SpringFactoriesLoader.loadFactoryNames(this.getSpringFactoriesLoaderFactoryClass(), this.getBeanClassLoader())获取到所有组件。 -
SpringFactoriesLoader类中的loadFactoryNames()方法源码:
public static List<String> loadFactoryNames(Class<?> factoryType, @Nullable ClassLoader classLoader) {ClassLoader classLoaderToUse = classLoader;if (classLoader == null) {classLoaderToUse = SpringFactoriesLoader.class.getClassLoader();}String factoryTypeName = factoryType.getName();return (List)loadSpringFactories(classLoaderToUse).getOrDefault(factoryTypeName, Collections.emptyList()); }private static Map<String, List<String>> loadSpringFactories(ClassLoader classLoader) {Map<String, List<String>> result = (Map)cache.get(classLoader);if (result != null) {return result;} else {Map<String, List<String>> result = new HashMap();try {/** 从所有包的META-INF/spring.factories位置来加载一个文件。*/Enumeration<URL> urls = classLoader.getResources("META-INF/spring.factories");while(urls.hasMoreElements()) {URL url = (URL)urls.nextElement();UrlResource resource = new UrlResource(url);Properties properties = PropertiesLoaderUtils.loadProperties(resource);Iterator var6 = properties.entrySet().iterator();while(var6.hasNext()) {Map.Entry<?, ?> entry = (Map.Entry)var6.next();String factoryTypeName = ((String)entry.getKey()).trim();String[] factoryImplementationNames = StringUtils.commaDelimitedListToStringArray((String)entry.getValue());String[] var10 = factoryImplementationNames;int var11 = factoryImplementationNames.length;for(int var12 = 0; var12 < var11; ++var12) {String factoryImplementationName = var10[var12];((List)result.computeIfAbsent(factoryTypeName, (key) -> {return new ArrayList();})).add(factoryImplementationName.trim());}}}result.replaceAll((factoryType, implementations) -> {return (List)implementations.stream().distinct().collect(Collectors.collectingAndThen(Collectors.toList(), Collections::unmodifiableList));});cache.put(classLoader, result);return result;} catch (IOException var14) {throw new IllegalArgumentException("Unable to load factories from location [META-INF/spring.factories]", var14);}} } -
查看源码得知Springboot默认加载了类路径下的META-INF/spring.factories文件。
-
在spring-boot-autoconfigure-2.7.14.jar包中找到META-INF/spring.factories文件。
最新版本的候选组件列表文件:org.springframework.boot.autoconfigure.AutoConfiguration.imports
-
-
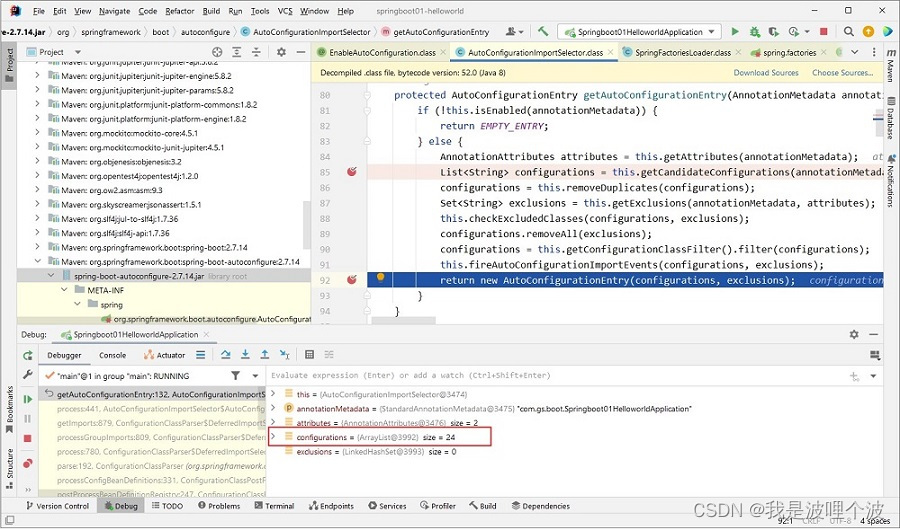
按需开启自动配置
虽然默认加载144个自动配置,但Springboot仍会按照条件装配规则@Conditional,最终按需配置。当代码执行到最后一行时,我们可以看到需要导入的自动配置类仅剩24个。
源码解读
RedisAutoConfiguration
随便找一个看看,这里看的是RedisAutoConfiguration,看看redis是如何配置的。
@AutoConfiguration
@ConditionalOnClass({RedisOperations.class})
@EnableConfigurationProperties({RedisProperties.class})
@Import({LettuceConnectionConfiguration.class, JedisConnectionConfiguration.class})
public class RedisAutoConfiguration {public RedisAutoConfiguration() {}@Bean@ConditionalOnMissingBean(name = {"redisTemplate"})@ConditionalOnSingleCandidate(RedisConnectionFactory.class)public RedisTemplate<Object, Object> redisTemplate(RedisConnectionFactory redisConnectionFactory) {RedisTemplate<Object, Object> template = new RedisTemplate();template.setConnectionFactory(redisConnectionFactory);return template;}@Bean@ConditionalOnMissingBean@ConditionalOnSingleCandidate(RedisConnectionFactory.class)public StringRedisTemplate stringRedisTemplate(RedisConnectionFactory redisConnectionFactory) {return new StringRedisTemplate(redisConnectionFactory);}
}
分析:
- @AutoConfiguration:表示这个类是一个自动配置类。因为一个自动配置类往往需要加很多注解,于是乎springboot就将一些经常用到的注解,给组合到一块,这样就可以做到一个注解拥有三个注解的功能。
- @Configuration:表示这个类是一个配置类;
- @AutoConfigureBefore:一般都是配合着
@Configuration使用,主要用于修饰在类上,然后可以指定该类 在 某类之前进行加载到容器。 - @AutoConfigureAfter: 同
@AutoConfigureBefore功能一样,他是指定该类 在 某类 之后进行加载到容器当中。
- @ConditionalOnClass({RedisOperations.class}):表示RedisOperations类存在则启用这个配置。
- @EnableConfigurationProperties({RedisProperties.class}) :RedisProperties这个类中初始化了redis的一些配置参数。在yml或者properties中写的配置就是这个类的对应的逻辑。
- @Import({ LettuceConnectionConfiguration.class, JedisConnectionConfiguration.class }) :表示导入redis连接的配置。
DispatcherServletAutoConfiguration
这里看的是DispatcherServletAutoConfiguration,看看DispatcherServlet是如何配置的。
@AutoConfigureOrder(Integer.MIN_VALUE)
@AutoConfiguration(after = {ServletWebServerFactoryAutoConfiguration.class})
@ConditionalOnWebApplication(type = Type.SERVLET)
@ConditionalOnClass({DispatcherServlet.class})
public class DispatcherServletAutoConfiguration {public static final String DEFAULT_DISPATCHER_SERVLET_BEAN_NAME = "dispatcherServlet";public static final String DEFAULT_DISPATCHER_SERVLET_REGISTRATION_BEAN_NAME = "dispatcherServletRegistration";public DispatcherServletAutoConfiguration() {}@Order(2147483637)private static class DispatcherServletRegistrationCondition extends SpringBootCondition {}@Order(2147483637)private static class DefaultDispatcherServletCondition extends SpringBootCondition {}@Configuration(proxyBeanMethods = false)@Conditional({DispatcherServletRegistrationCondition.class})@ConditionalOnClass({ServletRegistration.class})@EnableConfigurationProperties({WebMvcProperties.class})@Import({DispatcherServletConfiguration.class})protected static class DispatcherServletRegistrationConfiguration {}@Configuration(proxyBeanMethods = false)@Conditional({DefaultDispatcherServletCondition.class})@ConditionalOnClass({ServletRegistration.class})@EnableConfigurationProperties({WebMvcProperties.class})protected static class DispatcherServletConfiguration {protected DispatcherServletConfiguration() {}@Bean(name = {"dispatcherServlet"})public DispatcherServlet dispatcherServlet(WebMvcProperties webMvcProperties) {DispatcherServlet dispatcherServlet = new DispatcherServlet();dispatcherServlet.setDispatchOptionsRequest(webMvcProperties.isDispatchOptionsRequest());dispatcherServlet.setDispatchTraceRequest(webMvcProperties.isDispatchTraceRequest());dispatcherServlet.setThrowExceptionIfNoHandlerFound(webMvcProperties.isThrowExceptionIfNoHandlerFound());dispatcherServlet.setPublishEvents(webMvcProperties.isPublishRequestHandledEvents());dispatcherServlet.setEnableLoggingRequestDetails(webMvcProperties.isLogRequestDetails());return dispatcherServlet;}@Bean@ConditionalOnBean({MultipartResolver.class}) // 容器中有这个类型组件@ConditionalOnMissingBean(name = {"multipartResolver"})// 容器中没有这个名字 multipartResolver 的组件public MultipartResolver multipartResolver(MultipartResolver resolver) {// 给@Bean标注的方法传入了对象参数,这个参数的值就会从容器中找。// SpringMVC multipartResolver。防止有些用户配置的文件上传解析器不符合规范return resolver;}}
}
分析:
@Configuration配置类它也是一个Bean,但对于配置类来说,某些场景下的执行顺序是必须的,是需要得到保证的。Spring Boot下对自动配置的管理对比于Spring它就是黑盒,它会根据当前容器内的情况来动态的判断自动配置类的载入与否、以及载入的顺序,所以可以说:Spring Boot的自动配置它对顺序是有强要求的。需求驱使,Spring Boot给我们提供了@AutoConfigureBefore、@AutoConfigureAfter、@AutoConfigureOrder(下面统称这三个注解为“三大注解”)这三个注解来帮我们解决这种诉求。@AutoConfigureOrder属于1.3.0版本新增,表示绝对顺序(数字越小,优先顺序越高)。@AutoConfigureBefore、@AutoConfigureAfter来控制配置的顺序,表示在某种配置之后或之前载入;DispatcherServletAutoConfiguration被载入的前提是:ServletWebServerFactoryAutoConfiguration已经完成初始化。- 在DispatcherServletAutoConfiguration定义了四个内部类,只有DispatcherServletAutoConfiguration配置生效,才会判断内部类配置条件。
定制化配置
-
SpringBoot默认会在底层配好所有的组件。但是如果用户自己配置了以用户的优先。
-
定制化配置技巧:
-
用户直接自己@Bean替换底层的组件;
-
用户去看这个组件是获取的配置文件什么值就去修改。
xxxxxAutoConfiguration -> 组件 -> xxxxProperties里面拿值 -> application.properties
例如:
HttpEncodingAutoConfiguration -> characterEncodingFilter组件 -> ServerProperties里面获取字符编码 -> application.properties
-
总结
-
SpringBoot先加载所有的自动配置类 xxxxxAutoConfiguration;
-
每个自动配置类按照条件进行生效,默认都会绑定配置文件指定的值。
- xxxxProperties里面拿。
- xxxProperties和配置文件进行了绑定;
-
生效的配置类就会给容器中装配很多组件;
-
只要容器中有这些组件,相当于这些功能就有了;
3.4 最佳实践
-
引入场景依赖
- https://docs.spring.io/spring-boot/docs/current/reference/html/using-spring-boot.html#using-boot-starter
-
查看自动配置了哪些(选做)
- 自己分析,引入场景对应的自动配置一般都生效了
- 配置文件中debug=true开启自动配置报告。Negative(不生效)\Positive(生效)
-
是否需要修改
- 参照文档修改配置项
- https://docs.spring.io/spring-boot/docs/current/reference/html/appendix-application-properties.html#common-application-properties
- 自己分析。xxxxProperties绑定了配置文件的哪些。
- 自定义加入或者替换组件
- @Bean、@Component…
- …
置了以用户的优先。
- 参照文档修改配置项
-
定制化配置技巧:
-
用户直接自己@Bean替换底层的组件;
-
用户去看这个组件是获取的配置文件什么值就去修改。
xxxxxAutoConfiguration -> 组件 -> xxxxProperties里面拿值 -> application.properties
例如:
HttpEncodingAutoConfiguration -> characterEncodingFilter组件 -> ServerProperties里面获取字符编码 -> application.properties
-
总结
-
SpringBoot先加载所有的自动配置类 xxxxxAutoConfiguration;
-
每个自动配置类按照条件进行生效,默认都会绑定配置文件指定的值。
- xxxxProperties里面拿。
- xxxProperties和配置文件进行了绑定;
-
生效的配置类就会给容器中装配很多组件;
-
只要容器中有这些组件,相当于这些功能就有了;
3.4 最佳实践
- 引入场景依赖
- https://docs.spring.io/spring-boot/docs/current/reference/html/using-spring-boot.html#using-boot-starter
- 查看自动配置了哪些(选做)
- 自己分析,引入场景对应的自动配置一般都生效了
- 配置文件中debug=true开启自动配置报告。Negative(不生效)\Positive(生效)
- 是否需要修改
- 参照文档修改配置项
- https://docs.spring.io/spring-boot/docs/current/reference/html/appendix-application-properties.html#common-application-properties
- 自己分析。xxxxProperties绑定了配置文件的哪些。
- 自定义加入或者替换组件
- @Bean、@Component…
- …
- 参照文档修改配置项