准备环境
[root@lnmp src]# ll
总用量 169456
-rw-r--r--  1 root root 83709983 11月 23 00:27 boost_1_59_0.tar.gz
-rw-r--r--  1 root root 51822632 11月 23 00:22 mysql-5.7.21.tar.gz
-rw-r--r--  1 root root  1039530 12月 16 10:32 nginx-1.18.0.tar.gz
-rw-r--r--  1 root root 19675794 10月 27 19:30 php-7.3.24.tar.gz
-rw-r--r--  1 root root 17262366 1月   5 16:43 wordpress-5.6-zh_CN.zip
部署mysql5.7
##创建数据目录
[root@lnmp src]# mkdir -p /data/mysql##创建mysql用户
[root@lnmp src]# useradd -s /sbin/nologin mysql
[root@lnmp src]# chown -R mysql. /data/mysql/##安装boost库
[root@lnmp src]# tar xf boost_1_59_0.tar.gz
[root@lnmp src]# ls
boost_1_59_0         debug    mysql-5.7.21.tar.gz  php-7.3.24.tar.gz
boost_1_59_0.tar.gz  kernels  nginx-1.18.0.tar.gz  wordpress-5.6-zh_CN.zip
[root@lnmp src]# mv boost_1_59_0 /usr/local/boost
###安装依赖
[root@lnmp src]# yum install gcc ncurses-devel libaio bison gcc-c++ git cmake ncurses-devel openssl openssl-devel -y##解压mysql源码包
[root@lnmp src]# tar xf mysql-5.7.21.tar.gz
[root@lnmp src]# cd mysql-5.7.21/##预编译
cmake . -DCMAKE_INSTALL_PREFIX=/usr/local/mysql57 \
-DMYSQL_UNIX_ADDR=/data/mysql/mysql.sock \
-DMYSQL_DATADIR=/data/mysql \
-DSYSCONFDIR=/usr/local/mysql57 \
-DMYSQL_USER=mysql \
-DMYSQL_TCP_PORT=3306 \
-DWITH_XTRADB_STORAGE_ENGINE=1 \
-DWITH_INNOBASE_STORAGE_ENGINE=1 \
-DWITH_PARTITION_STORAGE_ENGINE=1 \
-DWITH_BLACKHOLE_STORAGE_ENGINE=1 \
-DWITH_MYISAM_STORAGE_ENGINE=1 \
-DWITH_READLINE=1 \
-DENABLED_LOCAL_INFILE=1 \
-DWITH_EXTRA_CHARSETS=1 \
-DDEFAULT_CHARSET=utf8 \
-DDEFAULT_COLLATION=utf8_general_ci \
-DEXTRA_CHARSETS=all \
-DWITH_BIG_TABLES=1 \
-DWITH_DEBUG=0 \
-DENABLE_DTRACE=0 \
-DDOWNLOAD_BOOST=1 \
-DWITH_BOOST=/usr/local/boost##编译安装
[root@lnmp mysql-5.7.21]# make && make install##创建启动脚本
[root@lnmp mysql-5.7.21]#  cp support-files/mysql.server /etc/init.d/mysql
[root@lnmp mysql-5.7.21]# chmod +x /etc/init.d/mysql##创建配置文件
[root@lnmp mysql-5.7.21]# vim /usr/local/mysql57/my.cnf
[mysqld]
basedir=/usr/local/mysql57/
datadir=/data/mysql/
port=3306
pid-file=/data/mysql/mysql.pid
socket=/data/mysql/mysql.sock
[mysqld_safe]
log-error=/data/mysql/mysql.log##初始化
[root@lnmp mysql-5.7.21]# /usr/local/mysql57/bin/mysqld --initialize --user=mysql --datadir=/data/mysql --basedir=/usr/local/mysql572021-01-06T03:42:35.663282Z 0 [Warning] TIMESTAMP with implicit DEFAULT value is deprecated. Please use --explicit_defaults_for_timestamp server option (see documentation for more details).
2021-01-06T03:42:35.843157Z 0 [Warning] InnoDB: New log files created, LSN=45790
2021-01-06T03:42:35.871667Z 0 [Warning] InnoDB: Creating foreign key constraint system tables.
2021-01-06T03:42:35.940910Z 0 [Warning] No existing UUID has been found, so we assume that this is the first time that this server has been started. Generating a new UUID: 374bd87b-4fd1-11eb-a02b-000c2985902f.
2021-01-06T03:42:35.942940Z 0 [Warning] Gtid table is not ready to be used. Table 'mysql.gtid_executed' cannot be opened.
2021-01-06T03:42:35.944037Z 1 [Note] A temporary password is generated for root@localhost: k9!tnXws9sKh##启动mysql
[root@lnmp mysql-5.7.21]# /etc/init.d/mysql start
Starting MySQL.Logging to '/data/mysql/mysql.log'.SUCCESS! ##查看mysql进程
[root@lnmp mysql-5.7.21]# ps -ef |grep mysql
root      64137      1  0 11:43 pts/1    00:00:00 /bin/sh /usr/local/mysql57//bin/mysqld_safe --datadir=/data/mysql/ --pid-file=/data/mysql/mysql.pid
mysql     64365  64137  0 11:43 pts/1    00:00:03 /usr/local/mysql57/bin/mysqld --basedir=/usr/local/mysql57/ --datadir=/data/mysql --plugin-dir=/usr/local/mysql57//lib/plugin --user=mysql --log-error=/data/mysql/mysql.log --pid-file=/data/mysql/mysql.pid --socket=/data/mysql/mysql.sock --port=3306
root      67033   7546  0 13:23 pts/1    00:00:00 grep --color=auto mysql##查看mysql端口
[root@lnmp mysql-5.7.21]# netstat -nltp |grep mysql
tcp6       0      0 :::3306                 :::*                    LISTEN      64365/mysqld  ##登录mysql修改密码
[root@lnmp mysql-5.7.21]# /usr/local/mysql57/bin/mysql -uroot -p
Enter password:k9!tnXws9sKh
mysql> alter user user() identified by "123456";
Query OK, 0 rows affected (0.00 sec)###
##创建wordpress数据库
mysql> create database wordpress charset utf8;
Query OK, 1 row affected (0.00 sec)##授权wordpress用户可以访问wordpress数据库
mysql> grant all on wordpress.* to "wordpress"@localhost identified by "123456";
Query OK, 0 rows affected, 1 warning (0.00 sec)##刷新权限
mysql> flush privileges;
Query OK, 0 rows affected (0.00 sec)
安装nginx1.18
##解压nginx
[root@lnmp src]# tar xf nginx-1.18.0.tar.gz
[root@lnmp src]# cd nginx-1.18.0/##预编译
[root@lnmp nginx-1.18.0]# ./configure --prefix=/usr/local/nginx --user=nginx --group=nginx --with-http_stub_status_module##编译安装
[root@lnmp nginx-1.18.0]# make && make install添加nginx用户
[root@lnmp nginx-1.18.0]# useradd -s /sbin/nologin nginx##修改nginx用户
[root@lnmp nginx-1.18.0]# vim /usr/local/nginx/conf/nginx.conf
user  nginx;##启动nginx
[root@lnmp nginx-1.18.0]# /usr/local/nginx/sbin/nginx
[root@lnmp nginx-1.18.0]# ps -ef |grep nginx
root      67058      1  0 12:00 ?        00:00:00 nginx: master process /usr/local/nginx/sbin/nginx
nginx     67059  67058  0 12:00 ?        00:00:00 nginx: worker process
root      67075   7546  0 12:02 pts/1    00:00:00 grep --color=auto nginx
安装PHP7.3
##解压php
[root@lnmp src]# tar xf php-7.3.24.tar.gz
[root@lnmp src]# cd php-7.3.24/##安装依赖
[root@lnmp php-7.3.24]# yum -y install gd curl curl-devel libjpeg libjpeg-devel libpng libpng-devel freetype freetype-devel libxml2 libxml2-devel -y##预编译
[root@lnmp php-7.3.24]# ./configure --prefix=/usr/local/php \--enable-fpm \--with-fpm-user=nginx \--with-fpm-group=nginx \--enable-debug \--with-gd \--with-jpeg-dir \--with-png-dir \--with-freetype-dir \--enable-mbstring \--with-curl \--with-mysqli=mysqlnd \--with-mysql-sock=/data/mysql/mysql.sock \--with-pdo-mysql=mysqlnd \--with-config-file-path=/usr/local/php/etc \--with-zlib-dir--with-openssl
##预编译结果
...
creating libtool
appending configuration tag "CXX" to libtoolGenerating files
configure: creating ./config.status
creating main/internal_functions.c
creating main/internal_functions_cli.c
+--------------------------------------------------------------------+
| License:                                                           |
| This software is subject to the PHP License, available in this     |
| distribution in the file LICENSE.  By continuing this installation |
| process, you are bound by the terms of this license agreement.     |
| If you do not agree with the terms of this license, you must abort |
| the installation process at this point.                            |
+--------------------------------------------------------------------+Thank you for using PHP.config.status: creating php7.spec
config.status: creating main/build-defs.h
config.status: creating scripts/phpize
config.status: creating scripts/man1/phpize.1
config.status: creating scripts/php-config
config.status: creating scripts/man1/php-config.1
config.status: creating sapi/cli/php.1
config.status: creating sapi/fpm/php-fpm.conf
config.status: creating sapi/fpm/www.conf
config.status: creating sapi/fpm/init.d.php-fpm
config.status: creating sapi/fpm/php-fpm.service
config.status: creating sapi/fpm/php-fpm.8
config.status: creating sapi/fpm/status.html
config.status: creating sapi/phpdbg/phpdbg.1
config.status: creating sapi/cgi/php-cgi.1
config.status: creating ext/phar/phar.1
config.status: creating ext/phar/phar.phar.1
config.status: creating main/php_config.h
config.status: executing default commands##编译安装
[root@lnmp php-7.3.24]# make && make install##创建配置文件
[root@lnmp php-7.3.24]# cp php.ini-development /usr/local/php/etc/php.ini
[root@lnmp php-7.3.24]# cp /usr/local/php/etc/php-fpm.conf.default  /usr/local/php/etc/php-fpm.conf##创建启动脚本
[root@lnmp php-7.3.24]# cp sapi/fpm/init.d.php-fpm /etc/init.d/php-fpm
[root@lnmp php-7.3.24]# chmod +x /etc/init.d/php-fpm##如启动报错可执行下操作
###
[root@lnmp php-7.3.24]# /etc/init.d/php-fpm start
Starting php-fpm [06-Jan-2021 12:41:11] WARNING: Nothing matches the include pattern '/usr/local/php/etc/php-fpm.d/*.conf' from /usr/local/php/etc/php-fpm.conf at line 143.
[06-Jan-2021 12:41:11] ERROR: No pool defined. at least one pool section must be specified in config file
[06-Jan-2021 12:41:11] ERROR: failed to post process the configuration
[06-Jan-2021 12:41:11] ERROR: FPM initialization failedfailed##执行操作
[root@lnmp php-fpm.d]# cp /usr/local/php/etc/php-fpm.d/www.conf.default /usr/local/php/etc/php-fpm.d/www.conf##启动php-fpm
[root@lnmp php-fpm.d]# /etc/init.d/php-fpm start
Starting php-fpm  done##查看进程
[root@lnmp php-fpm.d]# ps -ef |grep php
root      66722      1  0 12:41 ?        00:00:00 php-fpm: master process (/usr/local/php/etc/php-fpm.conf)
nginx     66723  66722  0 12:41 ?        00:00:00 php-fpm: pool www
nginx     66724  66722  0 12:41 ?        00:00:00 php-fpm: pool www
root      66726   7546  0 12:45 pts/1    00:00:00 grep --color=auto php##查看端口
[root@lnmp php-fpm.d]# netstat -nltp |grep php
tcp        0      0 127.0.0.1:9000          0.0.0.0:*               LISTEN      66722/php-fpm: mast
上传wordpress网站程序
##解压发布目录
[root@lnmp src]# unzip wordpress-5.6-zh_CN.zip -d /usr/local/nginx/html/##设置wordpress目录权限
[root@lnmp src]# chown -R nginx. /usr/local/nginx/html/wordpress/##创建虚拟主机配置文件目录
[root@lnmp src]# mkdir -p /usr/local/nginx/conf/vhost##创建wordpress虚拟机
#指定应用虚拟主机目录(主配置文件http指令)
[root@lnmp src]# vim /usr/local/nginx/conf/nginx.conf
include vhost/*.conf;##创建主机配置文件
[root@lnmp nginx-1.18.0]# vim /usr/local/nginx/conf/vhost/blog.wscyun.com.conf
server {listen    80;server_name blog.wscyun.com;charset utf8;
#       access_log logs/wordpress.access.log main;location / {root html/wordpress;index index.php index.html index.htm;}#reeor_page 404      /404.html;error_page 500 502 503 504 /50x.html;location = /50x.html {root html;}location ~ \.php$ {root    html/wordpress;fastcgi_pass 127.0.0.1:9000;fastcgi_index index.php;fastcgi_param SCRIPT_FILENAME $document_root$fastcgi_script_name;include fastcgi_params;}}
安装wordpress
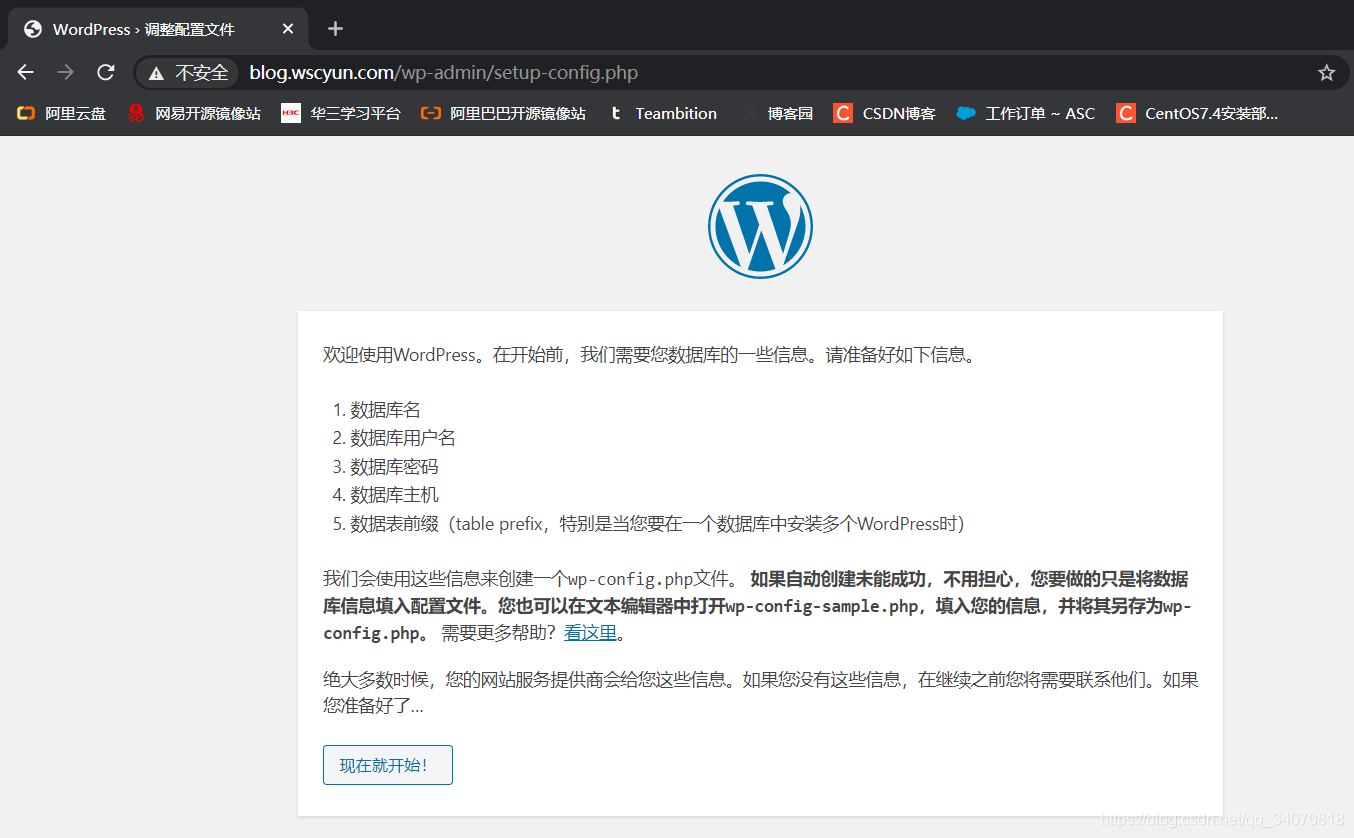
##访问blog.wscyun.com
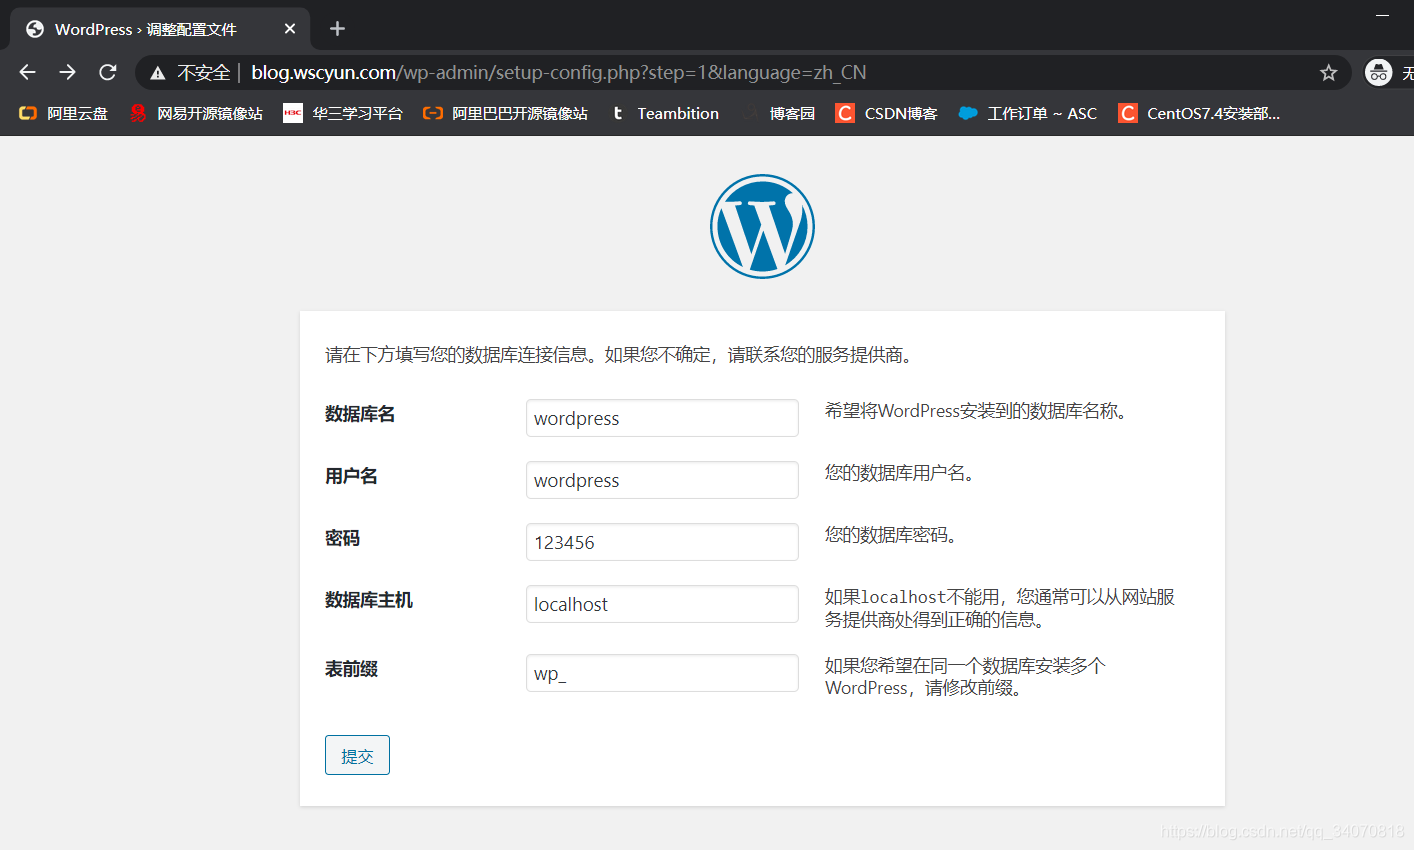
##输入准备好的数据库及密码

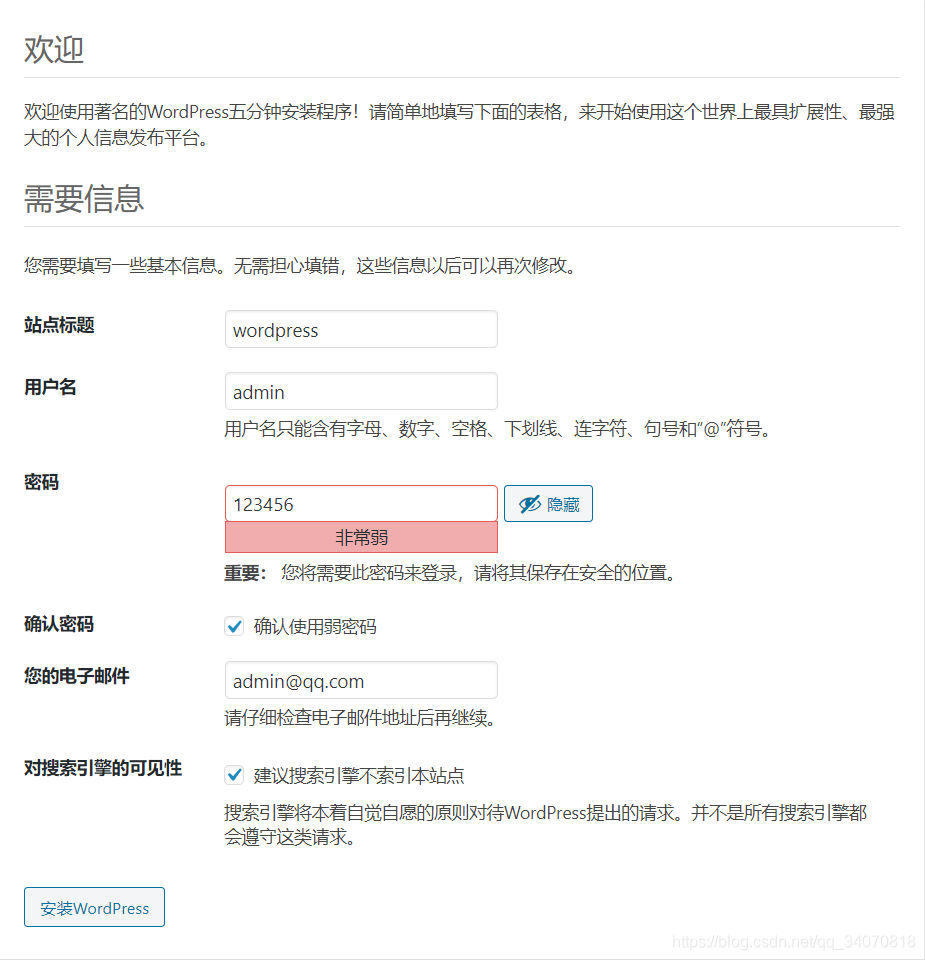
##输入网站信息
##开始安装
##登录


##查看网站

##上传wordpress主题