网站架构
网站架构,一般是为了一个目的,当访问的用户越来越多,怎么将更好,更快的服务推送给客户。当然后面的服务器架设是必不可少的。当然这里面需要考虑的也有很多。

硬架构
一、机房的选择,宽带的选择
二、对后台主机的划分更细,图片服务器,页面服务器,数据库服务器,日志服务器等等。
ps:lighttpd来做图片服务器,而apache来做页面服务器。当然不止一台,要很多台来做负载均衡。
如<img src="http://img.domain/abc.gif" />
数据库是一个网站最重要的一个环节。当然大部分的操作都是读操作了。所有需要搞一个一主多从,读写分离。
甚至可以做一个备份后台数据库。在大数据量的情况下,mysqldump基本就没用了,而直接备份数据时肯定会备份文件出错(不停服务情况下)。
但主从也有一个巨大的缺陷,那就是它只降低了读请求的压力,没有降低写请求的压力,因为主还是一个。
为了更大的规模,没办法。只能分库了,横向/纵向分割数据库。
☆、横向切分数据库就是把不同的表保存到不同的数据库服务器上。
比如说,博客用户信息放到A数据库服务器,博客用户的博客文章放到B数据库服务器。当然这样是有代价的,最明显的就是无法做LEFT JOIN之类的操作。
☆、纵向切分数据库就是很简单的,分库。
比如说,有5台数据库服务器,可以这样来,将user_id为1-1k 的用户所有相关内容放到1号数据库,1001-2k的用户的所有相关内容放到2号数据库......当然,纵向分库也会有很多麻烦,及明显的SUM,COUNT等函数就使用起来有麻烦。
当然最好使用专门的应用服务器了,比如专门创建一个php服务器,专门来跑PHP。当然,php-fpm已经使之实现了。可以给应用服务器配置一些如app.momain之类的域名,配置上必要的xcache缓存,加载模块一定要越少越好,除了url重写的mod_rewrite的重要模块。这样是为了减少httpd进程的内存消耗,而那些图片服务器或者静态缓存就是用lighttpd来做吧。
汇总日志也是很有必要的,像淘宝那样的网站,一天下来的日志都是T级别的。那么怎么分析呢?用awk?grep?当然不可能,日志文件能加载进内存吗?这就需要hadoop了,依托云计算平台,专门计算,分析日志。再次强调,日志服务器也是很有必要的。
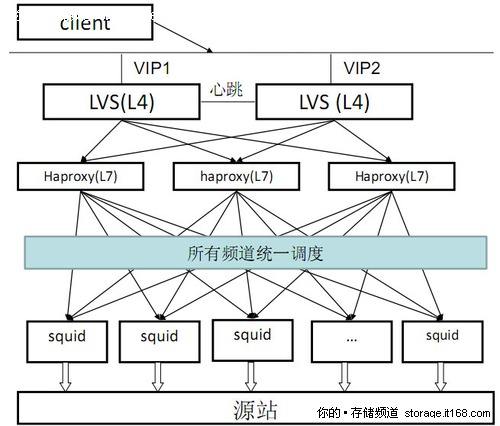
负载均衡
一、HTML页面静态化
常见的信息发布系统,同时缓存,对于频繁使用数据库查询但是内容更新很小的应用,可以使用html静态化。可以将频繁被前端调用,但是又不常更新的内容。缓存起来。
二、图片服务器分离
因为在web服务中,图片是很耗资源的
三、图片托管应用程序
提供web内容的分发,比如CDN。
四、数据库集群和库表散列
数据库集群不用说了,库表散列呢,就是比如论坛:用户,设置,帖子等信息设置数据库分离,然后对帖子、用户按照板块和ID进行散列。
五、缓存
网站的开发当然要有很多很多的缓存。squid等
六、镜像
镜像技术是大型网站提高性能和数据安全性的方式,镜像技术可以解决不同网络接入商和地域带来的访问速度差异。比如说可以使用rsync+inotify工具。
七、硬件四层交换
使用第三层和第四层信息包的报头。来分摊流量。
八、软件四层交换
LVS
根据淘宝网的发展史,今后的网站将迎来的就是云时代。
从最开始的几台机器组成的lamp架构就构建成了一个网站。到后来名气打出来了,有人访问了。
好了,这下访问的人越多越多了,几台服务器扛不住了,开始集群架构,包括缓存,各种分离等等。
现在,云时代的到来, 应‘云’而生---云时代的到来。使得运维有了新的理念。
云计算无疑是目前IT领域最大的热点。淘宝将所有的东西都放到云上,

所有的东西由云服务平台统一集中运行管理。比如某部门想要一台主机,直接去云上拿,所有的东西好像都是有一个接口,
通过接口直接去拿,而根本不用去管硬件这些实际存在的东西。如果用服务器蹦了,云里会调度。直接去补充云。有了云,淘宝可以在十小时之内迅速部署一个淘宝购物平台,一切都是自动化的。比如现在想要一个mysql主从架构了,鼠标点点就直接可以获取到‘。再通过hadoop将所有的运行状态,日志汇总,计算,管理。日后的网站架构将越来越自动化。整个网站就跟工业革命一样,工业革命前,人们还是手工纺织,工业革命后,机器代替一切,自动化的生产流水线,将原料投进去,就有纺好的布出来。
下来简单得配置一个小的网站架构。(使用wordpress个人博客系统)
由于我的虚拟机开启数量有限。所以我的设想是这样的。
前方有haproxy+keepalive负责负载均衡(2台主机)
中间nginx来提供web服务(2台主机)
后端采用mysql主从配置,一个(2台主机)
一台nagios负责监控整个业务
主机名: proxy1 192.168.217.10 负责调度和动静分离
proxy2 192.168.217.11 同上
web1 192.168.217.12 apache,负责静态请求(虽然nginx更适合静态请求。。。 )
)
)
web2 192.168.217.13 nginx,负责动态请求
master 192.168.217.14 mysql的主服务器
slave 192.168.217.15 mysql的从服务器
配置前台(keepalive+haproxy)
proxy1主机。(proxy2做同样的操作)
配置yum源
[root@proxy1 ~]# yum makecache
Loaded plugins: product-id, subscription-manager
This system is not registered to Red Hat Subscription Management. You can use subscription-manager to register.
HighAvailability                                         | 3.9 kB     00:00 ...
LoadBalancer                                             | 3.9 kB     00:00 ...
ResilientStorage                                         | 3.9 kB     00:00 ...
ScalableFileSystem                                       | 3.9 kB     00:00 ...
Server                                                   | 3.9 kB     00:00 ...
rhel                                                     | 3.9 kB     00:00 ...
Metadata Cache Created
[root@proxy1 ~]# yum -y install haproxy
[root@proxy1 ~]# vim /etc/haproxy/haproxy.cfg
globallog         127.0.0.1 local2chroot      /var/lib/haproxypidfile     /var/run/haproxy.pidmaxconn     4000user        haproxygroup       haproxydaemonstats socket /var/lib/haproxy/stats
defaultsmode                    httplog                     globaloption                  httplogoption                  dontlognulloption http-server-closeoption forwardfor       except 127.0.0.0/8option                  redispatchretries                 3timeout http-request    10stimeout queue           1mtimeout connect         10stimeout client          1mtimeout server          1mtimeout http-keep-alive 5stimeout check           5smaxconn                 3000#---------------------------------------------------------------------
# main frontend which proxys to the backends
#---------------------------------------------------------------------
frontend  main *:80acl url_static       path_beg       -i /static /images /javascript /stylesheetsacl url_static       path_end       -i .jpg .gif .png .css .jsacl north.com hdr_beg(host) -i north.comacl 192.168.217.200  hdr(host) -i 192.168.217.200redirect code 301 location http://www.north.com if north.comredirect code 301 location http://www.north.com if 192.168.217.200use_backend static          if url_staticdefault_backend             app#---------------------------------------------------------------------
# static backend for serving up images, stylesheets and such
#---------------------------------------------------------------------
backend staticbalance     roundrobinserver      static 192.168.217.12:80 check#---------------------------------------------------------------------
# round robin balancing between the various backends
#---------------------------------------------------------------------
backend appbalance     roundrobinserver  app1 192.168.217.13:80 checkserver  app2 127.0.0.1:8000      backup
这里说下。
首先做到了动静分离,将图片啊,css样式表啊都放到apache上处理
还有就是永久重定向,比如访问north.com 就自动重写成www.north.com(VIP是192.168.217.200)
备用主机是本机,所以本机的httpd监听8000端口,提供服务器崩溃的页面
制作keepalived。
解压keepalived。解压内容如下。
[root@proxy2 keepalived-1.1.19]# ls
AUTHOR     configure.in  genhash     keepalived          README
bin        CONTRIBUTORS  goodies     keepalived.spec.in  TODO
ChangeLog  COPYING       INSTALL     lib                 VERSION
configure  doc           install-sh  Makefile.in
[root@proxy2 keepalived-1.1.19]#
[root@proxy2 keepalived-1.1.19]# ./configure --prefix=/usr/local/keepalived
[root@proxy2 keepalived-1.1.19]# make && make install
[root@proxy2 keepalived-1.1.19]# ln -s /usr/local/keepalived/etc/rc.d/init.d/keepalived /etc/init.d/
[root@proxy2 keepalived-1.1.19]# ln -s /usr/local/keepalived/etc/sysconfig/keepalived /etc/sysconfig/
[root@proxy2 keepalived-1.1.19]# ln -s /usr/local/keepalived/etc/keepalived/ /etc/
[root@proxy2 keepalived-1.1.19]# ln -s /usr/local/keepalived/sbin/keepalived /usr/sbin/
proxy1的配置文件(/etc/keepalived/keepalived.conf)
global_defs {notification_email {root@localhost}notification_email_from keepalived@localhostsmtp_server 127.0.0.1smtp_connect_timeout 30router_id nginxvrrp_skip_check_adv_addrvrrp_strictvrrp_garp_interval 0vrrp_gna_interval 0
}vrrp_script chk_http_port {script "/etc/keepalived/check_haproxy.sh"interval 2weight 2
}vrrp_instance VI_1 {state MASTERinterface eth0virtual_router_id 51priority 100advert_int 1authentication {auth_type PASSauth_pass 1111}track_script {chk_http_port}virtual_ipaddress {192.168.217.200/24}
}
proxy2的主配置文件(/etc/keepalived/keepalived.conf)
global_defs {notification_email {root@localhost}notification_email_from keepalived@localhostsmtp_server 127.0.0.1smtp_connect_timeout 30router_id nginxvrrp_skip_check_adv_addrvrrp_strictvrrp_garp_interval 0vrrp_gna_interval 0
}vrrp_script chk_http_port {script "/etc/keepalived/check_haproxy.sh"interval 2weight 2
}vrrp_instance VI_1 {state BACKUPinterface eth1virtual_router_id 51priority 99advert_int 1authentication {auth_type PASSauth_pass 1111}track_script {chk_http_port}virtual_ipaddress {192.168.217.200/24}
}#!/bin/bash
if [ $(ps -C haproxy --no-header | wc -l) -eq 0 ]; then/etc/init.d/haproxy start
fi
sleep 2
if [ $(ps -C haproxy --no-header | wc -l) -eq 0 ]; then/etc/init.d/keepalived stop
fi[root@proxy2 keepalived]# ls
check_haproxy.sh keepalived.conf samples配置中间(nginx+php-fpm apache+php)

apache的配置就不讲了。。。
直接web2的nginx吧。
创建用户
[root@web2 ~]# groupadd nginx
[root@web2 ~]# useradd -r -c "Nginx" -M -s /sbin/nologin -g nginx nginx
解压缩
[root@web2 ~]# tar xf nginx-1.4.2.tar.gz
[root@web2 nginx-1.4.2]# ./configure \
> --prefix=/usr/local/nginx \
> --sbin-path=/usr/sbin/nginx \
> --conf-path=/etc/nginx/nginx.conf \
> --error-log-path=/var/log/nginx/error.log \
> --http-log-path=/var/log/nginx/access.log \
> --pid-path=/var/run/nginx/nginx.pid \
> --lock-path=/var/lock/nginx.lock \
> --user=nginx \
> --group=nginx \
> --with-http_ssl_module \
> --with-http_flv_module \
> --with-http_stub_status_module \
> --with-http_gzip_static_module \
> --with-pcre
[root@web2 nginx-1.4.2]# make && make install 先来编译php
先装相关依赖(rpm可以在网上找,我全是在网上找的)
[root@web2 php]# rpm -ivh libmcrypt-2.5.8-9.el6.x86_64.rpm libmcrypt-devel-2.5.8-9.el6.x86_64.rpm mhash-0.9.9.9-3.el6.x86_64.rpm mhash-devel-0.9.9.9-3.el6.x86_64.rpm
warning: libmcrypt-2.5.8-9.el6.x86_64.rpm: Header V3 RSA/SHA256 Signature, key ID 0608b895: NOKEY
Preparing...                ########################################### [100%]1:mhash                  ########################################### [ 25%]2:libmcrypt              ########################################### [ 50%]3:libmcrypt-devel        ########################################### [ 75%]4:mhash-devel            ########################################### [100%]
[root@web2 php]# tar xf libiconv-1.13.1.tar.gz
[root@web2 php]# cd libiconv-1.13.1
[root@web2 libiconv-1.13.1]# ./configure --prefix=/usr/local/libiconv
编译php
[root@web2 php]# tar -xf php-5.4.13.tar.gz
[root@web2 php]# cd php-5.4.13
[root@web2 php-5.4.13]# ./configure --prefix=/usr/local/php \
> --with-openssl \
> --enable-mbstring \
> --with-freetype-dir \
> --with-jpeg-dir \
> -with-png-dir \
> --with-zlib \
> --with-libxml-dir=/usr \
> --enable-xml \
> --enable-sockets \
> --with-mcrypt \
> --with-config-file-path=/etc \
> --with-config-file-scan-dir=/etc/php.d \
> --with-bz2 \
> --enable-maintainer-zts \
> --enable-fpm \
> --with-curl \
> --with-iconv=/usr/local/libiconv \
> --with-mysql \
> --with-mysqli \
> --with-pdo-mysql \
> --enable-mysqlnd
如果编译出错,提示缺啥,直接yum装就好了(大部分都是什么什么-devel)
make && make install
编译Xcache
编译加载模块。
[root@web2 php]# tar xf xcache-3.0.0.tar.gz
[root@web2 php]# cd xcache-3.0.0
[root@web2 xcache-3.0.0]# /usr/local/php/bin/phpsize
[root@web2 xcache-3.0.0]# /usr/local/php/bin/phpize
Configuring for:
PHP Api Version:         20100412
Zend Module Api No:      20100525
Zend Extension Api No:   220100525
[root@web2 xcache-3.0.0]# ./configure --enable-xcache --with-php-config=/usr/local/php/bin/php-config
[root@web2 xcache-3.0.0]# make && make install
[root@web2 xcache-3.0.0]# mkdir /etc/php.d
[root@web2 xcache-3.0.0]# cp xcache.ini /etc/php.d/
[root@web2 xcache-3.0.0]# vim /etc/php.d/xcache.ini
[xcache-common]
;; non-Windows example:
extension = /usr/local/php/lib/php/extensions/no-debug-zts-20100525/xcache.so
;; Windows example:
; extension = php_xcache.dll
更改nginx的配置文件
location ~ \.php$ {root html;fastcgi_pass 127.0.0.1:9000;fastcgi_index index.php;fastcgi_param SCRIPT_FILENAME /scripts$fastcgi_script_name;include fastcgi_params;}
启动
[root@web2 xcache-3.0.0]# service php-fpm start
Starting php-fpm  done
[root@web2 xcache-3.0.0]# service nginx start
nginx is already running, master process is 3606.
[root@web2 xcache-3.0.0]# echo "<?php phpinfo(); ?>" >/usr/local/nginx/html/index.php
fastcgi_param  GATEWAY_INTERFACE  CGI/1.1;
fastcgi_param  SERVER_SOFTWARE    nginx;fastcgi_param  QUERY_STRING       $query_string;
fastcgi_param  REQUEST_METHOD     $request_method;
fastcgi_param  CONTENT_TYPE       $content_type;
fastcgi_param  CONTENT_LENGTH     $content_length;
fastcgi_param  SCRIPT_FILENAME    $document_root$fastcgi_script_name;fastcgi_param  SCRIPT_NAME        $fastcgi_script_name;
fastcgi_param  REQUEST_URI        $request_uri;
fastcgi_param  DOCUMENT_URI       $document_uri;
fastcgi_param  DOCUMENT_ROOT      $document_root;
fastcgi_param  SERVER_PROTOCOL    $server_protocol;fastcgi_param  REMOTE_ADDR        $remote_addr;
fastcgi_param  REMOTE_PORT        $remote_port;
fastcgi_param  SERVER_ADDR        $server_addr;
fastcgi_param  SERVER_PORT        $server_port;
fastcgi_param  SERVER_NAME        $server_name;
重启下php-fpm nginx。
可以看到,编译成功,Xcache加了进去

mysql的编译不演示了。不过我是mysql5.6(源码编译)
Welcome to the MySQL monitor.  Commands end with ; or \g.
Your MySQL connection id is 4
Server version: 5.6.26-log Source distributionCopyright (c) 2000, 2015, Oracle and/or its affiliates. All rights reserved.Oracle is a registered trademark of Oracle Corporation and/or its
affiliates. Other names may be trademarks of their respective
owners.Type 'help;' or '\h' for help. Type '\c' to clear the current input statement.
安装heatbeat。
[root@master heartbeat]# yum -y install \
> heartbeat-3.0.4-2.el6.x86_64.rpm \
> heartbeat-devel-3.0.4-2.el6.x86_64.rpm \
> heartbeat-libs-3.0.4-2.el6.x86_64.rpm \
> ldirectord-3.9.5-3.1.x86_64.rpm
复制配置文件进来
[root@master heartbeat]# cd /etc/ha.d/
[root@master ha.d]# ls
harc  rc.d  README.config  resource.d  shellfuncs
[root@master ha.d]# cp /usr/share/doc/heartbeat-3.0.4/{authkeys,ha.cf,haresources}  .
[root@master ha.d]# ls
authkeys  ha.cf  harc  haresources  rc.d  README.config  resource.d  shellfuncs
更改key的权限
[root@master ha.d]# chmod 600 authkeys
修改ha.cf(只贴出来,重要需要改的)
34 logfacility     local0
48 keepalive 2
56 deadtime 30
61 warntime 10
71 initdead 60
76 udpport 694
91 bcast   eth1
157 auto_failback on
211 node    master.example.com
212 node    slave.example.com
220 ping 192.168.217.131
253 respawn hacluster /usr/lib64/heartbeat/ipfail
259 apiauth ipfail gid=haclient uid=hacluster
修改authkeys
auth 1
1 crc
master.example.com IPaddr::192.168.217.201/24/eth0 drbddisk::example Filesystem::/dev/drbd1::/var/lib/mysql::ext4 mysqld
好了,可以添加drbd了。(首先两台主机添加一块硬盘,大小要一样)
准备好rpm包!
[root@master x86_64]# ls
drbd-8.4.2-2.el6.x86_64.rpm
drbd-bash-completion-8.4.2-2.el6.x86_64.rpm
drbd-heartbeat-8.4.2-2.el6.x86_64.rpm
drbd-km-2.6.32_431.el6.x86_64-8.4.2-2.el6.x86_64.rpm
drbd-pacemaker-8.4.2-2.el6.x86_64.rpm
drbd-udev-8.4.2-2.el6.x86_64.rpm
drbd-utils-8.4.2-2.el6.x86_64.rpm
drbd-xen-8.4.2-2.el6.x86_64.rpm
[root@master x86_64]# rpm -ivh *
Preparing...                ########################################### [100%]1:drbd-utils             ########################################### [ 13%]2:drbd-bash-completion   ########################################### [ 25%]3:drbd-heartbeat         ########################################### [ 38%]4:drbd-pacemaker         ########################################### [ 50%]5:drbd-udev              ########################################### [ 63%]6:drbd-xen               ########################################### [ 75%]7:drbd                   ########################################### [ 88%]8:drbd-km-2.6.32_431.el6.########################################### [100%]
[root@master x86_64]#
配置文件位置
[root@master x86_64]# cd /etc/drbd.d/
[root@master drbd.d]# ls
global_common.conf
[root@master drbd.d]#
编译一个配置文件 /etc/drbd.d/example.res example可以随便起,但是必须以.res结尾
resource example {
meta-disk internal;
device /dev/drbd1;
syncer {
verify-alg sha1;
}
on master.example.com {
disk /dev/sdb;
address 192.168.217.14:7789;
}
on slave.example.com {
disk /dev/sdb;
address 192.168.217.15:7789;
}
}
编写好后,给slave也复制一份
执行命令。(两边都执行)
[root@slave drbd.d]# drbdadm create-md example
[root@master drbd.d]# service drbd start
Starting DRBD resources: [create res: exampleprepare disk: exampleadjust disk: exampleadjust net: example
]
.........
[root@master drbd.d]# drbdsetup /dev/drbd1 primary --force
[root@master drbd.d]# cat /proc/drbd
version: 8.4.2 (api:1/proto:86-101)
GIT-hash: 7ad5f850d711223713d6dcadc3dd48860321070c build by root@master.example.com, 2017-03-15 00:23:561: cs:SyncSource ro:Primary/Secondary ds:UpToDate/Inconsistent C r---n-ns:713356 nr:0 dw:0 dr:719512 al:0 bm:43 lo:0 pe:2 ua:6 ap:0 ep:1 wo:f oos:1385372[=====>..............] sync'ed: 34.0% (1385372/2097052)Kfinish: 0:00:25 speed: 54,744 (54,744) K/sec
[root@master drbd.d]# mkfs.ext4 /dev/drbd1
mke2fs 1.41.12 (17-May-2010)
Filesystem label=
OS type: Linux
Block size=4096 (log=2)
Fragment size=4096 (log=2)
Stride=0 blocks, Stripe width=0 blocks 。。。。。
挂载到MySQL的数据区。
[root@master mysql]# mount /dev/drbd1 /usr/local/mysql/data
[root@master mysql]# scripts/mysql_install_db --user=mysql --basedir=/usr/local/mysql --datadir=/usr/local/mysql/data
[root@master mysql]# service mysqld start
Starting MySQL..... SUCCESS!
[root@master mysql]#
drbd两边都设置为secondary。
[root@master mysql]# cat /proc/drbd
version: 8.4.2 (api:1/proto:86-101)
GIT-hash: 7ad5f850d711223713d6dcadc3dd48860321070c build by root@master.example.com, 2017-03-15 00:23:561: cs:Connected ro:Secondary/Secondary ds:UpToDate/UpToDate C r-----ns:0 nr:0 dw:0 dr:0 al:0 bm:0 lo:0 pe:0 ua:0 ap:0 ep:1 wo:f oos:0
启动heartbeat。实现MySQL的高可用。
在mysql上创建访问的用户
mysql> grant all on *.* to 'north'@'192.168.%.%' identified by '123';
Query OK, 0 rows affected (0.11 sec)mysql> create database wordpress;
Query OK, 1 row affected (0.05 sec)
最后部署个个人博客系统。wordpress


来。查看一下页面吧。。。。(接下来自己定义吧)