简介
LNMT=Linux+Nginx+MySQL+Tomcat;
Tomcat 服务器是一个免费的开放源代码的Web 应用服务器,属于轻量级应用服务器;
在中小型系统和并发访问用户不是很多的场合下被普遍使用,是开发和调试JSP 程序的首选;
架构需求
Tomcat实现JSP动态请求解析的基本架构

说明:由后端Tomcat负责解析动态jsp请求,但为了提高响应性能,在同一主机内配置Nginx做反向代理,转发所有请求至tomcat即可;
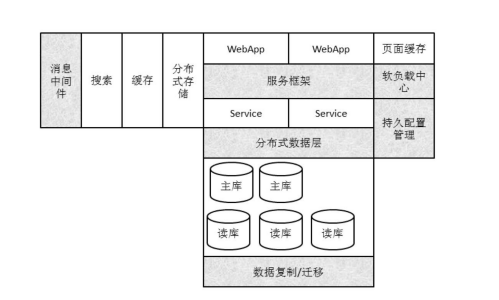
完整的LNMT架构设计

说明:本篇博客主要讲解单台Haproxy到后端多台Tomcat服务器的实现;
安装配置
Tomcat安装配置
安装JDK
| 1 2 3 4 5 | # rpm -ivh jdk-7u9-linux-x64.rpm# vi /etc/profile.d/java.sh export JAVA_HOME=/usr/java/latest export PATH=$JAVA_HOME/bin:$PATH # . /etc/profile.d/java.sh |
安装Tomcat
| 1 2 3 4 5 6 7 8 9 10 11 12 13 14 15 16 17 18 19 20 21 22 23 24 25 26 27 28 29 30 31 32 33 | # tar xf apache-tomcat-7.0.42.tar.gz -C /usr/local/# cd /usr/local/# ln -sv apache-tomcat-7.0.42/ tomcat# vi /etc/profile.d/tomcat.sh export CATALINA_HOME=/usr/local/tomcat export PATH=$CATALINA_HOME/bin:$PATH # . /etc/profile.d/tomcat.sh# 编写服务脚本# vi /etc/init.d/tomcat#!/bin/sh# Tomcat init script for Linux.## chkconfig: 2345 96 14# description: The Apache Tomcat servlet/JSP container.# JAVA_OPTS='-Xms64m -Xmx128m'JAVA_HOME=/usr/java/latest CATALINA_HOME=/usr/local/tomcat export JAVA_HOME CATALINA_HOME case $1 in start) exec $CATALINA_HOME/bin/catalina.sh start ;; stop) exec $CATALINA_HOME/bin/catalina.sh stop;; restart) $CATALINA_HOME/bin/catalina.sh stop sleep 2 exec $CATALINA_HOME/bin/catalina.sh start ;; *) echo "Usage: `basename $0` {start|stop|restart}" exit 1 ;; esac# chmod +x /etc/init.d/tomcat |
配置Tomcat
| 1 2 3 4 5 6 7 8 9 10 11 12 13 14 15 16 17 18 19 20 21 22 23 24 25 26 27 28 29 30 31 32 33 34 35 36 37 38 39 40 41 42 43 44 45 46 47 48 49 50 51 52 53 54 55 56 57 58 59 60 61 62 63 64 65 | # cd /usr/local/tomcat/conf# vi server.xml<?xml version='1.0' encoding='utf-8'?> <Server port="8005" shutdown="SHUTDOWN"> <Listener className="org.apache.catalina.core.AprLifecycleListener" SSLEngine="on" /> <Listener className="org.apache.catalina.core.JasperListener" /> <Listener className="org.apache.catalina.core.JreMemoryLeakPreventionListener" /> <Listener className="org.apache.catalina.mbeans.GlobalResourcesLifecycleListener" /> <Listener className="org.apache.catalina.core.ThreadLocalLeakPreventionListener" /> <GlobalNamingResources> <Resource name="UserDatabase" auth="Container" type="org.apache.catalina.UserDatabase" description="User database that can be updated and saved" factory="org.apache.catalina.users.MemoryUserDatabaseFactory" pathname="conf/tomcat-users.xml" /> </GlobalNamingResources> <Service name="Catalina"> <Connector port="9000" protocol="HTTP/1.1" # 配置HTTP连接器监听9000端口 connectionTimeout="20000" redirectPort="8443" /> <Connector port="8009" protocol="AJP/1.3" redirectPort="8443" /> <Engine name="Catalina" defaultHost="localhost"> <Realm className="org.apache.catalina.realm.LockOutRealm"> <Realm className="org.apache.catalina.realm.UserDatabaseRealm" resourceName="UserDatabase"/> </Realm> <Host name="xxrenzhe.lnmmp.com" appBase="webapps" # 新增Host,配置相应的Context unpackWARs="true" autoDeploy="true"> <Context path="" docBase="lnmmpapp" /> # 配置的应用程序目录是webapps/lnmmpapp <Valve className="org.apache.catalina.valves.AccessLogValve" directory="logs" prefix="lnmmp_access_log." suffix=".txt" pattern="%h %l %u %t "%r" %s %b" /> </Host> <Host name="localhost" appBase="webapps" unpackWARs="true" autoDeploy="true"> <Valve className="org.apache.catalina.valves.AccessLogValve" directory="logs" prefix="localhost_access_log." suffix=".txt" pattern="%h %l %u %t "%r" %s %b" /> </Host> </Engine> </Service> </Server> # 创建应用程序相关目录# cd /usr/local/tomcat/webapps/# mkdir -pv lnmmpapp/WEB-INF/{classes,lib}# cd lnmmpapp# vi index.jsp # 编写首页文件<%@ page language="java" %> <html> <head><title>Tomcat1</title></head># 在Tomcat2主机上替换为Tomcat2 <body> <h1><font color="red">Tomcat1.lnmmp.com</font></h1># 在Tomcat2主机上替换为Tomcat2.lnmmp.com,color修改为blue <table align="centre" border="1"> <tr> <td>Session ID</td> <% session.setAttribute("lnmmp.com","lnmmp.com"); %> <td><%= session.getId() %></td> </tr> <tr> <td>Created on</td> <td><%= session.getCreationTime() %></td> </tr> </table> </body> </html> |
启动Tomcat服务
| 1 2 | chkconfig --add tomcatservice tomcat start |
Nginx配置
Nginx安装详见博文“如何测试Nginx的高性能”
配置Nginx
| 1 2 3 4 5 6 7 8 9 10 11 12 13 14 15 16 17 18 19 20 21 22 23 24 25 26 27 28 29 30 31 32 33 34 35 36 37 38 39 40 41 42 43 44 45 46 47 48 49 50 | # vi /etc/nginx/nginx.confworker_processes 2;error_log /var/log/nginx/nginx.error.log; pid /var/run/nginx.pid; events { worker_connections 1024; }http { include mime.types; default_type application/octet-stream; log_format main '$remote_addr - $remote_user [$time_local] "$request" ' '$status $body_bytes_sent "$http_referer" ' '"$http_user_agent" "$http_x_forwarded_for"'; sendfile on; keepalive_timeout 65; fastcgi_cache_path /www/cache levels=1:2 keys_zone=fcgicache:10m inactive=5m; server { # 处理前端发来的图片请求; listen 4040; server_name xxrenzhe.lnmmp.com; access_log /var/log/nginx/nginx-img.access.log main; root /www/lnmmp.com; valid_referers none blocked xxrenzhe.lnmmp.com *.lnmmp.com; # 配置一定的反盗链策略; if ($invalid_referer) { rewrite ^/ http://xxrenzhe.lnmmp.com/404.html; } } server { listen 80; # 处理前端发来的静态请求; server_name xxrenzhe.lnmmp.com; access_log /var/log/nginx/nginx-static.access.log main; location / { root /www/lnmmp.com; index index.php index.html index.htm; } gzip on; # 对静态文件开启压缩传输功能; gzip_comp_level 6; gzip_buffers 16 8k; gzip_http_version 1.1; gzip_types text/plain text/css application/x-javascript text/xml application/xml; gzip_disable msie6; } server { listen 8080; server_name xxrenzhe.lnmmp.com; access_log /var/log/nginx/nginx-tomcat.access.log main; location / { proxy_pass http://127.0.0.1:9000; # 将全部动态请求都转发至后端tomcat } } } |
启动服务
| 1 | service nginx start |
Haproxy安装配置
| 1 2 3 4 5 6 7 8 9 10 11 12 13 14 15 16 17 18 19 20 21 22 23 24 25 26 27 28 29 30 31 32 33 34 35 36 37 38 39 40 41 42 43 44 45 46 47 48 49 50 51 52 53 54 55 56 57 58 59 60 61 62 63 64 | # yum -y install haproxy# vi /etc/haproxy/haproxy.cfgglobal log 127.0.0.1 local2 chroot /var/lib/haproxy pidfile /var/run/haproxy.pid maxconn 4000 user haproxy group haproxy daemon defaults mode http log global option httplog option dontlognull option http-server-close option forwardfor except 127.0.0.0/8 option redispatch retries 3 timeout http-request 10s timeout queue 1m timeout connect 10s timeout client 1m timeout server 1m timeout http-keep-alive 10s timeout check 10s maxconn 30000 listen stats # 配置haproxy的状态信息页面 mode http bind 0.0.0.0:1080 stats enable stats hide-version stats uri /haproxyadmin?stats stats realm Haproxy\ Statistics stats auth admin:admin stats admin if TRUE frontend http-in bind *:80 mode http log global option httpclose option logasap option dontlognull capture request header Host len 20 capture request header Referer len 60 acl url_img path_beg -i /images acl url_img path_end -i .jpg .jpeg .gif .png acl url_dynamic path_end -i .jsp .do use_backend img_servers if url_img # 图片请求发送至图片服务器; use_backend dynamic_servers if url_dynamic # JSP动态请求发送至Tomcat服务器; default_backend static_servers # 其余静态请求都发送至静态服务器; backend img_servers balance roundrobin server img-srv1 192.168.0.25:4040 check maxconn 6000 server img-srv2 192.168.0.35:4040 check maxconn 6000 backend static_servers cookie node insert nocache option httpchk HEAD /health_check.html server static-srv1 192.168.0.25:80 check maxconn 6000 cookie static-srv1 server static-srv2 192.168.0.35:80 check maxconn 6000 cookie static-srv2 backend dynamic_servers balance roundrobin server tomcat1 192.168.0.25:8080 check maxconn 1000 server tomcat2 192.168.0.35:8080 check maxconn 1000 |
启动服务
| 1 | service haproxy start |
本地DNS解析设置
| 1 | xxrenzhe.lnmmp.com A 172.16.25.109 # 配置为haproxy的IP地址即可 |
访问验证


说明:由于前端Haproxy调度动态请求是roundrobin算法,故每次刷新都会轮询分配到不同的Tomcat节点上,且每次获得的session都是不一样的;
实现session绑定
将同一用户的请求调度至后端同一台Tomcat上,不至于一刷新就导致session丢失;
修改Tomcat配置
| 1 2 | # vi /usr/local/tomcat/conf/server.xml # 修改如下行内容,添加jvmRoute字段<Engine name="Catalina" defaultHost="localhost" jvmRoute="tomcat1"> # 在Tomcat2上替换为tomcat2 |
修改Haproxy配置
| 1 2 3 4 5 6 | # vi /etc/haproxy/haproxy.cfg # 为后端动态节点添加cookie绑定机制backend dynamic_servers cookie node insert nocache balance roundrobin server tomcat1 192.168.0.25:8080 check maxconn 1000 cookie tomcat1 server tomcat2 192.168.0.35:8080 check maxconn 1000 cookie tomcat1 |
访问验证

说明:当第一次访问成功后,再次刷新并不会改变分配的Tomcat节点和session信息,说明session绑定成功;
实现session保持
Tomcat支持Session集群,可在各Tomcat服务器间复制全部session信息,当后端一台Tomcat服务器宕机后,Haproxy重新调度用户请求后,在其它正常的Tomcat服务上依然存在用户原先的session信息;
Session集群可在Tomcat服务器规模(一般10台以下)不大时使用,否则会导致复制代价过高;
配置实现
| 1 2 3 4 5 6 7 8 9 10 11 12 13 14 15 16 17 18 19 20 21 22 23 24 25 26 27 28 29 30 31 32 33 34 35 36 37 38 39 40 41 42 43 44 45 46 47 48 49 50 51 52 53 54 55 56 57 58 59 60 61 62 63 64 65 66 67 68 69 70 71 72 73 74 75 76 77 78 79 | # vi /usr/local/tomcat/conf/server.xml # 完整配置<?xml version='1.0' encoding='utf-8'?> <Server port="8005" shutdown="SHUTDOWN"> <Listener className="org.apache.catalina.core.AprLifecycleListener" SSLEngine="on" /> <Listener className="org.apache.catalina.core.JasperListener" /> <Listener className="org.apache.catalina.core.JreMemoryLeakPreventionListener" /> <Listener className="org.apache.catalina.mbeans.GlobalResourcesLifecycleListener" /> <Listener className="org.apache.catalina.core.ThreadLocalLeakPreventionListener" /> <GlobalNamingResources> <Resource name="UserDatabase" auth="Container" type="org.apache.catalina.UserDatabase" description="User database that can be updated and saved" factory="org.apache.catalina.users.MemoryUserDatabaseFactory" pathname="conf/tomcat-users.xml" /> </GlobalNamingResources> <Service name="Catalina"> <Connector port="9000" protocol="HTTP/1.1" connectionTimeout="20000" redirectPort="8443" /> <Connector port="8009" protocol="AJP/1.3" redirectPort="8443" /> <Engine name="Catalina" defaultHost="localhost" jvmRoute="tomcat1"># 在Tomcat2主机上替换为tomcat2 <Cluster className="org.apache.catalina.ha.tcp.SimpleTcpCluster" # 添加集群相关配置; channelSendOptions="8"> <Manager className="org.apache.catalina.ha.session.DeltaManager" # 集群会话管理器选择DeltaManager; expireSessionsOnShutdown="false" notifyListenersOnReplication="true"/> <Channel className="org.apache.catalina.tribes.group.GroupChannel"> # 为集群中的几点定义通信信道; <Membership className="org.apache.catalina.tribes.membership.McastService" # 定义使用McastService确定集群中的成员 address="228.25.25.4" # 集群内session复制所用的多播地址 port="45564" frequency="500" dropTime="3000"/> <Receiver className="org.apache.catalina.tribes.transport.nio.NioReceiver" # 定义以NioReceiver方式接收其它节点的数据; address="192.168.0.25"# 在Tomcat2主机上替换为192.168.0.35 port="4000" autoBind="100" selectorTimeout="5000" maxThreads="6"/> <Sender className="org.apache.catalina.tribes.transport.ReplicationTransmitter"> # 定义数据复制的发送器; <Transport className="org.apache.catalina.tribes.transport.nio.PooledParallelSender"/> </Sender> <Interceptor className="org.apache.catalina.tribes.group.interceptors.TcpFailureDetector"/> <Interceptor className="org.apache.catalina.tribes.group.interceptors.MessageDispatch15Interceptor"/> </Channel> <Valve className="org.apache.catalina.ha.tcp.ReplicationValve" filter=""/> <Valve className="org.apache.catalina.ha.session.JvmRouteBinderValve"/> <Deployer className="org.apache.catalina.ha.deploy.FarmWarDeployer" tempDir="/tmp/war-temp/" deployDir="/tmp/war-deploy/" watchDir="/tmp/war-listen/" watchEnabled="false"/> <ClusterListener className="org.apache.catalina.ha.session.JvmRouteSessionIDBinderListener"/> <ClusterListener className="org.apache.catalina.ha.session.ClusterSessionListener"/> </Cluster> <Realm className="org.apache.catalina.realm.LockOutRealm"> <Realm className="org.apache.catalina.realm.UserDatabaseRealm" resourceName="UserDatabase"/> </Realm> <Host name="xxrenzhe.lnmmp.com" appBase="webapps" unpackWARs="true" autoDeploy="true"> <Context path="" docBase="lnmmpapp" /> <Valve className="org.apache.catalina.valves.AccessLogValve" directory="logs" prefix="lnmmp_access_log." suffix=".txt" pattern="%h %l %u %t "%r" %s %b" /> </Host> <Host name="localhost" appBase="webapps" unpackWARs="true" autoDeploy="true"> <Valve className="org.apache.catalina.valves.AccessLogValve" directory="logs" prefix="localhost_access_log." suffix=".txt" pattern="%h %l %u %t "%r" %s %b" /> </Host> </Engine> </Service> </Server> # cd /usr/local/tomcat/webapps/lnmmpapp/WEB-INF/# cp /usr/local/tomcat/conf/web.xml .# vi web.xml # 添加如下一行,无需放置于任何容器中<distributable\> |
查看日志
| 1 2 3 4 | # tailf /usr/local/tomcat/logs/catalina.outMay 08, 2014 11:08:13 PM org.apache.catalina.ha.tcp.SimpleTcpCluster memberAddedINFO: Replication member added:org.apache.catalina.tribes.membership.MemberImpl[tcp://{192, 168, 0, 35}:4000,{192, 168, 0, 35},4000, alive=1029, securePort=-1, UDP Port=-1, id={106 35 -62 -54 -28 61 74 -98 -86 -11 -69 104 28 -114 32 -69 }, payload={}, command={}, domain={}, ] # 查看到如上信息,则说明session集群已生效,tomcat1已检测到tomcat2节点的存在 |
访问验证
第一次访问

然后停止tomcat1的nginx服务(service nginx stop),再次访问

说明:虽然因为tomcat1故障,导致用户请求被调度到了tomcat2节点上,但Session ID并未发生改变,即session集群内的所有节点都保存有全局的session信息,很好的实现了用户访问的不中断;,