04 Android基础--RelativeLayout
- 什么是RelativeLayout?
- RelativeLayout的常见用法:
什么是RelativeLayout?
相对布局(RelativeLayout)是一种根据
父容器和兄弟控件作为参照来确定控件位置的布局方式。
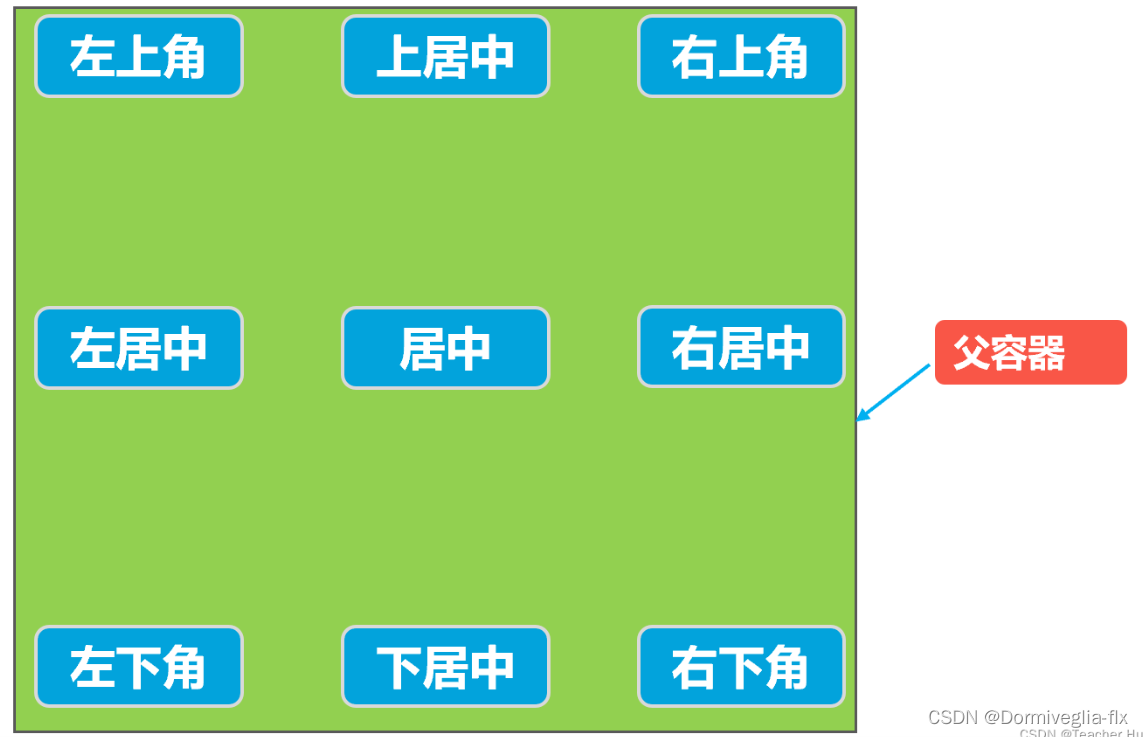
根据父容器定位
在相对布局中,可以通过以下的属性让的组合让控件处于父容器左上角、右上角、左下角、右下角、上下左右居中,正居中等九个位置。属性如下:
- android:layout_alignParentLeft=“true” 父容器左边
- android:layout_alignParentRight=“true” 父容器右边
- android:layout_alignParentTop=“true” 父容器顶部
- android:layout_alignParentBottom=“true” 父容器底部
- android:layout_centerHorizontal=“true” 水平方向居中
- android:layout_centerVertical=“true” 垂直方向居中
- android:layout_centerInParent=“true” 水平垂直都居中
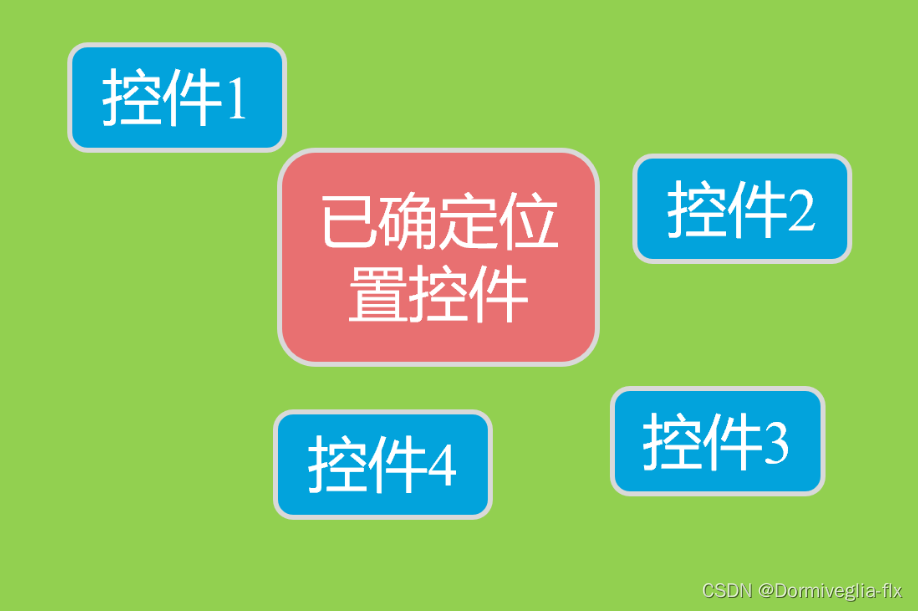
根据兄弟控件定位
在相对布局中,还支持通过已确定位置的控件作为参考来确定其他控件的位置,以下的属性让的组合让控件处于另外控件左上角、右上角、左下角、右下角、正上方、正下方、正左方、正右方等位置。属性如下:
- android:layout_toLeftOf=“@+id/button1” 在button1控件左方
- android:layout_toRightOf=“@+id/button1” 在button1控件右方
- android:layout_above=“@+id/button1” 在button1控件上方
- android:layout_below=“@+id/button1” 在button1控件下方
- android:layout_alignLeft=“@+id/button1” 与button1控件左边平齐
- android:layout_alignRight=“@+id/button1” 与button1控件右边平齐
- android:layout_alignTop=“@+id/button1” 与button1控件上边平齐
- android:layout_alignBottom=“@+id/button1” 与button1控件下边平齐
RelativeLayout的常见用法:
第一种情况:常用的列表页布局:
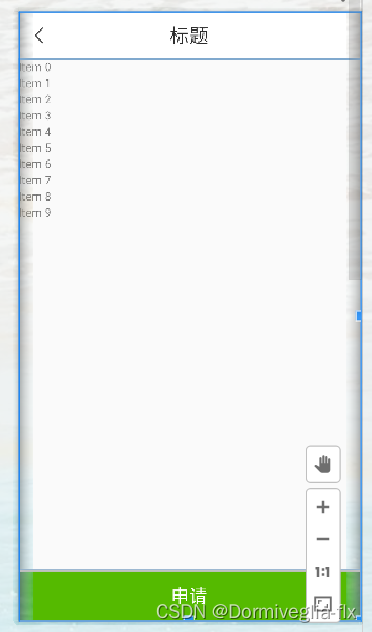
<RelativeLayoutandroid:layout_width="match_parent"android:layout_height="match_parent">// 标题<includeandroid:id="@+id/title_layout"layout="@layout/title_layout"/>// 1.android:layout_below="@+id/title_layout";这个布局在title的下方// 2.android:layout_marginBottom="60dp";指定该属性所在控件距下部最近控件的最小值;<androidx.swiperefreshlayout.widget.SwipeRefreshLayoutandroid:id="@+id/sw_layout"android:layout_width="match_parent"android:layout_height="match_parent"android:layout_below="@+id/title_layout"android:layout_marginBottom="60dp"><androidx.recyclerview.widget.RecyclerViewandroid:id="@+id/recyclerview"android:layout_width="match_parent"android:layout_height="match_parent" /></androidx.swiperefreshlayout.widget.SwipeRefreshLayout>// 3.android:layout_alignParentBottom="true";在父容器底部<LinearLayoutandroid:layout_alignParentBottom="true"><Buttonandroid:id="@+id/material_apply"android:layout_width="match_parent"android:layout_height="match_parent"/></LinearLayout></RelativeLayout>
第二种情况:常用的搜索抽屉布局:
搜索栏有很多,有滚动条,重置与搜索按钮在最底部。
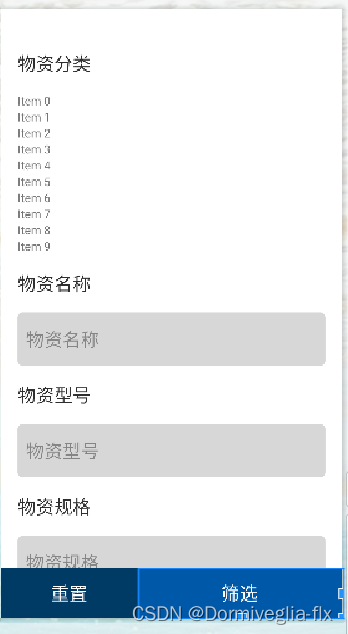
<RelativeLayout>// 1. 添加滚动条<androidx.core.widget.NestedScrollViewandroid:layout_width="match_parent"android:layout_height="match_parent"android:paddingHorizontal="20dp">// 2. 搜索栏需要 占满全屏 <LinearLayoutandroid:layout_width="match_parent"android:layout_height="match_parent"android:orientation="vertical"><TextViewstyle="@style/select_title"android:text="@string/material_type" /><androidx.recyclerview.widget.RecyclerViewandroid:id="@+id/madetails_recyclerview"android:layout_width="match_parent"android:layout_height="wrap_content"android:layout_marginTop="20dp" /><TextViewstyle="@style/select_title"android:layout_marginTop="20dp"android:text="@string/name_of_goods" /><EditTextandroid:id="@+id/madetails_name_of_goods"style="@style/select_ed"android:background="@drawable/select_ed_background"android:hint="@string/name_of_goods" /><TextViewstyle="@style/select_title"android:layout_marginTop="20dp"android:text="@string/model_of_goods" /><EditTextandroid:id="@+id/madetails_model_of_goods"style="@style/select_ed"android:background="@drawable/select_ed_background"android:hint="@string/model_of_goods" /><TextViewstyle="@style/select_title"android:layout_marginTop="20dp"android:text="@string/specification_of_goods" /><EditTextandroid:id="@+id/madetails_specification_of_goods"style="@style/select_ed"android:background="@drawable/select_ed_background"android:hint="@string/specification_of_goods" /><TextViewstyle="@style/select_title"android:layout_marginTop="20dp"android:text="@string/code_of_goods" /><EditTextandroid:id="@+id/madetails_code_of_goods"style="@style/select_ed"android:background="@drawable/select_ed_background"android:hint="@string/code_of_goods" /></LinearLayout></androidx.core.widget.NestedScrollView>// 3. android:layout_alignParentBottom="true";相对于根元素布局,在根元素的底部。<LinearLayoutstyle="@style/select_bottom_layout"android:layout_alignParentBottom="true"><Buttonandroid:id="@+id/reset_btn"android:layout_width="0dp"android:layout_height="match_parent"android:layout_weight="2"android:background="@color/dark_blue"android:text="@string/reset"android:textColor="@color/white"android:textSize="22dp" /><Buttonandroid:id="@+id/filter_btn"android:layout_width="0dp"android:layout_height="match_parent"android:layout_weight="3"android:background="@color/colorAccent"android:text="@string/filter"android:textColor="@color/white"android:textSize="22dp" /></LinearLayout></RelativeLayout>
类似于这种布局的做法:1.上面的元素需要
占满全屏2.下面的按钮android:layout_alignParentBottom="true"相对父元素布局,在父元素的底部。
第三种情况:子页面展示项
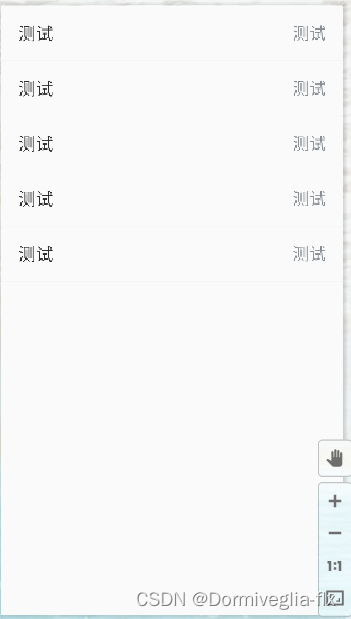
<?xml version="1.0" encoding="utf-8"?>
<RelativeLayout xmlns:android="http://schemas.android.com/apk/res/android"xmlns:app="http://schemas.android.com/apk/res-auto"xmlns:tools="http://schemas.android.com/tools"android:layout_width="match_parent"android:layout_height="match_parent"android:orientation="vertical""><LinearLayoutandroid:layout_width="match_parent"android:layout_height="wrap_content"android:orientation="vertical"><!--1. android:layout_alignParentLeft="true": 父容器左边android:layout_alignParentRight="true" 父容器右边android:layout_centerInParent="true" 水平垂直都居中--><RelativeLayout android:layout_width="match_parent"android:layout_height="60px"><TextViewandroid:layout_alignParentLeft="true"android:layout_centerInParent="true"android:layout_width="wrap_content"android:layout_height="wrap_content"android:text="测试" /><TextViewandroid:id="@+id/apply_form_tv"android:layout_alignParentRight="true"android:layout_centerInParent="true"android:layout_width="wrap_content"android:layout_height="wrap_content"tools:text="测试" /></RelativeLayout><!--测试--><RelativeLayout style="@style/sub_line"><TextViewandroid:layout_alignParentLeft="true"android:layout_centerInParent="true"android:layout_width="wrap_content"android:layout_height="wrap_content"android:text="测试" /><TextViewandroid:id="@+id/apply_form_tv"android:layout_alignParentRight="true"android:layout_centerInParent="true"android:layout_width="wrap_content"android:layout_height="wrap_content"tools:text="测试" /></RelativeLayout></LinearLayout></RelativeLayout>
对于这种展示形布局或者说是提交型布局:1.<LinearLayout 标签可以让其下的子布局页面竖向排列 2.<RelativeLayout 标签:位于父容器左边与父容器右边,且水平竖直居中。