文章目录
- 架构分析
- 节点资源
- 硬盘资源
- 服务安装
- 安装步骤
- 创建系统服务
- 新建用户和用户组
- 创建环境变量
- 启动服务
- 负载均衡
- 代码集成
- 注意
最近打算使用MinIO替代原来使用的FastDFS,所以一直在学习MinIO的知识。这篇文章是基于MinIO多节点多驱动的部署进行研究。
架构分析

节点资源
| IP | 环境类型 | 作用 | 驱动器 |
|---|---|---|---|
| 192.168.89.1 | 宿主机 | nginx服务 | |
| 192.168.89.71 | 虚拟机 | minio存储节点1 | 四块硬盘 |
| 192.168.89.72 | 虚拟机 | minio存储节点2 | 四块硬盘 |
因为我的虚拟机采用的Host-Only加共享方式配置的网络,所以我在宿主机的C:\Windows\System32\drivers\etc\hosts文件中添加了域名的设置,文件内容如下:
# minio
192.168.89.71 minio1.example.com
192.168.89.72 minio2.example.com
192.168.89.1  minio.example.com
这样设置之后,不管在宿主机还是任何一个虚拟机(虚拟机中配置的DNS是192.168.89.1),都可以正常解析域名了。
硬盘资源
| 磁盘 | 挂载位置 | 格式化 |
|---|---|---|
| sdb | /mnt/disk1 | xfs |
| sdc | /mnt/disk2 | xfs |
| sdd | /mnt/disk3 | xfs |
| sde | /mnt/disk4 | xfs |
VirtualBox虚拟磁盘设置请参考VirtualBox添加虚拟磁盘,两个虚拟机节点都需要同样的配置。
服务安装
采用二进制程序安装方式,具体可参考官网。
两个存储节点都需要安装,且环境保持一致。
安装步骤
[root@lizx src]# wget https://dl.min.io/server/minio/release/linux-amd64/minio
[root@lizx src]# chmod +x minio
[root@lizx src]# mv minio /usr/local/bin/
创建系统服务
二进制方式安装需要手动创建服务。
[root@lizx src]# vi /etc/systemd/system/minio.service
文件写入如下内容:
[Unit]
Description=MinIO
Documentation=https://min.io/docs/minio/linux/index.html
Wants=network-online.target
After=network-online.target
AssertFileIsExecutable=/usr/local/bin/minio[Service]
WorkingDirectory=/usr/localUser=minio-user
Group=minio-user
ProtectProc=invisibleEnvironmentFile=-/etc/default/minio
ExecStartPre=/bin/bash -c "if [ -z \"${MINIO_VOLUMES}\" ]; then echo \"Variable MINIO_VOLUMES not set in /etc/default/minio\"; exit 1; fi"
ExecStart=/usr/local/bin/minio server $MINIO_OPTS $MINIO_VOLUMES# Let systemd restart this service always
Restart=always# Specifies the maximum file descriptor number that can be opened by this process
LimitNOFILE=65536# Specifies the maximum number of threads this process can create
TasksMax=infinity# Disable timeout logic and wait until process is stopped
TimeoutStopSec=infinity
SendSIGKILL=no[Install]
WantedBy=multi-user.target# Built for ${project.name}-${project.version} (${project.name})
新建用户和用户组
[root@lizx src]# groupadd -r minio-user
[root@lizx src]# useradd -M -r -g minio-user minio-user
[root@lizx src]# chown minio-user:minio-user /mnt/disk1 /mnt/disk2 /mnt/disk3 /mnt/disk4
创建环境变量
服务启动依赖环境变量文件:/etc/default/minio,包含主机域名和硬盘的配置。创建服务时,此EnvironmentFile配置项指定的该文件。
内容如下:
# Set the hosts and volumes MinIO uses at startup
# The command uses MinIO expansion notation {x...y} to denote a
# sequential series.
#
# The following example covers four MinIO hosts
# with 4 drives each at the specified hostname and drive locations.
# The command includes the port that each MinIO server listens on
# (default 9000)MINIO_VOLUMES="http://minio{1...2}.example.com:9000/mnt/disk{1...4}/minio"# Set all MinIO server options
#
# The following explicitly sets the MinIO Console listen address to
# port 9001 on all network interfaces. The default behavior is dynamic
# port selection.MINIO_OPTS="--console-address :9001"# Set the root username. This user has unrestricted permissions to
# perform S3 and administrative API operations on any resource in the
# deployment.
#
# Defer to your organizations requirements for superadmin user name.MINIO_ROOT_USER=minioadmin# Set the root password
#
# Use a long, random, unique string that meets your organizations
# requirements for passwords.MINIO_ROOT_PASSWORD=minioadmin# Set to the URL of the load balancer for the MinIO deployment
# This value *must* match across all MinIO servers. If you do
# not have a load balancer, set this value to to any *one* of the
# MinIO hosts in the deployment as a temporary measure.
MINIO_SERVER_URL="http://minio.example.com:19000"
启动服务
在每一个节点服务器上按照如下命令启动minio 服务:
systemctl start minio.service
负载均衡
在宿主机上配置一个nginx,配置如下:
upstream minio_api {server 192.168.89.71:9000;server 192.168.89.72:9000;}upstream minio_console {server 192.168.89.71:9001;server 192.168.89.72:9001;}
server{listen 19000;server_name minio.example.com;ignore_invalid_headers off;client_max_body_size 0;proxy_buffering off;location / {proxy_set_header X-Forwarded-Proto $scheme;proxy_set_header Host $http_host;proxy_set_header X-Real-IP $remote_addr;proxy_set_header Upgrade $http_upgrade;proxy_set_header Connection "upgrade";proxy_connect_timeout 300;proxy_http_version 1.1;chunked_transfer_encoding off;proxy_ignore_client_abort on;proxy_pass http://minio_api;}}server{listen 19001;server_name minio.example.com;ignore_invalid_headers off;client_max_body_size 0;proxy_buffering off;location / {proxy_set_header X-Forwarded-Proto $scheme;proxy_set_header Host $http_host;proxy_set_header X-Real-IP $remote_addr;proxy_set_header Upgrade $http_upgrade;proxy_set_header Connection "upgrade";proxy_connect_timeout 300;proxy_http_version 1.1;chunked_transfer_encoding off;proxy_ignore_client_abort on;proxy_pass http://minio_console;}}
测试时进入控制台报错,是因为websocket没配置,在location中加上如下配置就好了。
proxy_set_header Upgrade $http_upgrade;proxy_set_header Connection "upgrade";
代码集成
在程序中进行配置:
# Minio配置
minio:url: http://minio.example.com:19000accessKey: minioadminsecretKey: minioadminbucketName: first-test
bucketName需要提前在控制台进行创建,否则程序报错。
注意
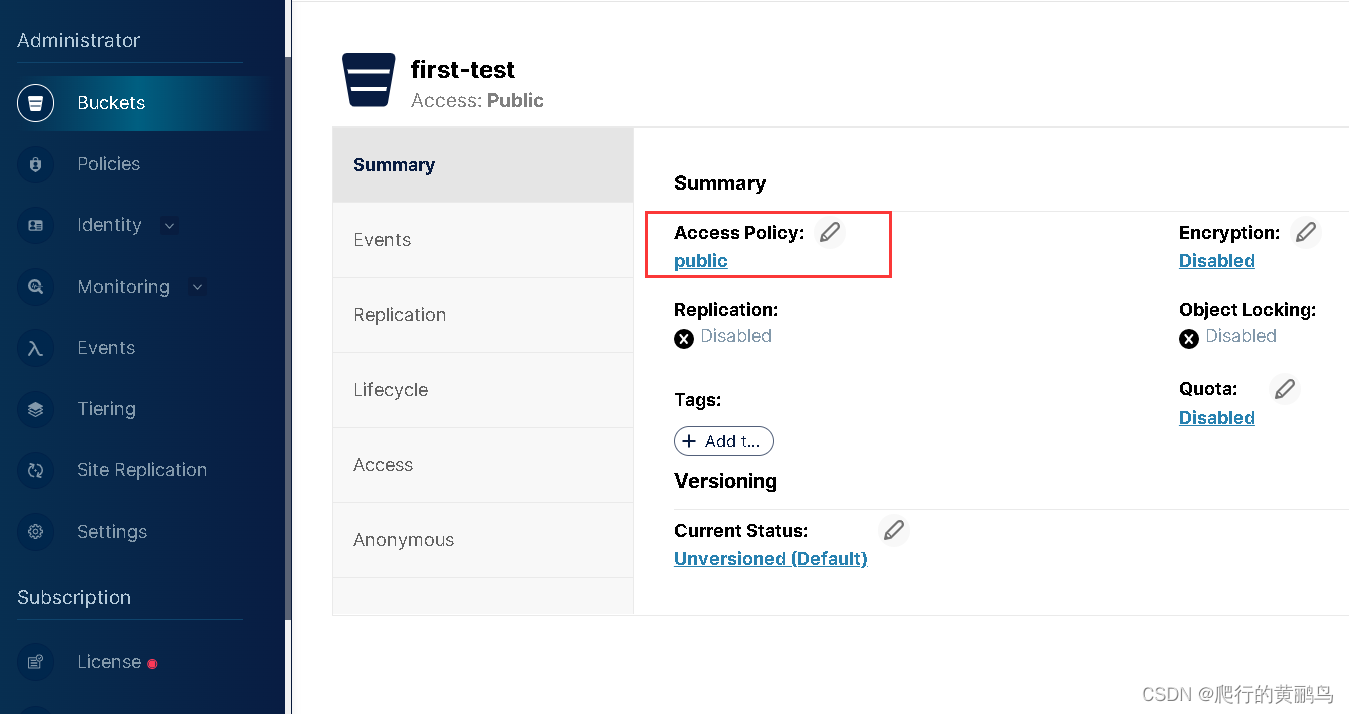
做好nginx负载均衡后,发现使用19000端口无法访问,比如我的一个图片访问链接是:http://minio.example.com:19000/first-test/2023/02/23/loginBtn_20230223143747A003.jpg,浏览器提示"Access denied",我以为是虚拟机时间戳的问题,时间同步后还是存在这个问题,最后发现是bucket的Access 策略设置为private导致的,我改为如下图所示的public策略就可以了。


![[音视频] wav 格式](https://img-blog.csdnimg.cn/5667fc7ae1ee47eebf1e21abae1a6161.png)