为什么80%的码农都做不了架构师?>>> 
《j2ee 简单网站搭建:(一) windows 操作系统下使用 eclipse 建立 maven web 项目》
《j2ee 简单网站搭建:(二)添加和配置 spring + spring-mvc 的 mvc 开发环境》
《j2ee 简单网站搭建:(三)在搭建好的 spring maven web 项目中加入 mybatis 访问数据库》
《j2ee 简单网站搭建:(四)将 freemaker 模板引擎作为 spring-mvc 展现层》
《j2ee 简单网站搭建:(五)使用 jcaptcha 生成验证码图片》
《j2ee 简单网站搭建:(六)使用 hibernate validation 实现 domain 层实体类验证》
《j2ee 简单网站搭建:(七)使用 shiro 结合 jcaptcha 实现用户验证登录》
《j2ee 简单网站搭建:(八)使用 jquery-validate 实现页面验证入门》
《j2ee 简单网站搭建:(九)jquery datatables + jquery ui dialog 插件使用入门》
《j2ee 简单网站搭建:(十)jquery ztree 插件使用入门》
《j2ee 简单网站搭建:(十一)ckeditor 控件使用入门》
spring 已经成为 j2ee 项目中的标配,在完成 maven web 项目的基本构建后,就需要通过 maven 的方式引入 spring 和 spring-mvc 包,然后通过新建 spring 和 spring-mvc 的配置文件并在 web.xml 中完成相应配置。
相关框架版本
spring 及 spring-mvc 4.0.0-b01
注意事项:在向项目内添加文件前请先将 eclipse 环境设置为 utf-8 编码,否则经常会出现读取文件出错、乱码等问题,具体操作如下图:

 一 pom.xml 中添加 spring、spring-mvc 的相关 jar 包文件
<properties><servlet.version>4.0.0-b01</servlet.version><jstl.version>1.2</jstl.version><taglibs.version>1.1.2</taglibs.version><spring.version>4.2.5.RELEASE</spring.version><aspectj.version>1.8.7</aspectj.version><cglib.version>3.2.2</cglib.version>
</properties>
<dependencies><!-- 基本的 Servlet 库文件以及 jstl 文件 start --><dependency><groupId>javax.servlet</groupId><artifactId>javax.servlet-api</artifactId><version>${servlet.version}</version><scope>provided</scope></dependency><dependency><groupId>javax.servlet</groupId><artifactId>jstl</artifactId><version>${jstl.version}</version></dependency><dependency><groupId>taglibs</groupId><artifactId>standard</artifactId><version>${taglibs.version}</version></dependency><!-- 基本的 Servlet 库文件以及 jstl 文件 end   --><!-- Spring 及 Spring-MVC 相关包 start --><dependency><groupId>org.springframework</groupId><artifactId>spring-core</artifactId><version>${spring.version}</version></dependency><dependency><groupId>org.springframework</groupId><artifactId>spring-context-support</artifactId><version>${spring.version}</version></dependency><dependency><groupId>org.springframework</groupId><artifactId>spring-web</artifactId><version>${spring.version}</version></dependency><dependency><groupId>org.springframework</groupId><artifactId>spring-webmvc</artifactId><version>${spring.version}</version></dependency><dependency><groupId>org.springframework</groupId><artifactId>spring-jdbc</artifactId><version>${spring.version}</version></dependency><dependency><groupId>org.springframework</groupId><artifactId>spring-aop</artifactId><version>${spring.version}</version></dependency><dependency><groupId>org.springframework</groupId><artifactId>spring-test</artifactId><version>${spring.version}</version></dependency><dependency><groupId>org.aspectj</groupId><artifactId>aspectjrt</artifactId><version>${aspectj.version}</version></dependency><dependency><groupId>org.aspectj</groupId><artifactId>aspectjweaver</artifactId><version>${aspectj.version}</version></dependency><dependency><groupId>cglib</groupId><artifactId>cglib</artifactId><version>${cglib.version}</version></dependency><!-- Spring 及 Spring-MVC 相关包 end   -->
</dependencies>
二 为 spring 和 spring-mvc 创建新的配置文件
maven web 项目中默认的配置文件夹为 src/main/resources ,该文件夹下的文件在编译时会直接输出到编译结果中,我们在该文件夹下添加 spring 和 spring-mvc 配置文件,然后通过 j2ee 重要的启动加载配置文件 web.xml 中配置加载 spring 、spring-mvc 及其它配置实现 web 项目运行时加载相关配置。
1 在 src/main/resources 中创建 spring-config.xml 作为 spring 的配置文件。配置文件中主要是定义扫描哪些目录文件实现类注入、如何进行事物执行、如何执行方法的切入执行。在文件头中定义的
spring 配置文件中主要是定义扫描哪些目录文件实现类注入、如何进行事物执行、如何执行方法的切入执行。在文件头中定义的 xml schema 中需要加入配置文件内容中用户的各种标签命名空间,例如 aop 是做切面的、context 是做上下文及其它配置文件操作的、beans 是做注入的、tx 是做事物控制的等等。
spring-mvc 配置文件中主要定义 controller 层的注入扫描,web 网站项目中的目录映射等工作。
<?xml version="1.0" encoding="UTF-8"?>
<beans xmlns="http://www.springframework.org/schema/beans"xmlns:aop="http://www.springframework.org/schema/aop"xmlns:context="http://www.springframework.org/schema/context"xmlns:tx="http://www.springframework.org/schema/tx"xmlns:xsi="http://www.w3.org/2001/XMLSchema-instance"xsi:schemaLocation="http://www.springframework.org/schema/aophttp://www.springframework.org/schema/aop/spring-aop.xsdhttp://www.springframework.org/schema/beanshttp://www.springframework.org/schema/beans/spring-beans.xsdhttp://www.springframework.org/schema/contexthttp://www.springframework.org/schema/context/spring-context.xsdhttp://www.springframework.org/schema/txhttp://www.springframework.org/schema/tx/spring-tx.xsd"><!-- 扫描类包,将标注spring注解的类自动转化bean,同时完成bean的注入,排除spring mvc的controller,放在spring mvc单独的配置文件中完成 --><context:component-scan base-package="com.binux.webdemo.**"/><!-- 激活自动代理功能--><aop:aspectj-autoproxy expose-proxy="true"/>
</beans>
<beans xmlns="http://www.springframework.org/schema/beans"xmlns:context="http://www.springframework.org/schema/context"xmlns:mvc="http://www.springframework.org/schema/mvc"xmlns:xsi="http://www.w3.org/2001/XMLSchema-instance"xsi:schemaLocation="http://www.springframework.org/schema/beanshttp://www.springframework.org/schema/beans/spring-beans.xsdhttp://www.springframework.org/schema/contexthttp://www.springframework.org/schema/context/spring-context.xsdhttp://www.springframework.org/schema/mvchttp://www.springframework.org/schema/mvc/spring-mvc.xsd"><!-- 扫描类包,将标注spring注解的类自动转化bean,同时完成bean的注入,排除spring mvc的controller --><context:component-scan base-package="com.binux.webdemo.**"/><!-- 声明支持springmvc注解 --><mvc:annotation-driven/><!-- 声明支持jsp.html.css等request请求交于默认servlet处理 --><!-- 当在web.xml 中 DispatcherServlet使用 <url-pattern>/</url-pattern> 映射时,能映射静态资源 --><mvc:default-servlet-handler/><bean id="multipartResolver" class="org.springframework.web.multipart.commons.CommonsMultipartResolver" />
</beans>三 在 web.xml 中加入配置文件并配置监听器和过滤器为 spring 和 spring-mvc
<!DOCTYPE web-app PUBLIC "-//Sun Microsystems, Inc.//DTD Web Application 2.3//EN" "http://java.sun.com/dtd/web-app_2_3.dtd" >
<web-app><display-name>webdemo</display-name><context-param><param-name>contextConfigLocation</param-name><param-value>classpath*:spring-config.xml</param-value></context-param><filter><filter-name>Set Character Encoding</filter-name><filter-class>org.springframework.web.filter.CharacterEncodingFilter</filter-class><init-param><param-name>encoding</param-name><param-value>UTF-8</param-value></init-param><init-param><param-name>forceEncoding</param-name><param-value>true</param-value></init-param></filter><filter-mapping><filter-name>Set Character Encoding</filter-name><url-pattern>/*</url-pattern></filter-mapping><listener><listener-class>org.springframework.web.context.ContextLoaderListener</listener-class></listener><listener><listener-class>org.springframework.web.context.request.RequestContextListener</listener-class></listener><servlet><servlet-name>spring-mvc</servlet-name><servlet-class>org.springframework.web.servlet.DispatcherServlet</servlet-class><init-param><param-name>contextConfigLocation</param-name><param-value>classpath*:spring-mvc-config.xml</param-value></init-param><load-on-startup>1</load-on-startup></servlet><servlet-mapping><servlet-name>spring-mvc</servlet-name><url-pattern>/</url-pattern></servlet-mapping><servlet-mapping><servlet-name>default</servlet-name><url-pattern>*.css</url-pattern></servlet-mapping><servlet-mapping><servlet-name>default</servlet-name><url-pattern>*.gif</url-pattern></servlet-mapping><servlet-mapping><servlet-name>default</servlet-name><url-pattern>*.jpg</url-pattern></servlet-mapping><servlet-mapping><servlet-name>default</servlet-name><url-pattern>*.png</url-pattern></servlet-mapping><servlet-mapping><servlet-name>default</servlet-name><url-pattern>*.js</url-pattern></servlet-mapping><welcome-file-list><welcome-file>/default</welcome-file></welcome-file-list>
</web-app>
四 为项目建立相对完整的开发目录
我们采用较为通用的代码分层包实现MVC分层,一般数据库实体类放在 domain 包中、数据库访问类放在 dao 包中、业务代码服务类放在 service 包中、客户端访问处理控制类放在 controller 包中,结合本例中的命名空间,在项目虚拟目录 Java Resources 中创建对应的 java 代码包。此外网页相关的文件都存放在项目 src/main/webapp 文件夹下,该文件夹中 WEB-INF 文件夹中存放 web.xml 文件并且该文件夹中的文件不会被客户端下载,所以很多模板文件都存放在该文件夹下。
1 鼠标右键 src下的 main 目录,添加 java 文件夹和 test 文件夹,这里所做的操作都会反映到 Java Resources 虚拟文件夹下
2 在 java 文件夹下创建 java 代码包
|- src|- main|- java|- com.binux.webdemo.domain (数据库实体类)|- com.binux.webdemo.dao (数据处理类)|- com.binux.webdemo.service (服务类)|- com.binux.webdemo.controller (http请求处理类)|- resources (配置文件文件夹)|- webapp|- WEB-INF|- web.xml 五 建立简单的 controller 类验证所有配置运行正常
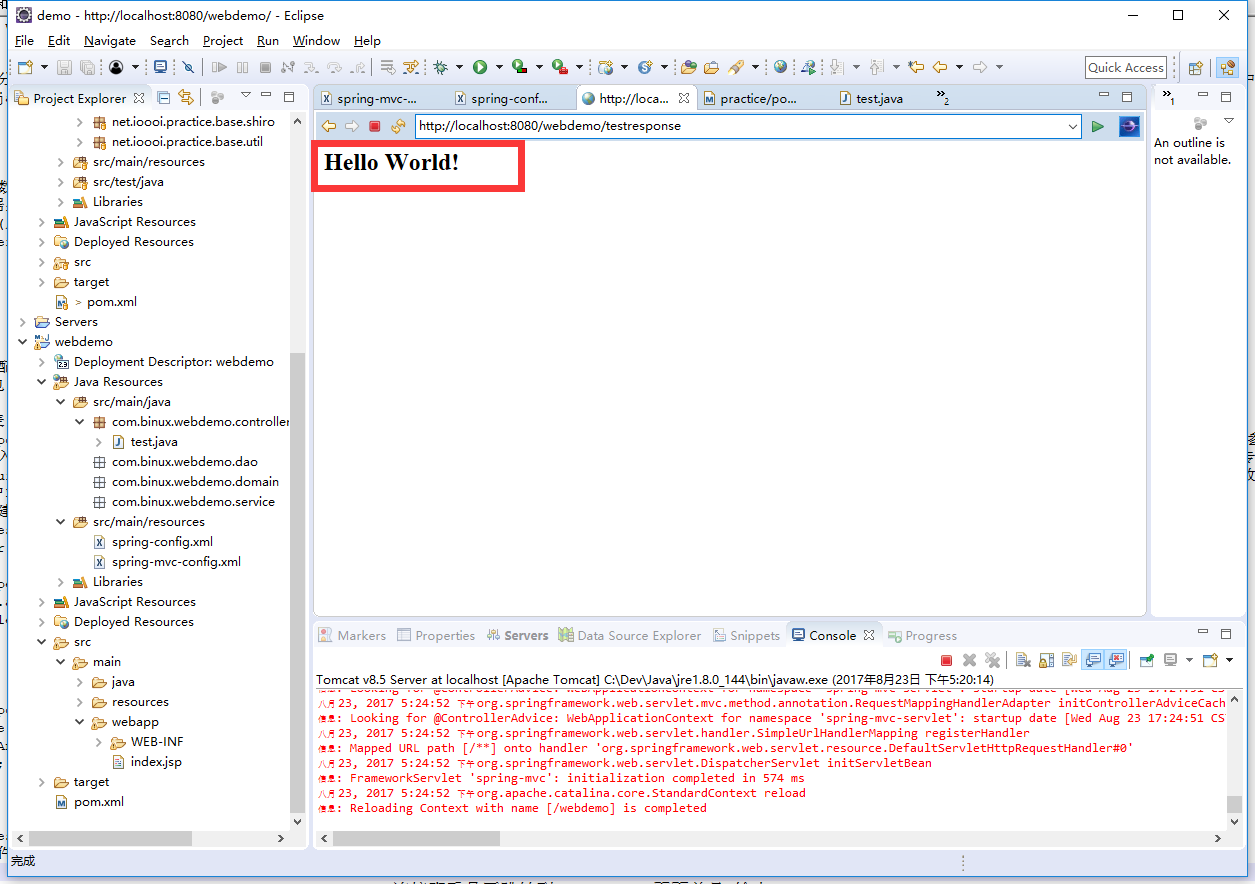
1 在 com.binux.webdemo.controller 包中新建 test.java 文件并添加响应浏览器请求 http://localhost:8080/webdemo/testresponse 地址的处理方法并作出响应值输出到浏览器。
类文件中需要注意的是几个注解如下:
@Controller 该注解放在类名上方,表明该类是 spring-mvc 的 controller 类
@RequestMapping(value = "/testresponse", produces = "application/json;charset=UTF-8") 该注解放在类或者方法上方,是 spring-mvc 中对浏览器等客户端请求的响应路径的注解,value 参数是标注方法响应浏览器给出路径,例如这里的就是 testresponse 路径,produces 是标明浏览器传送的请求是什么数据类型,本例中是指传入的是为json数据请求,如果使用正常的 http 数据传输可以省略这个参数。
@Autowired 该注解是 spring 的类注入注解,标注后的类实例不需要初始化,因为 spring 会自动注入并初始化,能够注入的类都是在编写该类的时候就作为 spring 的可注入类存在的,要么是专门的注解标注过的类,要么是一些默认可以实现注入的接口等。
@RequestParam(value = "draw", required = false, defaultValue = "") 该注解在方法参数前定义,用以标注方法中的参数和 http 请求中参数的对应关系以及是否必须提供该参数或者设置参数的默认值, value 参数是 http 中的参数名称, required 参数是控制该参数是否必须提供,defaultValue 参数指如果客户端未传输该参数那么设置成一个默认值。
@ResponseBody 该注解是指方法向客户端返回的数据将采用 json 格式。
controller 类中如果想实现页面转向,建议让方法执行完毕后使用 ModelAndView 对象,该对象除了可以使用addobject方法向客户端反馈参数外,还可以使用setViewName方法转向其它页面
package com.binux.webdemo.controller;import org.springframework.stereotype.Controller;
import org.springframework.web.bind.annotation.RequestMapping;
import org.springframework.web.servlet.ModelAndView;@Controller
@RequestMapping("")
public class test {@RequestMapping(value="/testresponse")public ModelAndView testResponse() {ModelAndView mv = new ModelAndView();mv.setViewName("index.jsp");return mv;}
}
2 为了不在编译时验证各种 xml 配置文件中的格式内容而报错,建议在 eclipse 验证属性中取消对 xml 文件的相关验证
3 编译项目并启动项目,然后通过输入 http://localhost:8080/webdemo/testresponse 连接查看是否跳转到 index.jsp 页面并且 输出 “Hello World!”。