2、spring security中,安全配置通过继承
WebSecurityConfigurerAdapter来配置@Configuration public class MyWebSecurityConfigurerAdapter extends WebSecurityConfigurerAdapter{protected void configure(HttpSecurity http) throws Exception {//做大量的配置//认证配置//授权配置 // 例如:http.authorizeRequests()//访问"/"和"/home"路径的请求都允许.antMatchers("/", "/home","/staff","/staff/*").permitAll()//而其他的请求都需要认证.anyRequest().authenticated().and()//修改Spring Security默认的登陆界面.formLogin().loginPage("/login").permitAll().and().logout().permitAll();}3、添加认证校验 (authentication)
创建数据库,创建一个用户库,用户名和密码
创建访问数据库的接口
public interface UserMapper {User selectByUserName(String userName);List<String> selectAllRoleByUserId(Integer userId);List<String> selectPermissionsByUserId(Integer userId);}创建访问数据库的userMapper.xml
<?xml version="1.0" encoding="UTF-8" ?>
<!DOCTYPE mapperPUBLIC "-//mybatis.org//DTD Mapper 3.0//EN""http://mybatis.org/dtd/mybatis-3-mapper.dtd">
<mapper namespace="com.demo.mapper.UserMapper"><select id="selectByUserName" resultType="com.demo.entity.User">select id,userName,passwordfrom t_user where username = #{userName}</select><select id="selectAllRoleByUserId" resultType="String">select r.name as name from t_role_user u,t_role r where r.id = u.rid and u.uid=#{userId};</select><select id="selectPermissionsByUserId" resultType="String">SELECT permission FROM t_role r,t_role_user u,t_role_menu rm,t_menu mwhere r.id = u.uid and rm.mid = m.id and u.rid =rm.rid and u.uid=#{userId}</select>
</mapper>
新建一个类,实现spring security提供的接口org.springframework.security.core.userdetails.UserDetailsService
这样就会调用该类的方法去访问数据库认证了。这一步中会返回一个User对象,该对象是SpringSecurity里定义的User对象
需要将用户的权限和角色用逗号分割后组装在一起。
@Service
public class UserDetailsServiceImpl implements UserDetailsService {@Autowiredprivate PasswordEncoder passwordEncoder;@Autowiredprivate UserMapper userMapper;@Overridepublic UserDetails loadUserByUsername(String s) throws UsernameNotFoundException {com.demo.entity.User user = userMapper.selectByUserName(s);if (user == null) {throw new UsernameNotFoundException("用户不存在");}List<String> roles = userMapper.selectAllRoleByUserId(user.getId());List<String> permissions = userMapper.selectPermissionsByUserId(user.getId());StringBuilder sb = new StringBuilder();for (String role : roles) {sb.append("ROLE_" + role + ",");}for (String permission : permissions) {sb.append(permission + ",");}String rolepermission = sb.substring(0, sb.length() - 1);UserDetails userDetails = new User(user.getUserName(), user.getPassword(), AuthorityUtils.commaSeparatedStringToAuthorityList(rolepermission));return userDetails;}
}
注意,
认证的步骤,是先获取用户信息,再校验用户密码的认证过程。
在上步骤中需要使用到一个passwordEncoder编码器,来生成加密密码明文生成密文。
通过java类来配置一个passwordEncoder
@Configuration
public class SecurityConfig {@Beanprotected PasswordEncoder passwordEncoder() {return new BCryptPasswordEncoder();}
}
4、添加配置,用于完成认证流程管理
登录的界面:/showLogin
登录逻辑入口 /login
登录成功地址 /showMain
登录失败地址 /showFail
.usernameParameter("myusername")以及.passwordParameter("mypassword")定义了登录页面中的表单名称是myusername和mypasswordUsernamePasswordAuthenticationFilter :对/login 的 POST 请求做拦截,校验表单中用户名,密码。
通过源码不难发现:一旦我们使用SpringSecurity来作为认证框架,我们要写自己的登录的接口的话,一定要用post请求,并且用户名和密码是固定的,只能用username和password来作为参数名,因为这是SpringSecurity默认的(如果执意要改,可以通过配置文件进行改)。
public class MyWebSecurityConfigurerAdapter  extends WebSecurityConfigurerAdapter{protected void configure(HttpSecurity http) throws Exception {http.formLogin()//未登录时的地址.loginPage("/showLogin")//处理登录请求的url.loginProcessingUrl("/login")//.successForwardUrl("/showMain")//认证成功后跳转的地址.successHandler(new AuthenticationSuccessHandler() {@Overridepublic void onAuthenticationSuccess(HttpServletRequest httpServletRequest, HttpServletResponse httpServletResponse, Authentication authentication) throws IOException, ServletException {httpServletResponse.sendRedirect("/showMain");}})//.failureForwardUrl("/showFail")//登录失败后的处理器.usernameParameter("myusername")//客户端的密码参数名称.passwordParameter("mypassword").failureHandler(new AuthenticationFailureHandler() {@Overridepublic void onAuthenticationFailure(HttpServletRequest httpServletRequest, HttpServletResponse httpServletResponse, AuthenticationException e) throws IOException, ServletException {httpServletResponse.sendRedirect("/showFail");}});http.exceptionHandling()//.accessDeniedHandler(accessDeniedHandler);//只适用于非前端框架,适用于同步请求的方式//如果是异步请求需要使用上一种方式。.accessDeniedPage("/showAccessDenied");}
}
5、异常配置
配置异常页面,如果程序异常测跳转到该页面。
如果是异步请求,如ajax,则可以实现
AccessDeniedHandler接口@Component public class MyAccessDeniedHandler implements AccessDeniedHandler {@Overridepublic void handle(HttpServletRequest httpServletRequest, HttpServletResponse httpServletResponse, AccessDeniedException e) throws IOException, ServletException {httpServletResponse.setContentType("application/json;charset=UTF-8");httpServletResponse.setStatus(httpServletResponse.SC_FORBIDDEN);PrintWriter writer = httpServletResponse.getWriter();writer.println("权限不足");writer.flush();writer.close();} }6、配置 Remember Me
需要配置生成一个token,并将token下发给浏览器。
因此需要一个PersistentTokenRepository类。
通过java配置类的方式来定义bean,这个bean就是persistentTokenRepository@Configuration public class RememberMeConfig {@Autowiredprivate DataSource dataSource;@Beanprotected PersistentTokenRepository getPersistentTokenRepository(){JdbcTokenRepositoryImpl jdbcTokenRepository = new JdbcTokenRepositoryImpl();//jdbcTokenRepository.setCreateTableOnStartup(true);jdbcTokenRepository.setDataSource(dataSource);return jdbcTokenRepository;} } // 在MyWebSecurityConfigurerAdapter中配置.rememberMe()private MyAccessDeniedHandler accessDeniedHandler;private PersistentTokenRepository persistentTokenRepository;protected void configure(HttpSecurity http) throws Exception {//其他配置http.rememberMe().userDetailsService(userDetailsService).tokenRepository(persistentTokenRepository).tokenValiditySeconds(10*2);//其他配置}7、配置授权
授权一般需要依托用户的角色,对权限集合进行绑定。
因为必须先登录,因此对于登录页面直接方行,antMatchers(“/showLogin”,“/showFail”).access(“permitAll”)。
因为静态资源也要直接放行,所以对于.antMatchers(“/images/**”).permitAll() .regexMatchers(“/js/.*”).permitAll() .antMatchers(“/demo”).permitAll()这几个直接放行。
.antMatchers(“/abc”).denyAll() 所有到/abc的请求都拒绝。
最后一行的.anyRequest().authenticated(); 声明所有的请求都需要登录。
public class MyWebSecurityConfigurerAdapter extends WebSecurityConfigurerAdapter{protected void configure(HttpSecurity http) throws Exception {//前面的认证配置http.authorizeRequests()//.antMatchers("/showLogin","/showFail").permitAll().antMatchers("/showLogin","/showFail").access("permitAll")//对于静态和动态请求需要分开//.antMatchers("/js/**").permitAll().antMatchers("/abc").denyAll().antMatchers("/jczl").hasAnyAuthority("demo:update")//.antMatchers("/jczl").hasAnyRole("ADMIN").antMatchers("/admin").access("@myServiceImpl.hasPermission(request,authentication)").antMatchers("/ip").hasIpAddress("192.168.7.86").antMatchers("/images/**").permitAll().regexMatchers("/js/.*").permitAll().antMatchers("/demo").permitAll().anyRequest().authenticated();8、配置安全 csrf
为防止跨越的表单提交,在login.html 的隐藏域中需要加上
<input type=“hidden” th:value=“${_csrf.token}” name=“_csrf” th:if=“${_csrf}”>
然后在MyWebSecurityConfigurerAdapter 中继续取消 http.csrf().disable();的注释,即默认开启csrf的校验了。
WebSecurityConfigurerAdapter类:可以通过重载该类的三个configure()方法来制定Web安全的细节。
1、configure(WebSecurity):通过重载该方法,可配置Spring Security的Filter链。
2、configure(HttpSecurity):通过重载该方法,可配置如何通过拦截器保护请求。
3、configure(AuthenticationManagerBuilder):通过重载该方法,可配置user-detail(用户详细信息)服务。
1、使用基于内存的用户存储:
2、基于数据库表进行认证:
\*\* 3、基于LDAP进行认证 \*\*
@EnableGlobalMethodSecurity(prePostEnabled = true, securedEnabled = true)
public class SecurityConfig extends WebSecurityConfigurerAdapter {/*** 自定义用户认证逻辑*/@Autowiredprivate UserDetailsService userDetailsService;@Beanpublic BCryptPasswordEncoder bCryptPasswordEncoder() {return new BCryptPasswordEncoder();}/*** 身份认证接口  从写了这个接口,这里最重要的就是WebSecurityConfigurerAdapter接口下的configure方法,这个方法就是我们要实现的认证逻辑。其实也可以不重写configure方法,他默认就会去容器里面找PasswordEncoder实现类来作为认证的时候 密码加密 和数据库比较,以及userDetailsService实现类。*/@Overrideprotected void configure(AuthenticationManagerBuilder auth) throws Exception {// 告诉SpringSecurity 我们要使用自己定义的userDetailsService来通过username来获取主体,并且使用了BCryptPasswordEncoder加密进行密码比较auth.userDetailsService(userDetailsService).passwordEncoder(bCryptPasswordEncoder());}
}
Spring Security是什么? - 简单例子(三)

本文来自互联网用户投稿,该文观点仅代表作者本人,不代表本站立场。本站仅提供信息存储空间服务,不拥有所有权,不承担相关法律责任。如若转载,请注明出处:http://www.luyixian.cn/news_show_411571.aspx
如若内容造成侵权/违法违规/事实不符,请联系dt猫网进行投诉反馈email:809451989@qq.com,一经查实,立即删除!相关文章

万字深剖 Linux I/O 原理
目录传统艺能😎梅开二度🤔当前路径🤔三大输入输出流🤔系统文件 I/O🤔open😋open 返回值🤔close😋write😋read😋文件描述符fd😋对应关系Ƕ…
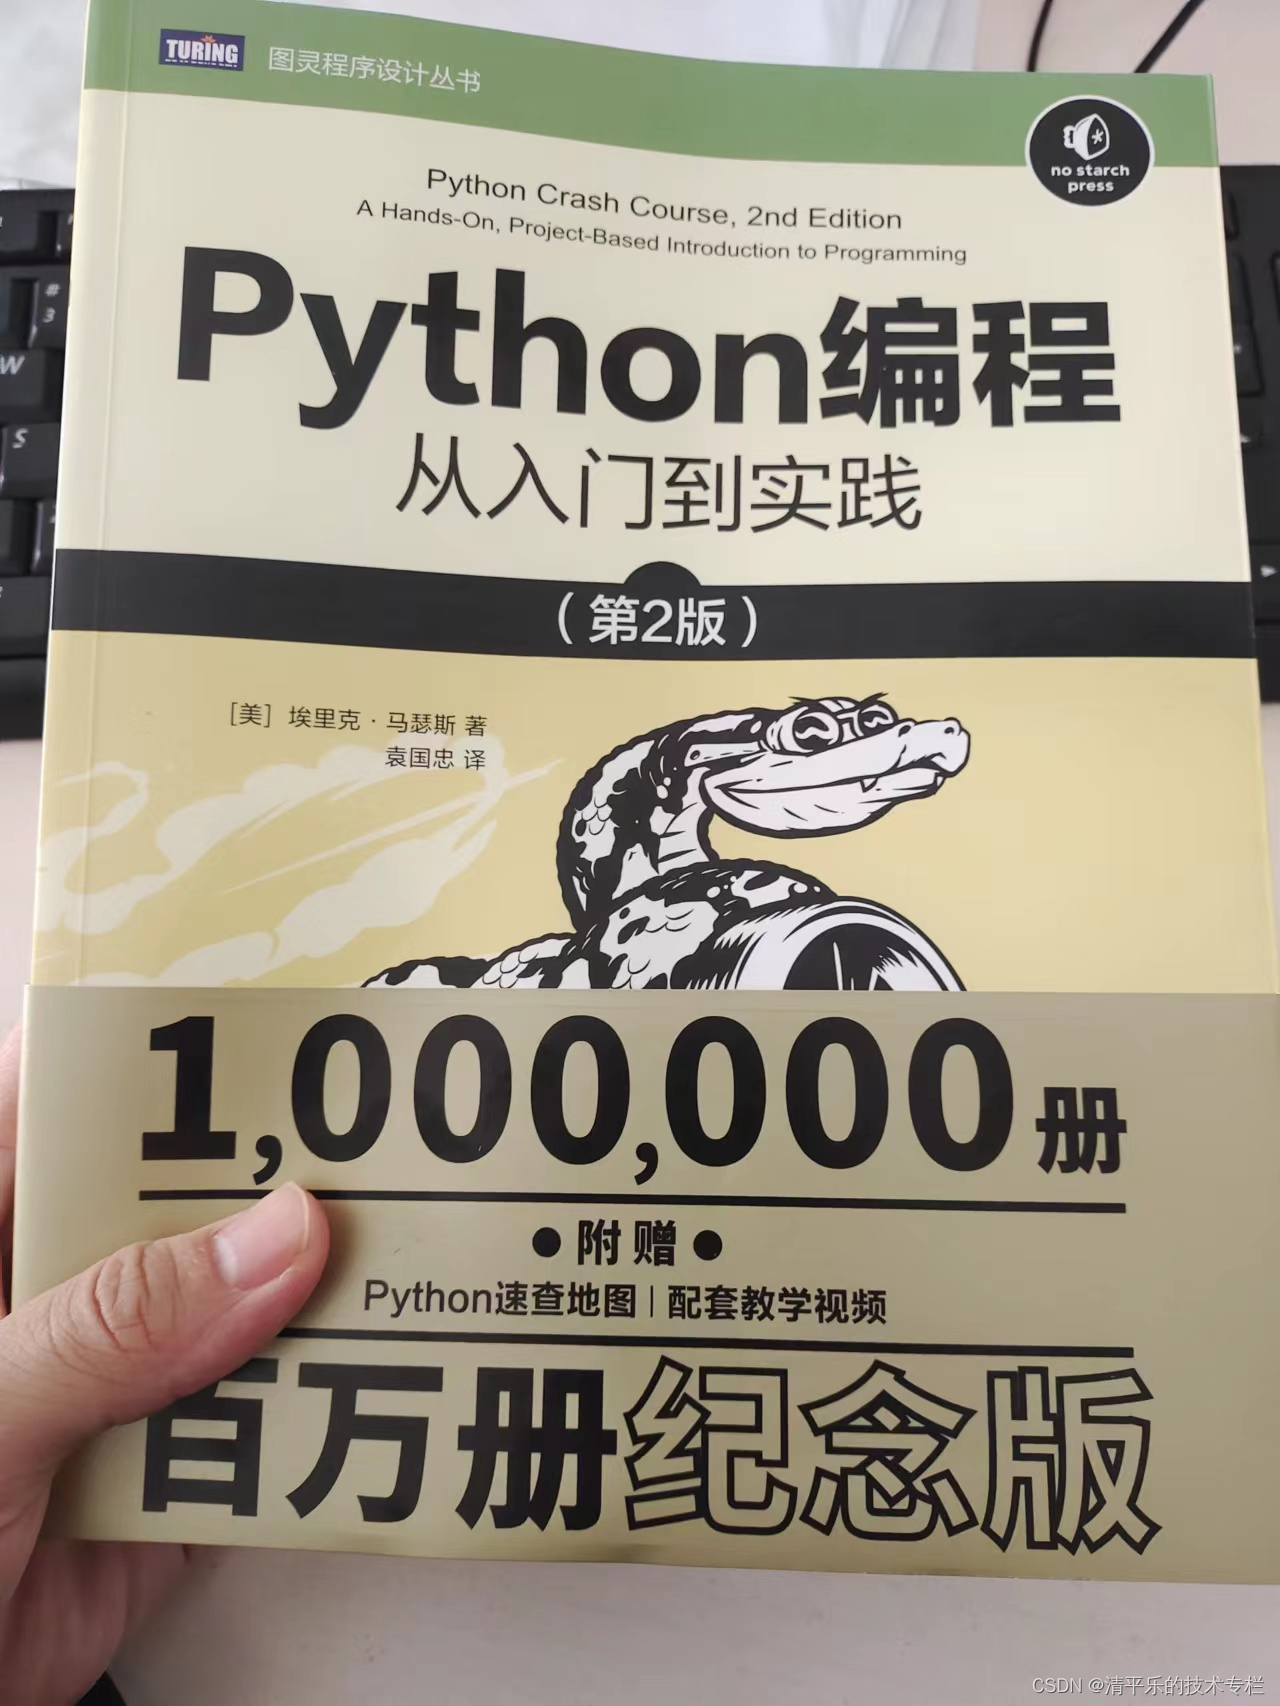
【好书推荐】《Python编程:从入门到实践(第2版)》
第二版是2020年底发布的,第二版相比较第一版更新了不少新东西。 不错的python入门书,第一部分讲基础知识,第二部分讲了三个实际的项目:一个小游戏,一个数据可视化程序,一个网站。
可以方便地下载全书的源…

学习笔记-Kioptrix4-WalkThrough
Kioptrix4-WalkThrough 文章作者 xidaner & r0fus0d 免责声明 本文档仅供学习和研究使用,请勿使用文中的技术源码用于非法用途,任何人造成的任何负面影响,与本人无关. 靶机地址 https://www.vulnhub.com/entry/kioptrix-level-13-4,25/ Description Again a long delay bet…

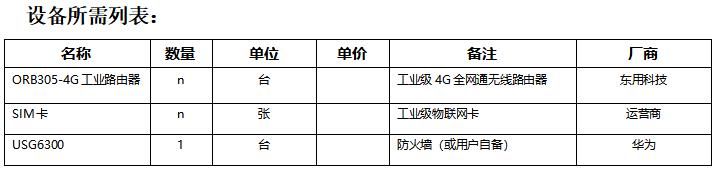
分布式光伏站远程监控组网解决方案
一、项目背景随着规模性的光伏电站陆续建设和投入运行,如何实时了解电站的运行状况,如何满足上一级系统或电网调度系统的监控需求成为了急需解决的事情。为使对分布式能源实现高效监控、满足电力接入电网要求、合理调配、集中监控、电网分析、配网自动化…
前端特效、js代码优化
1.旋转按钮边框
效果: 代码: <div class"container"><button class"btn">旋转边框</button></div>*{margin: 0;padding: 0;}.container{background: #000;height: 100vh;overflow: hidden;}.btn{/* borde…

35岁以后还能学软件测试吗?
之前看到一个问题“35岁学软件测试来得及吗”。 之前一直在工厂上班,看不到希望。 已经35岁了,想转学软件测试来得及吗? 经常会碰到类似这样的问题:担心自己学历不够,非计算机专业,害怕学不会,甚…

擎创技术流 | ClickHouse实用工具—ckman教程(1)部署安装
前言: 在数据量日益增长的当下,传统数据库的查询性能已满足不了业务需求。而Clickhouse在OLAP(On-Line Analysis Processing——即一种在线分析处理的,用于数据分析的计算方法)领域的应用,可以助力企业打造…
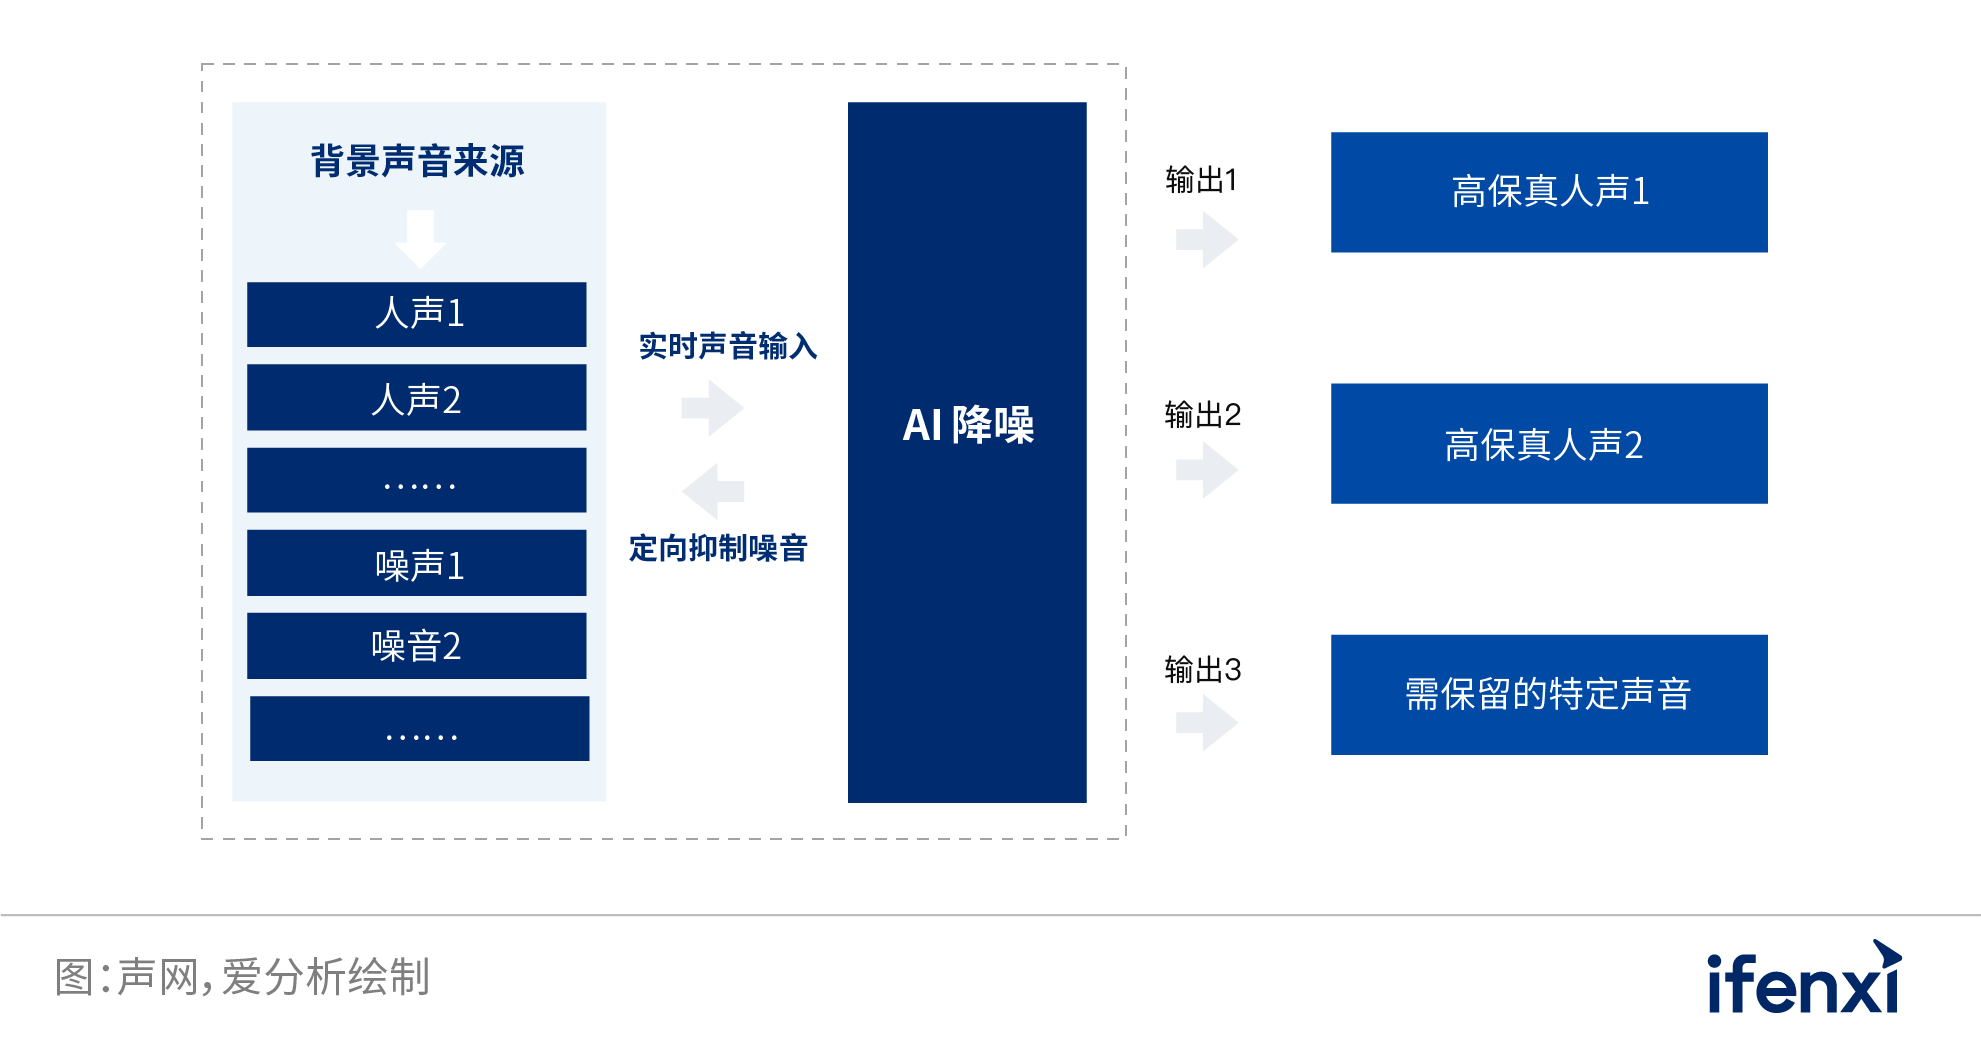
2022爱分析·虚拟化活动实践报告
报告编委
张扬
爱分析联合创始人&首席分析师
文鸿伟
爱分析高级分析师
**王鹏
**
爱分析分析师
外部专家**(按姓氏拼音排序)**
梁瑛玮
保利威技术副总裁
于颢
tatameCEO
特别鸣谢(按拼音排序)
报告摘要
新冠疫…
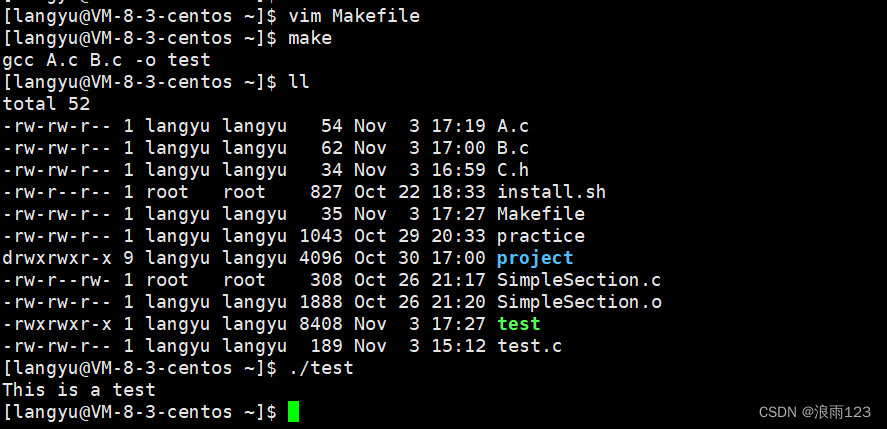
Linux基础(yum,vim,gcc,gdb)
Linux基本的命令我们会敲了,基本的文件概念以及权限概念我们也都了解了,接下来该学一些好用的工具,用Linux完成一些工作了 目录
yum
yum的作用
yum基本操作
vim
vim的基本模式
命令模式
插入模式
底行模式
可视化模式
gcc
gcc…

Drag-MoveMent
目录UGUI-OnDrag事件如何使用PointerEventDataposition屏幕空间->世界坐标/局部坐标空间(转换)参考文章UGUI-OnDrag事件 示例代码:
using UnityEngine.EventSystems;public class TestOnDrag : MonoBehaviour, IDragHandler, IBeginDragHandler, IEndDragHandler
{public v…

java计算机毕业设计基于安卓Android的教学考勤系统APP
项目介绍
首先,论文一开始便是清楚的论述了系统的研究内容。其次,剖析系统需求分析,弄明白“做什么”,分析包括业务分析和业务流程的分析以及用例分析,更进一步明确系统的需求。然后在明白了系统的需求基础上需要进一步地设计系统,主要包罗软件架构模式、整体功能模块、数据库…

二叉查找树、平衡二叉树、红黑二叉树简单概念
二叉查找树(二叉排序树、二叉搜索树): 性质: 1.若其左子树非空,则左子树上所有节点的值都小于根节点的值; 2.若其右子树非空,则右子树上所有节点的值都大于根节点的值; 3.其…

系统学习SpringFrame:SpringBean的注入方式
本篇内容包括:Spring 容器简介(什么是容器、容器如何工作)、SpringBean 注入方式(SpringBean 注入方式分类、Autowiring 自动绑定)以及 获取 Spring Bean 的工具类! 一、Spring 容器
1、什么是容器
Sprin…

企业电子文档管理系统哪个好?怎么选?
选择一款企业电子文档管理系统(EDMS)时应该关注什么? 这完全取决于你需要实现的控制、协作和灵活性水平。 然而,有两个关键的电子文档管理系统功能是你应该要关注的。 ● 简单配置的工作流程 你可以更轻松地进行协作ÿ…
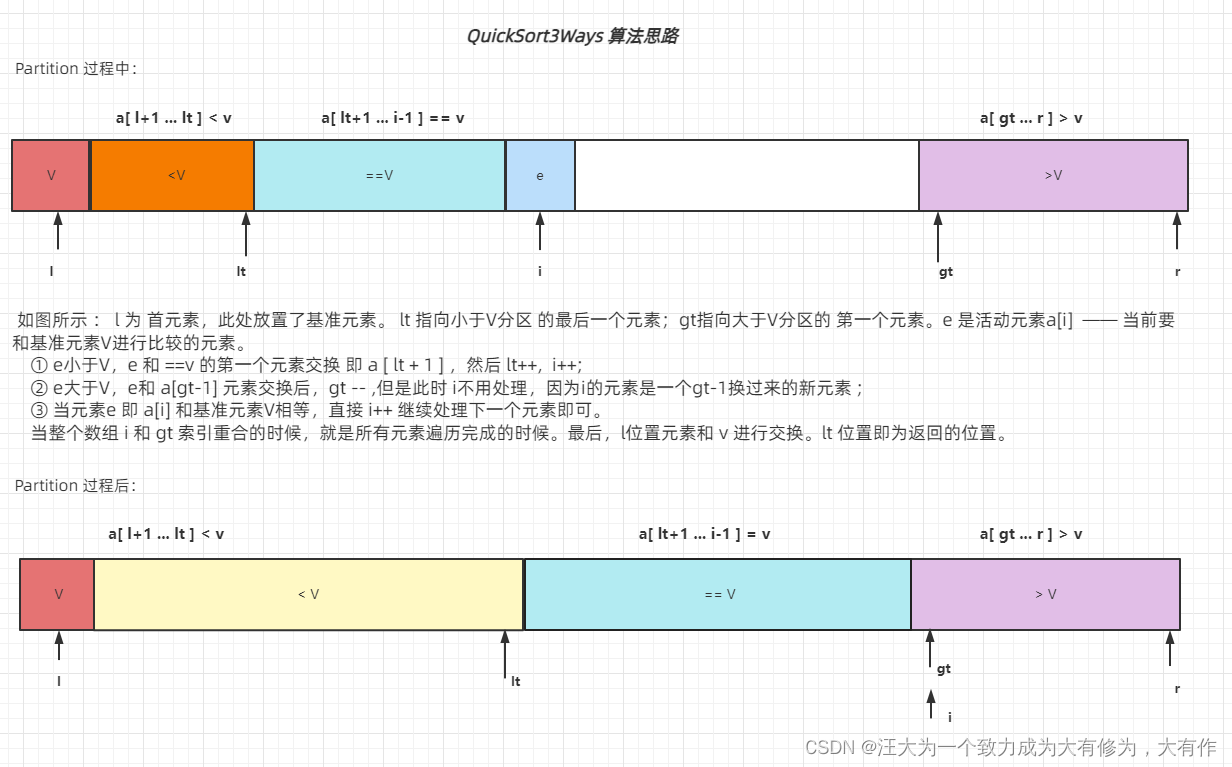
算法6 排序算法 QuickSort 快速排序
Quick sort 快速排序快算排序 Quick Sort ,可能是应用最为广泛的算法,被视为20世纪科学和工程领域的十大算法之一。其流行的原因是因为它实现简单,可适用于不同数据,并且在一般场景下比其他算法要更快。其优点是:
可借…

JSP声明:变量、方法和类的声明
在 JSP 页面中可以声明变量、方法和类,其声明格式如下: <%!声明变量、方法和类的代码%>特别要注意,在“<%“与“!”之间不要有空格。声明的语法与在 Java 语言中声明变量和方法时的语法是一样的。
声明变量
在“<%!…

面试官视角总结的测开面试题(付答案)
背景
leader让胖虎当回面试官, 招一位合适的测开同学.
由于是第一次当面试官, 肯定要认真对待一下, 所以精心准备了一些面试题.
讲道理胖虎经历过很多次面试了, 不过都是以面试者的角度, 首次以面试官的身份来面试别人还是有点期待的!
制定评判标准
首先我列了个能力需求和…