前言
TreeView是在Qt6.3中加入的,弥补了Qt中无官方树图。笔者上手尝试了下,虽然有点麻烦,但官方也做了不少简化。
本次教程,笔者创建一个简单的示例,以帮助读者使用TreeView。
一、创建模型类
当前模型需要使用C++定义,模型类继承自QAbstractItemModel,笔者的头文件如下
class TreeItem;class TreeModel : public QAbstractItemModel
{Q_OBJECTpublic:enum TreeRole {FullNameRole = Qt::DisplayRole,AddressRole = Qt::UserRole};Q_ENUM(TreeRole)explicit TreeModel(QObject *parent = nullptr);~TreeModel();// Header:QVariant headerData(int section, Qt::Orientation orientation, int role = Qt::DisplayRole) const override;//    bool setHeaderData(int section, Qt::Orientation orientation, const QVariant &value, int role = Qt::EditRole) override;// Basic functionality:QModelIndex index(int row, int column,const QModelIndex &parent = QModelIndex()) const override;QModelIndex parent(const QModelIndex &index) const override;int rowCount(const QModelIndex &parent = QModelIndex()) const override;int columnCount(const QModelIndex &parent = QModelIndex()) const override;QVariant data(const QModelIndex &index, int role = Qt::DisplayRole) const override;QHash<int, QByteArray> roleNames() const override;// Editable:bool setData(const QModelIndex &index, const QVariant &value,int role = Qt::EditRole) override;Qt::ItemFlags flags(const QModelIndex& index) const override;private:void setupModelData(TreeItem *parent);TreeItem *getItem(const QModelIndex &index) const;TreeItem *rootItem;
};
与TableView的模型相关,多了index()和parent()的实现
模型类实现后,可以注册到qml中
qmlRegisterType<TreeModel>("TreeModelTest", 1, 0, "TreeModel");二、显示模型数据
TreeView {id: treeView//模型model: TreeModel {}//委托delegate: TreeViewDelegate {}//边界操作boundsBehavior: Flickable.StopAtBounds//水平滚动条ScrollBar.horizontal: ScrollBar {}//垂直滚动条ScrollBar.vertical: ScrollBar {}
}
树形视图的实现比较好理解,可以调整很多属性
TreeViewDelegate是Qt内置的委托,也可以自定义实现
注:
TreeView继承自TableView,所以TableView可以使用的东西,TreeView也可以使用。
三、添加水平表头
HorizontalHeaderView {id: tableView_topHeaderanchors.left: treeView.leftanchors.right: treeView.rightanchors.top: parent.topsyncView: treeView}若不指定水平表头的模型数据,默认会调用模型的headerData()函数获取,需要在C++中实现。
syncView属性可以将treeView的水平位置或列宽等信息,同步到水平表头,这样就不要再单独调用相关属性了。
注:
HorizontalHeaderView继承自TableView,所以TableView可以使用的东西,HorizontalHeaderView也可以使用。
四、添加垂直表头
VerticalHeaderView {id: tableView_leftHeaderanchors.left: parent.leftanchors.top: treeView.topanchors.bottom: treeView.bottomsyncView: treeViewmodel: treeView.rows}若不指定水平表头的模型数据,默认会调用模型的headerData()函数获取,但要注意,headerData()只能返回最顶层的表头数据,导致显示异常。笔者建议直接绑定TreeView的行数或自定义。
syncView属性可以将treeView的垂直位置或列高等信息,同步到垂直表头,这样就不要再单独调用相关属性了。
注:
VerticalHeaderView继承自TableView,所以TableView可以使用的东西,VerticalHeaderView也可以使用。
五、增加选择功能
TreeView {id: treeView//模型model: TreeModel {}//选择模型selectionModel:  ItemSelectionModel{ id: itemSelectionModel}//委托delegate: TreeViewDelegate {}//边界操作boundsBehavior: Flickable.StopAtBounds//水平滚动条ScrollBar.horizontal: ScrollBar {}//垂直滚动条ScrollBar.vertical: ScrollBar {}
}
笔者测试了下Qt自带的选择模型,win10下效果还不错,但在android下的效果欠佳
六、读取模型数据
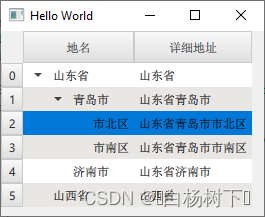
treeView.delegate: TreeViewDelegate {TapHandler {acceptedButtons: Qt.RightButtononTapped: {console.debug("currentIndex",row,column,index,treeView.modelIndex(column, row),model.display )}}}TreeView读取模型数据,和一般视图相同,但也有一些区别。和其他视图-模型不同,TreeView的row、column是视图中的显示的行与列(从0开始),index是视图中的列向叠加序列(自上而下,先计算第0列,再依次叠加后面几列)。模型中的行是相对于父对象的。也就是说,视图的row、column、index与模型中的不同,但存在对应关系。可以TreeView里的函数获取,如 columnAtIndex()、 modelIndex()、 rowAtIndex()等。
笔者使用的测试源码
后记
TreeView可以自定义表头,以实现复杂的表头设计。
时间所限,笔者只是显示了TreeView的简单用法,且仅在win10和android下简单测试。其中定有不足,请小伙伴指正。


![[附源码]SSM计算机毕业设计校园疫情防控管理系统JAVA](https://img-blog.csdnimg.cn/0580695c0edf47d893c8791c8f495f28.png)