目录
【1】安装Filebeat
【2】配置-测试
【3】配置使用Filebeat
【4】filebeat-收集系统文件日志
【5】配置filebeat,将/var/log/all.log日志采集到es集群中
【6】定制索引名称
【7】收集多个web节点的日志,输出到相同的索引中
【8】filebeat-收集nginx日志
【9】修改nginx的日志格式
【10】图形化展示
【11】filebeat-收集nginx的访问日志+错误日志
【12】filebeat收集nginx多虚拟主机日志
【13】收集tomcat日志
【14】filebeat-收集tomcat错误日志
【1】安装Filebeat
[root@filebeat ~]# rpm -ivh filebeat-7.4.0-x86_64.rpm
warning: filebeat-7.4.0-x86_64.rpm: Header V4 RSA/SHA512 Signature, key ID d88e42b4: NOKEY
Preparing...                          ################################# [100%]
Updating / installing...1:filebeat-7.4.0-1                 ################################# [100%]
【2】配置-测试
- 配置filebeat从终端读入,从终端输出
[root@filebeat ~]# vim /etc/filebeat/test.yml
filebeat.inputs:
- type: stdinenabled: true
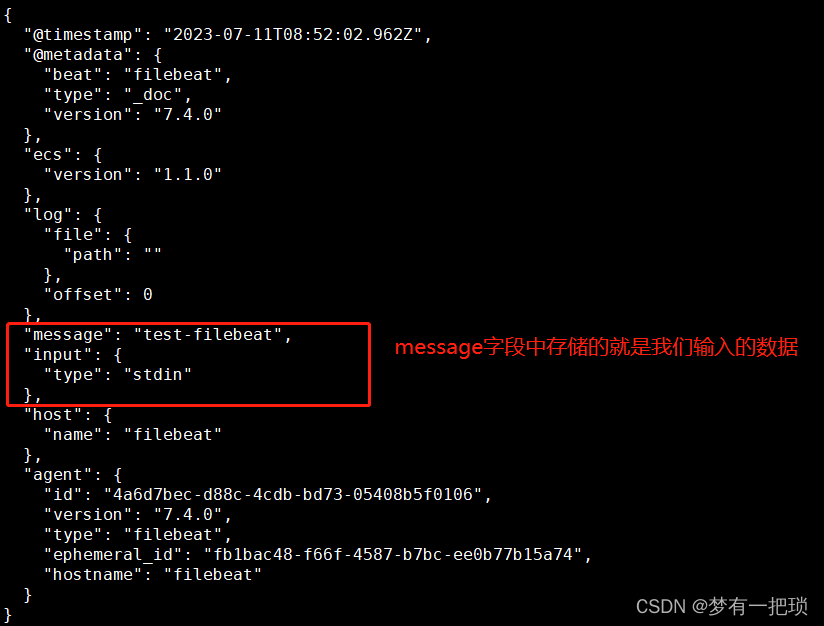
output.console:pretty: trueenable: true## 测试
[root@filebeat ~]# filebeat -e -c test.yml![]()
【3】配置使用Filebeat
[root@filebeat ~]# cp /etc/filebeat/filebeat.yml /etc/filebeat/filebeat.yml_bak
[root@filebeat ~]# vim /etc/filebeat/filebeat.yml
filebeat.inputs:
- type: logenabled: truepaths:- /var/log/messagesoutput.elasticsearch:hosts: ["10.0.0.21:9200","10.0.0.22:9200","10.0.0.23:9200"]enable: true## 测试
[root@filebeat ~]# systemctl restart filebeat.service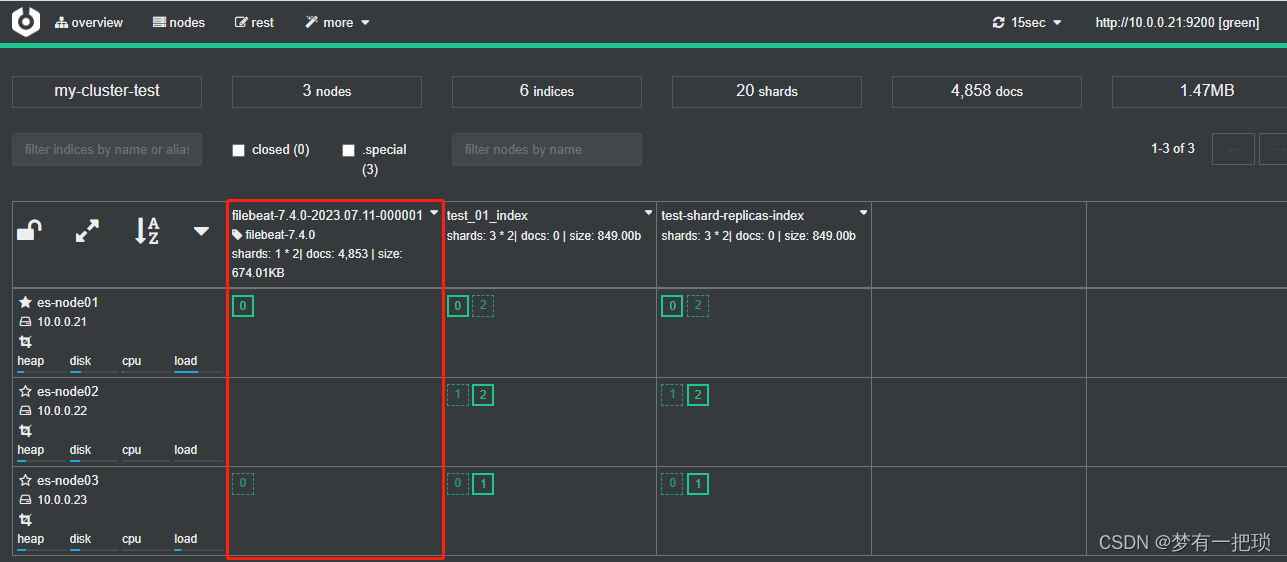
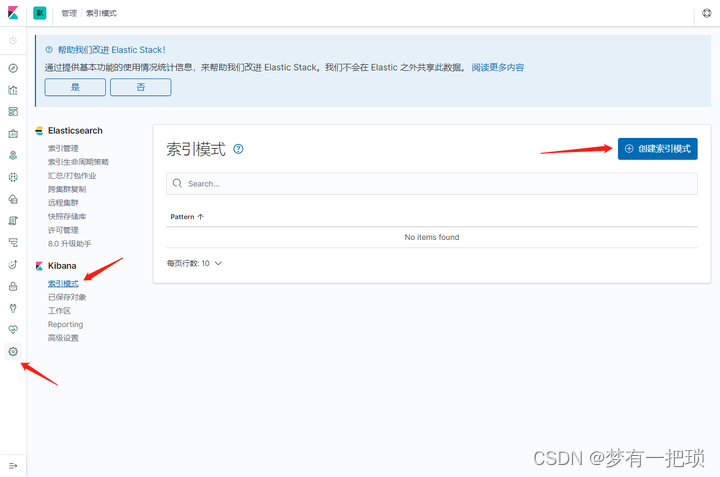
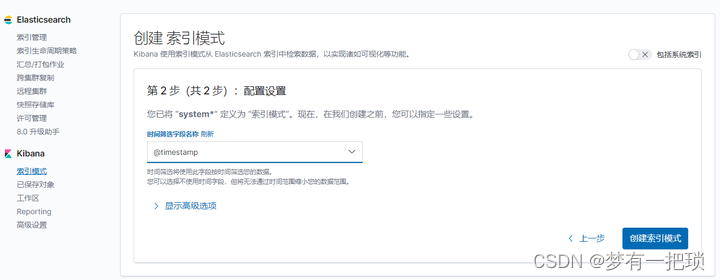
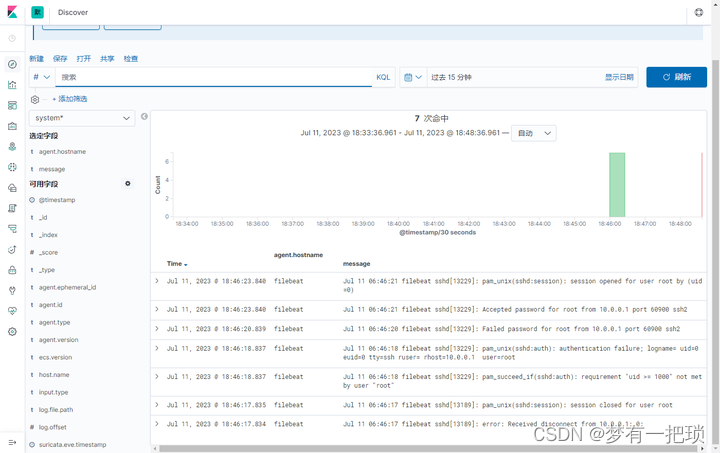
- 使用kibana读取filebeat索引中的数据


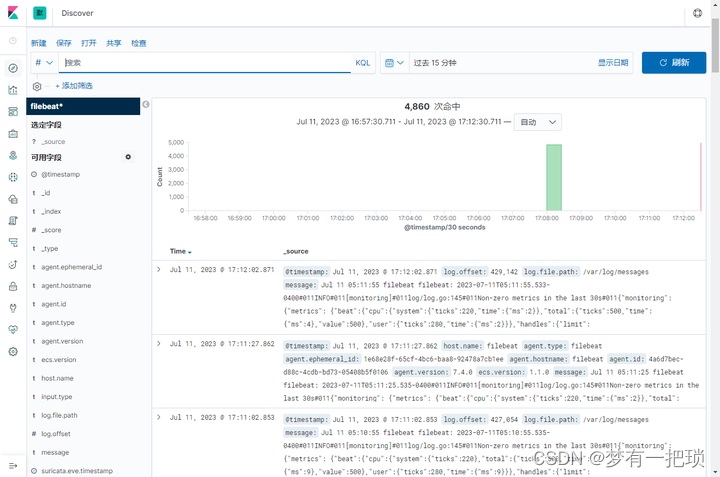
- 日志中写入新的数据,刷新验证是否能被命中
[root@filebeat ~]# echo "test" >> /var/log/messages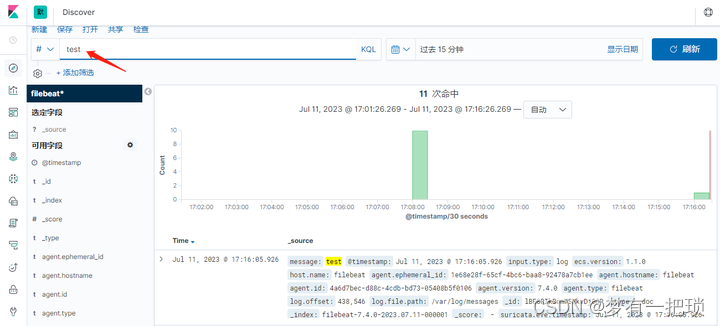
【4】filebeat-收集系统文件日志
系统日志包含messages、secure、cron、dmesg、ssh、boot等
如果挨个配置会变得很麻烦,我们可以将这些日志进行统一几种管理,使用rsyslog将本地所有类型的日志都写入到/var/log/all.log文件中,然后使用filebeat对该文件进行收集
[root@filebeat ~]# yum -y install rsyslog
....
$ModLoad imudp
$UDPServerRun 514
....
*.* /var/log/all.log
....## 重启测试
[root@filebeat ~]# systemctl restart rsyslog.service
[root@filebeat ~]# logger "rsyslog test from all"
[root@filebeat ~]# grep "all" /var/log/all.log
Jul 11 05:25:47 filebeat root: rsyslog test from all
【5】配置filebeat,将/var/log/all.log日志采集到es集群中
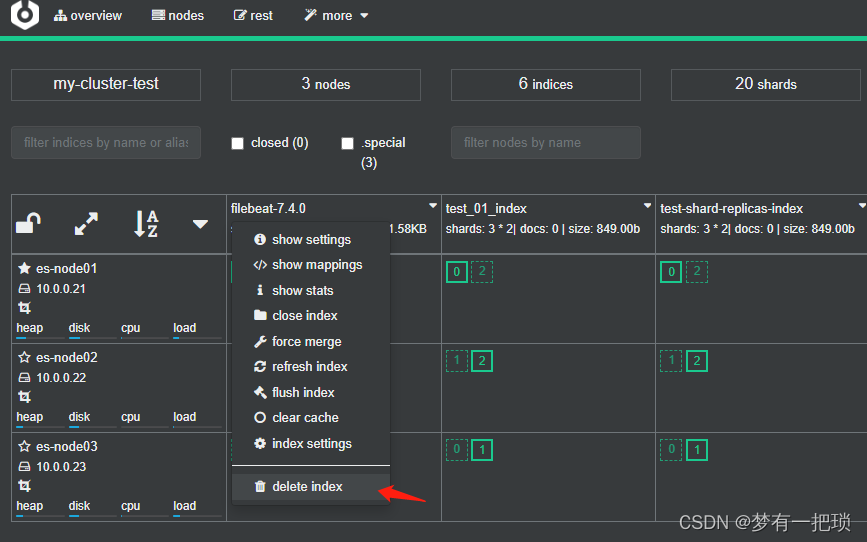
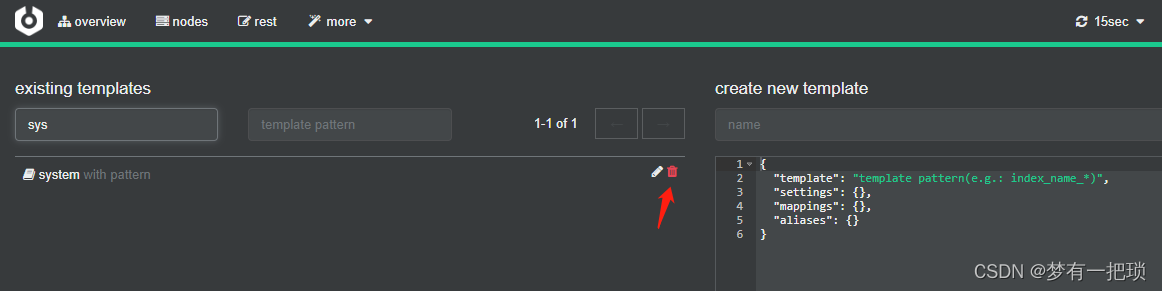
- 先删除es中的索引和kibana中匹配的索引,重启后生成新的索引
[root@filebeat ~]# vim /etc/filebeat/filebeat.yml
filebeat.inputs:
- type: logenabled: truepaths:- /var/log/all.loginclude_lines: ['^ERR', '^WARN', 'sshd']output.elasticsearch:hosts: ["10.0.0.21:9200","10.0.0.22:9200","10.0.0.23:9200"]enable: true[root@filebeat ~]# systemctl restart filebeat.service
【6】定制索引名称
[root@filebeat ~]# vim /etc/filebeat/filebeat.ymlfilebeat.inputs:
- type: logenabled: truepaths:- /var/log/all.loginclude_lines: ['^ERR', '^WARN', 'sshd']output.elasticsearch:hosts: ["10.0.0.21:9200","10.0.0.22:9200","10.0.0.23:9200"]enable: trueindex: "system-%{[agent.version]}-%{+yyyy.MM.dd}"
setup.ilm.enabled: false # 索引的生命周期。默认开启,开启后索引名称只能是filebeat
setup.template.name: "system" # 定义模板名称
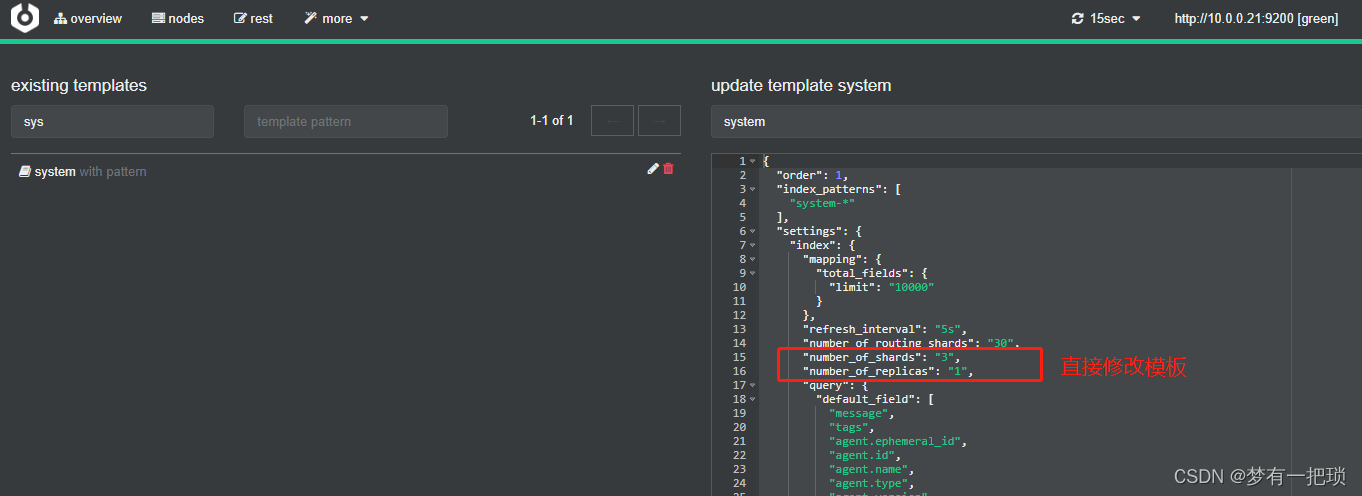
setup.template.pattern: "system-*" # 定义模板匹配索引的名称## 索引分片,方式一
setup.template.settings:index.number_of_shards: 3index.number_of_replicas: 1## 索引分片,方式二
1、修改system模板,添加分片和副本数量
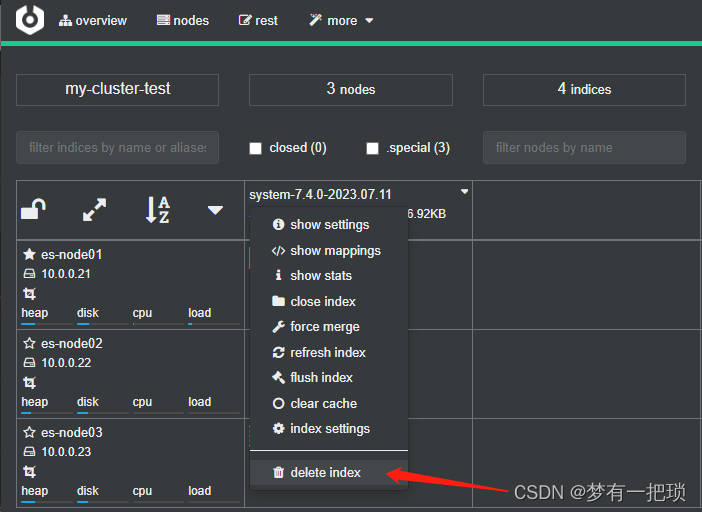
2、删除模板关联的索引
3、重启filebeat
4、产生新的日志验证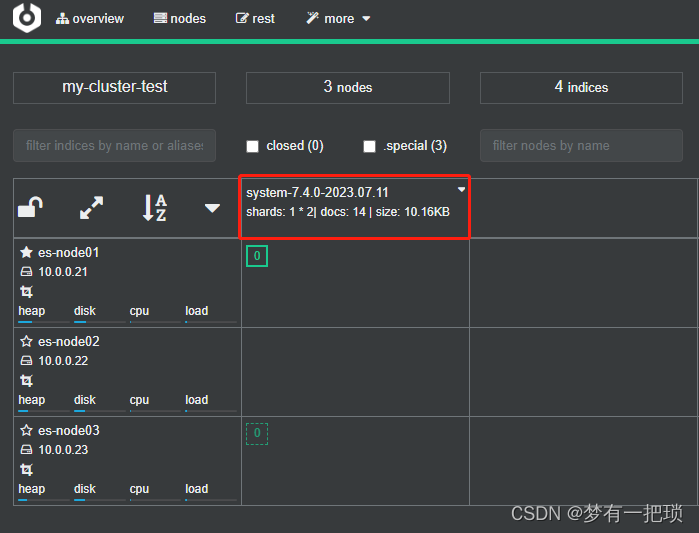
- 我们需要删除syste模板和索引,因为模板默认分片就是1,要不然分片永远不会生效

## 重启
[root@filebeat ~]# systemctl restart filebeat.service## 产生新的日志,验证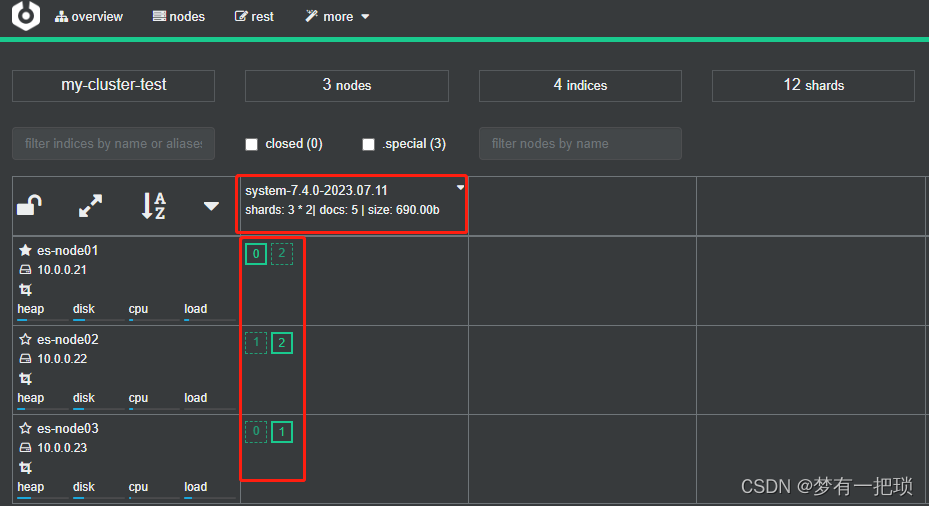
第二种方式
【7】收集多个web节点的日志,输出到相同的索引中
- web-01配置filebeat
[root@filebeat ~]# vim /etc/rsyslog.conf
.....
$ModLoad imudp
$UDPServerRun 514
.....
*.* /var/log/all.log
.....[root@filebeat ~]# vim /etc/filebeat/filebeat.yml
filebeat.inputs:
- type: logenabled: truepaths:- /var/log/all.loginclude_lines: ['^ERR', '^WARN', 'sshd']output.elasticsearch:hosts: ["10.0.0.21:9200","10.0.0.22:9200","10.0.0.23:9200"]enable: trueindex: "system-%{[agent.version]}-%{+yyyy.MM.dd}"setup.ilm.enabled: false
setup.template.name: "system"
setup.template.pattern: "system-*"
setup.template.settings:index.number_of_shards: 3index.number_of_replicas: 1[root@filebeat ~]# systemctl restart rsyslog.service
[root@filebeat ~]# systemctl restart filebeat.service- web-02配置filebeat
[root@filebeat ~]# vim /etc/rsyslog.conf
.....
$ModLoad imudp
$UDPServerRun 514
.....
*.* /var/log/all.log
.....[root@filebeat-02 ~]# vim /etc/filebeat/filebeat.yml
filebeat.inputs:
- type: logenabled: truepaths:- /var/log/all.loginclude_lines: ['^ERR', '^WARN', 'sshd']output.elasticsearch:hosts: ["10.0.0.21:9200","10.0.0.22:9200","10.0.0.23:9200"]enable: trueindex: "system-%{[agent.version]}-%{+yyyy.MM.dd}"setup.ilm.enabled: false
setup.template.name: "system"
setup.template.pattern: "system-*"
setup.template.settings:index.number_of_shards: 3index.number_of_replicas: 1[root@filebeat-02 ~]# systemctl restart rsyslog.service
[root@filebeat-02 ~]# systemctl restart filebeat.service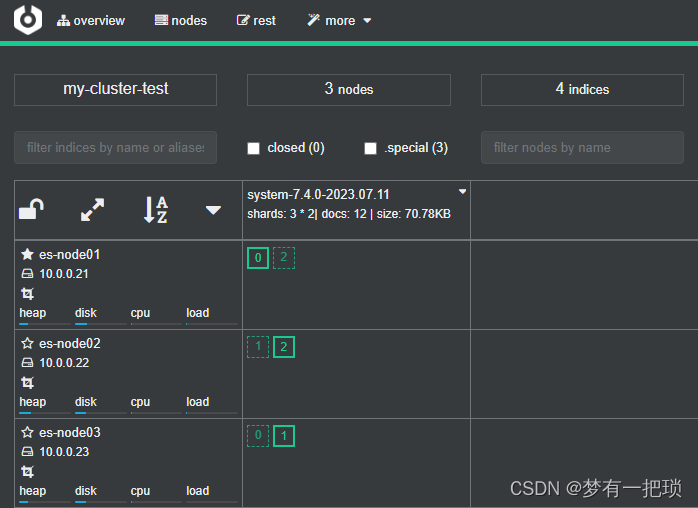

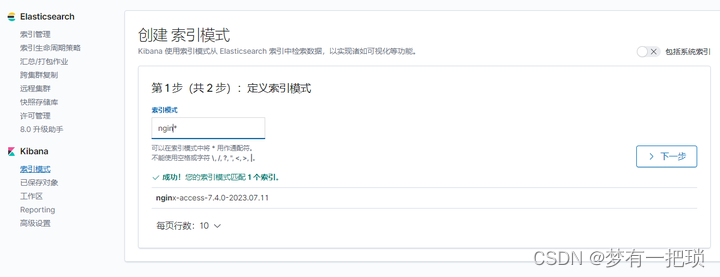
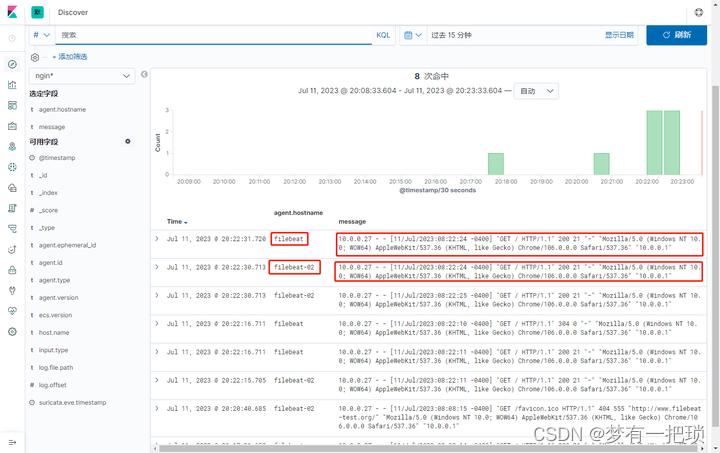
【8】filebeat-收集nginx日志
- 获取用户细信息:来源IP、地域、网站PV、UV、状态码、访问时间等
| lb-server | 10.0.0.27 |
| web-01 | 10.0.0.25 |
| web-02 | 10.0.0.26 |
- lb-server
[root@lb-server-01 ~]# vim /etc/nginx/conf.d/filebeat-test.conf
upstream file {server 10.0.0.25;server 10.0.0.26;
}
server {listen 80;server_name www.filebeat-test.org;location / {proxy_pass http://file;include proxy_params;}
}[root@lb-server-01 ~]# vim /etc/nginx/proxy_params
proxy_set_header Host $http_host;
proxy_set_header X-Forwarded-For $proxy_add_x_forwarded_for;
proxy_http_version 1.1;
proxy_connect_timeout 60s;      # nginx连接后端的超时时间
proxy_read_timeout 60s;         # 响应头部超时时间
proxy_send_timeout 60s;         # 响应数据主体的超时时间
proxy_buffering on;             # 开启缓冲区
proxy_buffer_size 8k;           # 缓冲区Header大小
proxy_buffers 4 64k; # 缓冲区数量 * 大小 = 最大接收[root@lb-server-01 ~]# systemctl reload nginx- web-01和web-02配置相同
[root@filebeat conf.d]# vim /etc/nginx/conf.d/filebeat-test.conf
server {listen 80;server_name www.filebeat-test.org;root /code/filebeat;location / {index index.html;}
}[root@filebeat conf.d]# mkdir -p /code/filebeat
[root@filebeat conf.d]# echo "filebeat-test-web-01" >> /code/filebeat/index.html
[root@filebeat-02 conf.d]# echo "filebeat-test-web-02" >> /code/filebeat/index.html
[root@filebeat conf.d]# systemctl reload nginx.service
- web-01、web-02 配置filebeat
[root@filebeat conf.d]# vim /etc/filebeat/nginx-filebeat-access.yml
filebeat.inputs:
- type: logenabled: truepaths:- /var/log/nginx/access.logoutput.elasticsearch:hosts: ["10.0.0.21:9200","10.0.0.22:9200","10.0.0.23:9200"]enable: trueindex: "nginx-access-%{[agent.version]}-%{+yyyy.MM.dd}"setup.ilm.enabled: false
setup.template.name: "nginx"
setup.template.pattern: "nginx-*"[root@filebeat conf.d]# filebeat -e -c /etc/filebeat/nginx-filebeat-access.yml &>/dev/null &
[1] 13738- 验证

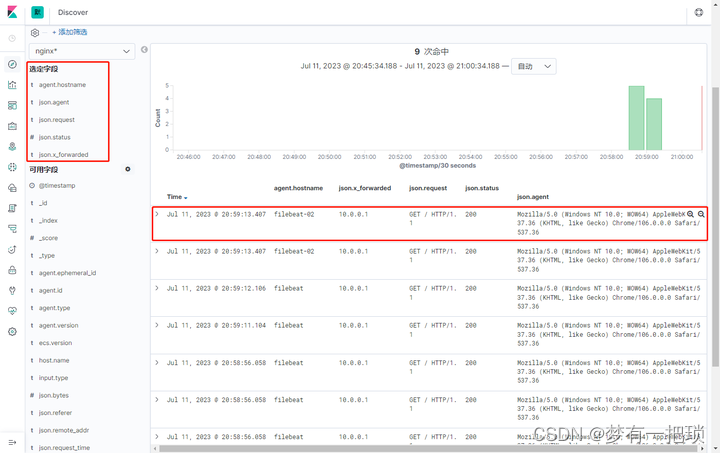
- 我们看到在message字段中,记录的信息非常的多,不适合我们之后的统计,那么怎么做呢
方式一、修改nginx的日志格式 json 方式二、filebeat —> logstash
【9】修改nginx的日志格式
[root@filebeat ~]# vim /etc/nginx/nginx.conf
............
............log_format json '{ "time_local": "$time_local", ''"remote_addr": "$remote_addr", ''"referer": "$http_referer", ''"request": "$request", ''"status": $status, ''"bytes": $body_bytes_sent, ''"agent": "$http_user_agent", ''"x_forwarded": "$http_x_forwarded_for", ''"up_addr": "$upstream_addr", ''"up_host": "$upstream_http_host", ''"upstream_time": "$upstream_response_time", ''"request_time": "$request_time"''}'
...........access_log  /var/log/nginx/access-json.log  json;[root@filebeat ~]# systemctl reload nginx.service
[root@filebeat ~]# tailf /var/log/nginx/access-json.log
{ "time_local": "11/Jul/2023:08:44:55 -0400", "remote_addr": "10.0.0.27", "referer": "-", "request": "GET / HTTP/1.1", "status": 200, "bytes": 21, "agent": "Mozilla/5.0 (Windows NT 10.0; WOW64) AppleWebKit/537.36 (KHTML, like Gecko) Chrome/106.0.0.0 Safari/537.36", "x_forwarded": "10.0.0.1", "up_addr": "-", "up_host": "-", "upstream_time": "-", "request_time": "0.000"}access_log/var/log/nginx/access.logmain## 收集日志改为access-json.log
[root@filebeat ~]# vim /etc/filebeat/nginx-filebeat-access.yml
filebeat.inputs:
- type: logenabled: truepaths:- /var/log/nginx/access-json.logjson_keys_under_root: true    # false表示将json解析的内容存储在message字段,true表示不存储在message字段中json.overwrite_keys: true     # 覆盖message字段,使用自定义json的keyoutput.elasticsearch:hosts: ["10.0.0.21:9200","10.0.0.22:9200","10.0.0.23:9200"]enable: trueindex: "nginx-access-%{[agent.version]}-%{+yyyy.MM.dd}"setup.ilm.enabled: false
setup.template.name: "nginx"
setup.template.pattern: "nginx-*"[root@filebeat ~]# kill 13738
[root@filebeat ~]# filebeat -e -c /etc/filebeat/nginx-filebeat-access.yml &>/dev/null &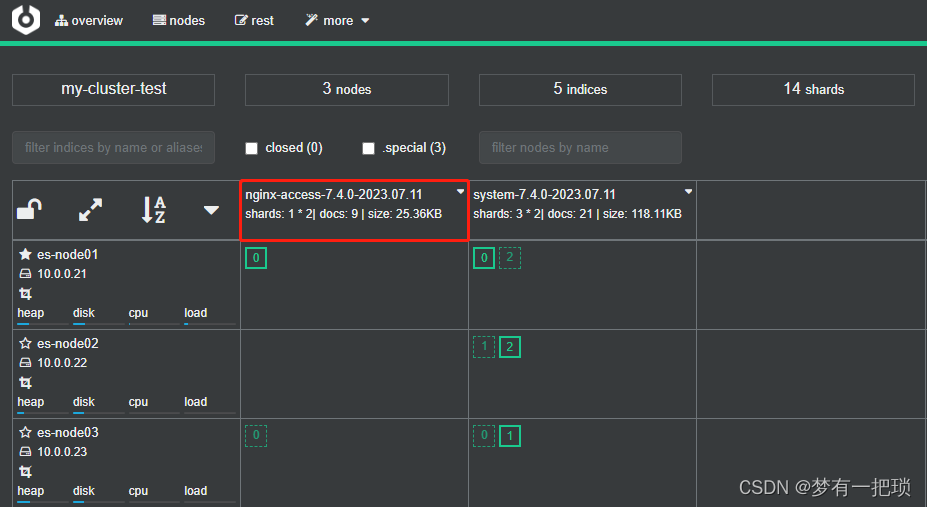
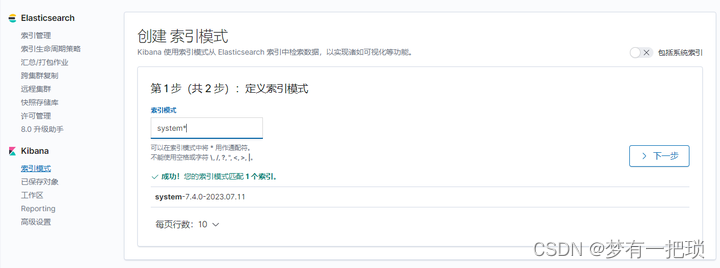
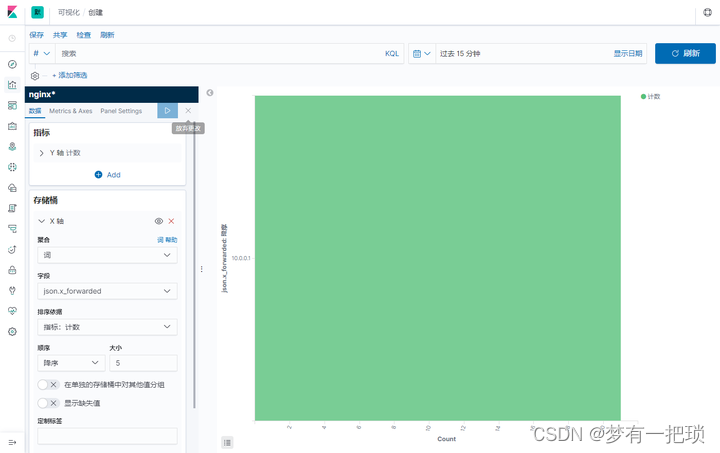
【10】图形化展示

【11】filebeat-收集nginx的访问日志+错误日志
[root@filebeat ~]# vim /etc/filebeat/nginx-filebeat-access-error.yml
filebeat.inputs:
- type: logenabled: truepaths:- /var/log/nginx/access-json.logjson_keys_under_root: truejson.overwrite_keys: truetags: ["nginx-access"]- type: logenabled: truepaths:- /var/log/nginx/error.logtags: ["nginx-error"]output.elasticsearch:hosts: ["10.0.0.21:9200","10.0.0.22:9200","10.0.0.23:9200"]enable: trueindices:- index: "nginx-access-%{[agent.version]}-%{+yyyy.MM.dd}"when.contains:tags: "nginx-access"- index: "nginx-error-%{[agent.version]}-%{+yyyy.MM.dd}"when.contains:tags: "nginx-error"setup.ilm.enabled: false
setup.template.name: "nginx"
setup.template.pattern: "nginx-*"[root@filebeat ~]# filebeat -e -c /etc/filebeat/nginx-filebeat-access-error.yml &>/dev/null &

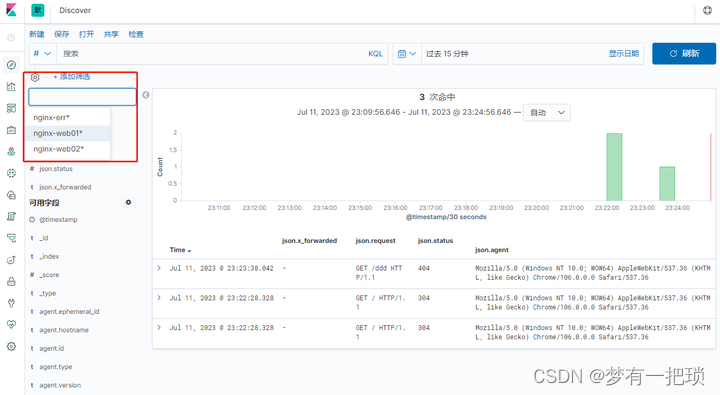
【12】filebeat收集nginx多虚拟主机日志
[root@filebeat filebeat]# vim /etc/nginx/conf.d/filebeat-test-01.conf
server {listen 80;server_name www.filebeat-test-01.org;root /code/filebeat-01;access_log /var/log/nginx/access-test-01.log json;location / {index index.html;}
}[root@filebeat ~]# vim /etc/nginx/conf.d/filebeat-test-02.conf
server {listen 80;server_name www.filebeat-test-02.org;root /code/filebeat-02;access_log /var/log/nginx/access-test-02.log json;location / {index index.html;}
}[root@filebeat filebeat]# mkdir /code/filebeat-01
[root@filebeat filebeat]# echo "www.filebeat-01-web01" >> /code/filebeat-01/index.html[root@filebeat ~]# mkdir /code/filebeat-02
[root@filebeat ~]# echo "www.filebeat-02-web01" >> /code/filebeat-02/index.html
[root@filebeat ~]# systemctl reload nginx.service- 配置filebeat
[root@filebeat ~]# cat /etc/filebeat/filebeat.yml
filebeat.inputs:
- type: logenabled: truepaths:- /var/log/nginx/access-test-01.logjson_keys_under_root: truejson.overwrite_keys: truetags: ["nginx-web01"]- type: logenabled: truepaths:- /var/log/nginx/access-test-02.logjson_keys_under_root: truejson.overwrite_keys: truetags: ["nginx-web02"]- type: logenabled: truepaths:- /var/log/nginx/error.logtags: ["nginx-error"]output.elasticsearch:hosts: ["10.0.0.21:9200","10.0.0.22:9200","10.0.0.23:9200"]enable: trueindices:- index: "nginx-web01-%{[agent.version]}-%{+yyyy.MM.dd}"when.contains:tags: "nginx-web01"- index: "nginx-web02-%{[agent.version]}-%{+yyyy.MM.dd}"when.contains:tags: "nginx-web02"- index: "nginx-error-%{[agent.version]}-%{+yyyy.MM.dd}"when.contains:tags: "nginx-error"setup.ilm.enabled: false
setup.template.name: "nginx"
setup.template.pattern: "nginx-*"[root@filebeat filebeat]# systemctl restart filebeat.service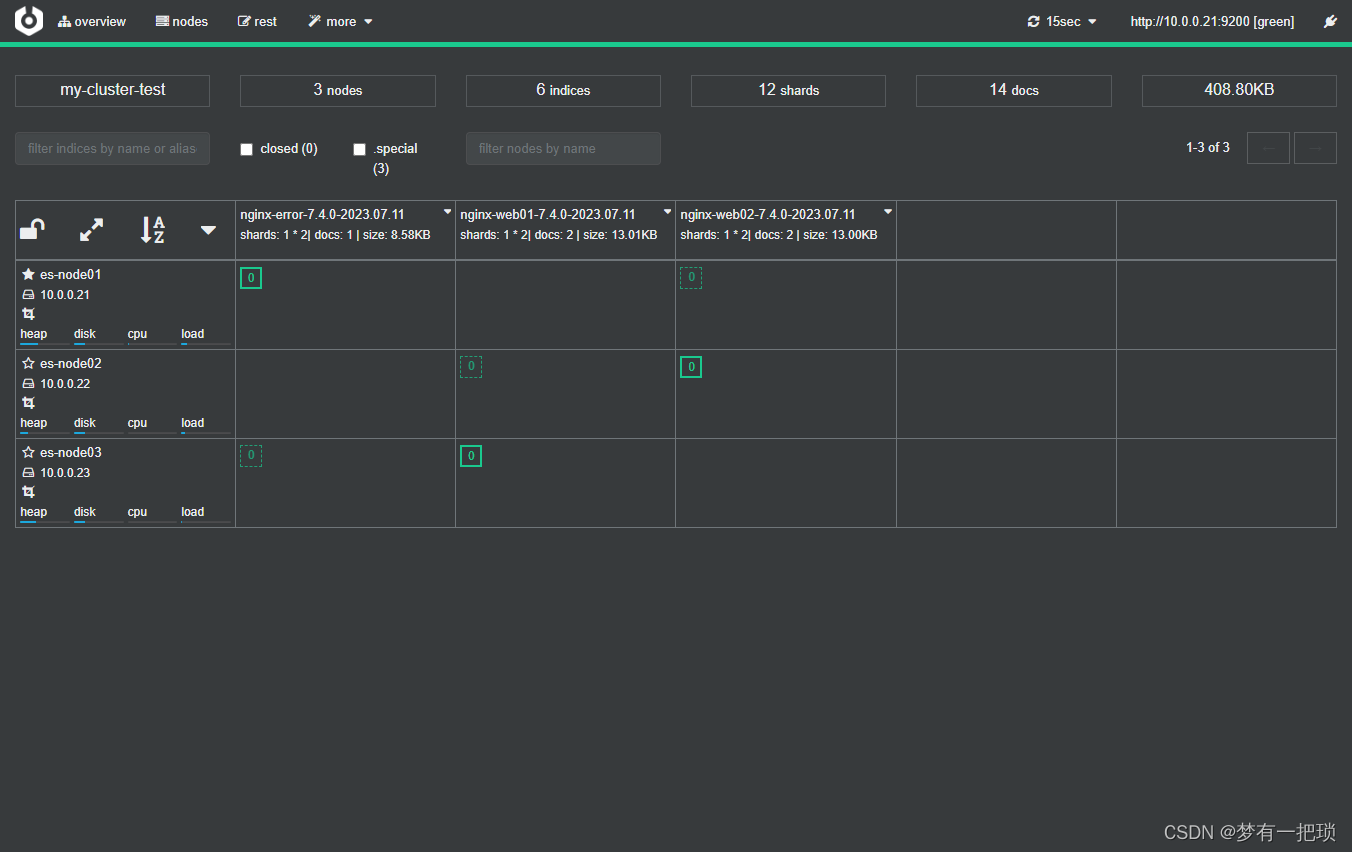
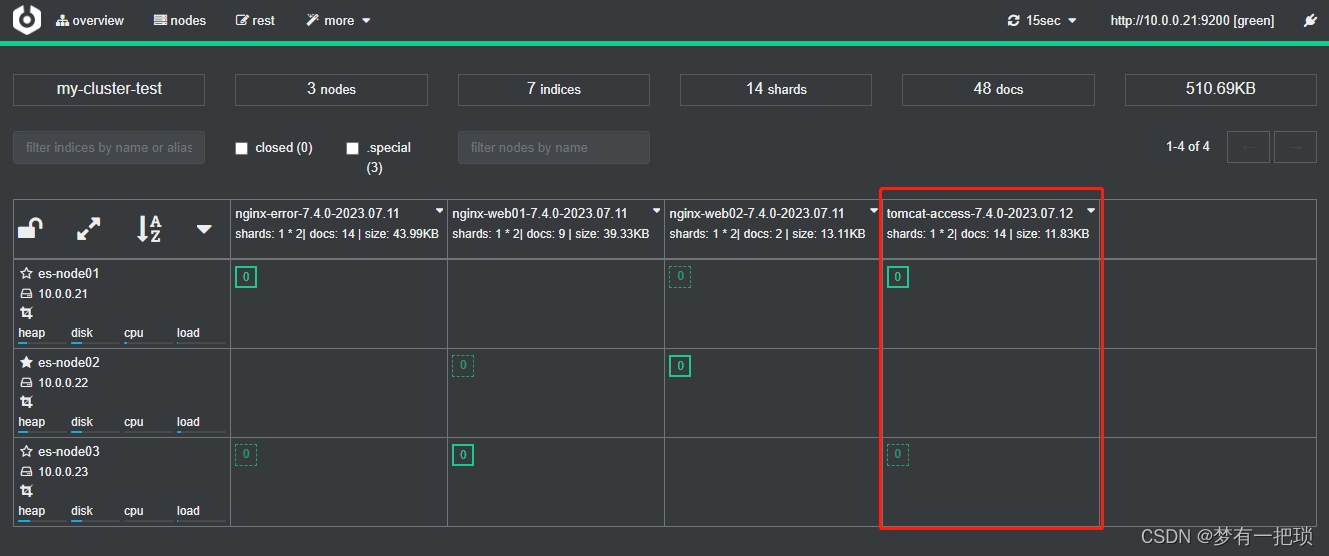
【13】收集tomcat日志
- 修改tomcat的日志格式
<Host name="www.file-tomcat.org" appBase="webapps"unpackWARs="true" autoDeploy="true"><Valve className="org.apache.catalina.valves.AccessLogValve" directory="logs"prefix="file-tomcat_access_log." suffix=".txt"pattern="{"clientip":"%h",ClientUser":"%l","authenticated":"%u","AccessTime":"%t","method":"%r","status":"%s","SendBytes":"%b","Query?string":"%q","parner":"%{Referer}i","AgentVersion":"%{User-Agent}i"}" /></Host>- 启动tomcat,验证日志格式
[root@filebeat soft]# systemctl restart tomcat.service
[root@filebeat soft]# tailf /soft/tomcat/logs/file-tomcat_access_log..2023-07-12.txt
{"clientip":"10.0.0.1",ClientUser":"-","authenticated":"-","AccessTime":"[12/Jul/2023:03:26:54 -0400]","method":"GET / HTTP/1.1","status":"200","SendBytes":"11156","Query?string":"","parner":"-","AgentVersion":"Mozilla/5.0 (Windows NT 10.0; WOW64) AppleWebKit/537.36 (KHTML, like Gecko) Chrome/106.0.0.0 Safari/537.36"}- 配置filebeat
[root@filebeat filebeat]# vim filebeat.yml
filebeat.inputs:
- type: logenabled: truepaths:- /soft/tomcat/logs/file-tomcat_access_log.*.txtjson_keys_under_root: truejson.overwrite_keys: truetags: ["tomcat-access"]output.elasticsearch:hosts: ["10.0.0.21:9200","10.0.0.22:9200","10.0.0.23:9200"]enable: trueindices:- index: "tomcat-access-%{[agent.version]}-%{+yyyy.MM.dd}"when.contains:tags: "tomcat-access"setup.ilm.enabled: false
setup.template.name: "tomcat"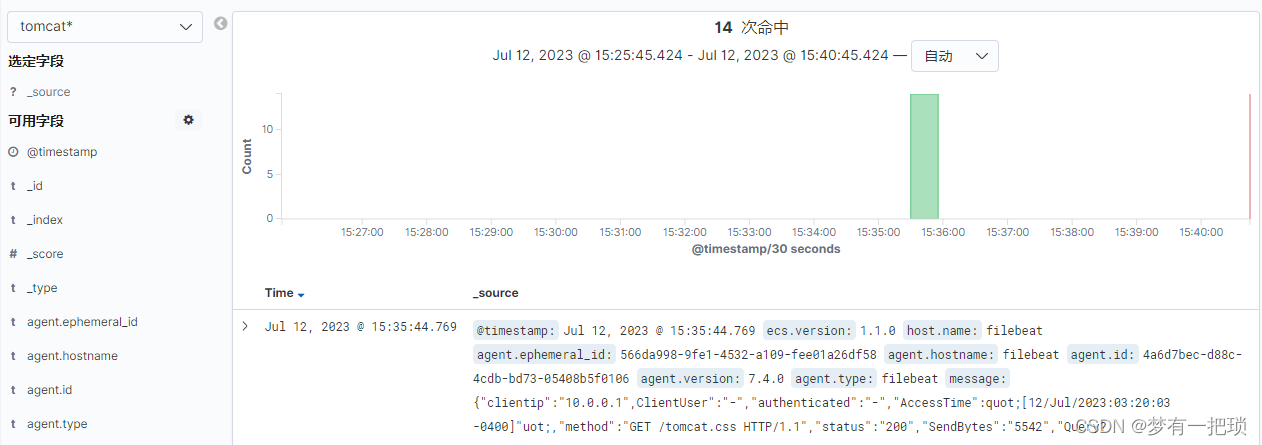
setup.template.pattern: "tomcat-*"[root@filebeat filebeat]# systemctl restart filebeat.service- 验证
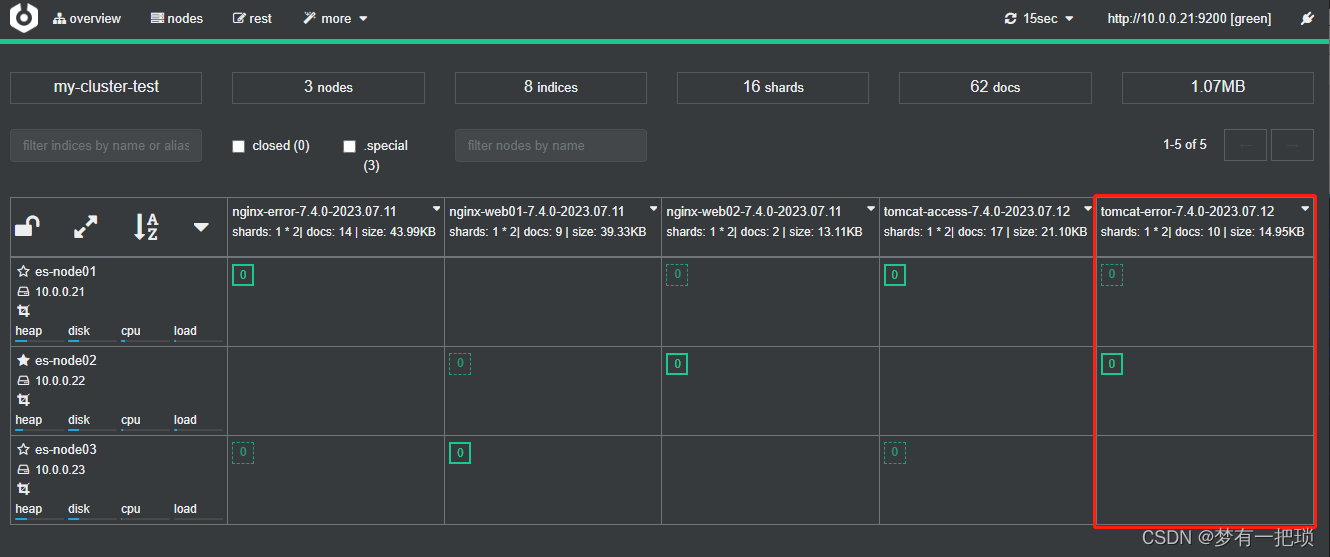
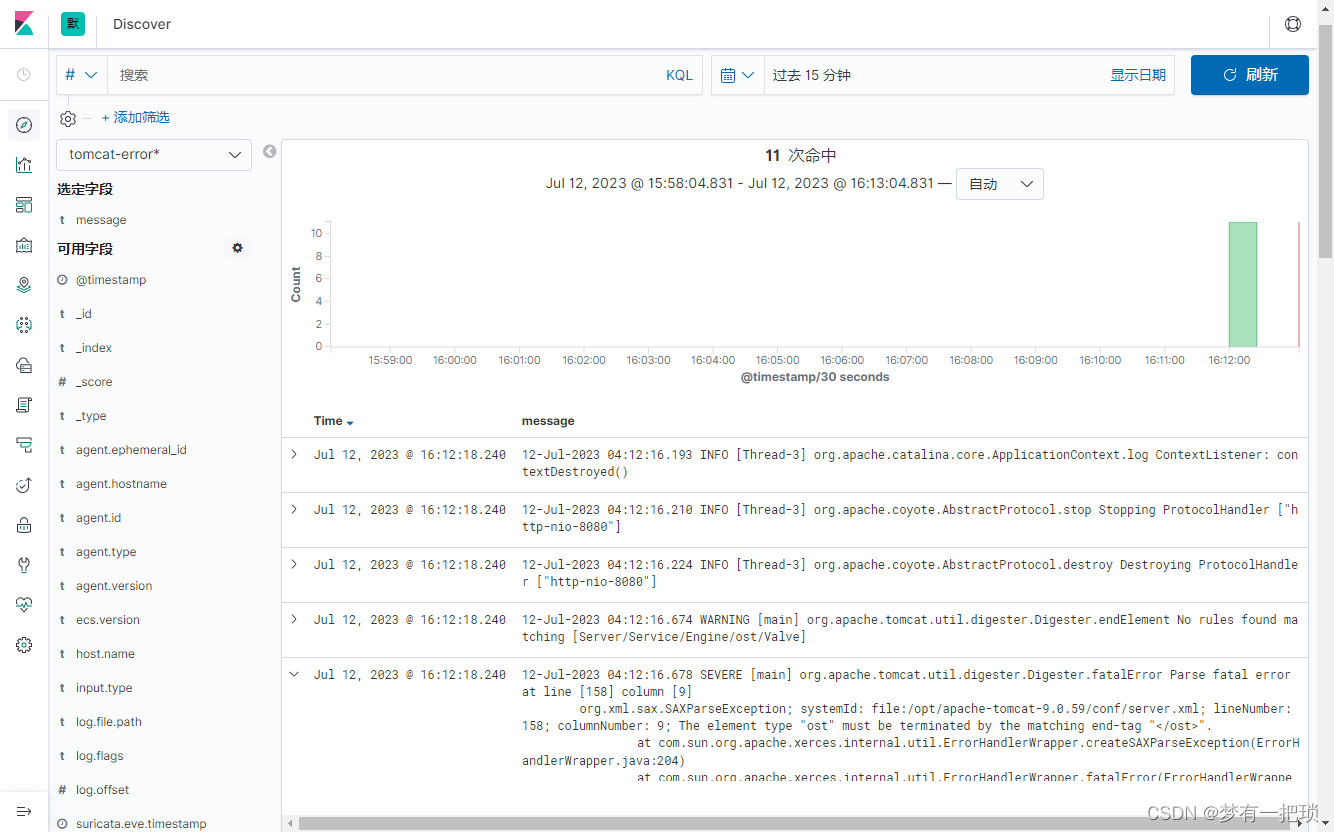
【14】filebeat-收集tomcat错误日志
[root@filebeat filebeat]# vim filebeat.yml
filebeat.inputs:
- type: logenabled: truepaths:- /soft/tomcat/logs/file-tomcat_access_log.*.txtjson_keys_under_root: truejson.overwrite_keys: truetags: ["tomcat-access"]- type: logenabled: truepaths:- /soft/tomcat/logs/catalina.outmultiline.pattern: '^\d{2}'multiline.negate: truemultiline.match: aftermultiline.max_lines: 1000tags: ["tomcat-error"]output.elasticsearch:hosts: ["10.0.0.21:9200","10.0.0.22:9200","10.0.0.23:9200"]enable: trueindices:- index: "tomcat-access-%{[agent.version]}-%{+yyyy.MM.dd}"when.contains:tags: "tomcat-access"- index: "tomcat-error-%{[agent.version]}-%{+yyyy.MM.dd}"when.contains:tags: "tomcat-error"setup.ilm.enabled: false
setup.template.name: "tomcat"
setup.template.pattern: "tomcat-*"[root@filebeat filebeat]# systemctl restart filebeat.service- 验证