SpringBoot基础篇
入门案例
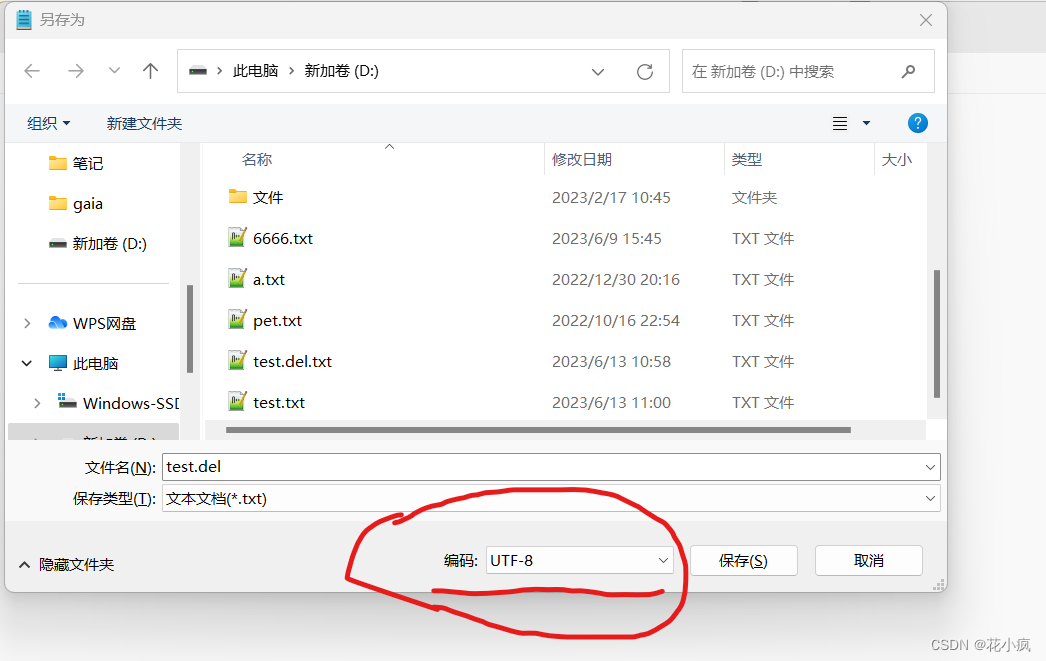
在创建SpringBoot项目时,会出现以下不需要的文件,如果每次都手动删除的话,就会很麻烦。
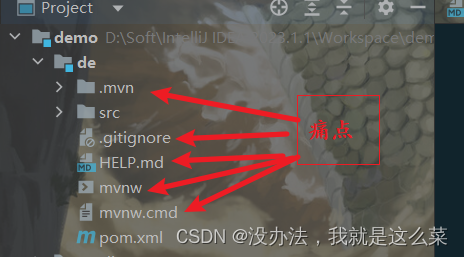
教你一招
在setting设置中找到Editor,选择File Types–>Ignored Files and Folders–>点击+号,输入要隐藏的文件/文件夹
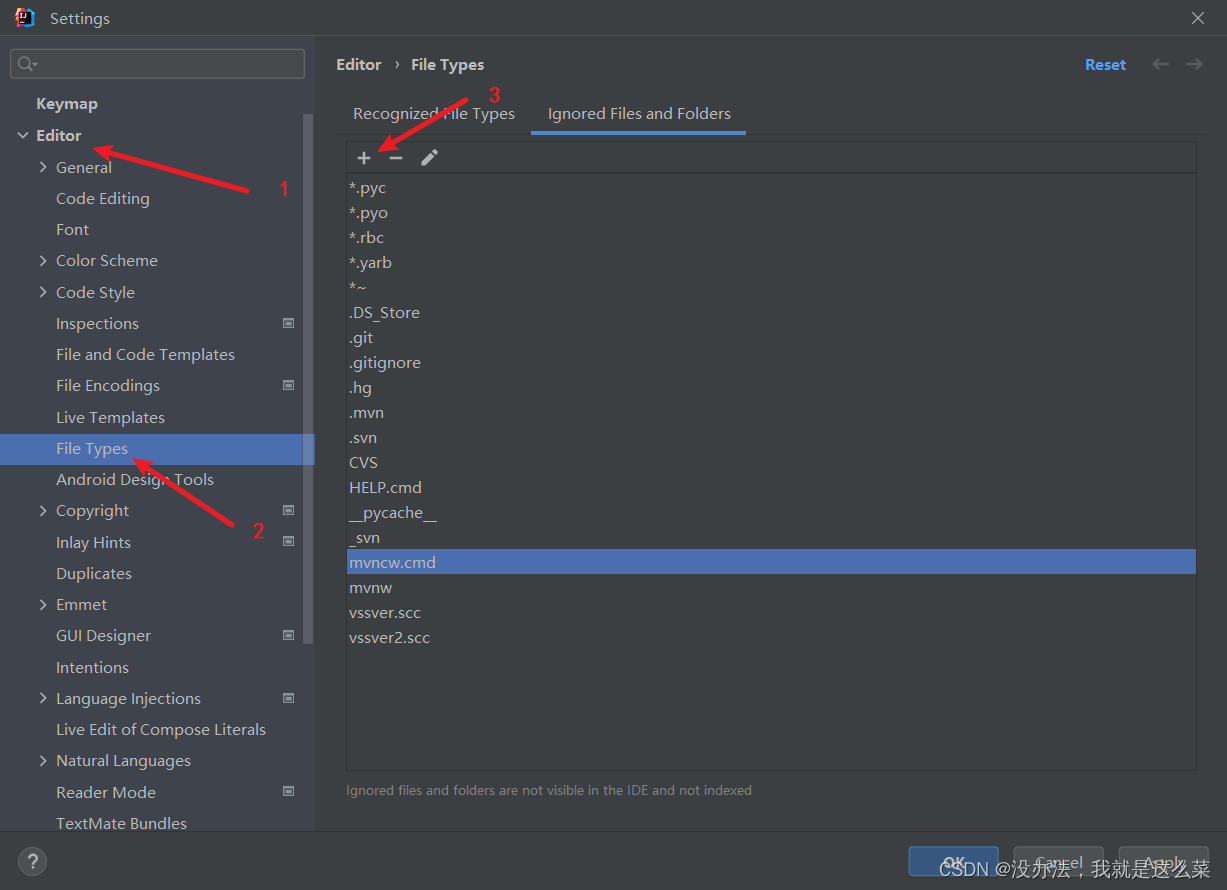
这样以后每次创建SpringBoot项目时,其他文件就不会再出现
快速上手SpringBoot
SpringBoot简介
- SpringBoot是由Pivotal团队提供的全新框架,其设计目的是用来
简化Spring应用的初始搭建以及开发过程- Spring程序缺点
- 依赖设置繁琐
- 配置繁琐
- SpringBoot程序优点
- 起步依赖(简化依赖配置)
- 自动配置(简化常用工程相关配置)
- 辅助功能(内置服务器)
- Spring程序缺点
依赖解析(解决配置问题)
-
starter
- SpringBoot中常见项目名称,定义了当前项目使用的所有坐标,以达到减少依赖配置的目的
-
parent
- 所有SpringBoot项目要继承的项目,定义了若干个坐标版本号(依赖管理,而非依赖),以达到减少依赖冲突的目的
- spring-boot-starter-parent各版本间存在诸多坐标版本不同
-
实际开发
- 使用任意坐标时,仅书写GAV中的G和A,v由SpringBoot提供,除非SpringBoot未提供对应版本v
- 如发生坐标错误,再指定Version(小心版本冲突)
说明:
- GAV
- groupId:定义当前maven组织的项目名称
- artifactId:定义实际项目名称
- version:定义当前项目的当前版本
引导类
启动方式
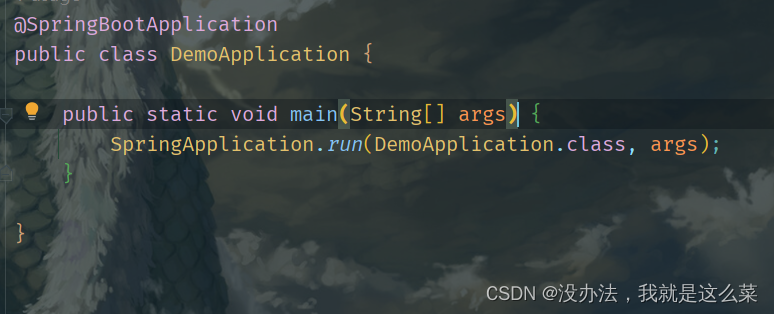
- SpringBoot的引导类是Boot工程的执行入口,运行main方法就可以启动项目
- SpringBoot工程运行后初始化Spring容器,扫描引导类所在包加载bean
内嵌tomcat
使用maven依赖管理变更起步依赖项
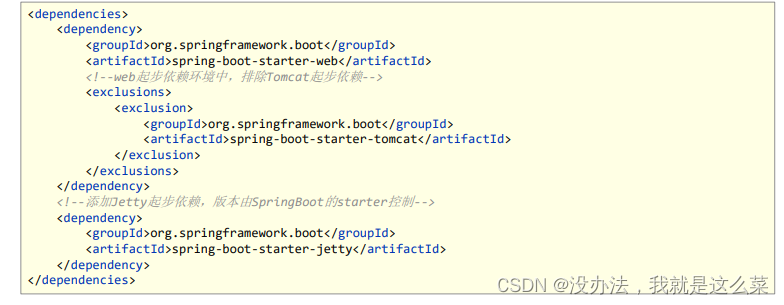
Jetty比tomcat更轻量级,可扩展性更强(相较于Tomcat),谷歌应用引擎(GAE)已经全面切换为Jetty
内置服务器
- Tomcat(默认):apache出品,粉丝多,应用面广,负载了若干较重的组件
- jetty:更轻量级,负载性能远不及tomcat
- undertow:undertow,负载性能勉强跑赢tomcat
REST开发
REST(Representational State Transfer),表现形式状态转换
- 传统风格资源描述形式
- http://localhost/user/getById?id=1
- http://localhost/user/saveUser
- REST风格描述形式
- http://localhost/user/1
- http://localhost/user
优点:
- 隐藏资源的访问行为,无法通过地址得知对资源是何种操作
- 书写简化
REST风格简介
按照REST风格访问资源时使用行为动作区分对资源进行了何种操作
- http://localhost/users:查询全部用户信息 GET(查询)
- http://localhost/users/1:查询指定用户信息 GET(查询)
- http://localhost/users:添加用户信息 POST(新增/保存)
- http://localhost/users:修改用户信息 PUT(修改/更新)
- http://localhost/users/1:删除用户信息 DELETE(删除)
注意事项:
上述行为是约定方式,约定不是规范,可以打破,所以称REST风格,而不是REST规范
描述模块的名称通常使用复数,也就是加s的格式描述,表示此类资源,而非单个资源,例如:users、books、accounts…
REST入门案例
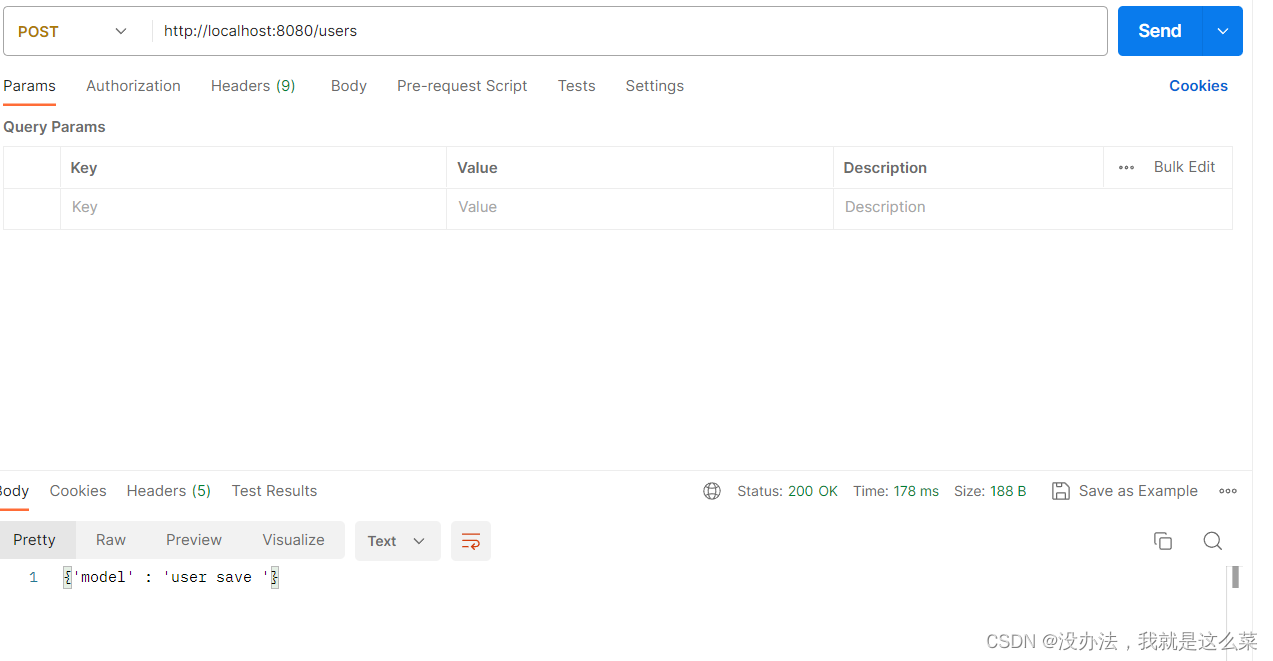
POST请求:
@Controller
public class UserController {@PostMapping("/users")// @RequestMapping(value = "/users", method = Request.POST)@ResponseBodypublic String save() {System.out.println("user save ...");return "{'model' : 'user save '}";}
}
效果:
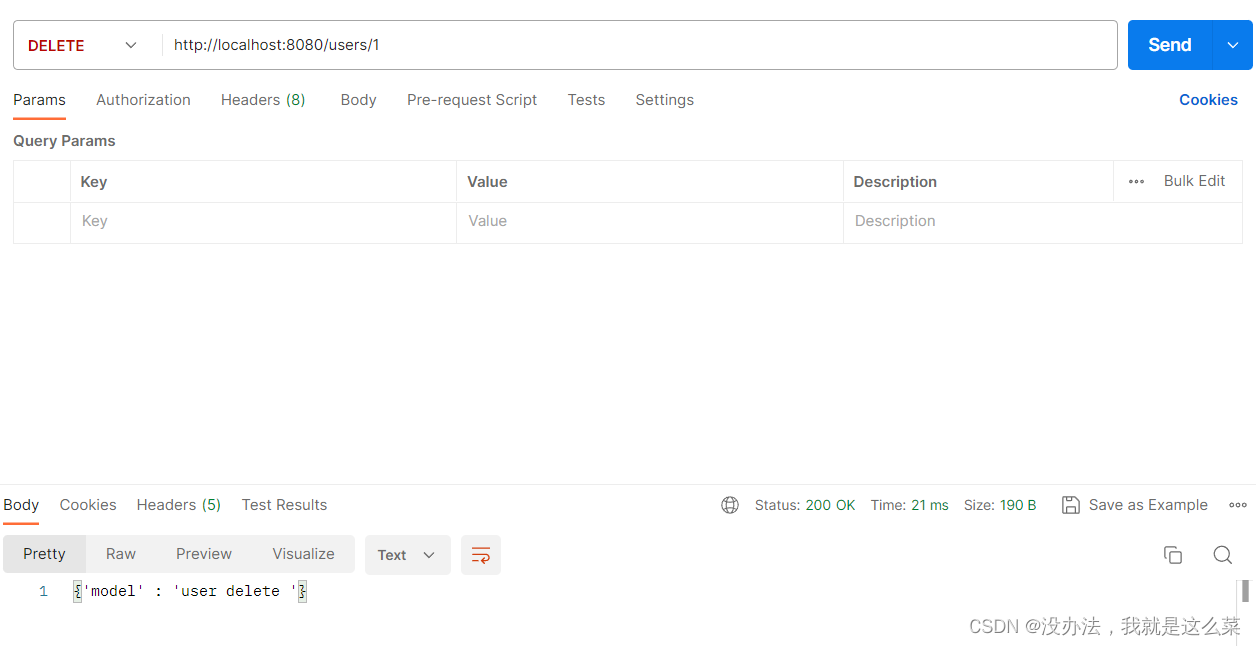
DELET请求:
@DeleteMapping("/users/{id}")// @RequestMapping(value = "/users/{id}", method = RequestMethod.DELETE)@ResponseBodypublic String delete(@PathVariable Integer id){System.out.println("users delete 。。。" + id);return "{'model' : 'user delete '}";}
效果:
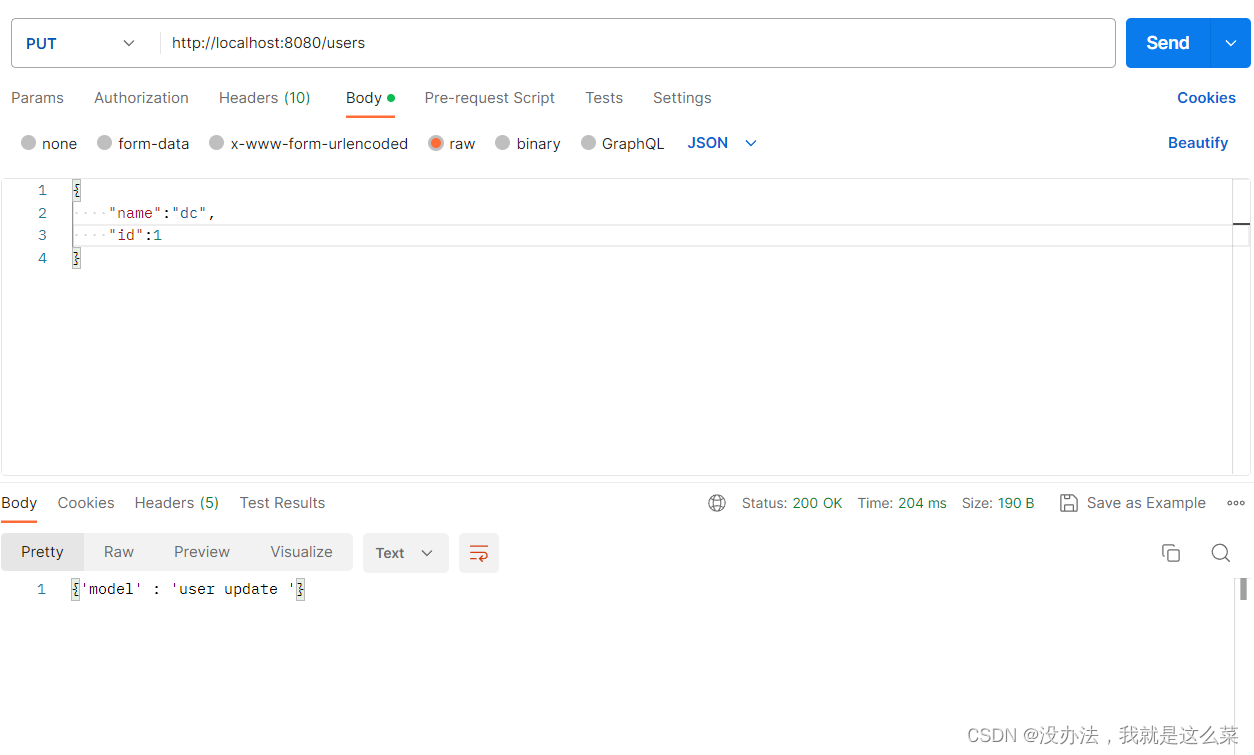
PUT请求:
@PutMapping("/users")// @RequestMapping(value = "/users", method = RequestMethod.PUT)@ResponseBodypublic String update(@RequestBody User user) {System.out.println("users update 。。。" + user);return "{'model' : 'user update '}";}
效果:
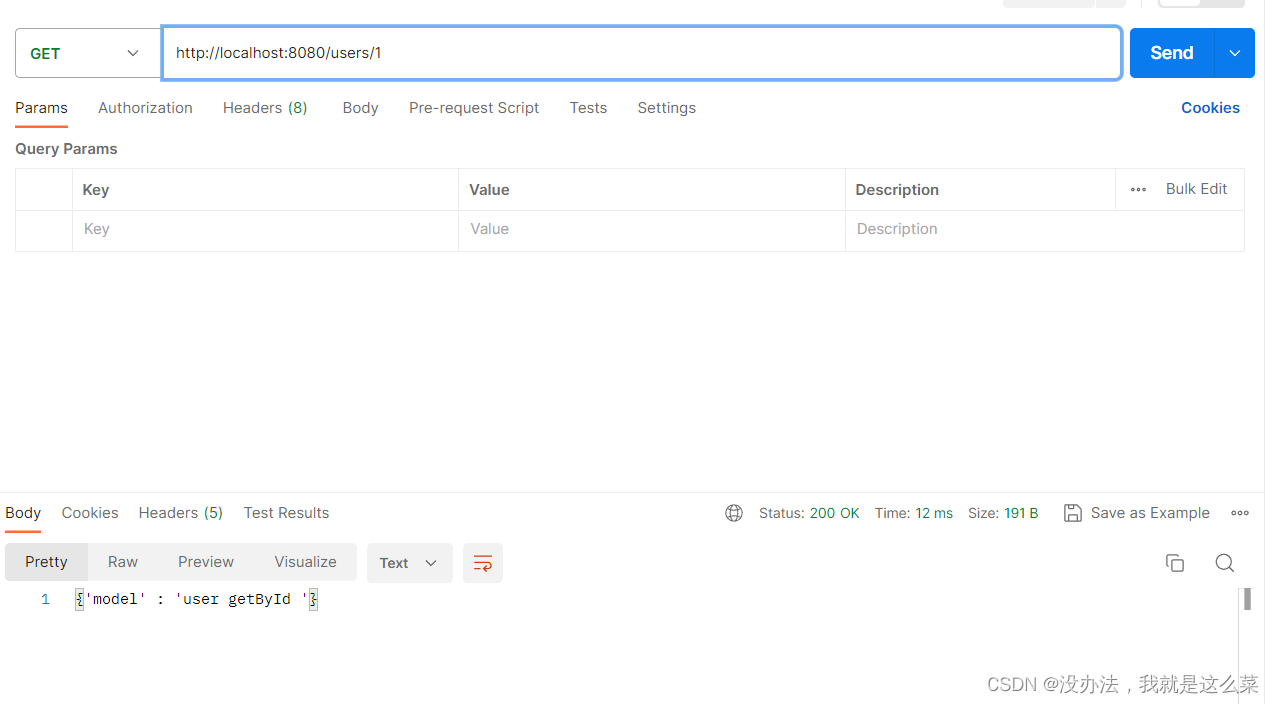
GET请求(单个):
@GetMapping("/users/{id}")// @RequestMapping(value = "/users/{id}", method = RequestMethod.GET)@ResponseBodypublic String getById(@PathVariable Integer id) {System.out.println("users getById 。。。" + id);return "{'model' : 'user getById '}";}
效果:
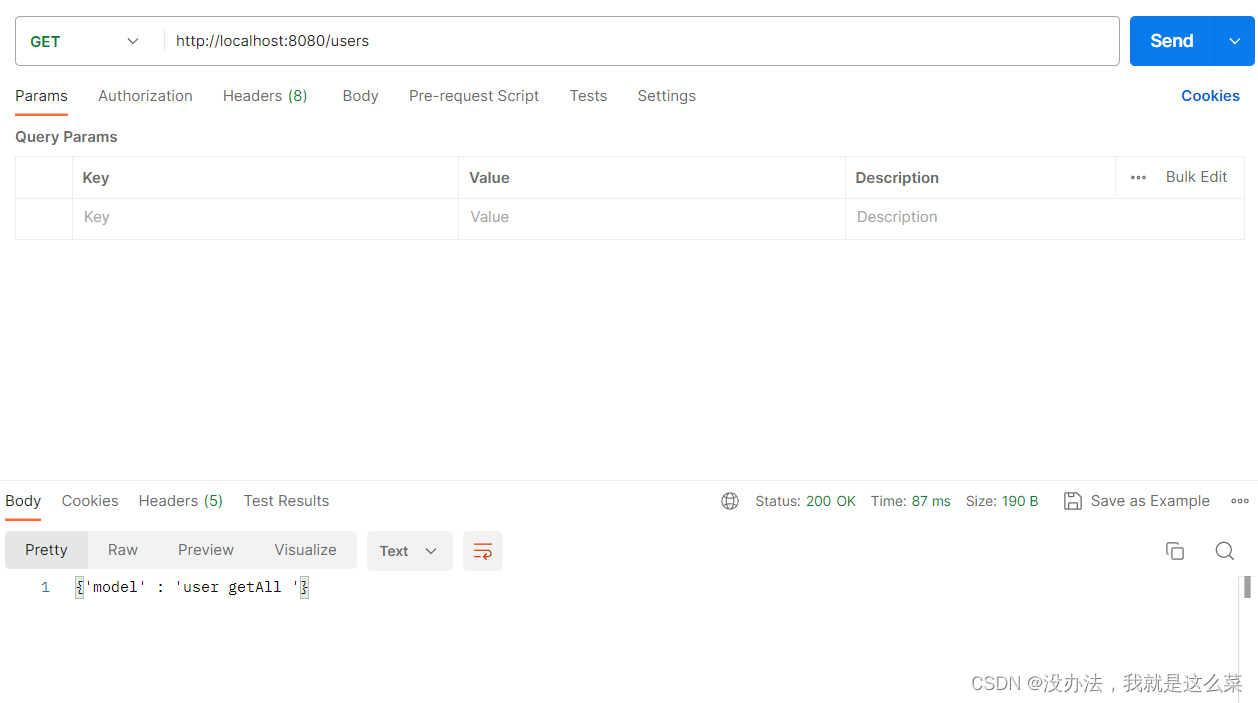
GET请求(全部):
ResponseBodypublic String getAll() {System.out.println("users getAll 。。。");return "{'model' : 'user getAll '}";}
效果:
步骤
- 设定http请求动作(POST、GET…)
- 设定请求参数(路径变量 如:/users/{id})
注解介绍
@RequestMapping
类型:方法注解
位置:SpringMVC控制器方法定义上方
作用:设置当前控制器方法请求访问路径
属性:value(默认):请求访问路径
method:http请求动作,标准动作(GET/POST/PUT/DELETE)
@PathVariable
类型:形参注解
位置:SpringMVC控制器方法形参定义前面
作用:绑定路径参数与处理器方法形参间的关系,要求路径参数名与形参名一一对应
@RequestBody、@RequestPara、@PathVariable
区别:
- @RequestParam用于接收url地址传参或表单传参
- @RequestBody用于接收json数据
- @PathVariable用于接收路径参数,使用(参数名称)描述路径参数
应用:
- 后期开发中,发送请求参数超过1个小时,以json格式为主,@RequestBody应用较广
- 如果发送非json格式数据,选用@RequestParam接收请求参数
- 采用RESTful进行开发,当参数数据较少时,例如1个,可以采用@PathVariable接收请求路径变量,通常用于传输id值
@RestController
类型:类注解
位置:基于SpringMVC的RESTful开发控制器类定义上方
作用:设置当前控制器类为RESTful风格,等同于@Controller与@ResponseBody两个注解组合功能
属性:value(默认): 请求访问路径
基础配置
教你一招
- 原则
- 保留工程基础结构
- 抹掉原始工程痕迹
过程:
- 在工作空间中复制对应工程,并修改工程名称
- 删除与Idea相关配置文件,仅保留src目录与pom.xml文件
- 修改pom.xml中的artifactId与新工程/模块名相同
- 删除name标签(可选)
- 保留备份工程供后期使用
属性配置
修改服务器端口
SpringBoot默认配置文件application.properties,通过键值对配置对应属性
server.port=80
关闭运行日志图标
spring,main.banner-mode=off
设置日志相关
logging.level.root=debug
SpringBoot提供了多种属性配置方式
-
application.properties
server.port=80 -
application.yml
server:port: 81 -
application.yaml
server:port: 82
加载顺序:
properties > yml > yaml
常用的配置文件种类:
application.yml
教你一招:自动提示功能消失解决方案

yaml
YAML(YAML Ain’t Markup Language),一种数据序列化格式
优点:
- 容易阅读
- 容易与脚本语言交互
- 以数据为核心,重数据轻格式
yaml扩展名
- .yml(主流)
- .yaml
语法规则
-
大小写敏感
-
属性层级关系使用多行描述,每行结尾使用冒号结束
-
使用缩进表示层级关系,同层级左侧对齐,只允许使用空格(不允许使用tab键)
-
属性值前面添加空格(属性名与属性值之间使用冒号+空格作为分隔)
-
#表示注释
-
核心规则:数据前面要加空格与冒号隔开
-
字面值表示方式
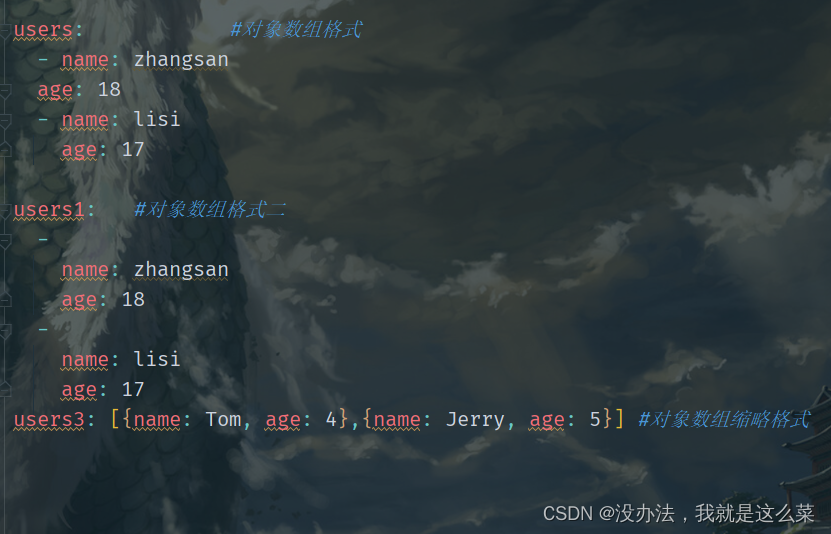
boolean: TRUE #TRUE、true、True,FALSE,false.False均可 float: 3.14 #支持科学计数法 int: 123 #支持二进制、八进制、十六进制 null: ~ #使用~表示null string: HelloWorld #字符串直接书写 string2: "Hello World" #可以使用双引号包裹特殊字符 date: 2018-02-17 #日期必须使用yyyy-MM-dd格式 datetime: 2018-02-17T15:02:31+08:00 #时间和日期之间使用T连接,最后使用+代表时区 -
数组表示方式

yaml数据读取
使用@Value读取单个数据,属性名引用方式:${一级属性名.二级属性名…}
@Value("${country}")private String country;@Value("${user2.name}")private String name1;@Value("${likes[1]}")private String like;@Value("${users[1].age}")private String age;@GetMapping("/users")// @RequestMapping(value = "/users", method = RequestMethod.GET)@ResponseBodypublic String getAll() {System.out.println("users getAll 。。。");System.out.println("country =" + country);System.out.println("user.name =" + name1);System.out.println("like =" + like);System.out.println("age =" + age);return "{'model' : 'user getAll '}";}
在配置文件中可以使用属性名引用方式引用属性
baseDir: C:\windowstempDir: ${baseDir}\emp
@Value("${tempDir}")
private String tempDir;
@GetMapping("/users")
// @RequestMapping(value = "/users", method = RequestMethod.GET)
@ResponseBody
public String getAll() {System.out.println("users getAll 。。。");System.out.println("tempDir =" + tempDir);return "{'model' : 'user getAll '}";
}
属性值中如果出现转移字符,需要使用双引号包裹
lesson: "Spring\tboot\nlesson"
@Value("${lesson}")
private String lesson;@GetMapping("/users")
// @RequestMapping(value = "/users", method = RequestMethod.GET)
@ResponseBody
public String getAll() {System.out.println("users getAll 。。。");System.out.println("lesson =" + lesson);return "{'model' : 'user getAll '}";
}
封装全部数据到Environment对象
// 使用自动装配将所有的数据封装到一个对象environment中
@Autowired
private Environment environment;
@GetMapping("/users")
// @RequestMapping(value = "/users", method = RequestMethod.GET)
@ResponseBody
public String getAll() {System.out.println("users getAll 。。。"); 			          System.out.println(environment.getProperty("users[0].name"));return "{'model' : 'user getAll '}";
}
自定义对象封装指定数据的作用
yml配置文件:
spring:datasource:driver-class-name: com.mysql.cj.jdbc.Driverurl: jdbc:mysql://localhost:3306/testusername: rootpassword: root
MyDataSource类:
@Data
@AllArgsConstructor
@NoArgsConstructor
@Component
@ConfigurationProperties(prefix = "spring.datasource")
public class MyDataSource {private String driverClassName;private String url;private String userName;private String password;
}
UserController类:
@Autowired
private MyDataSource dataSource;@GetMapping("/users")
// @RequestMapping(value = "/users", method = RequestMethod.GET)
@ResponseBody
public String getAll() {System.out.println("datasource =" + dataSource);return "{'model' : 'user getAll '}";
}
整合第三方技术
整合JUnit
@SpringBootTest
class Springboot07JunitApplicationTests {@Autowiredprivate BookService bookService;@Testpublic void testSave(){bookService.save();}
}
@SpringBootTest
类型:测试类注解
位置:测试类定义上方
作用:设置JUnit加载的SpringBoot启动类
范例:
@SpringBootTest(classes = Springboot05JUnitApplication.class)
class Springboot07JUnitApplicationTests {}
相关属性:
classes:设置SpringBoot启动类
注意事项:
如果测试类在SpringBoot启动类的包或子包中,可以省略启动类的设置,也就是省略classes的设定
整合MyBatis
- 核心配置:数据库相关信息(连什么?连谁?什么权限)
- 映射配置:SQL映射(XML/注解)
步骤:
1、在创建项目时,选择模块MyBatis Framework、MySQL Driver
2、设置数据源参数
spring:datasource:driver-class-name: com.mysql.cj.jdbc.Driverurl: jdbc:mysql://localhost:3306/testusername: rootpassword: root
注意事项:
SpringBoot版本低于2.4.3(不含),Mysql驱动版本大于8.0时,需要在url中配置时区
jdbc:mysql://localhost:3306/ssm_db?serverTimezone=UTC
或在MySQL数据库端配置时区解决问题
3、定义数据层接口与映射配置
@Mapper
public interface UserMapper {@Select("select * from stu where id = #{id}")User getById(Integer id);
}
4、测试类中注入mapper接口,测试功能
@SpringBootTest
public class MpTest {@Autowiredprivate UserMapper userMapper;@Testpublic void testGetById() {User byId = userMapper.getById(1);System.out.println(byId);}
}
整合MyBatis-Plus
MyBatis-Plus与MyBatis区别
- 导入坐标不同
- 数据层实现简化
步骤:
1、手动添加SpringBoot整合MyBatis-Plus的坐标,可以通过mvnrepository获取
<dependency><groupId>com.baomidou</groupId><artifactId>mybatis-plus-boot-starter</artifactId><version>3.1.1</version>
</dependency>
注意事项:
由于SpringBoot中未收录MyBatis-Plus的坐标版本,需要指定对应的version
2、定义数据层接口与映射配置,继承BaseMapper
@Mapper
public interface UserMapper extends BaseMapper<User> {
}
3、在User实体类中添加注解@TableName()
@Data
@AllArgsConstructor
@NoArgsConstructor
@TableName("stu")
public class User {private Integer id;private String name;private Integer age;
}
4、测试
@SpringBootTest
public class MpTest {@Autowiredprivate UserMapper userMapper;@Testpublic void testGetById() {User byId = userMapper.selectById(1);System.out.println(byId);}
}
整合Druid
导入依赖
<dependency><groupId>com.alibaba</groupId><artifactId>druid-spring-boot-starter</artifactId><version>1.2.8</version>
</dependency>
指定数据源类型
spring:datasource:driver-class-name: com.mysql.cj.jdbc.Driverurl: jdbc:mysql://localhost:3306/testusername: rootpassword: roottype: com.alibaba.druid.pool.DruidDataSource
或
spring:datasource:druid:driver-class-name: com.mysql.cj.jdbc.Driverurl: jdbc:mysql://localhost:3306/testusername: rootpassword: root
SSMP整合案例
实体类开发
导入lombok(一个Java类库,提供了一组注解,简化了POJO实体类开发,版本由SpringBoot提供)
<dependency><groupId>org.projectlombok</groupId><artifactId>lombok</artifactId><optional>true</optional>
</dependency>
实体类:
@Data
@AllArgsConstructor
@NoArgsConstructor
@TableName("stu")
public class User {private Integer id;private String name;private Integer age;
}
数据层开发
技术实现方案:
- MyBatisPlus
- Druid
导入MyBatisPlus与Druid对应的starter
<dependency><groupId>com.alibaba</groupId><artifactId>druid-spring-boot-starter</artifactId><version>1.2.8</version>
</dependency>
<dependency><groupId>com.baomidou</groupId><artifactId>mybatis-plus-boot-starter</artifactId><version>3.1.1</version>
</dependency>
配置数据源与MyBatisPlus对应的基础配置(id生成策略使用数据库自增策略)
spring:datasource:druid:driver-class-name: com.mysql.cj.jdbc.Driverurl: jdbc:mysql://localhost:3306/testusername: rootpassword: root
#    type: com.alibaba.druid.pool.DruidDataSourcemybatis-plus:global-config:db-config:id-type: auto
继承BaseMapper并指定泛型
@Mapper
public interface UserMapper extends BaseMapper<User> {
}
制作测试类测试结果
@Slf4j
@SpringBootTest
public class MpTest {@Autowiredprivate UserMapper userMapper;@Testpublic void testSave() {User user = new User();user.setAge(20);user.setName("张三");int insert = userMapper.insert(user);}@Testvoid testGetById(){System.out.println(userMapper.selectById(26));}
}
为了方便调试,可以开启MyBatisPlus的日志
log-impl: org.apache.ibatis.logging.stdout.StdOutImpl
数据层开发——分页功能
分页操作需要设定分页对象IPage
IPage对象中封装了分页操作中的所有数据
- 数据
- 当前页码值
- 每页数据总量
- 最大页码值
- 数据总量
分页操作是在mybatisplus的常规操作基础上增强得到的,内部是动态拼写SQL语句,因此需要增强对应的功能,使用MyBatisPlus拦截器实现
@Configuration
public class MpConfig {@Beanpublic MybatisPlusInterceptor mpInterceptor() {// 1、定义MP拦截器MybatisPlusInterceptor mybatisPlusInterceptor = new MybatisPlusInterceptor();// 2、添加具体的拦截器mybatisPlusInterceptor.addInnerInterceptor(new PaginationInnerInterceptor());return mybatisPlusInterceptor;}
}
注意:这里如果
MybatisPlusInterceptor没法导包,应该是MyBatisPlus中版本号太低,换成3.4.3.1即可
测试:
@Test
void testGetPage() {IPage page = new Page(1, 5);IPage iPage = userMapper.selectPage(page, null);System.out.println(iPage);
}
条件查询功能
使用QueryWrapper对象封装查询条件,推荐使用LambdaQueryWrapper对象,所有查询操作封装成方法调用
@Test
void testGetByCondition() {IPage page = new Page(1, 10);LambdaQueryWrapper<User> lqw = new LambdaQueryWrapper<>();lqw.like(User::getName, "张三");IPage iPage = userMapper.selectPage(page, lqw);System.out.println(iPage);
}
@Test
void testGetByCondition1() {QueryWrapper<User> qw = new QueryWrapper<>();qw.like("name", "张三");List<User> users = userMapper.selectList(qw);for (User user : users) {System.out.println(user);}
}
支持动态拼写查询条件
@Test
void testGetByCondition2() {String name = "张三";IPage page = new Page(1, 10);LambdaQueryWrapper<User> lqw = new LambdaQueryWrapper<>();lqw.like(Strings.isNotEmpty(name), User::getName, "张三");IPage iPage = userMapper.selectPage(page, lqw);System.out.println(iPage);
}
注意:
like()方法中,如果Strings.isNotEmpty(name)返回是true,继续匹配后续条件,如果返回为false,后续条件不再匹配
业务层开发
Service层接口定义与数据层接口定义具有较大区别,不要混用
快速开发方案
- 使用MyBatisPlus提供有业务层调用接口(IService<T>)与业务层通用实现类(ServiceImpl<M,T>)
- 在通用类基础上做功能重载或功能追加
- 注意重载时不要覆盖原始操作,避免原始提供的功能丢失
service接口
public interface UserService extends IService<User> {public Boolean insert(User user);public Boolean modify(User user);public Boolean delete(Integer id);public User get(Integer id);
}
serviceImpl实现类
@Service
public class UserServiceImpl extends ServiceImpl<UserMapper,User> implements UserService {@Autowiredprivate UserMapper userMapper;public Boolean insert(User user) {return userMapper.insert(user) > 0;}public Boolean modify(User user) {return userMapper.updateById(user) > 0;}public Boolean delete(Integer id) {return userMapper.deleteById(id) > 0;}public User get(Integer id) {return userMapper.selectById(id);}
}
测试:
@SpringBootTest
public class TestService {@Autowiredprivate UserService userService;@Testvoid testInsert() {User byId = userService.getById(1);System.out.println(byId);}@Testvoid testUpdate(){User user = new User();user.setName("zhangsan");user.setId(1);boolean update = userService.modify(user);System.out.println(update);}
}
表现层开发
方案:
- 基于Restful进行表现层接口开发
- 使用Postman测试表现层接口功能
首先,要对表现层信息进行一致性处理
创建工具类Result
@Data
@AllArgsConstructor
@NoArgsConstructor
public class Result {// 响应码 1代表成功 0代表失败private Integer code;// 相应信息 描述字符串private String msg;// 返回的数据private Object data;// 增删改,成功响应public static Result success() {return new Result(1, "success", null);}// 查询成功响应public static Result success(Object data) {return new Result(1, "success", data);}// 查询失败public static Result error(String msg) {return new Result(0, msg, null);}}
表现层
@RestController
@RequestMapping("/user")
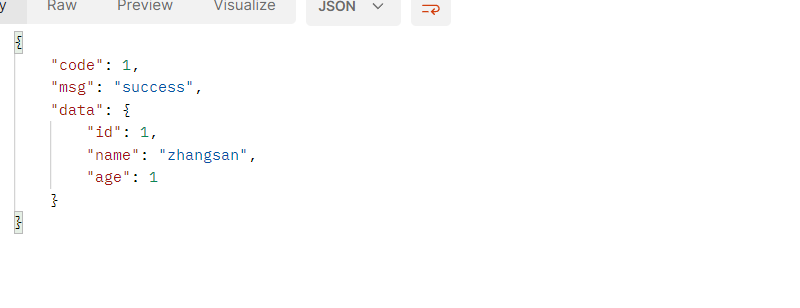
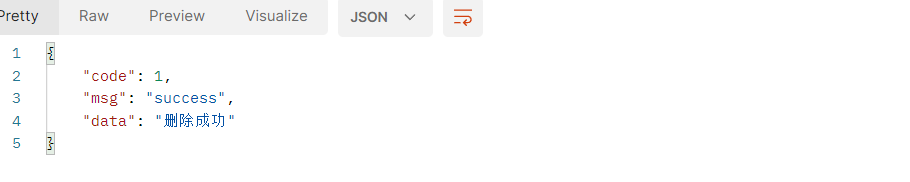
public class UserController {@Autowiredprivate UserService userService;@GetMappingpublic Result getAll() {return Result.success(userService.list());}@DeleteMapping("/{id}")public Result delete(@PathVariable Integer id){Boolean delete = userService.delete(id);return Result.success("删除成功");}@GetMapping("/{id}")public Result getById(@PathVariable Integer id) {User byId = userService.getById(id);return Result.success(byId);}
}
查询结果:
删除结果:
前后端协议联调
- 前后端分离结构设计中页面归属前端服务器
- 单体工程中页面放置在resources目录下的static目录中(建议执行clean)
前端页面:
<!DOCTYPE html><html><head><!-- 页面meta --><meta charset="utf-8"><meta http-equiv="X-UA-Compatible" content="IE=edge"><title>基于SpringBoot整合SSM案例</title><meta content="width=device-width,initial-scale=1,maximum-scale=1,user-scalable=no" name="viewport"><!-- 引入样式 --><link rel="stylesheet" href="../plugins/elementui/index.css"><link rel="stylesheet" href="../plugins/font-awesome/css/font-awesome.min.css"><link rel="stylesheet" href="../css/style.css"></head><body class="hold-transition"><div id="app"><div class="content-header"><h1>图书管理</h1></div><div class="app-container"><div class="box"><div class="filter-container"><el-input placeholder="年龄" v-model="pagination.age" style="width: 200px;" class="filter-item"></el-input><el-input placeholder="名字" v-model="pagination.name" style="width: 200px;" class="filter-item"></el-input><el-input placeholder="描述" style="width: 200px;" class="filter-item"></el-input><el-button @click="getAll()" class="dalfBut">查询</el-button><el-button type="primary" class="butT" @click="handleCreate()">新建</el-button></div><el-table size="small" current-row-key="id" :data="dataList" stripe highlight-current-row><el-table-column type="index" prop="id" align="center" label="序号"></el-table-column><el-table-column prop="age" label="年龄" align="center"></el-table-column><el-table-column prop="name" label="名字" align="center"></el-table-column><el-table-column prop="description" label="描述" align="center"></el-table-column><el-table-column label="操作" align="center"><template slot-scope="scope"><el-button type="primary" size="mini" @click="handleUpdate(scope.row)">编辑</el-button><el-button type="danger" size="mini" @click="handleDelete(scope.row)">删除</el-button></template></el-table-column></el-table><!--分页组件--><div class="pagination-container"><el-paginationclass="pagiantion"@current-change="handleCurrentChange":current-page="pagination.currentPage":page-size="pagination.pageSize"layout="total, prev, pager, next, jumper":total="pagination.total"></el-pagination></div><!-- 新增标签弹层 --><div class="add-form"><el-dialog title="新增图书" :visible.sync="dialogFormVisible"><el-form ref="dataAddForm" :model="formData" :rules="rules" label-position="right" label-width="100px"><el-row><el-col :span="12"><el-form-item label="年龄" prop="age"><el-input v-model="formData.age"/></el-form-item></el-col><el-col :span="12"><el-form-item label="名字" prop="name"><el-input v-model="formData.name"/></el-form-item></el-col></el-row><el-row><el-col :span="24"><el-form-item label="描述"><el-input v-model="formData.description" type="textarea"></el-input></el-form-item></el-col></el-row></el-form><div slot="footer" class="dialog-footer"><el-button @click="cancel()">取消</el-button><el-button type="primary" @click="handleAdd()">确定</el-button></div></el-dialog></div><!-- 编辑标签弹层 --><div class="add-form"><el-dialog title="编辑检查项" :visible.sync="dialogFormVisible4Edit"><el-form ref="dataEditForm" :model="formData" :rules="rules" label-position="right" label-width="100px"><el-row><el-col :span="12"><el-form-item label="年龄" prop="age"><el-input v-model="formData.age"/></el-form-item></el-col><el-col :span="12"><el-form-item label="名字" prop="name"><el-input v-model="formData.name"/></el-form-item></el-col></el-row><el-row><el-col :span="24"><el-form-item label="描述"><el-input v-model="formData.description" type="textarea"></el-input></el-form-item></el-col></el-row></el-form><div slot="footer" class="dialog-footer"><el-button @click="cancel()">取消</el-button><el-button type="primary" @click="handleEdit()">确定</el-button></div></el-dialog></div></div></div></div></body><!-- 引入组件库 --><script src="../js/vue.js"></script><script src="../plugins/elementui/index.js"></script><script type="text/javascript" src="../js/jquery.min.js"></script><script src="../js/axios-0.18.0.js"></script><script>var vue = new Vue({el: '#app',data:{dataList: [],//当前页要展示的列表数据dialogFormVisible: false,//添加表单是否可见dialogFormVisible4Edit:false,//编辑表单是否可见formData: {},//表单数据rules: {//校验规则type: [{ required: true, message: '图书类别为必填项', trigger: 'blur' }],name: [{ required: true, message: '图书名称为必填项', trigger: 'blur' }]},pagination: {//分页相关模型数据currentPage: 1,//当前页码pageSize:10,//每页显示的记录数total:0,//总记录数name:""}},//钩子函数,VUE对象初始化完成后自动执行created() {this.getAll();},methods: {/*getAll() {axios.get("/user").then((res)=>{this.dataList = res.data.data;})},*///列表getAll() {param = "?name=" + this.pagination.name;axios.get("/user/" + this.pagination.currentPage + "/" + this.pagination.pageSize + param).then((res)=>{this.pagination.total = res.data.data.total;this.pagination.currentPage = res.data.data.current;this.pagination.pageSize = res.data.data.size;this.dataList = res.data.data.records;})},//弹出添加窗口handleCreate() {this.dialogFormVisible = true;this.resetForm();},//重置表单resetForm() {this.formData = {};},//添加handleAdd () {axios.post("/user", this.formData).then((res)=>{// 如果操作成功,关闭弹层,显示数据if (res.data.code == 1) {this.dialogFormVisible = false;this.$message.success("添加成功");} else {this.$message.error("添加失败");}}).finally(()=>{this.getAll();})},//取消cancel(){this.dialogFormVisible = false;this.dialogFormVisible4Edit = false;this.$message.info("操作取消");},// 删除handleDelete(row){// 弹出提示框this.$confirm("此操作永久删除当前数据,是否继续?","提示",{type: 'info'}).then(()=>{axios.delete("/user/"+row.id).then((res)=> {if (res.data.code == 1) {this.$message.success("删除成功");} else {this.$message.error("删除失败");}}).finally(()=>{this.getAll();});}).catch(()=>{// 取消删除this.$message.info("取消删除操作")})},//弹出编辑窗口handleUpdate(row) {axios.get("/user/"+row.id).then((res)=>{if (res.data.code == 1) {// 展示弹层,加载数据this.formData = res.data.data;this.dialogFormVisible4Edit = true;} else {this.$message.error("数据同步失败,自动刷新")}})},//修改handleEdit() {axios.put("/user", this.formData).then((res)=>{// 如果操作成功,关闭弹层并刷新页面if (res.data.code == 1) {this.dialogFormVisible4Edit = false;this.$message.success("修改成功");} else {this.$message.error("修改失败");}}).finally(()=>{this.getAll();})},//分页查询//切换页码handleCurrentChange(currentPage) {// 修改页码为当前选中的页码值this.pagination.currentPage = currentPage;// 执行查询this.getAll();},//条件查询}})</script></html>
列表页:
getAll() {axios.get("/user").then((res)=>{this.dataList = res.data.data;})
}
弹出添加窗口
//弹出添加窗口
handleCreate() {this.dialogFormVisible = true;// 重置表单this.resetForm();
}
添加
//添加
handleAdd () {axios.post("/user", this.formData).then((res)=>{// 如果操作成功,关闭弹层,显示数据if (res.data.code == 1) {this.dialogFormVisible = false;this.$message.success("添加成功");} else {this.$message.error("添加失败");}}).finally(()=>{this.getAll();})
}
取消添加
cancel(){this.dialogFormVisible = false;this.dialogFormVisible4Edit = false;this.$message.info("操作取消");
}
删除
// 删除
handleDelete(row){// 弹出提示框this.$confirm("此操作永久删除当前数据,是否继续?","提示",{type: 'info'}).then(()=>{axios.delete("/user/"+row.id).then((res)=> {if (res.data.code == 1) {this.$message.success("删除成功");} else {this.$message.error("删除失败");}}).finally(()=>{this.getAll();});}).catch(()=>{// 取消删除this.$message.info("取消删除操作")})
}
弹出修改窗口
handleUpdate(row) {axios.get("/user/"+row.id).then((res)=>{if (res.data.code == 1) {// 展示弹层,加载数据this.formData = res.data.data;this.dialogFormVisible4Edit = true;} else {this.$message.error("数据同步失败,自动刷新")}})
}
修改
//修改
handleEdit() {axios.put("/user", this.formData).then((res)=>{// 如果操作成功,关闭弹层并刷新页面if (res.data.code == 1) {this.dialogFormVisible4Edit = false;this.$message.success("修改成功");} else {this.$message.error("修改失败");}}).finally(()=>{this.getAll();})
}
分页操作
//列表
getAll() {param = "?name=" + this.pagination.name;axios.get("/user/" + this.pagination.currentPage + "/" + this.pagination.pageSize + param).then((res)=>{this.pagination.total = res.data.data.total;this.pagination.currentPage = res.data.data.current;this.pagination.pageSize = res.data.data.size;this.dataList = res.data.data.records;})
}
userServiceImpl类
public IPage<User> getPage(Integer currentPage, Integer pageSize, User queryUser) {IPage page = new Page(currentPage, pageSize);LambdaQueryWrapper<User> lqw = new LambdaQueryWrapper<User>();lqw.like(Strings.isNotEmpty(queryUser.getName()), User::getName, queryUser.getName());return userMapper.selectPage(page, lqw);
}
userController类
@GetMapping("{currentPage}/{pageSize}")
public Result getAll(@PathVariable int currentPage, @PathVariable int pageSize, User user) {IPage<User> page = userService.getPage(currentPage, pageSize, user);System.out.println(page);return Result.success(page);
}
分页页码值切换
//切换页码
handleCurrentChange(currentPage) {// 修改页码为当前选中的页码值this.pagination.currentPage = currentPage;// 执行查询this.getAll();
}
总结
介于SpringBoot的SSMP整合案例的步骤:
-
pom.xml
配置起步依赖
-
applicaiton.yml
设置数据源、端口、框架技术相关配置等
-
mapper
继承BaseMapper、设置@Mapper
-
mapper测试类
-
service
调用数据层接口或Mybatis-plus提供的接口快速开发
-
controller
基于Restful开发,使用postman测试跑通功能
-
页面
放置在resources目录下的static目录中