文章目录
- 🍔 Preface
- ✨ 如何在屏幕坐标系内绘制框选框
- 🎉 根据框选范围定位其在世界坐标系中对应的区域
- 🥇 在该区域内进行物理检测
🍔 Preface
本文简单介绍如何实现即时战略游戏中框选战斗单位的功能,如图所示:

🍺 实现思路:
本文将该功能的实现拆分为以下部分:
- 在屏幕坐标系中绘制框选范围;
- 根据框选范围定位其在世界坐标系中对应的区域;
- 在该区域内进行物理检测。
✨ 如何在屏幕坐标系内绘制框选框
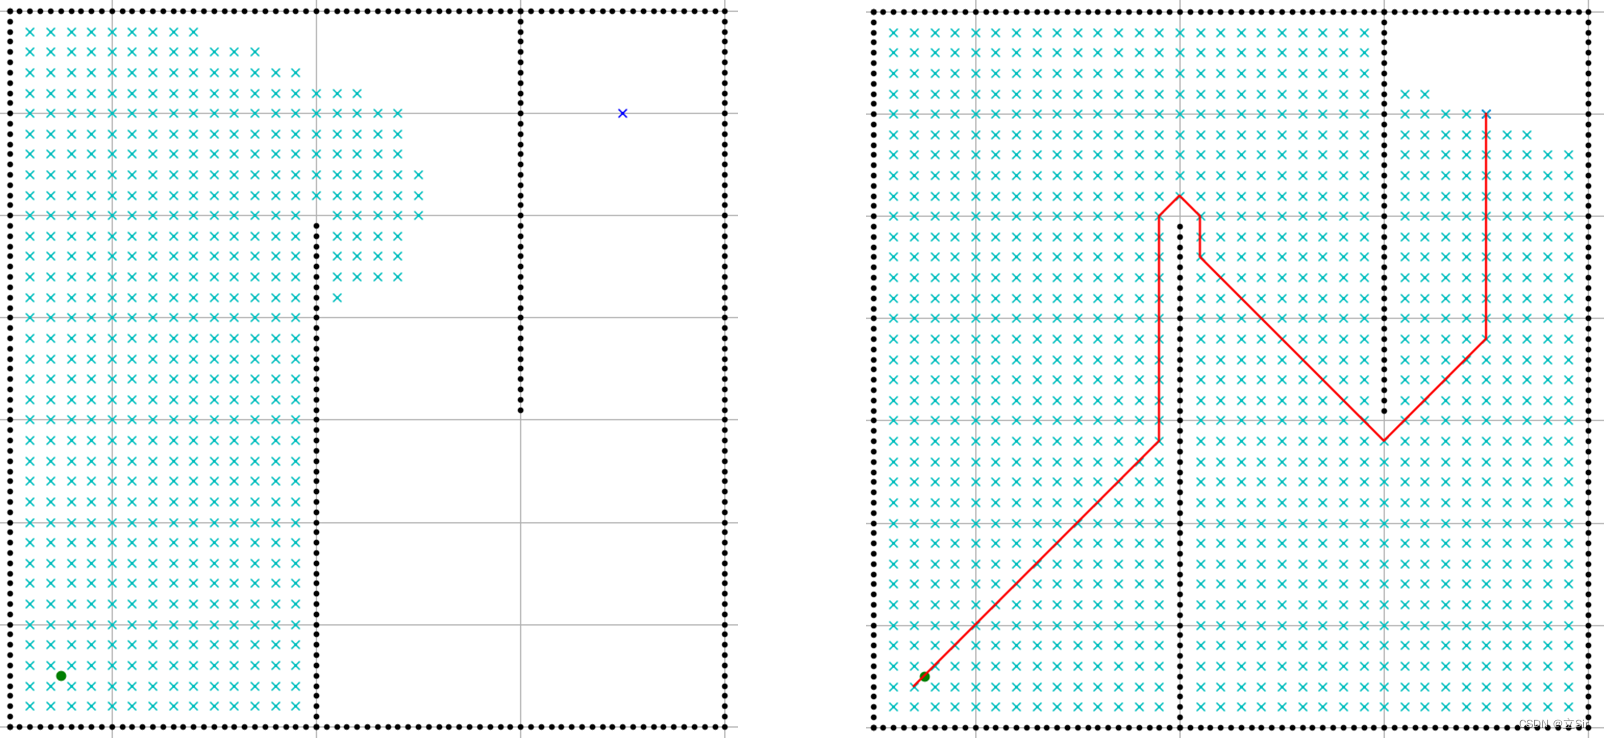
使用Line Renderer光线渲染器组件来进行范围绘制,当鼠标按下时,可以获得框选范围的起始点,鼠标持续按下时,鼠标位置则是框选范围的结束点,根据这两个点的坐标可以求得另外两个顶点的坐标,如图所示:

首先设置Line Renderer光线渲染器的属性:

Enable:默认设为false,当鼠标按下时将其设为true;Loop:设为true,为了让第三个顶点与起始点相连形成闭环;Size:设为4,框选范围有4个顶点;Width:设为0.001即可,线框不需要很粗,可适当调整;
代码部分:
using UnityEngine;
using SK.Framework;
using System.Collections.Generic;public class Example : MonoBehaviour
{//光线渲染器组件private LineRenderer lineRenderer;//屏幕坐标系起始点private Vector3 screenStartPoint;//屏幕坐标系结束点private Vector3 screenEndPoint;private void Start(){//获取光线渲染器组件lineRenderer = GetComponent<LineRenderer>();}private void Update(){//鼠标按下if (Input.GetMouseButtonDown(0)){//激活光线渲染器lineRenderer.enabled = true;//屏幕坐标系起始点screenStartPoint = Input.mousePosition;screenStartPoint.z = 1;}//鼠标持续按下if (Input.GetMouseButton(0)){//屏幕坐标系结束点screenEndPoint = Input.mousePosition;screenEndPoint.z = 1;//求得框选框的另外两个顶点的位置Vector3 point1 = new Vector3(screenEndPoint.x, screenStartPoint.y, 1);Vector3 point2 = new Vector3(screenStartPoint.x, screenEndPoint.y, 1);//接下来使用光线渲染器画出框选范围lineRenderer.SetPosition(0, Camera.main.ScreenToWorldPoint(screenStartPoint));lineRenderer.SetPosition(1, Camera.main.ScreenToWorldPoint(point1));lineRenderer.SetPosition(2, Camera.main.ScreenToWorldPoint(screenEndPoint));lineRenderer.SetPosition(3, Camera.main.ScreenToWorldPoint(point2));}//鼠标抬起if (Input.GetMouseButtonUp(0)){//取消光线渲染器lineRenderer.enabled = false;}}
}
如图所示,已经实现框选范围的绘制:

🎉 根据框选范围定位其在世界坐标系中对应的区域
该部分的实现主要依靠物理射线检测,在鼠标位置发出射线,检测与地面的碰撞点,首先为Plane地面设置Layer层级:

在鼠标按下时根据射线检测信息确定世界坐标系中的起始点:
//鼠标按下
if (Input.GetMouseButtonDown(0))
{//激活光线渲染器lineRenderer.enabled = true;//屏幕坐标系起始点screenStartPoint = Input.mousePosition;screenStartPoint.z = 1;//射线检测if (Physics.Raycast(mainCamera.ScreenPointToRay(Input.mousePosition), out hit, 1 << LayerMask.NameToLayer("Ground"))){//世界坐标系起始点worldStartPoint = hit.point;}
}
在鼠标抬起时根据射线检测信息确定世界坐标系中的结束点:
//鼠标抬起
if (Input.GetMouseButtonUp(0))
{//取消光线渲染器lineRenderer.enabled = false;//射线检测if (Physics.Raycast(mainCamera.ScreenPointToRay(Input.mousePosition), out hit, 1 << LayerMask.NameToLayer("Ground"))){//世界坐标系结束点worldEndPoint = hit.point;}
}
🥇 在该区域内进行物理检测
该部分用的的核心API:

可以理解为创建一个碰撞盒来检测该范围内的碰撞体,首先计算出该API需要传入的参数:
center:该盒子的中心点;halfExtents:该盒子长宽高的一半。
//盒子中心点
Vector3 center = new Vector3((worldEndPoint.x + worldStartPoint.x) * .5f, 1f, (worldEndPoint.z + worldStartPoint.z) * .5f);
//盒子长宽高的一半
Vector3 halfExtents = new Vector3(Mathf.Abs(worldEndPoint.x - worldStartPoint.x) * .5f, 1f, Mathf.Abs(worldEndPoint.z - worldStartPoint.z) * .5f);
有了这两个参数,调用该API可以获得该区域内的所有碰撞体,遍历判断碰撞体身上如果包含指定的组件,则将其选中,这里使用Outline高亮组件来表示:
//盒子中心点
Vector3 center = new Vector3((worldEndPoint.x + worldStartPoint.x) * .5f, 1f, (worldEndPoint.z + worldStartPoint.z) * .5f);
//盒子长宽高的一半
Vector3 halfExtents = new Vector3(Mathf.Abs(worldEndPoint.x - worldStartPoint.x) * .5f, 1f, Mathf.Abs(worldEndPoint.z - worldStartPoint.z) * .5f);
//检测到盒子内的碰撞器
Collider[] colliders = Physics.OverlapBox(center, halfExtents);for (int i = 0; i < colliders.Length; i++)
{var collider = colliders[i];var outline = collider.GetComponent<Outline>();if (outline != null){outline.enabled = true;}
}
如图所示,我们已经实现了基本的框选功能:

在框选时,还需要清除上一次框选的内容,因此我们使用一个List列表来记录当前框选的战斗单位,框选前遍历该列表来清除框选记录,完整代码如下:
public class Example : MonoBehaviour
{//光线渲染器组件private LineRenderer lineRenderer;//屏幕坐标系起始点private Vector3 screenStartPoint;//屏幕坐标系结束点private Vector3 screenEndPoint;//主相机private Camera mainCamera;//碰撞信息private RaycastHit hit;//世界坐标系起始点private Vector3 worldStartPoint;//世界坐标系结束点private Vector3 worldEndPoint;//框选记录列表private List<Outline> list = new List<Outline>();private void Start(){//获取光线渲染器组件lineRenderer = GetComponent<LineRenderer>();//获取主相机mainCamera = Camera.main != null ? Camera.main : FindObjectOfType<Camera>();}private void Update(){//鼠标按下if (Input.GetMouseButtonDown(0)){//激活光线渲染器lineRenderer.enabled = true;//屏幕坐标系起始点screenStartPoint = Input.mousePosition;screenStartPoint.z = 1;//射线检测if (Physics.Raycast(mainCamera.ScreenPointToRay(Input.mousePosition), out hit, 1 << LayerMask.NameToLayer("Ground"))){//世界坐标系起始点worldStartPoint = hit.point;}}//鼠标持续按下if (Input.GetMouseButton(0)){//屏幕坐标系结束点screenEndPoint = Input.mousePosition;screenEndPoint.z = 1;//求得框选框的另外两个顶点的位置Vector3 point1 = new Vector3(screenEndPoint.x, screenStartPoint.y, 1);Vector3 point2 = new Vector3(screenStartPoint.x, screenEndPoint.y, 1);//接下来使用光线渲染器画出框选范围lineRenderer.SetPosition(0, Camera.main.ScreenToWorldPoint(screenStartPoint));lineRenderer.SetPosition(1, Camera.main.ScreenToWorldPoint(point1));lineRenderer.SetPosition(2, Camera.main.ScreenToWorldPoint(screenEndPoint));lineRenderer.SetPosition(3, Camera.main.ScreenToWorldPoint(point2));}//鼠标抬起if (Input.GetMouseButtonUp(0)){//取消光线渲染器lineRenderer.enabled = false;//首先清除上一次的框选记录for (int i = 0; i < list.Count; i++){list[i].enabled = false;}list.Clear();//射线检测if (Physics.Raycast(mainCamera.ScreenPointToRay(Input.mousePosition), out hit, 1 << LayerMask.NameToLayer("Ground"))){//世界坐标系结束点worldEndPoint = hit.point;//盒子中心点Vector3 center = new Vector3((worldEndPoint.x + worldStartPoint.x) * .5f, 1f, (worldEndPoint.z + worldStartPoint.z) * .5f);//盒子长宽高的一半Vector3 halfExtents = new Vector3(Mathf.Abs(worldEndPoint.x - worldStartPoint.x) * .5f, 1f, Mathf.Abs(worldEndPoint.z - worldStartPoint.z) * .5f);//检测到盒子内的碰撞器Collider[] colliders = Physics.OverlapBox(center, halfExtents);for (int i = 0; i < colliders.Length; i++){var collider = colliders[i];var outline = collider.GetComponent<Outline>();if (outline != null){list.Add(outline);outline.enabled = true;}}}}}
}