这篇文章,主要介绍如何使用SpringBoot框架实现文件上传和文件下载。
目录
一、SpringBoot文件上传
1.1、引入依赖
1.2、编写文件上传页面
1.3、编写文件上传代码
(1)MultipartFile对象
(2)ResourceUtils工具类
1.4、运行测试
1.5、配置文件上传属性
二、SpringBoot文件下载
2.1、编写文件下载页面
2.2、编写文件下载代码
2.3、运行测试
三、文件上传下载完整代码
3.1、完整控制器代码
一、SpringBoot文件上传
SpringBoot文件上传和下载,还是使用的SpringMVC框架中的,只不过SpringBoot给我们做了简化,它提供了一些文件上传的配置属性,例如:设置单个文件上传大小、单个请求最大上传文件大小、是否支持多文件上传等。下面介绍如何在SpringBoot框架中实现文件上传。
1.1、引入依赖
要实现文件上传功能,只需要引入【spring-boot-starter-parent】、【spring-boot-starter-web】依赖即可(web依赖里面已经包含了文件上传所需的jar包)。因为要编写文件上传界面,所以这里引入【spring-boot-starter-thymeleaf】依赖作为前端视图组件。
<!-- 引入 SpringBoot 父工程依赖 -->
<parent><groupId>org.springframework.boot</groupId><artifactId>spring-boot-starter-parent</artifactId><version>2.3.0.RELEASE</version>
</parent><!-- 引入 web 工程依赖 -->
<dependency><groupId>org.springframework.boot</groupId><artifactId>spring-boot-starter-web</artifactId>
</dependency>
<!-- 引入 thymeleaf 依赖 -->
<dependency><groupId>org.springframework.boot</groupId><artifactId>spring-boot-starter-thymeleaf</artifactId>
</dependency>
1.2、编写文件上传页面
在【templates】目录下面,新建【index.html】页面,编写文件上传表单界面。
<!DOCTYPE html>
<html lang="en" xmlns:th="http://www.thymeleaf.org">
<head><meta charset="UTF-8"><title>文件上传下载</title>
</head>
<body><h3>文件上传</h3><form action="/api/upload" method="post" enctype="multipart/form-data">请选择文件:<input type="file" name="file"/><input type="submit" value="上传文件"></form>
</body>
</html>
1.3、编写文件上传代码
(1)MultipartFile对象
SpringBoot后,文件上传核心就是利用【MultipartFile】对象,我们只需要在上传方法参数里面使用这个参数对象,SpringBoot就自动会将上传的文件信息保存到这个MultipartFile对象里面,之后开发人员只需要调用该对象的方法进行各种操作即可完成文件的上传。
package com.spring.boot.demo.controller;import org.springframework.stereotype.Controller;
import org.springframework.util.ResourceUtils;
import org.springframework.web.bind.annotation.GetMapping;
import org.springframework.web.bind.annotation.PostMapping;
import org.springframework.web.bind.annotation.RequestMapping;
import org.springframework.web.bind.annotation.ResponseBody;
import org.springframework.web.multipart.MultipartFile;import java.io.File;/*** @author ZhuYouBin* @version 1.0.0* @Date: 2022/10/25 12:29* @Description*/
@Controller
@RequestMapping("/api")
public class FileUploadController {@GetMapping("/index")public String index() {return "index";}@PostMapping("/upload")@ResponseBodypublic String upload(MultipartFile file) {try {// 获取文件名称String originalFilename = file.getOriginalFilename();// 获取文件上传的目录路径// 获取 classpath 类路径String path = ResourceUtils.getURL("classpath:").getPath();// 将文件上传到 【classpath:/static/files】目录下面path += "/static/files/";// 创建 File 文件目录对象File filePath = new File(path);// 判断文件目录是否存在if (!filePath.exists()) {// 目录不存在, 则创建目录filePath.mkdirs();}// 创建上传之后的文件全路径名称File uploadPath = new File(filePath, originalFilename);// 上传文件file.transferTo(uploadPath);} catch (Exception e) {e.printStackTrace();return "文件上传失败";}return "文件上传成功";}}
(2)ResourceUtils工具类
Spring中提供了一个ResourceUtils工具类,这个工具类可以获取到资源相关信息,例如:获取classpath类路径。
// 获取 classpath 类路径
String path = ResourceUtils.getURL("classpath:").getPath();
1.4、运行测试
启动工程,访问【http://localhost:8080/api/index】文件上传页面,选择上传的文件,点击上传按钮,就可以看到文件上传成功成功。

查看工程目录里面的【target】目录,在这个目录下面,可以找到我们上传之后的文件,如下图所示。

1.5、配置文件上传属性
SpringBoot提供了几个文件上传的配置属性,主要有下面三个:
# 文件上传 相关配置
spring:servlet:multipart:enabled: true # 是否开启多文件上传max-request-size: 100MB # 单个请求最大上传文件大小,默认10MB(不写单位,默认单位是字节)max-file-size: 10MB # 单个文件最大上传大小,默认1MB(不写单位,默认单位是字节)
通过配置上面三个属性,当上传的文件过大时候,此时SpringBoot框架将会抛出异常,例如下面所示:
org.apache.tomcat.util.http.fileupload.impl.FileSizeLimitExceededException:The field file exceeds its maximum permitted size of 10 bytes.大致含义就是,上传的文件大小超过了配置的文件大小。
二、SpringBoot文件下载
SpringBoot实现文件下载,其实是利用HTTP的Response对象实现的,通过设置Response对象的Header相关属性,从而实现文件的下载。
2.1、编写文件下载页面
这里是通过超链接的方式实现文件的下载。
<!DOCTYPE html>
<html lang="en" xmlns:th="http://www.thymeleaf.org">
<head><meta charset="UTF-8"><title>文件上传下载</title>
</head>
<body><h3>文件上传</h3><form action="/api/upload" method="post" enctype="multipart/form-data">请选择文件:<input type="file" name="file"/><input type="submit" value="上传文件"></form><h3>文件下载</h3><a href="/api/download?filename=2020-12-13_080921.png">2020-12-13_080921.png</a> <br><a href="/api/download?filename=SpringMVC上传文件.docx">SpringMVC上传文件.docx</a>
</body>
</html>
2.2、编写文件下载代码
@GetMapping("/download")
@ResponseBody
public String download(String filename, HttpServletResponse response) {try {// 读取文件String path = ResourceUtils.getURL("classpath:").getPath();path += "/static/files/" + filename;// 创建文件对象File file = new File(path);// 将文件以输入流的形式读取FileInputStream fis = new FileInputStream(file);// 获取缓冲字符集BufferedReader reader = new BufferedReader(new InputStreamReader(fis, StandardCharsets.UTF_8));// 设置 response 响应头 等信息response.reset(); // 垂直响应流// 设置响应类型是:流response.setHeader("content-type", "application/octet-stream");// 设置响应内容位置, 这里是以附件的形式响应给客户端// 这里需要通过 URLEncoder 进行编码,否则中文名称会乱码response.setHeader("content-disposition", "attachment; filename=" + URLEncoder.encode(filename, "UTF-8"));// 设置响应字符集response.setCharacterEncoding("UTF-8");// 获取输出流对象PrintWriter out = response.getWriter();// 从输入流读取数据,通过输出流响应给浏览器String line;while ((line = reader.readLine()) != null) {out.write(line);}// 响应结束,关闭流fis.close();out.close();} catch (Exception e) {e.printStackTrace();return "文件下载失败";}return "文件下载成功";
}
2.3、运行测试
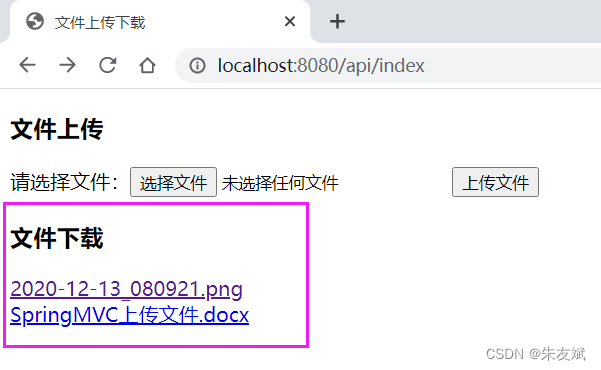
启动工程,访问文件上传下载,点击文件下载的超链接,就可以完成文件的下载功能。
三、文件上传下载完整代码
3.1、完整控制器代码
package com.spring.boot.demo.controller;import org.springframework.stereotype.Controller;
import org.springframework.util.ResourceUtils;
import org.springframework.web.bind.annotation.GetMapping;
import org.springframework.web.bind.annotation.PostMapping;
import org.springframework.web.bind.annotation.RequestMapping;
import org.springframework.web.bind.annotation.ResponseBody;
import org.springframework.web.multipart.MultipartFile;import javax.servlet.ServletOutputStream;
import javax.servlet.http.HttpServletResponse;
import java.io.*;
import java.nio.charset.StandardCharsets;/*** @author ZhuYouBin* @version 1.0.0* @Date: 2022/10/25 12:29* @Description*/
@Controller
@RequestMapping("/api")
public class FileUploadController {@GetMapping("/index")public String index() {return "index";}@PostMapping("/upload")@ResponseBodypublic String upload(MultipartFile file) {try {// 获取文件名称String originalFilename = file.getOriginalFilename();// 获取文件上传的目录路径// 获取 classpath 类路径String path = ResourceUtils.getURL("classpath:").getPath();// 将文件上传到 【classpath:/static/files】目录下面path += "/static/files/";// 创建 File 文件目录对象File filePath = new File(path);// 判断文件目录是否存在if (!filePath.exists()) {// 目录不存在, 则创建目录filePath.mkdirs();}// 创建上传之后的文件全路径名称File uploadPath = new File(filePath, originalFilename);// 上传文件file.transferTo(uploadPath);} catch (Exception e) {e.printStackTrace();return "文件上传失败";}return "文件上传成功";}@GetMapping("/download")@ResponseBodypublic String download(String filename, HttpServletResponse response) {try {// 读取文件String path = ResourceUtils.getURL("classpath:").getPath();path += "/static/files/" + filename;// 创建文件对象File file = new File(path);// 将文件以输入流的形式读取FileInputStream fis = new FileInputStream(file);// 获取缓冲字符集BufferedReader reader = new BufferedReader(new InputStreamReader(fis, StandardCharsets.UTF_8));// 设置 response 响应头 等信息response.reset(); // 垂直响应流// 设置响应类型是:流response.setHeader("content-type", "application/octet-stream");// 设置响应内容位置, 这里是以附件的形式响应给客户端// 这里需要通过 URLEncoder 进行编码,否则中文名称会乱码response.setHeader("content-disposition", "attachment; filename=" + URLEncoder.encode(filename, "UTF-8"));// 设置响应字符集response.setCharacterEncoding("UTF-8");// 获取输出流对象PrintWriter out = response.getWriter();// 从输入流读取数据,通过输出流响应给浏览器String line;while ((line = reader.readLine()) != null) {out.write(line);}// 响应结束,关闭流fis.close();out.close();} catch (Exception e) {e.printStackTrace();return "文件下载失败";}return "文件下载成功";}}
到此,SpringBoot框架实现文件的上传和下载就成功啦。
综上,这篇文章结束了,主要介绍如何使用SpringBoot框架实现文件上传和文件下载。