hook函数是勾子函数,用于在不改变原始模型结构的情况下,注入一些新的代码用于调试和检验模型,常见的用法有保留非叶子结点的梯度数据(Pytorch的非叶子节点的梯度数据在计算完毕之后就会被删除,访问的时候会显示为
None),又或者查看模型的层与层之间的数据传递情况(数据维度、数据大小等),抑或是在不修改原始模型代码的基础上可视化各个卷积特征图。
Pytorch提供了四种hook函数
- torch.tensor.register_hook(hooc_func)
- torch.nn.Module.register_forward_hook(hook_func)
- torch.nn.Module.register_forward_pre_hook(hook_func)
- torch.nn.Module.register_backward_hook
1. torch.tensor.register_hook(hooc_func)
解释:注册一个反向传播hook函数,其函数签名如下
def hook(grad):...
输入参数为张量的梯度,实现的hook函数可以在此修改梯度数据(原地修改或者通过返回值返回),或者在此将梯度数据保存、裁剪等。
示例 1
# leaf node data
x = torch.Tensor([0, 1, 2, 3]).requires_grad_()
y = torch.Tensor([4, 5, 6, 7]).requires_grad_()
w = torch.Tensor([1, 2, 3, 4]).requires_grad_()# intermediate variable
z = x + y# output
o = torch.dot(w, z)# backward to calculate gradient
o.backward()# print gradient infomation
print('x.grad:', x.grad) # tensor([1., 2., 3., 4.])
print('y.grad:', y.grad) # tensor([1., 2., 3., 4.])
print('w.grad:', w.grad) # tensor([ 4.,  6.,  8., 10.])
print('z.grad:', z.grad) # None
print('o.grad:', o.grad) # None
输出:
x.grad: tensor([1., 2., 3., 4.])
y.grad: tensor([1., 2., 3., 4.])
w.grad: tensor([ 4.,  6.,  8., 10.])
z.grad: None
o.grad: None
可以看到代码中的非叶子节点z, o的梯度信息(grad)在计算之后立即被释放,因此都等于None,如果需要显式地声明需要保留非叶子节点的grad,需要使用retain_grad方法,如下例:
import torch
a = torch.ones(5)
a.requires_grad = Trueb = 2*ab.retain_grad()   # 让非叶子节点b的梯度保持
c = b.mean()
c.backward()print(f'a.grad = {a.grad}\nb.grad = {b.grad}')
输出:
a.grad = tensor([0.4000, 0.4000, 0.4000, 0.4000, 0.4000])
b.grad = tensor([0.2000, 0.2000, 0.2000, 0.2000, 0.2000])
retain_grad()方法会增加显存的占用,我们可以使用hook获取梯度信息而不需要显式地使用retain_grad()强制系统保存梯度信息,如下例:
import torcha = torch.ones(5).requires_grad_()b = 2 * aa.register_hook(lambda x:print(f'a.grad = {x}'))
b.register_hook(lambda x: print(f'b.grad = {x}'))  c = b.mean()print('begin backward'.center(30, '-'))
c.backward()
print('end backward'.center(30, '-'))
输出:
--------begin backward--------
b.grad = tensor([0.2000, 0.2000, 0.2000, 0.2000, 0.2000])
a.grad = tensor([0.4000, 0.4000, 0.4000, 0.4000, 0.4000])
---------end backward---------
上述例子中我们使用hook对tensor的grad进行访问,没有使用retain_grad对信息进行保存。输出结果表明,hook执行的时间是在backward之间,从后往前依次执行,首先输出b的grad,然后输出a的grad,最后结束backward过程。
上述过程都没有对梯度信息进行改变,其实,如果hook函数的有返回值或者将输入参数grad原地进行修改的话,那么之后的梯度信息都会被改变,这一机制简直就是为梯度裁剪量身定制的。
如下例:
import torchdef hook(grad):torch.clamp_(grad, min=0.5, max=0.2)print(grad)a = torch.ones(5).requires_grad_()
b = 2 * aa.register_hook(hook)
b.register_hook(hook)  c = b.mean()print('begin backward'.center(30, '-'))
c.backward()
print('end backward'.center(30, '-'))
输出:
--------begin backward--------
tensor([0.2000, 0.2000, 0.2000, 0.2000, 0.2000])
tensor([0.2000, 0.2000, 0.2000, 0.2000, 0.2000])
---------end backward---------
对比上一例可以发现a的梯度从0.4被裁剪到了0.2,这里使用的clamp_是直接原地修改,所以不需要返回值。
也可将上述例子中的hook更改为有返回值的函数,效果相同。
部分例子参考:https://zhuanlan.zhihu.com/p/662760483
2. torch.nn.Module.register_forward_hook(hook_func)
除了register_hook是对tensor操作的hook之外,其他的hook都是对module进行操作的,这里的module包括各种layer,例如:Conv2d, Linear等
register_forward_hook在执行module的forward函数之后执行,其函数签名为
def hook(module, inputs, outpus):pass
注意:这里的
module是当前被注册的module,inputs是执行forward之前的inputs,而outputs则是执行forward之后的outputs,这么设计可能是为了方便读取执行之前的intputs。
如下例所示:
import torch
import torch.nn as nn# 定义一个简单的模块
class MyModule(nn.Module):def forward(self, x):print('forward'.center(20, '-'))return x * 2  # 假设这个模块简单地将输入乘以2# 创建模块实例
module = MyModule()# 定义一个hook函数,它接受输入和输出作为参数
def my_hook(module, input, output):print(f"Input: {input}")print(f"Output: {output}")# 注册hook函数
module.register_forward_hook(my_hook)# 创建一个输入张量
input_tensor = torch.tensor([1.0, 2.0, 3.0], requires_grad=True)# 执行前向传播,这将触发hook函数的调用
output_tensor = module(input_tensor)
输出:
------forward-------
Input: (tensor([1., 2., 3.], requires_grad=True),)
Output: tensor([2., 4., 6.], grad_fn=<MulBackward0>)
从中我们可以看到,这里的Input还是执行forward之前的input,但是outputs是执行forward之后的outputs,从打印的------forward-------位置可以知道,这里的forward函数是在执行之后调用的hook。
我们可以使用hook实现torchsummary类似的功能,查看resnet18的各个层的输出情况,如下例
import torch
from torch import nn
from torchvision.models import resnet18class Visualize(nn.Module):def __init__(self, model) -> None:super().__init__()self.model = model# Register a hook for each layerfor name, layer in self.model.named_children():# add a property dynamicallylayer.name = name# module.name is the newly added propertylayer.register_forward_hook(lambda module, inputs, outputs:print(f"{module.name}".ljust(10), '-->', f'{outputs.shape}'))def forward(self, x):return self.model(x)model = resnet18()
inputs = torch.randn(1, 3, 224, 224)
vis = Visualize(model)
output = vis(inputs)
输出:
conv1      --> torch.Size([1, 64, 112, 112])
bn1        --> torch.Size([1, 64, 112, 112])
relu       --> torch.Size([1, 64, 112, 112])
maxpool    --> torch.Size([1, 64, 56, 56])
layer1     --> torch.Size([1, 64, 56, 56])
layer2     --> torch.Size([1, 128, 28, 28])
layer3     --> torch.Size([1, 256, 14, 14])
layer4     --> torch.Size([1, 512, 7, 7])
avgpool    --> torch.Size([1, 512, 1, 1])
fc         --> torch.Size([1, 1000])
如果使用使用apply对hook进行注册,apply会递归地将model里面的所有layer都进行相同的操作,于是结果就和for name, layer in self.model.named_modules()类似。
import torch
from torch import nn
from torchvision.models import resnet18def hook(module, inputs, outputs):print(module.__class__.__name__.ljust(10), end='')print(outputs.shape)def register(module):if isinstance(module, nn.Conv2d):module.register_forward_hook(hook)model = resnet18()
inputs = torch.randn(1, 3, 224, 224)
# 这里的apply会递归地把所有层都遍历,因此register_forward_hook注册到的层
# 是所有的Conv2d,包括子层,子层中的子层...
model.apply(register)
outputs = model(inputs)
输出为:
Conv2d    torch.Size([1, 64, 112, 112])
Conv2d    torch.Size([1, 64, 56, 56])
Conv2d    torch.Size([1, 64, 56, 56])
Conv2d    torch.Size([1, 64, 56, 56])
Conv2d    torch.Size([1, 64, 56, 56])
Conv2d    torch.Size([1, 128, 28, 28])
Conv2d    torch.Size([1, 128, 28, 28])
Conv2d    torch.Size([1, 128, 28, 28])
Conv2d    torch.Size([1, 128, 28, 28])
Conv2d    torch.Size([1, 128, 28, 28])
Conv2d    torch.Size([1, 256, 14, 14])
Conv2d    torch.Size([1, 256, 14, 14])
Conv2d    torch.Size([1, 256, 14, 14])
Conv2d    torch.Size([1, 256, 14, 14])
Conv2d    torch.Size([1, 256, 14, 14])
Conv2d    torch.Size([1, 512, 7, 7])
Conv2d    torch.Size([1, 512, 7, 7])
Conv2d    torch.Size([1, 512, 7, 7])
Conv2d    torch.Size([1, 512, 7, 7])
Conv2d    torch.Size([1, 512, 7, 7])
apply将所有的Conv2d都注册了,所以输出了所有的Conv2d的输出shape。
3.torch.nn.Module.register_backward_hook
在了解了前一个hook的用法之后,这个hook的作用也就不言而喻了,在backward之后执行,这里的hook函数签名如下
def hook_fn(module, grad_in, grad_out):pass
输入参数包括三个,分别是module,grad_in和grad_out,其中,grad_in和grad_out分别指代当前模块的输入和输出的梯度信息,若grad_in和grad_out包括多个输入输出,则grad_in和grad_out以元组形式呈现。
现在使用会register_backward_hook爆出警告:
module.py:1352: UserWarning: Using a non-full backward hook when the forward contains multiple autograd Nodes is deprecated and will be removed in future versions. This hook will be missing some grad_input. Please use register_full_backward_hook to get the documented behavior.warnings.warn("Using a non-full backward hook when the forward contains multiple autograd Nodes "
解决办法就是使用新的hook函数register_full_backward_hook,新的hook函数功能更加强大,不仅仅包括模块的输入输出梯度信息,还包括内部的一些其他变量的梯度信息,但是register_backward_hook和register_full_backward_hook两者之间的兼容性并不是很完美。
示例
import torch
from torch import nn
from torchvision.models import resnet18def hook_fn(module, grad_in, grad_out):# 当前module的输入和输出梯度# 若module有多个输入,则grad_in为一个元组# y = wx+bprint(module.__class__.__name__)print("------------Input Grad------------")# 容错处理,部分元组中的变量会是Nonefor grad in grad_in:try:print(grad.shape)except AttributeError: print ("None found for Gradient")print("------------Output Grad------------")for grad in grad_out:  try:print(grad.shape)except AttributeError: print ("None found for Gradient")print("\n")net = resnet18()
for name, layer in net.named_children():# 每一个大的子层都注册一个勾子函数layer.register_backward_hook(hook_fn)# 为了能够执行backward,构建一些虚拟的输入输出
dummy_inputs = torch.randn(10, 3, 224, 224)
dummy_labels = torch.randint(0, 1001, (10, ))
loss_fn = nn.CrossEntropyLoss()y_hat = net(dummy_inputs)loss = loss_fn(y_hat, dummy_labels)
loss.backward()
输出:
module.py:1352: UserWarning: Using a non-full backward hook when the forward contains multiple autograd Nodes is deprecated and will be removed in future versions. This hook will be missing some grad_input. Please use register_full_backward_hook to get the documented behavior.warnings.warn("Using a non-full backward hook when the forward contains multiple autograd Nodes "Linear
------------Input Grad------------
torch.Size([1000])
torch.Size([10, 512])
torch.Size([512, 1000])
------------Output Grad------------
torch.Size([10, 1000])AdaptiveAvgPool2d
------------Input Grad------------
torch.Size([10, 512, 7, 7])
------------Output Grad------------
torch.Size([10, 512, 1, 1])Sequential
------------Input Grad------------
torch.Size([10, 512, 7, 7])
------------Output Grad------------
torch.Size([10, 512, 7, 7])Sequential
------------Input Grad------------
torch.Size([10, 256, 14, 14])
------------Output Grad------------
torch.Size([10, 256, 14, 14])Sequential
------------Input Grad------------
torch.Size([10, 128, 28, 28])
------------Output Grad------------
torch.Size([10, 128, 28, 28])Sequential
------------Input Grad------------
torch.Size([10, 64, 56, 56])
------------Output Grad------------
torch.Size([10, 64, 56, 56])MaxPool2d
------------Input Grad------------
torch.Size([10, 64, 112, 112])
------------Output Grad------------
torch.Size([10, 64, 56, 56])ReLU
------------Input Grad------------
torch.Size([10, 64, 112, 112])
------------Output Grad------------
torch.Size([10, 64, 112, 112])BatchNorm2d
------------Input Grad------------
torch.Size([10, 64, 112, 112])
torch.Size([64])
torch.Size([64])
------------Output Grad------------
torch.Size([10, 64, 112, 112])Conv2d
------------Input Grad------------
None found for Gradient
torch.Size([64, 3, 7, 7])
None found for Gradient
------------Output Grad------------
torch.Size([10, 64, 112, 112])
最上面是警告信息可以忽略,然后根据backward的路径,从后往前进行返回。
使用如下代码查看resnet18的层级情况:
for name, layer in net.named_children():print(name)
输出:
conv1
bn1
relu
maxpool
layer1
layer2
layer3
layer4
avgpool
fc
可以看到这里的10个层对应上面hook函数返回的10个层。
综合以上两个部分,用一个示例演示同时构建前向和后向勾子函数:
import torch
import torch.nn as nn# 前向钩子示例
def forward_hook(module, input, output):print("{} forward hook:".format(module.__class__.__name__))print("Input:", input)print("Output:", output)print("")# 反向钩子示例
def backward_hook(module, grad_input, grad_output):print("{} backward hook:".format(module.__class__.__name__))print("Gradient input:")for item in grad_input:if item is not None:print(item.shape)print("Gradient output:")for item in grad_output:if item is not None:print(item.shape)print("")# 示例模型
class SimpleModel(nn.Module):def __init__(self):super(SimpleModel, self).__init__()self.fc1 = nn.Linear(10, 20)self.fc2 = nn.Linear(20, 1)def forward(self, x):x = torch.relu(self.fc1(x))x = self.fc2(x)return x# 示例
model = SimpleModel()# 注册前向钩子
hook_handle = model.fc1.register_forward_hook(forward_hook)# 注册反向钩子
hook_handle2 = model.fc1.register_backward_hook(backward_hook)# 示例输入数据
input_data = torch.randn(1, 10)# 前向传播
output = model(input_data)# 反向传播
loss = output.sum()
loss.backward()# 移除钩子
hook_handle.remove()
hook_handle2.remove()
输出:
Linear forward hook:
Input: (tensor([[-1.6549, -1.1471, -0.2341,  0.1456,  0.6528, -1.0562,  0.1078,  0.9752,0.8794,  1.0463]]),)
Output: tensor([[-0.6406,  0.0515,  0.1893, -0.5211, -0.2393,  0.2923,  0.0143,  0.6929,-0.4688, -0.1708, -0.6461,  0.5460, -0.1515, -0.1707, -0.5409, -0.6382,-0.9836,  0.3446,  0.2147, -0.7682]], grad_fn=<AddmmBackward0>)Linear backward hook:
Gradient input:
torch.Size([20])
torch.Size([10, 20])
Gradient output:
torch.Size([1, 20])
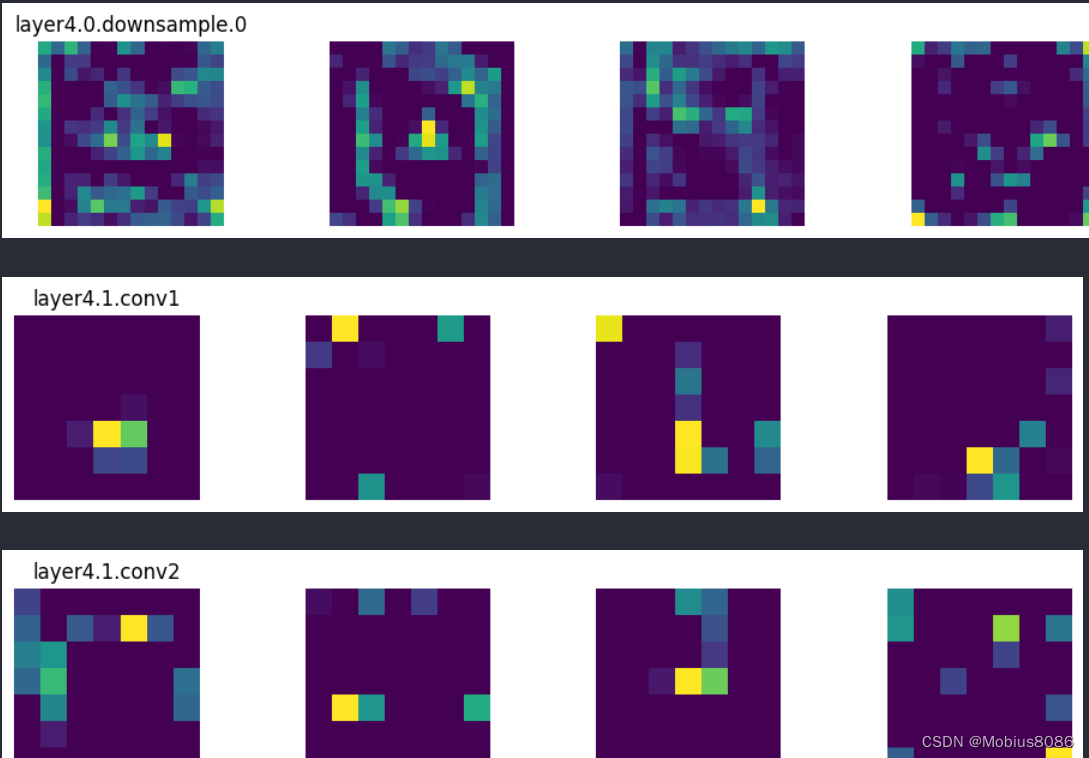
使用hook机制可视化resnet的特征图输出
import cv2
from torchvision import transforms
from torchvision.models import ResNet18_Weights, resnet18
import torch
import matplotlib.pyplot as pltdef viz(name):def imshow(module, input, output):feature_maps = input[0]# feature map dimension:# (batch_size, ch, width, height)# visualize 4 channels at mostmax_ch = min(feature_maps.size(1), 4)imgs = feature_maps[0, :max_ch, :, :]# print(imgs.shape)plt.figure(figsize=(12, 2))for i, img in enumerate(imgs):plt.subplot(1, 4, i+1)# plt.imshow(img.cpu(), cmap='gray')plt.imshow(img.cpu())plt.axis('off')if i == 0:plt.title(name)plt.show()return imshowdef main():trans = transforms.Compose([transforms.ToPILImage(),transforms.Resize((224, 224)),transforms.ToTensor(),transforms.Normalize(mean=[0.485, 0.456, 0.406],std=[0.229, 0.224, 0.225])])device = torch.device("cuda:0" if torch.cuda.is_available() else "cpu")model = resnet18(weights=ResNet18_Weights.IMAGENET1K_V1).to(device)for name, module in model.named_modules():# 这里只对卷积层的feature map进行显示if isinstance(module, torch.nn.Conv2d):module.register_forward_hook(viz(name))img = cv2.imread(r'faces\ftw1.jpg')img = trans(img).unsqueeze(0).to(device)with torch.no_grad():model(img)main()
输出示例:

总结:
- 勾子函数可以在不修改源代码的情况下实现功能的注入
- 实现过程需要重写对应的勾子函数,需要注意执行的顺序以及参数的含义
register_forward_hook:在forward函数之后执行,输入参数为input和output,其中input是forward函数之前的输入,output是forwad函数之后的输入。这个勾子函数一般用于可视化特征图register_backward_hook:在执行backward之时执行,backward到哪一个层就执行哪一个层的勾子函数,需要注意的是,输入参数分别为当前层的梯度输入和梯度输出,也即grad_input,grad_output,再者,使用该函数不能有原地修改的操作,否则会报异常。
参考内容
- 一文搞懂PyTorch Hook
- Pytorch官方文档
PyTorch Hook用法解析