谷歌nexus9刷机
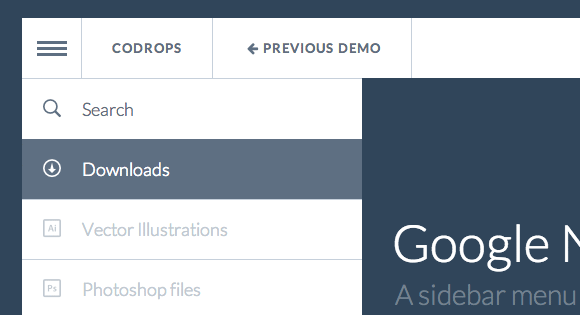
Today I want to show you how to reconstruct the sidebar menu of the Google Nexus 7 page. It slides out with a really nice effect where some subitems get expanded as well. When hovering over a special menu icon, the sidebar icons will be revealed. When clicking on the icon, the whole sidebar menu will be shown. The first sidebar menu item is a search input which is styled the same way like the other menu items.
今天,我想向您展示如何重建Google Nexus 7页面的侧边栏菜单。 滑出效果非常好,其中一些子项也得到了扩展。 将鼠标悬停在特殊菜单图标上时,将显示侧边栏图标。 单击图标时,将显示整个侧栏菜单。 第一个侧边栏菜单项是搜索输入,其输入样式与其他菜单项相同。
We will reconstruct this menu using unordered, nested lists and some CSS transitions. We’ll use JavaScript to apply classes for the opening effects and handling the hover and click events. With the help of a media query, we’ll adjust the size to make sense for smaller devices.
我们将使用无序的嵌套列表和一些CSS过渡来重构此菜单。 我们将使用JavaScript为打开效果应用类,并处理悬停和click事件。 借助媒体查询,我们将调整尺寸以适合较小的设备。
So let’s get started!
因此,让我们开始吧!
标记 (The Markup)
Our menu will consist of two main parts: a main menu, the one that you can see at the top like a header, and the sidebar menu. We’ll give the class “gn-menu-main” to the first one and wrap the second one in a nav element. You could of course use any structure that you prefer. The first menu item will contain the menu icon anchor and the nav element:
我们的菜单将包含两个主要部分:一个主菜单,一个可以在顶部看到的标题(如标题)和侧边栏菜单。 我们将“ gn-menu-main”类赋予第一个,并将第二个包裹在nav元素中。 您当然可以使用您喜欢的任何结构。 第一个菜单项将包含菜单图标锚点和nav元素:
<ul id="gn-menu" class="gn-menu-main">
<li class="gn-trigger">
<a class="gn-icon gn-icon-menu"><span>Menu</span></a>
<nav class="gn-menu-wrapper">
<!-- ... -->
</nav>
</li>
<li><a href="http://tympanus.net/codrops">Codrops</a></li>
<li><!-- ... --></li>
<!-- ... -->
</ul>
Inside of the nav element we’ll add another wrapper that will help us with hiding the nasty scrollbar for Windows browsers. The heart of this submenu is the unordered list with the class “gn-menu”. It will consist of list items, some of which will have a sublist. The first item will be the special search input:
在nav元素内,我们将添加另一个包装,这将有助于我们隐藏Windows浏览器的讨厌的滚动条。 该子菜单的核心是类别为“ gn-menu”的无序列表。 它将由列表项组成,其中一些项将具有子列表。 第一项将是特殊搜索输入:
<div class="gn-scroller">
<ul class="gn-menu">
<li class="gn-search-item">
<input placeholder="Search" type="search" class="gn-search">
<a class="gn-icon gn-icon-search"><span>Search</span></a>
</li>
<li>
<a class="gn-icon gn-icon-download">Downloads</a>
<ul class="gn-submenu">
<li><a class="gn-icon gn-icon-illustrator">Vector Illustrations</a></li>
<li><a class="gn-icon gn-icon-photoshop">Photoshop files</a></li>
</ul>
</li>
<li><a class="gn-icon gn-icon-cog">Settings</a></li>
<li><!-- ... --></li>
<!-- ... -->
</ul>
</div><!-- /gn-scroller -->
Now, let’s style everything.
现在,让我们为所有样式设置样式。
CSS (The CSS)
Note that the CSS will not contain any vendor prefixes, but you will find them in the files.
请注意,CSS将不包含任何供应商前缀,但是您可以在文件中找到它们。
Let’s start by setting border-box for all the box-sizing:
让我们开始为所有框大小设置border-box:
*,
*:after,
*::before {
box-sizing: border-box;
}
Since we’ll be using an icon font for the icons, we’ll head over to IcoMoon and select some nice icons from Matthew Skiles’ Eco Ico set.
由于我们将为图标使用图标字体,因此我们将转到IcoMoon并从Matthew Skiles的Eco Ico set中选择一些不错的图标。
@font-face {
font-weight: normal;
font-style: normal;
font-family: 'ecoicons';
src: url("../fonts/ecoicons/ecoicons.eot");
src: url("../fonts/ecoicons/ecoicons.eot?#iefix") format("embedded-opentype"), url("../fonts/ecoicons/ecoicons.woff") format("woff"), url("../fonts/ecoicons/ecoicons.ttf") format("truetype"), url("../fonts/ecoicons/ecoicons.svg#ecoicons") format("svg");
}
Later we’ll use a pseudo element to add the icons to the anchors.
稍后,我们将使用伪元素将图标添加到锚点。
But let’s style all the lists before:
但是让我们对所有列表进行样式设置:
.gn-menu-main,
.gn-menu-main ul {
margin: 0;
padding: 0;
background: white;
color: #5f6f81;
list-style: none;
text-transform: none;
font-weight: 300;
font-family: 'Lato', Arial, sans-serif;
line-height: 60px;
}
These are some general (reset) styles for the lists and the sublists.
这些是列表和子列表的一些常规(重置)样式。
Now, let’s specify the styles for the main list. It will be fixed to the top of the page and we’ll give it a height of 60 pixels:
现在,让我们为主列表指定样式。 它将固定在页面顶部,我们将其高度设置为60像素:
.gn-menu-main {
position: fixed;
top: 0;
left: 0;
width: 100%;
height: 60px;
font-size: 13px;
}
The general style for all the links in our menu and submenus will be the following:
菜单和子菜单中所有链接的一般样式如下:
.gn-menu-main a {
display: block;
height: 100%;
color: #5f6f81;
text-decoration: none;
cursor: pointer;
}
Let’s also define some hover styles where we invert the colors. For the first sidebar menu item which will have a search input, we’ll need a special hover style. There we won’t have an anchor that fills all the item, so let’s define the hover on the li and control what happens to the icon (the anchor) and the li itself:
让我们还定义一些悬停样式以反转颜色。 对于第一个带有搜索输入的侧边栏菜单项,我们需要一种特殊的悬停样式。 那里我们没有一个锚来填充所有项目,因此让我们在li上定义悬停并控制图标(锚)和li本身发生什么情况:
.no-touch .gn-menu-main a:hover,
.no-touch .gn-menu li.gn-search-item:hover,
.no-touch .gn-menu li.gn-search-item:hover a {
background: #5f6f81;
color: white;
}
The list item childen will float left and they’ll have a right border:
子项列表项将向左浮动,并具有右边框:
.gn-menu-main > li {
display: block;
float: left;
height: 100%;
border-right: 1px solid #c6d0da;
text-align: center;
}
The first list item will be the special trigger item and because we will hide the text and use a pseudo element for the menu icon, we will set the user-select to none and the width to be the same as the items’ height.
第一个列表项将是特殊的触发项,并且因为我们将隐藏文本并为菜单图标使用伪元素,所以我们将用户选择设置为none,并将宽度设置为项目的高度。
.gn-menu-main li.gn-trigger {
position: relative;
width: 60px;
user-select: none;
}
The last item in our main list will be floated right and we’ll swap the border:
我们主列表中的最后一项将向右浮动,我们将交换边框:
.gn-menu-main > li:last-child {
float: right;
border-right: none;
border-left: 1px solid #c6d0da;
}
The anchors for the main menu will have some padding and we’ll style the text a bit differently:
主菜单的锚点会有一些填充,我们将为文本设置一些不同的样式:
.gn-menu-main > li > a {
padding: 0 30px;
text-transform: uppercase;
letter-spacing: 1px;
font-weight: bold;
}
Let’s clear the floats with the following micro clearfix hack by Nicolas Gallagher:
让我们用Nicolas Gallagher的以下微型clearfix修补程序清除浮标:
.gn-menu-main:after {
display: table;
clear: both;
content: '';
}
Alright, so now it just misses the style of the menu icon, but let’s leave that one for later when we define the other icon pseudo classes.
好了,所以现在它只是错过了菜单图标的样式,但是让我们在定义其他图标伪类时将其留待以后使用。
Let’s move on to the wrapper for the sidebar menu. Why do we need those extra wrappers? Well, if you don’t mind having a scrollbar visible you might as well get rid of them and simply set the menu to overflow-y: scroll. But since the scrollbar really breaks our minimal design in browsers on Windows, we’ll use a little trick to hide it. We’ll set the main wrapper to be overflow hidden, with a certain width (initially it’s just wide enough to see the icon bar). Then we’ll give the scroll wrapper a slightly larger width and a height of 100%. The scrollbar will be hidden. Our menu will then extend to the height it needs and it will be scrollable. Initially we want to hide the menu, so we’ll give it a negative left value (of its width). Why are we not using 2D translate here?
让我们继续侧边栏菜单的包装器。 为什么我们需要那些额外的包装器? 好吧,如果您不介意显示滚动条,则最好也将它们清除掉,只需将菜单设置为溢出-y:滚动即可。 但是由于滚动条确实破坏了Windows浏览器中的最小设计,因此我们将使用一些技巧来隐藏它。 我们将主包装器设置为隐藏溢出,并具有一定的宽度(最初它的宽度足以看到图标栏)。 然后,我们将滚动包装的宽度和高度设置为100%。 滚动条将被隐藏。 然后,我们的菜单将扩展到所需的高度,并且可以滚动。 最初,我们想隐藏菜单,所以我们给它一个负的左值(宽度)。 为什么我们在这里不使用2D翻译?
.gn-menu-wrapper {
position: fixed;
top: 60px;
bottom: 0;
left: 0;
overflow: hidden;
width: 60px; /* will be transitioned to 340px */
border-top: 1px solid #c6d0da;
background: white;
transform: translateX(-60px); /* will be transitioned to 0px */
transition: transform 0.3s, width 0.3s;
}.gn-scroller {
position: absolute;
overflow-y: scroll;
width: 370px;
height: 100%;
}.gn-menu {
border-bottom: 1px solid #c6d0da;
text-align: left;
font-size: 18px;
}
Let’s add a box shadow for separating the list items. This will help us avoid double lines when hiding the submenu items:
让我们添加一个框阴影以分隔列表项。 这将有助于我们在隐藏子菜单项时避免出现双行:
.gn-menu li:not(:first-child),
.gn-menu li li {
box-shadow: inset 0 1px #c6d0da
}
Let’s add a transition the the submenu list items and set their initial height to 0:
让我们在子菜单列表项中添加一个过渡,并将其初始高度设置为0:
.gn-submenu li {
overflow: hidden;
height: 0;
transition: height 0.3s;
}
The color will be slightly lighter than the parent menu items:
颜色将比父菜单项略浅:
.gn-submenu li a {
color: #c1c9d1
}
Now, let’s style the special search item and the search input specifically. We want to make it really subtle like on the Google Nexus page, so we’ll give it a transparent background colors and make the placeholders look like a normal menu item:
现在,让我们为特殊搜索项和搜索输入专门设置样式。 我们希望使其像Google Nexus页面上那样非常微妙,因此我们将为它提供透明的背景色,并使占位符看起来像普通菜单项:
input.gn-search {
position: relative;
z-index: 10;
padding-left: 60px;
outline: none;
border: none;
background: transparent;
color: #5f6f81;
font-weight: 300;
font-family: 'Lato', Arial, sans-serif;
cursor: pointer;
}/* placeholder */.gn-search::-webkit-input-placeholder {
color: #5f6f81
}.gn-search:-moz-placeholder {
color: #5f6f81
}.gn-search::-moz-placeholder {
color: #5f6f81
}.gn-search:-ms-input-placeholder {
color: #5f6f81
}
Most browsers will hide the placeholder when we click on the input which is much better for the user to understand that this is an input. Chrome does not have that behavior so we’ll use a little trick to emulate the same thing by setting the color of the placeholder to transparent once the user clicks on the input and focuses it:
当我们单击输入时,大多数浏览器会隐藏占位符,这对于用户来说更好地理解这是输入。 Chrome没有这种行为,因此一旦用户单击输入并对其进行聚焦,我们将通过将占位符的颜色设置为透明来使用一个小技巧来模仿同一件事:
.gn-search:focus::-webkit-input-placeholder,
.no-touch .gn-menu li.gn-search-item:hover .gn-search:focus::-webkit-input-placeholder {
color: transparent
}input.gn-search:focus {
cursor: text
}
On hover we will change the color of the input text to white, just like we do to the other anchors (this is the text the user types):
悬停时,我们将输入文本的颜色更改为白色,就像我们对其他锚点所做的一样(这是用户键入的文本):
.no-touch .gn-menu li.gn-search-item:hover input.gn-search {
color: white
}
We will also do that for the placeholder text:
我们还将对占位符文本执行此操作:
/* placeholder */.no-touch .gn-menu li.gn-search-item:hover .gn-search::-webkit-input-placeholder {
color: white
}.no-touch .gn-menu li.gn-search-item:hover .gn-search:-moz-placeholder {
color: white
}.no-touch .gn-menu li.gn-search-item:hover .gn-search::-moz-placeholder {
color: white
}.no-touch .gn-menu li.gn-search-item:hover .gn-search:-ms-input-placeholder {
color: white
}
The search icon anchor will be a special one because it won’t have the text visible next to it. The whole list item is a trick box. You see, by setting the icon anchor to position absolute, we will let the search input start at the very left of our list item. But remember, we gave the input a large left padding which will make the text start only after out search icon. When clicking on the search icon we will be actually clicking on the input, focusing it.
搜索图标锚将是一个特殊的锚,因为它旁边没有可见的文本。 整个列表项是一个技巧框。 您会看到,通过将图标锚设置为绝对位置,我们将使搜索输入从列表项的最左侧开始。 但是请记住,我们为输入提供了一个较大的左填充,这将使文本仅在搜索图标之后才开始。 当单击搜索图标时,我们实际上将单击输入,将其聚焦。
.gn-menu-main a.gn-icon-search {
position: absolute;
top: 0;
left: 0;
height: 60px;
}
Now, let’s style the ::before pseudo element for the icons. We’ll set them to inline-block and give them a width of 60 pixel. We have to reset all the font styles, because now we’ll be using our icon font that we’ve included in the beginning of the CSS:
现在,让我们为图标的:: before伪元素设置样式。 我们将它们设置为inline-block并为其设置60像素的宽度。 我们必须重置所有字体样式,因为现在我们将使用CSS开头包含的图标字体:
.gn-icon::before {
display: inline-block;
width: 60px;
text-align: center;
text-transform: none;
font-weight: normal;
font-style: normal;
font-variant: normal;
font-family: 'ecoicons';
line-height: 1;
speak: none;
-webkit-font-smoothing: antialiased;
}
Let’s define the content for all the icons:
让我们为所有图标定义内容:
.gn-icon-help::before {
content: "e000"
}.gn-icon-cog::before {
content: "e006"
}.gn-icon-search::before {
content: "e005"
}.gn-icon-download::before {
content: "e007"
}.gn-icon-photoshop::before {
content: "e001"
}.gn-icon-illustrator::before {
content: "e002"
}.gn-icon-archive::before {
content: "e00d"
}.gn-icon-article::before {
content: "e003"
}.gn-icon-pictures::before {
content: "e008"
}.gn-icon-videos::before {
content: "e009"
}
Normally, we want the text of the anchor to show next to the icon but sometimes, we only want to show the icon. But we don’t just want an empty anchor, the text should still be in the HTML. So we will wrap those special cases into a span which we will simply hide by setting the width and height to 0 and the overflow to hidden. Why not simply using display: none? Hiding the content like that would make it inaccessible to screen readers, so let’s make sure that we don’t “erase” anything so important for them:
通常,我们希望锚文本显示在图标旁边,但有时,我们只希望显示图标。 但是我们不只是想要一个空的锚,文本仍应该在HTML中。 因此,我们将这些特殊情况包装到一个跨度中,只需将width和height设置为0并将溢出设置为hidden即可将其隐藏。 为什么不简单地使用display: none ? 隐藏这样的内容将使屏幕阅读器无法访问它,因此,请确保我们不要“擦除”对他们如此重要的内容:
.gn-icon span {
width: 0;
height: 0;
display: block;
overflow: hidden;
}
Let’s not forget about our little menu icon in the main menu. So, we won’t use an icon from the icon font here, although you of course could. Instead we’ll create it with a box shadow that will use alternating colors (background and blue) to create the three lines. You could also use a gradient here if you prefer.
让我们不要忘记主菜单中的小菜单图标。 因此,我们当然不会在这里使用图标字体中的图标。 取而代之的是,我们使用框阴影创建它,该阴影将使用交替的颜色(背景和蓝色)创建三行。 如果愿意,也可以在此处使用渐变。
.gn-icon-menu::before {
margin-left: -15px;
vertical-align: -2px;
width: 30px;
height: 3px;
background: #5f6f81;
box-shadow: 0 3px white, 0 -6px #5f6f81, 0 -9px white, 0 -12px #5f6f81;
content: '';
}
On hover, we will invert the box shadow colors:
悬停时,我们将反转框阴影颜色:
.no-touch .gn-icon-menu:hover::before,
.no-touch .gn-icon-menu.gn-selected:hover::before {
background: white;
box-shadow: 0 3px #5f6f81, 0 -6px white, 0 -9px #5f6f81, 0 -12px white;
}
And when it’s selected (our side menu is open), we’ll make it more blue:
选中它(打开侧面菜单)后,我们将其设为蓝色:
.gn-icon-menu.gn-selected::before {
background: #5993cd;
box-shadow: 0 3px white, 0 -6px #5993cd, 0 -9px white, 0 -12px #5993cd;
}
The last thing we need to do is to define our two classes for opening the menu for showing the icons only and for showing the whole menu. When we hover over the menu icon, we will show the icons only. Let’s call this class gn-open-part. The other class, gn-open-all will be applied either if we click on the main menu icon or if we hover over the icon part shown (the menu sidebar menu itself). In both cases, we’ll need to reset the translate to 0:
我们需要做的最后一件事是定义我们的两个类,以打开菜单以仅显示图标并显示整个菜单。 当我们将鼠标悬停在菜单图标上时,将仅显示图标。 我们将此类称为gn-open-part 。 如果单击主菜单图标,或者将鼠标悬停在显示的图标部分(菜单侧栏菜单本身)上,则将应用另一类gn-open-all 。 在这两种情况下,我们都需要将转换重置为0:
.gn-menu-wrapper.gn-open-all,
.gn-menu-wrapper.gn-open-part {
transform: translateX(0px);
}
If we want to open the whole menu, we’ll need to set the right width:
如果要打开整个菜单,则需要设置正确的宽度:
.gn-menu-wrapper.gn-open-all {
width: 340px;
}
Opening the whole menu, should also expand the submenu items:
打开整个菜单,还应该展开子菜单项:
.gn-menu-wrapper.gn-open-all .gn-submenu li {
height: 60px;
}
Last, but not least, our precious media query that will make the menu use the whole width of the screen:
最后但并非最不重要的一点是,我们宝贵的媒体查询将使菜单使用屏幕的整个宽度:
@media screen and (max-width: 422px) {
.gn-menu-wrapper.gn-open-all {
transform: translateX(0px);
width: 100%;
}.gn-menu-wrapper.gn-open-all .gn-scroller {
width: 130%;
}
}
And we’ll also adjust the width of the scroll wrapper to be larger than the 100%. This is probably not too important as we don’t see scrollbars on most devices of that size.
并且我们还将滚动包装的宽度调整为大于100%。 这可能不太重要,因为我们在大多数这种尺寸的设备上看不到滚动条。
Alright, now that we’ve styled everything, we’ll use some JavaScript for the logic of opening and closing the menu (i.e. applying the classes).
好了,既然我们已经为所有样式设置了样式,那么我们将使用一些JavaScript来打开和关闭菜单(即应用类)的逻辑。
JavaScript (The JavaScript)
So let’s create a small script that will take care of the menu functionality. When we hover over the menu icon, we want the first part of the menu to slide out so that we can see the icons. If we hover over the sidebar menu area or if we click on the main menu icon, then the rest of the menu should slide out. Clicking the menu icon again or clicking on any other part of the body should make the whole menu slide back in. So let’s see how we can pull all that off.
因此,让我们创建一个小脚本,它将处理菜单功能。 当我们将鼠标悬停在菜单图标上时,我们希望菜单的第一部分滑出以便可以看到图标。 如果将鼠标悬停在侧边栏菜单区域上,或者单击主菜单图标,则菜单的其余部分应滑出。 再次单击菜单图标或单击主体的任何其他部分,应使整个菜单重新滑入。因此,让我们看一下如何将所有这些都拉开。
We start by caching some elements and initializing some variables. The bodyClickFn function defines what happens when the menu is open and we click somewhere else on the document. We should also take care of touch events.
我们首先缓存一些元素并初始化一些变量。 bodyClickFn函数定义打开菜单并单击文档上其他位置时发生的情况。 我们还应该注意触摸事件。
_init : function() {
this.trigger = this.el.querySelector( 'a.gn-icon-menu' );
this.menu = this.el.querySelector( 'nav.gn-menu-wrapper' );
this.isMenuOpen = false;
this.eventtype = mobilecheck() ? 'touchstart' : 'click';
this._initEvents();var self = this;
this.bodyClickFn = function() {
self._closeMenu();
this.removeEventListener( self.eventtype, self.bodyClickFn );
};
}
Let’s take a look at the events that need to be initialized. We want to open the first part of the menu (let’s call it icon menu) when the main menu icon (trigger) is hovered. When we move the mouse out this same menu should slide back in.
让我们看一下需要初始化的事件。 当悬停主菜单图标(触发)时,我们想打开菜单的第一部分(我们称之为图标菜单)。 当我们将鼠标移出时,该菜单应滑回。
this.trigger.addEventListener( 'mouseover', function(ev) { self._openIconMenu(); } );
this.trigger.addEventListener( 'mouseout', function(ev) { self._closeIconMenu(); } );
Once the icon menu is in the viewport, hovering over it will make the rest of the menu slide out. After it slides out, and we click somewhere on the body then the menu should slide back in. We need to bind the respective event (click or touchstart) to the document.
图标菜单进入视口后,将鼠标悬停在其上会使菜单的其余部分滑出。 滑出后,我们单击主体上的某个位置,然后菜单应滑回。我们需要将相应事件(单击或touchstart)绑定到文档。
this.menu.addEventListener( 'mouseover', function(ev) {
self._openMenu();
document.addEventListener( self.eventtype, self.bodyClickFn );
} );
Finally if we click the menu icon, we want the whole menu to slide out or slide in if it’s already in the viewport. We will also bind (or unbind) the respective event (click or touchstart) to the document.
最后,如果单击菜单图标,则希望整个菜单滑出或滑入(如果它已经在视口中)。 我们还将绑定(或取消绑定)相应的事件(单击或touchstart)到文档。
this.trigger.addEventListener( this.eventtype, function( ev ) {
ev.stopPropagation();
ev.preventDefault();
if( self.isMenuOpen ) {
self._closeMenu();
document.removeEventListener( self.eventtype, self.bodyClickFn );
}
else {
self._openMenu();
document.addEventListener( self.eventtype, self.bodyClickFn );
}
} );
One last thing: we don’t want the menu to slide back in if we click somewhere inside the menu area. Since we are binding the click/touchstart event to the document (so that the menu closes) we need to do the following:
最后一件事:如果我们单击菜单区域内的某个位置,我们不希望菜单向后滑动。 由于我们将click / touchstart事件绑定到文档(以便菜单关闭),因此我们需要执行以下操作:
this.menu.addEventListener( this.eventtype, function(ev) { ev.stopPropagation(); } );
And here is the final _initEvents function and the methods to open and close the menu.
这是最后的_initEvents函数以及打开和关闭菜单的方法。
_initEvents : function() {
var self = this;if( !mobilecheck() ) {
this.trigger.addEventListener( 'mouseover', function(ev) { self._openIconMenu(); } );
this.trigger.addEventListener( 'mouseout', function(ev) { self._closeIconMenu(); } );
this.menu.addEventListener( 'mouseover', function(ev) {
self._openMenu();
document.addEventListener( self.eventtype, self.bodyClickFn );
} );
}
this.trigger.addEventListener( this.eventtype, function( ev ) {
ev.stopPropagation();
ev.preventDefault();
if( self.isMenuOpen ) {
self._closeMenu();
document.removeEventListener( self.eventtype, self.bodyClickFn );
}
else {
self._openMenu();
document.addEventListener( self.eventtype, self.bodyClickFn );
}
} );
this.menu.addEventListener( this.eventtype, function(ev) { ev.stopPropagation(); } );
},
_openIconMenu : function() {
classie.add( this.menu, 'gn-open-part' );
},
_closeIconMenu : function() {
classie.remove( this.menu, 'gn-open-part' );
},
_openMenu : function() {
if( this.isMenuOpen ) return;
classie.add( this.trigger, 'gn-selected' );
this.isMenuOpen = true;
classie.add( this.menu, 'gn-open-all' );
this._closeIconMenu();
},
_closeMenu : function() {
if( !this.isMenuOpen ) return;
classie.remove( this.trigger, 'gn-selected' );
this.isMenuOpen = false;
classie.remove( this.menu, 'gn-open-all' );
this._closeIconMenu();
}
And that’s all! Thank you for reading and I hope you enjoyed this tutorial and find it useful!
就这样! 感谢您的阅读,希望您喜欢本教程并觉得它有用!
Check out this in-depth video tutorial by Mike Deluxy that will guide you through the creation of the menu:
观看Mike Deluxy撰写的深入视频教程,它将指导您完成菜单的创建:
演示地址
翻译自: https://tympanus.net/codrops/2013/07/30/google-nexus-website-menu/
谷歌nexus9刷机