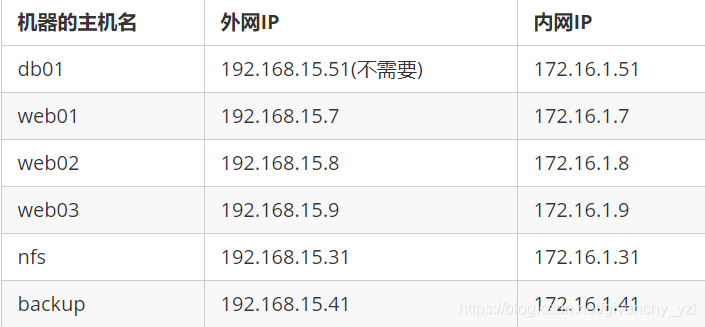
1、拆分机器
2、搭建backup服务器
# 软件 rsync # 关闭防火墙、selinux# 安装rsync# 编写配置文件
[root@backup ~]# vim /etc/rsyncd.conf
## 前端代码仓库、数据库备份、上传文件的备份
uid=www
gid=www
port=873
fake super=yes
use chroot=no
max connection=200
timeuot=600
ignore errors
read only=false
list=false
auth users=ytt
secrets file=/etc/rsync.passwd
log file=/var/log/rsyncd/log
###################################
[web]
comment="前端代码仓库"
path=/backup/web
[database]
comment="数据库备份"
path=/backup/database
[download]
comment="上传文件备份"
path=/backup/download# 同一用户
[root@backup ~]# useradd -u1000 www# 创建仓库
[root@backup ~]# mkdir /backup/web -p
[root@backup ~]# mkdir /backup/database
[root@backup ~]# mkdir /backup/download# 授权
[root@backup ~]# chown www.www -R /backup/# 创建密码文件
[root@backup ~]# echo "ytt:123" > /etc/rsync.passwd
[root@backup ~]# chmod 600 /etc/rsync.passwd# 启动
[root@backup ~]# systemctl enable --now rsyncd
Created symlink from /etc/systemd/system/multi-user.target.wants/rsyncd.service to /usr/lib/systemd/system/rsyncd.service.
3、搭建NFS服务器
# 软件 nfs-utils rpcbind# 安装软件
[root@nfs ~]# yum install nfs-utils rpcbind -y# 创建用户
[root@nfs ~]# useradd www -u1000# 创建前端代码仓库、数据库备份、上传文件的备份
[root@nfs ~]# mkdir /nfs/web -p
[root@nfs ~]# mkdir /nfs/database
[root@nfs ~]# mkdir /nfs/download# 授权
[root@nfs ~]# chown www.www -R /nfs/# 设置挂载点
[root@nfs ~]# vim /etc/exports
/nfs/web      172.16.1.0/20(rw,sync,all_squash,anonuid=1000,anongid=1000)
/nfs/database 172.16.1.0/20(rw,sync,all_squash,anonuid=1000,anongid=1000)
/nfs/download 172.16.1.0/20(rw,sync,all_squash,anonuid=1000,anongid=1000)# 重启
[root@nfs ~]# systemctl restart nfs
Created symlink from /etc/systemd/system/multi-user.target.wants/nfs-server.service to /usr/lib/systemd/system/nfs-server.service.# 检测
[root@nfs ~]# showmount -e
Export list for nfs:
/nfs/download 172.16.1.0/20
/nfs/database 172.16.1.0/20
/nfs/web      172.16.1.0/20#第二种检查方法
[root@nfs ~]# cat /var/lib/nfs/etab
/nfs/download	172.16.1.0/20(rw,sync,wdelay,hide,nocrossmnt,secure,root_squash,all_squash,no_subtree_check,secure_locks,acl,no_pnfs,anonuid=1000,anongid=1000,sec=sys,rw,secure,root_squash,all_squash)
/nfs/database	172.16.1.0/20(rw,sync,wdelay,hide,nocrossmnt,secure,root_squash,all_squash,no_subtree_check,secure_locks,acl,no_pnfs,anonuid=1000,anongid=1000,sec=sys,rw,secure,root_squash,all_squash)
/nfs/web	172.16.1.0/20(rw,sync,wdelay,hide,nocrossmnt,secure,root_squash,all_squash,no_subtree_check,secure_locks,acl,no_pnfs,anonuid=1000,anongid=1000,sec=sys,rw,secure,root_squash,all_squash)
4、搭建数据库
# 软件:mariadb# 安装
[root@db01 ~]# yum install mariadb-server -y# 启动
[root@db01 ~]# systemctl enable --now mariadb
Created symlink from /etc/systemd/system/multi-user.target.wants/mariadb.service to /usr/lib/systemd/system/mariadb.service.# 创建密码并登录数据库
[root@db01 ~]# mysqladmin -uroot password '123'
[root@db01 ~]# mysql -uroot -p123#创建对应数据库
MariaDB [(none)]> create database wordpress;
Query OK, 1 row affected (0.00 sec)MariaDB [(none)]> create database zhihu;
Query OK, 1 row affected (0.00 sec)# 创建用户并授权给数据库
MariaDB [(none)]> grant all privileges on wordpress.* to ytt@'%''123';
Query OK, 0 rows affected (0.00 sec)
MariaDB [(none)]> grant all privileges on zhihu.* to ytt@'%''123';
Query OK, 0 rows affected (0.00 sec)#重载数据库
MariaDB [mysql]> flush privileges;
Query OK, 0 rows affected (0.00 sec)# 数据备份
5、搭建web服务器
点击xshell中的工具—》发送键输入到所有会话
# 安装官方源
[root@web01 ~]# vim /etc/yum.repos.d/nginx.repo
[nginx]
name=nginx repo
baseurl=http://nginx.org/packages/centos/$releasever/$basearch/
gpgcheck=0
enabled=1
module_hotfixes=true[root@web01 ~]# yum clean all# 安装nginx
[root@web01 ~]# yum install nginx -y# 启动
[root@web01 ~]# systemctl enable --now nginx
Created symlink from /etc/systemd/system/multi-user.target.wants/nginx.service to /usr/lib/systemd/system/nginx.service.
6、安装PHP
#上传代码包
[root@web01 ~]# rz -E
rz waiting to receive.#解压并安装
[root@web01 ~]# tar -xf php.tar.gz && yum localinstall -y *.rpm# 修改配置文件
[root@web01 ~]# vim /etc/php-fpm.d/www.conf
user = www
group = www#创建用户
[root@web01 ~]# useradd www -u1000# 启动php
[root@web01 ~]# systemctl enable --now php-fpm.service
Created symlink from /etc/systemd/system/multi-user.target.wants/php-fpm.service to /usr/lib/systemd/system/php-fpm.service.
7、搭建wordpress页面
# 共享代码、共享数据、共享nginx配置
## 在nfs服务器上创建/nfs/conf目录
[root@nfs web]# mkdir /nfs/conf## 授权/nfs/conf
[root@nfs web]# chown www.www /nfs/conf## 加入nfs配置文件
[root@nfs web]# vim /etc/exports
/nfs/conf     172.16.1.0/20(rw,sync,all_squash,anonuid=1000,anongid=1000)## 重启nfs
[root@nfs web]# systemctl restart nfs-server rpcbind#创建密码文件与用户
[root@web01 ~]# htpasswd -c /etc/nginx/conf.d/auth_basic linux## 增加wordpress配置并加入密码模块
[root@web01 ~]# vim wordpress.conf
server {listen 80;server_name linux.wps.com;root /www/wordpress;client_max_body_size 10m;location / {index index.php;}location ~* \.php$ {fastcgi_pass 127.0.0.1:9000;fastcgi_param SCRIPT_FILENAME $document_root$fastcgi_script_name;include fastcgi_params;}location =/wp-admin {auth_basic "小老弟,暗号:天王盖地虎";auth_basic_user_file /etc/nginx/conf.d/auth_basic;index index.php;}
}#创建站点目录
[root@web01 ~]# mkdir /www#挂载
[root@web01 ~]# mount  -t nfs 172.16.1.31:/nfs/web /www
[root@web01 ~]# mount -t nfs 172.16.1.31:/nfs/conf /etc/nginx/conf.d#上传压缩包
[root@web01 ~]# cd /www
[root@web01 www]# rz -E
rz waiting to receive#解压
[root@web01 www]# cd /www
[root@web01 www]# tar -xf wordpress.tar.gz
8、搭建WeCenter
[root@web01 www]# unzip zhihu.zip
[root@web01 www]# chown www.www -R /www
[root@web01 www]# vim /etc/nginx/conf.d/wecenter.conf
server {listen 80;server_name linux.wecenter.cluster.local.com;root /www/zhihu;location / {index index.php;}location ~* \.php$ {fastcgi_pass 127.0.0.1:9000;fastcgi_param SCRIPT_FILENAME $document_root$fastcgi_script_name;include fastcgi_params;}
}# 重启
[root@web01 conf.d]# systemctl restart nginx
9、数据库备份
#创建目录
[root@db01 ~]# mkdir /databases[root@db01 databases]# mount -t nfs 172.16.1.31:/nfs/database /databases/# 编写备份脚本
[root@db01 ~]# vim /databases/mysql_dump.sh
#!/bin/bash
DATE=`date +%F`
BACKUP="/databases"
cd $BACKUP
mysqldump -uroot -p123 --all-databases --single-transaction > mysql-all-${DATE}.sql
tar -czf mysql-all-${DATE}.tar.gz mysql-all-${DATE}.sql
rm -rf mysql-all-${DATE}.sql#创建用户并授权
[root@db01 databases]# useradd www -u1000
[root@db01 databases]# chown www.www /databases/# 脚本加入定时任务
[root@db01 ~]# crontab -e
01 00 * * *  /databases/mysql_dump.sh
10、将web02和web03加入集群
[root@web02 ~]# mkdir /www
[root@web02 ~]# chown -R www.www /www/
[root@web02 ~]# mount  -t nfs 172.16.1.31:/nfs/web /www
[root@web02 ~]# mount -t nfs 172.16.1.31:/nfs/conf /etc/nginx/conf.d
[root@web02 ~]# systemctl restart nginx[root@web03 ~]# mkdir /www
[root@web03 ~]# chown -R www.www /www/
[root@web03 ~]# mount  -t nfs 172.16.1.31:/nfs/web /www
[root@web03 ~]# mount -t nfs 172.16.1.31:/nfs/conf /etc/nginx/conf.d/
[root@web03 ~]# systemctl restart nginx
11、数据备份与同步
#上传实时备份软件
[root@nfs ~]# cd /nfs/download
[root@nfs download]# rz -E
rz waiting to receive.
[root@nfs download]# tar -xf sersync.gz
[root@nfs download]# cd GNU-Linux-x86/
[root@nfs GNU-Linux-x86]# vim confxml.xml
<?xml version="1.0" encoding="ISO-8859-1"?>
<head version="2.5"><host hostip="localhost" port="8008"></host><debug start="false"/><fileSystem xfs="false"/><filter start="false"><exclude expression="(.*)\.svn"></exclude><exclude expression="(.*)\.gz"></exclude><exclude expression="^info/*"></exclude><exclude expression="^static/*"></exclude></filter><inotify><delete start="true"/><createFolder start="true"/><createFile start="true"/><closeWrite start="true"/><moveFrom start="true"/><moveTo start="true"/><attrib start="true"/><modify start="true"/></inotify><sersync><localpath watch="/nfs/download"><remote ip="172.16.1.41" name="download"/><!--<remote ip="192.168.8.39" name="tongbu"/>--><!--<remote ip="192.168.8.40" name="tongbu"/>--></localpath><rsync><commonParams params="-az"/><auth start="true" users="ytt" passwordfile="/etc/rsync.passwd"/><userDefinedPort start="false" port="874"/><!-- port=874 --><timeout start="false" time="100"/><!-- timeout=100 --><ssh start="false"/></rsync><failLog path="/tmp/rsync_fail_log.sh" timeToExecute="60"/><!--default every 60mins execute once--><crontab start="false" schedule="600"><!--600mins--><crontabfilter start="false"><exclude expression="*.php"></exclude><exclude expression="info/*"></exclude></crontabfilter></crontab><plugin start="false" name="command"/></sersync><plugin name="command"><param prefix="/bin/sh" suffix="" ignoreError="true"/>	<!--prefix /opt/tongbu/mmm.sh suffix--><filter start="false"><include expression="(.*)\.php"/><include expression="(.*)\.sh"/></filter></plugin><plugin name="socket"><localpath watch="/opt/tongbu"><deshost ip="192.168.138.20" port="8009"/></localpath></plugin><plugin name="refreshCDN"><localpath watch="/data0/htdocs/cms.xoyo.com/site/"><cdninfo domainname="ccms.chinacache.com" port="80" username="xxxx" passwd="xxxx"/><sendurl base="http://pic.xoyo.com/cms"/><regexurl regex="false" match="cms.xoyo.com/site([/a-zA-Z0-9]*).xoyo.com/images"/></localpath></plugin>
</head>
[root@nfs GNU-Linux-x86]# echo "123"> /etc/rsync.passwd
[root@nfs GNU-Linux-x86]# ./sersync2 -dro confxml.xml [root@nfs ~]# cd /nfs/database
[root@nfs download]# rz -E
rz waiting to receive.
[root@nfs download]# tar -xf sersync.gz
[root@nfs download]# cd GNU-Linux-x86/
[root@nfs GNU-Linux-x86]# vim confxml.xml
cat confxml.xml
<?xml version="1.0" encoding="ISO-8859-1"?>
<head version="2.5"><host hostip="localhost" port="8008"></host><debug start="false"/><fileSystem xfs="false"/><filter start="false"><exclude expression="(.*)\.svn"></exclude><exclude expression="(.*)\.gz"></exclude><exclude expression="^info/*"></exclude><exclude expression="^static/*"></exclude></filter><inotify><delete start="true"/><createFolder start="true"/><createFile start="true"/><closeWrite start="true"/><moveFrom start="true"/><moveTo start="true"/><attrib start="true"/><modify start="true"/></inotify><sersync><localpath watch="/nfs/database"><remote ip="172.16.1.41" name="database"/><!--<remote ip="192.168.8.39" name="tongbu"/>--><!--<remote ip="192.168.8.40" name="tongbu"/>--></localpath><rsync><commonParams params="-az"/><auth start="true" users="ytt" passwordfile="/etc/rsync.passwd"/><userDefinedPort start="false" port="874"/><!-- port=874 --><timeout start="false" time="100"/><!-- timeout=100 --><ssh start="false"/></rsync><failLog path="/tmp/rsync_fail_log.sh" timeToExecute="60"/><!--default every 60mins execute once--><crontab start="false" schedule="600"><!--600mins--><crontabfilter start="false"><exclude expression="*.php"></exclude><exclude expression="info/*"></exclude></crontabfilter></crontab><plugin start="false" name="command"/></sersync><plugin name="command"><param prefix="/bin/sh" suffix="" ignoreError="true"/>	<!--prefix /opt/tongbu/mmm.sh suffix--><filter start="false"><include expression="(.*)\.php"/><include expression="(.*)\.sh"/></filter></plugin><plugin name="socket"><localpath watch="/opt/tongbu"><deshost ip="192.168.138.20" port="8009"/></localpath></plugin><plugin name="refreshCDN"><localpath watch="/data0/htdocs/cms.xoyo.com/site/"><cdninfo domainname="ccms.chinacache.com" port="80" username="xxxx" passwd="xxxx"/><sendurl base="http://pic.xoyo.com/cms"/><regexurl regex="false" match="cms.xoyo.com/site([/a-zA-Z0-9]*).xoyo.com/images"/></localpath></plugin>
</head>
[root@nfs GNU-Linux-x86]# ./sersync2 -dro confxml.xml 


![[BOF]高性能网站设计、开发、部署](http://blog.joycode.com/images/blog.joycode.com/ghj/983/r_网站归类.jpg)