目录
一、什么是LNMP
二、安装LNMP基础环境
三、配置访问PHP脚本
四、配置PHP脚本连接数据库
一、什么是LNMP
LNMP是主流的企业网站平台之一
- L:Linux操作系统
- N:Nginx网站服务
- M:MySQL、MariaDB数据库
- P:网站开发语言(PHP、Perl、Python)
二、安装LNMP基础环境
1、安装Nginx
步骤可参照前文Nginx安装、升级与基础配置_桂安俊@kylinOS的博客-CSDN博客
2、安装数据库
yum install mariadb-server mariadb mariadb-devel -y3、安装php
yum install php -y         #安装php解释器
yum install php-fpm -y     #安装fastcgi,作为php和nginx的接口
yum install php-mysql -y   #安装php连接数据库的扩展包
4、启动服务
启动nginx、mariadb、php-fpm
/usr/local/nginx/sbin/nginxsystemctl start mariadbsystemctl start php-fpmss -utnalp | grep -E "80|3306|9000" #检查启动端口
三、配置访问PHP脚本
1、nginx.conf中的location语法
location /test { #从域名后的"/"根开始匹配
deny 1.1.1.1; #匹配到的域名后面跟/test的时候,拒绝1.1.1.1的源IP访问
}
location /video { #匹配到的域名后面跟/video的时候,拒绝1.1.1.1的源IP访问
allow 2.2.2.2; #仅允许源IP是2.2.2.2的访问
deny all; #其他IP都拒绝访问
}
location / { #其他location都没有匹配到,就到这里,/ 优先级最低
allow all;
}
#注:以上几个location的顺序跟匹配优先级无关,哪个location符合匹配规则,就进入哪个location
测试:
firefox http://web1.test.cn/test #匹配第1个location,除了1.1.1.1其他都可访问
firefox http://web1.test.cn/video #匹配到第2个location,仅允许2.2.2.2访问
firefox http://web1.test.cn/other #匹配到第3个location,所有IP都可访问
2、编辑nginx.conf
(实现动静分离,动态文件和静态文件,执行脚本文件都属于动态文件,其他的如访问普通的html文件或者图片、视频文件,都属于静态文件,因为静态文件不管访问多少次返回的结果都是固定的,而返回脚本文件的结果是根据脚本执行情况而变化的)
vim /usr/local/nginx/conf/nginx.conf #如下修改内容为截取的红色修改部分,非全部内容server {
listen 80;
server_name web1.test.cn;
#处理静态文件访问
location / { # / 优先级最低,其他location没匹配到的都到这里
root html;
index index.html index.htm;
}
error_page 500 502 503 504 /50x.html;
location = /50x.html {
root html;
}#处理动态文件访问
location ~ \.php$ { #~指使用正则匹配,\是转义字符,即匹配以.php结尾的内容
root html;
fastcgi_pass 127.0.0.1:9000; #转发给php-fpm的IP与端口
fastcgi_index index.php;
#fastcgi_param SCRIPT_FILENAME /scripts$fastcgi_script_name; #注释
include fastcgi.conf; #加载Fast-CGI参数文件
}
}
/usr/local/nginx/sbin/nginx -s reload #重新加载配置3、编写测试php脚本
vim /usr/local/nginx/html/test.php<?php
$i=33;
echo $i;
?>4、访问测试
客户端测试:如果windows浏览器远程访问,由于没配dns,可以手动加一下hosts文件进行域名解析,文件路径 C:\Windows\System32\drivers\etc\hosts
访问http://web1.test.cn/test.php

如上可以看到,浏览器返回的是经过php解释后的运行结果,而不是php源码。
四、配置PHP脚本连接数据库
通过编写PHP脚本实现数据库操作,要求安装php-mysql扩展
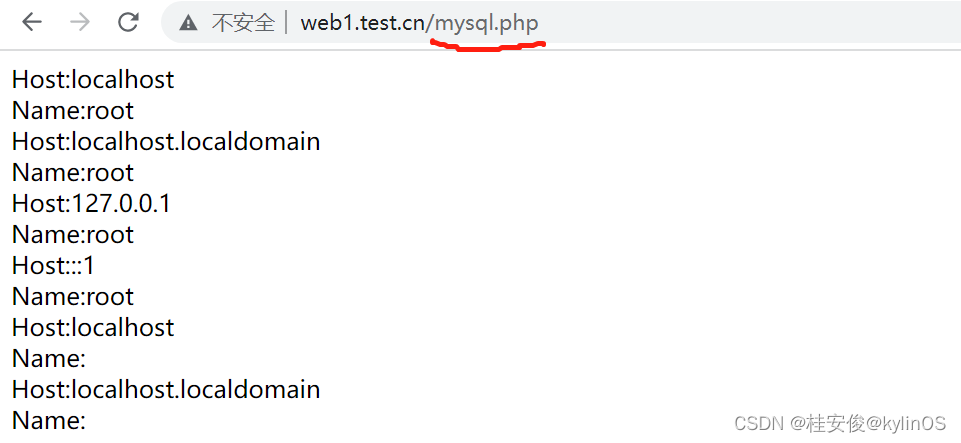
yum install php-mysql -y #已安装可忽略vim /usr/local/nginx/html/mysql.php #新建php访问mysql测试脚本<?php
$mysqli = new mysqli('localhost','root','','mysql'); #中间2个连续单引号是空密码的意思,mysql是进入数据库中的mysql这一个自带的数据库,前面都是登录信息
if(mysqli_connect_errno()){ #连接失败die('Unable to connect!').mysqli_connect_error(); #显示无法连接
}
$sql="select * from user"; #能连上就查询user表
$result=$mysqli->query($sql);
while($row=$result->fetch_array()){ #while循环打印搜索内容printf("Host:%s",$row[0]);printf("</br>");printf("Name:%s",$row[1]);printf("</br>");
}
?>浏览器访问web1.test.cn/mysql.php测试,如下图可以看到网页显示的是php查询mysql后的结果: