1)硬件环境 Windowsxp
2)软件环境 CentOS6864
3)项目名称 我叫超级无敌变态实验
4)项目描述
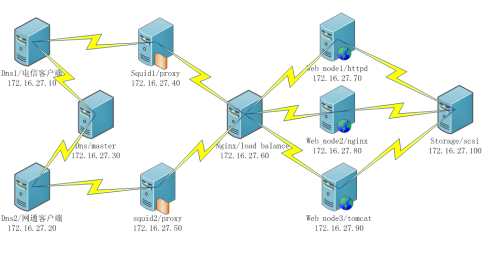
DNS主从+DNS视图+两个Squid反向代理+Nginx负载均衡+
Httpd/Nginx/Tomcat部署+ISCSI后端存储
5)配置步骤
A、用Visio规划好整体架构
B、DNS主从DNS视图用squid1、squid2做两个网页验证
C、ISCSI后端存储先做双王再导入第三个节点
D、部署Httpd/Nginx/Tomcat 挂载访问网页验证存储
E、部署nginx负载均衡卸载网页根写上不同的内容验证
F、配置两个反向代理用客户端验证
注意:因硬件环境限制分别用DNS1,DNS2,作电信和网通的客户端。

先用dns1搭建一台时间同步器
DNS主从加视图
[root@dns1 ~]# yum install ntp ntpdate -y
[root@dns1 ~]# vim /etc/ntp.conf
19 restrict 172.16.0.0 mask 255.255.0.0 nomodify notrap
20 server 127.127.1.0
[root@dns1 ~]# /etc/init.d/ntpd start
Starting ntpd:
[root@dns1 ~]# vim /etc/hosts
127.0.0.1 localhost localhost.localdomain localhost4 localhost4.localdomain4
::1 localhost localhost.localdomain localhost6 localhost6.localdomain6
172.16.27.10 dns1
172.16.27.20 dns2
172.16.27.30 dnsm
172.16.27.40 squid1
172.16.27.50 squid2
172.16.27.60 nginxf
172.16.27.70 node1
172.16.27.80 node2
172.16.27.90 node3
172.16.27.100 scsi
[root@dns1 ~]# scp /etc/hosts dns1:/etc/hosts
[root@dns1 ~]# scp /etc/hosts dnss:/etc/hosts
[root@dns2 ~]# ntpdate dns1
[root@dnsm ~]# ntpdate dns1
主dns
[root@dnsm~]# yum install bind bind-utils -y
[root@dnsm ~]# vim /etc/named.conf
options {
directory "/var/named";
};
acl telcomip { 172.16.27.10; };
acl unicomip { 172.16.27.20; };
view telcom {
match-clients { telcomip; };
zone "lee.com" {
type master;
file "lee.com.telcom";
notify yes;
also-notify { 172.16.27.10 ;};
};
};
view unicom {
match-clients { unicomip; };
zone "lee.com" {
type master;
file "lee.com.unicom";
notify yes;
also-notify { 172.16.27.20; };
};
};
[root@dnsm ~]# cd /var/named/
[root@dnsm named]# cp -p named.localhost lee.com.telcom
[root@dnsmnamed]# vim lee.com.telcom
$TTL 1D
@ IN SOA @ rname.invalid. (
0 ; serial
1D ; refresh
1H ; retry
1W ; expire
3H ) ; minimum
NS dns.lee.com.
dns A 172.16.27.30
www A 172.16.27.40
[root@dnsm named]# cp -p lee.com.telcom lee.com.unicom
[root@dnsm named]# vim lee.com.unicom
$TTL 1D
@ IN SOA @ rname.invalid. (
0 ; serial
1D ; refresh
1H ; retry
1W ; expire
3H ) ; minimum
NS dns.lee.com.
dns A 172.16.27.30
www A 172.16.27.50
[root@dnsm named]# /etc/init.d/named start
从dns1
[root@dns1 ~]# yum install bind bind-utils -y
[root@dns1 ~]# scp dnsm:/etc/named.conf /etc/
[root@dns1 ~]# vim /etc/named.conf
options {
directory "/var/named";
};
acl telcomip { 172.16.27.10; };
acl unicomip { 172.16.27.20; };
view telcom {
match-clients { telcomip; };
zone "lee.com" {
type slave;
file "lee.com.telcom";
masters { 172.16.27.30; };
};
};
[root@dns1 ~]# /etc/init.d/named start
Generating /etc/rndc.key: [ OK ]
Starting named: [ OK ]
[root@dns1 ~]# vim /etc/resolv.conf
nameserver 172.16.27.30
[root@dns1 ~]# nslookup www.lee.com
Server:172.16.27.10
Address:172.16.27.10#53
Name:www.lee.com
Address: 172.16.27.40
[root@dns2 ~]# yum install bind bind-utils -y
[root@dns2 ~]# scp dns1:/etc/named.conf /etc/
[root@dns2 ~]# vim /etc/named.conf
options {
directory "/var/named";
};
acl telcomip { 172.16.27.10; };
acl unicomip { 172.16.27.20; };
view unicom {
match-clients { unicomip; };
zone "lee.com" {
type slave;
file "lee.com.telcom";
masters { 172.16.27.30; };
};
};
[root@dns2 ~]# /etc/init.d/named start
Generating /etc/rndc.key: [ OK ]
Starting named: [ OK ]
[root@dns2 ~]# vim /etc/resolv.conf
nameserver 172.16.27.20
[root@dns2 ~]# nslookup www.lee.com
Server:172.16.27.20
[root@dns2 ~]# vim /etc/resolv.conf
nameserver 172.16.27.40
Address:172.16.27.20#53
Name:www.lee.com
Address: 172.16.27.50
到此DNS主从加视图完事
开启squid1代理和squid2代理做一个简单的http网页测试
配置hosts文件主机名ip地址时间同步
Squid1代理
[root@squid1~]# hostname squid
[root@squid1~]# vim /etc/sysconfig/network
NETWORKING=yes
HOSTNAME=squid
退出重新连接
[root@squid1 ~]# scp 172.16.27.10:/etc/hosts /etc/hosts
[root@squid1 ~]# ntpdate dns1
[root@squid1 ~]# yum install httpd -y
[root@squid1 ~]# echo "wo shi dianxin" >> /var/www/html/index.html
[root@squid1 ~]# /etc/init.d/httpd start
Starting httpd: httpd: Could not reliably determine the server's fully qualified domain name, using 172.16.27.40 for ServerName
[ OK ]
Squid2代理
[root@lee ~]# hostname squid2
[root@lee ~]# vim /etc/sysconfig/network
NETWORKING=yes
HOSTNAME=nginx
退出重新连接
[root@squid2 ~]# scp 172.16.27.10:/etc/hosts /etc/hosts
[root@squid2 ~]# ntpdate dns1
[root@squid2~]# yum install httpd -y
[root@squid2 ~]# echo "wo shi wangtong" >> /var/www/html/index.html
[root@squid2 ~]# /etc/init.d/httpd start
Starting httpd: httpd: Could not reliably determine the server's fully qualified domain name, using 172.16.27.50 for ServerName
[ OK ]
分别用dns1 dns2访问www.lee.com验证
DNS1
[root@dns1 ~]# yum install elinks -y
[root@dns1 ~]# elinks --dump www.lee.com
wo shi dianxin
DNS2
[root@dns2 ~]# yum install elinks -y
[root@dns2 ~]# elinks --dump www.lee.com
wo shi wangtong
关闭代理的网页防止以后实验干扰
[root@squid1 ~]# /etc/init.d/httpd stop
Stopping httpd: [ OK ]
[root@squid2~]# /etc/init.d/httpd stop
Stopping httpd: [ OK ]
先做存储
修改主机名、ip地址、时间同步、hosts文件。
先实现双王模式集群 再添加第三个节点
存储端导出存储
[root@scsi ~]# yum install scsi-target-utils -y
[root@scsi ~]# fdisk /dev/sda
导出的存储大小为20G
/dev/sda5:20G
[root@scsi ~]# partx -a /dev/sda
[root@scsi ~]# ls /dev/sda*
[root@scsi ~]# vim /etc/tgt/targets.conf
41 <target iqn.2017-10.com.up.storage:lee20G>
42 backing-store /dev/sda5
43 </target>
[root@scsi ~]# /etc/init.d/tgtd start
Starting SCSI target daemon: [ OK ]
[root@scsi ~]# chkconfig tgtd on
[root@scsi ~]# tgt-admin -s
Target 1: iqn.2017-10.com.up.storage:lee20G
看一下是否导出
集群节点node1,node2
Node1
[root@node1 ~]# yum install httpd cman rgmanager iscsi-initiator-utils gfs2-utils lvm2-cluster -y
创建集群配置文件
[root@node1 ~]# ccs_tool create -2 cluslee
[root@node1 ~]# mv /etc/cluster/cluster.conf{,.bak}
[root@node1 ~]# ccs_tool create cluslee
添加栅设备
[root@node1 ~]# ccs_tool addfence zfence fence_manual
向集群中添加节点
[root@node1 ~]# ccs_tool addnode -n 1 -f zfence node1
[root@node1 ~]# ccs_tool addnode -n 2 -f zfence node2
修改集群配置文件,设置为双王模式
[root@node1 ~]# grep cman /etc/cluster/cluster.conf.bak
<cman two_node="1" expected_votes="1"/> \\复制好
[root@node1 ~]# vim /etc/cluster/cluster.conf
粘贴到第三行
1 <?xml version="1.0"?>
2 <cluster name="cluslee" config_version="4">
3 <cman two_node="1" expected_votes="1"/>
4 <clusternodes>
[root@node1 ~]# echo 123456 | passwd --stdin ricci
拷贝给node2
[root@node1 ~]# scp /etc/cluster/cluster.conf node2:/etc/cluster/
Node2
[root@node2 ~]# yum install cman rgmanager iscsi-initiator-utils gfs2-utils lvm2-cluster -y
[root@node2 ~]# echo 123456 | passwd --stdin ricci
安装nginx
[root@node2 ~]# yum install lrzsz -y
导入软件包
[root@node2 ~]# rz
[root@node2 ~]# tar xvf nginx.tar.gz -C /usr/local/src
[root@node2 ~]# cd /usr/local/src/nginx/
先安装pcre软件(URL重写时nginx支持正则)
[root@node2 nginx]# tar xvf pcre-8.10.tar.gz -C /usr/local/src/
[root@node2 nginx]# cd /usr/local/src/pcre-8.10/
[root@node2 pcre-8.10]# yum install gcc gcc-c++ -y
[root@node2 pcre-8.10]# ./configure && make && make install
安装nginx
[root@node2 pcre-8.10]# cd /usr/local/src/nginx/
[root@node2 nginx]# tar xvf nginx-1.12.0.tar.gz -C /usr/local/src/
[root@node2 nginx]# useradd -r -s /sbin/nologin nginx
[root@node2 nginx]# id nginx
uid=498(nginx) gid=498(nginx) groups=498(nginx)
[root@node2 nginx]# cd /usr/local/src/nginx-1.12.0/
[root@node2 nginx-1.12.0]# yum install openssl-devel -y
[root@node2 nginx-1.12.0]#./configure --prefix=/usr/local/webserver/nginx --user=nginx --group=nginx --with-http_ssl_module --with-http_stub_status_module
[root@node2 nginx-1.12.0]# make && make install
修改PATH变量
[root@node2 nginx-1.12.0]# vim /root/.bash_profile
10 PATH=/usr/local/webserver/nginx/sbin:$PATH:$HOME/bin
[root@node2 nginx-1.12.0]# source !$
启动服务
[root@node2 nginx-1.12.0]# nginx
[root@node2 nginx-1.12.0]# netstat -antulp | grep :80
tcp 0 0 0.0.0.0:80 0.0.0.0:* LISTEN 26939/nginx
服务停掉
[root@node2 nginx-1.12.0]# nginx -s stop
Nginx安装完成
启动node1 ,node2
启动ricci
[root@node1 ~]# /etc/init.d/ricci start
[root@node2 ~]# /etc/init.d/ricci start
启动cman
[root@node1 ~]# /etc/init.d/cman start
[root@node2 ~]# /etc/init.d/cman start
查看集群状态
[root@node2 ~]# clustat
Cluster Status for cluslee @ Thu Oct 19 18:36:16 2017
Member Status: Quorate
Member Name ID Status
------ ---- ---- ------
node1 1 Online
node2 2 Online, Local
两节点发现并导入存储
[root@node1 ~]# iscsiadm -m discovery -t st -p scsi -l
[root@node2 ~]# iscsiadm -m discovery -t st -p scsi -l
让lvm支持集群
[root@node1 ~]# lvmconf --enable-cluster
[root@node2 ~]# lvmconf --enable-cluster
启动clvmd
[root@node1 ~]# /etc/init.d/clvmd start
[root@node2 ~]# /etc/init.d/clvmd start
在node1上创建lv
[root@node1 ~]# pvcreate /dev/sdb
[root@node1 ~]# vgcreate vglee0 /dev/sdb
[root@node1 ~]# lvcreate -L 5G -n lv01lee vglee0
[root@node1 ~]# lvs
LV VG Attr LSize Pool Origin Data% Meta% Move Log Cpy%Sync Convert
lv01lee vglee0 -wi-a----- 5.00g
在node2上查看
[root@node2 ~]# lvs
LV VG Attr LSize Pool Origin Data% Meta% Move Log Cpy%Sync Convert
lv01lee vglee0 -wi-a----- 5.00g
格式化成集群文件系统(比较慢)
[root@node1 ~]# mkfs.gfs2 -j 2 -p lock_dlm -t cluslee:lv01lee /dev/vglee0/lv01lee
挂载使用
[root@node1 ~]# mount /dev/vglee0/lv01lee /var/www/html/
[root@node2 ~]# mount /dev/vglee0/lv01lee /usr/local/webserver/nginx/html
[root@node1 ~]# echo we are cluster > /var/www/html/index.html
[root@node1 ~]# /etc/init.d/httpd start
Starting httpd: httpd: Could not reliably determine the server's fully qualified domain name, using 172.16.27.70 for ServerName
[ OK ]
[root@node2 ~]# nginx
[root@node1 ~]# curl node1
we are cluster
[root@node1 ~]# curl node2
we are cluster
至此双王成功加入第三个节点
[root@node3 ~]# yum install iscsi-initiator-utils cman rgmanager gfs2-utils lvm2-cluster httpd -y
部署tomcat
[root@node3 ~]# yum install lrzsz unzip -y
安装jdk
[root@node3 ~]# rz \\导入压缩包
[root@node3 ~]# unzip tomcat-software.zip
[root@node3 tomcat-software]# cd tomcat-software
[root@node3 tomcat-software]# chmod +x jdk-6u45-linux-x64.bin
[root@node3 tomcat-software]# ./jdk-6u45-linux-x64.bin
[root@node3 tomcat-software]# cp -a jdk1.6.0_45/ /usr/local/java
修改环境变量
[root@node3 tomcat-software]# vim /etc/profile
79 JAVA_HOME=/usr/local/java
80 CLASSPATH=.:$JAVA_HOME/lib/dt.jar:$JAVA_HOME/lib/tools.jar
81 PATH=$JAVA_HOME/bin:$PATH
82 export JAVA_HOME CLASSPATH PATH
[root@node3 tomcat-software]# source !$
[root@node3 tomcat-software]# echo $JAVA_HOME
/usr/local/java
[root@node3 tomcat-software]# java -version
java version "1.6.0_45"
Java(TM) SE Runtime Environment (build 1.6.0_45-b06)
Java HotSpot(TM) 64-Bit Server VM (build 20.45-b01, mixed mode)
安装tomcat
[root@node3 tomcat-software]# tar xvf apache-tomcat-7.0.14.tar.gz -C /usr/local/src/
[root@node3 tomcat-software]# cd /usr/local/src/
[root@node3 src]# mv apache-tomcat-7.0.14/ /usr/local/tomcat7
[root@node3 src]# cd /usr/local/tomcat7/conf/
修改tomcat端口
[root@node3 conf]# vim server.xml
70 <Connector port="80" protocol="HTTP/1.1" \\8080换80
Tomcat 部署完成
[root@node3 ~]# echo 123456 | passwd --stdin ricci
Changing password for user ricci.
passwd: all authentication tokens updated successfully.
[root@node3 ~]# /etc/init.d/ricci start
Starting oddjobd: [ OK ]
generating SSL certificates... done
Generating NSS database... done
Starting ricci: [ OK ]
修改集群配置文件 删除双王的那行配置加了一个node3节点 版本号加1
[root@node1 ~]# vim /etc/cluster/cluster.conf
<?xml version="1.0"?>
<cluster name="cluslee" config_version="5">
<clusternodes>
<clusternode name="node1" votes="1" nodeid="1"><fence><method name="single"><device name="zfence"/></method></fence></clusternode>
<clusternode name="node2" votes="1" nodeid="2"><fence><method name="single"><device name="zfence"/></method></fence></clusternode>
<clusternode name="node3" votes="1" nodeid="3"><fence><method name="single"><device name="zfence"/></method></fence></clusternode>
</clusternodes>
<fencedevices>
<fencedevice name="zfence" agent="fence_manual"/>
</fencedevices>
<rm>
<failoverdomains/>
<resources/>
</rm>
</cluster>
推送配置文件
[root@node1 ~]# cman_tool version -r
You have not authenticated to the ricci daemon on node3
Password:
You have not authenticated to the ricci daemon on node1
Password:
You have not authenticated to the ricci daemon on node2
Password:
Node3启动cman
[root@node3 ~]# /etc/init.d/cman start
导入存储
[root@node3 ~]# iscsiadm -m discovery -t st -p scsi
Starting iscsid: [ OK ]
172.16.27.100:3260,1 iqn.2017-10.com.up.storage:lee20G
[root@node3 ~]# iscsiadm -m node -T iqn.2017-10.com.up.storage:lee20G -p scsi -l
Logging in to [iface: default, target: iqn.2017-10.com.up.storage:lee20G, portal: 172.16.27.100,3260] (multiple)
Login to [iface: default, target: iqn.2017-10.com.up.storage:lee20G, portal: 172.16.27.100,3260] successful.
[root@node3 ~]# lvmconf --enable-cluster
[root@node3 ~]# /etc/init.d/clvmd start
Starting clvmd:
Activating VG(s): 1 logical volume(s) in volume group "vglee0" now active
[ OK ]
[root@node1 ~]# gfs2_jadd -j 1 /dev/vglee0/lv01lee
Filesystem: /var/www/html
Old Journals 2
New Journals 3
[root@node3 ~]# mount /dev/vglee0/lv01lee /usr/local/tomcat7/webapps/ROOT/
[root@node1 ~]# curl node1
we are cluster
[root@node1 ~]# curl node2
we are cluster
[root@node1 ~]# curl node3
we are cluster
存储完成
装一个nginx做负载均衡调度器
修改主机名、ip地址、时间同步、hosts文件
Nginxf负载均衡
安装nginx
[root@nginxf ~]# yum install lrzsz -y
导入软件包
[root@nginxf ~]# rz
[root@nginxf ~]# tar xvf nginx.tar.gz -C /usr/local/src
[root@nginxf ~]# cd /usr/local/src/nginx/
先安装pcre软件(URL重写时nginx支持正则)
[root@nginxf nginx]# tar xvf pcre-8.10.tar.gz -C /usr/local/src/
[root@nginxf nginx]# cd /usr/local/src/pcre-8.10/
[root@nginxf pcre-8.10]# yum install gcc gcc-c++ -y
[root@nginxf pcre-8.10]# ./configure && make && make install
安装nginx
[root@nginxf pcre-8.10]# cd /usr/local/src/nginx/
[root@nginxf nginx]# tar xvf nginx-1.12.0.tar.gz -C /usr/local/src/
[root@nginxf nginx]# useradd -r -s /sbin/nologin nginx
[root@nginxf nginx]# id nginx
uid=498(nginx) gid=498(nginx) groups=498(nginx)
[root@nginxf nginx]# cd /usr/local/src/nginx-1.12.0/
[root@nginxf nginx-1.12.0]# yum install openssl-devel -y
[root@nginxf nginx-1.12.0]#./configure --prefix=/usr/local/webserver/nginx --user=nginx --group=nginx --with-http_ssl_module --with-http_stub_status_module
[root@nginxf nginx-1.12.0]# make && make install
修改PATH变量
[root@nginxf nginx-1.12.0]# vim /root/.bash_profile
10 PATH=/usr/local/webserver/nginx/sbin:$PATH:$HOME/bin
[root@nginxf nginx-1.12.0]# source !$
启动服务
[root@nginxf nginx-1.12.0]# nginx
[root@nginxf nginx-1.12.0]# netstat -antulp | grep :80
tcp 0 0 0.0.0.0:80 0.0.0.0:* LISTEN 26939/nginx
服务停掉
[root@nginxf nginx-1.12.0]# nginx -s stop
Nginx安装完成
做负载均衡的调度器
[root@nginxf nginx-1.12.0]# cd /usr/local/webserver/nginx/conf/
[root@nginxf conf]# cp nginx.conf{,.bak}
[root@nginxf conf]# vim nginx.conf
34 upstream webserver {
35 server 172.16.27.80;
36 server 172.16.27.90;
37 server 172.16.27.100;
38 }
39
40 server {
41 listen 80;
42 server_name www.lee.com 172.16.27.60;
43 #charset koi8-r;
44
45 #access_log logs/host.access.log main;
46 root html;
47 index index.html index.htm;
48
49 location / {
50 proxy_pass http://webserver;
51 proxy_next_upstream http_500 http_502 http_503 error timeout invalid_header;
52 include /usr/local/webserver/nginx/conf/proxy.conf;
53
54 }
}
注意server括号扩回的位置
[root@nginxf conf]# vim proxy.conf
proxy_redirect off;
proxy_set_header Host $host;
proxy_set_header X-Real_IP $remote_addr;
proxy_set_header X-Forwarded-For $proxy_add_x_forwarded_for;
client_body_buffer_size 128k;
proxy_connect_timeout 90;
proxy_send_timeout 90;
proxy_read_timeout 90;
proxy_buffer_size 4k;
proxy_buffers 4 32k;
proxy_busy_buffers_size 64k;
proxy_temp_file_write_size 64k;
[root@nginxf conf]# nginx -t
nginx: the configuration file /usr/local/webserver/nginx/conf/nginx.conf syntax is ok
nginx: configuration file /usr/local/webserver/nginx/conf/nginx.conf test is successful
[root@nginxf conf]# nginx -s reload
验证
在node3上写网页内容把挂载的分区卸载
[root@node3 ~]# umount /usr/local/tomcat7/webapps/ROOT/
[root@node3 ~]# echo lee >> /usr/local/tomcat7/webapps/ROOT/index.html
[root@node3 ~]# /usr/local/tomcat7/bin/shutdown.sh
等一会在开启
[root@node3 ~]# /usr/local/tomcat7/bin/startup.sh
[root@nginxf conf]# curl nginxf
lee
[root@nginxf conf]# curl nginxf
we are cluster
[root@nginxf conf]# curl nginxf
lee
[root@nginxf conf]# curl nginxf
we are cluster
负载均衡成功
部署安装代理服务器squid1、squid2
修改主机名、ip地址、时间同步、hosts文件
Squid1
[root@squid1 ~]# yum install squid -y
[root@squid1 ~]# vim /etc/squid/squid.conf
61 # Squid normally listens to port 3128
62 #http_port 3128
63 http_port 80 vhost vport
64 cache_dir ufs /var/spool/squid 512 16 256
65 cache_mem 16 MB
66 cache_peer 172.16.27.60 parent 80 0 no-query originserver
[root@squid1 ~]# /etc/init.d/squid start
init_cache_dir /var/spool/squid... Starting squid: . [ OK ]
Squid2
[root@squid2 ~]# yum install squid -y
[root@squid2 ~]# vim /etc/squid/squid.conf
61 # Squid normally listens to port 3128
62 #http_port 3128
63 http_port 80 vhost vport
64 cache_dir ufs /var/spool/squid 512 16 256
65 cache_mem 16 MB
66 cache_peer 172.16.27.60 parent 80 0 no-query originserver
[root@squid2 ~]# /etc/init.d/squid start
init_cache_dir /var/spool/squid... Starting squid: . [ OK ]
反向代理完成
DNS主从+DNS视图+两个Squid反向代理+nginx负载均衡+httpd,nginx,tomcat部署+iscsi后端存储
全部完成 验证
[root@dns1 ~]# nslookup www.lee.com
Server:172.16.27.30
Address:172.16.27.30#53
Name:www.lee.com
Address: 172.16.27.40
[root@dns1 ~]# curl www.lee.com
we are cluster
[root@dns2 ~]# nslookup www.lee.com
Server:172.16.27.20
Address:172.16.27.20#53
Name:www.lee.com
Address: 172.16.27.50
[root@dns2 ~]# curl www.lee.com
we are cluster
恭喜你完成了我叫超级无敌变态实验你这么强!!!

原创手打
如有错误欢迎批评和指正!!!
转载于:https://blog.51cto.com/lee1002/1975783


