LAMP 首先我们要了解LAMP到底是什么
- Linux Linux 是免费开源软件,这意味着源代码可用的操作系统。
- Apache Apache 是使用中最受欢迎的一个开放源码的WEB服务器软件。
- MySQL MySQL 是多线程、多用户的SQL数据库管理系统
- PHP,Perl 或 Python PHP 是一种编程语言最初设计生产动态网站。PHP 是主要用于服务器端的应用程序软件。Perl 和 Python 类似。
此处就用Linux + Apache + Mysql + PHP 给大家演示一下怎样快速建站,希望您看过之后能有所帮助。此处我们就用rpm包来安装,当然也可以使用源码安装,(后期回味大家演示)第一次搭建论坛建议使用rpm包来安装。
需要用到的几个rpm包 httpd ,mysql, mysql-server, php, php-mysql php-mbstring ,php-gd。建议使用yum源进行安装,来解决其依赖关系。
- [root@localhost ~]# yum install httpd mysql mysql-server -y
- [root@localhost ~]# yum install php php-mysql php-mbstring php-gd -y
- [root@localhost ~]# service httpd start
- [root@localhost ~]# service mysqld start
- [root@localhost html]# chkconfig httpd on #开机自动启动服务
- [root@localhost html]# chkconfig mysqld on
- [root@localhost ~]# netstat -tupln #查看开放端口
- Active Internet connections (only servers)
- Proto Recv-Q Send-Q Local Address Foreign Address State PID/Program name
- tcp 0 0 127.0.0.1:2208 0.0.0.0:* LISTEN 2934/hpiod
- tcp 0 0 0.0.0.0:3306 0.0.0.0:* LISTEN 17908/mysqld
启动了httpd和mysql服务后就可以进行测试
- [root@localhost ~]# cd /var/www/html
- [root@localhost html]# vim index.php
- <?php
- phpinfo();
- ?>

- [root@localhost ~]# cd /var/www/html
- [root@localhost html]# vim index.php
- $link=mysql_connect('localhost','root','');
- if ($link)
- echo "Success...";
- else
- echo "Failure";
- ?>
和mysql数据库连接正常

此时我们可以进入mysql并为mysql创建密码
- [root@localhost ~]# mysql
- Welcome to the MySQL monitor. Commands end with ; or \g.
- Your MySQL connection id is 3
- Server version: 5.0.45 Source distribution
- Type 'help;' or '\h' for help. Type '\c' to clear the buffer.
- mysql> show databases; #查询数据库
- +--------------------+
- | Database |
- +--------------------+
- | information_schema |
- | mysql |
- | test |
- +--------------------+
- 3 rows in set (0.01 sec)
- mysql> use mysql ; #进入此数据库
- Reading table information for completion of table and column names
- You can turn off this feature to get a quicker startup with -A
- Database changed
- mysql> show tables; #查询数据库内的表
- +---------------------------+
- | Tables_in_mysql |
- +---------------------------+
- | columns_priv |
- | db |
- | func |
- | help_category |
- | help_keyword |
- | help_relation |
- | help_topic |
- | host |
- | proc |
- | procs_priv |
- | tables_priv |
- | time_zone |
- | time_zone_leap_second |
- | time_zone_name |
- | time_zone_transition |
- | time_zone_transition_type |
- | user |
- +---------------------------+
- 17 rows in set (0.00 sec)
- mysql> select host,user,password from user; #查询表内的内容
- +-----------------------+------+----------+
- | host | user | password |
- +-----------------------+------+----------+
- | localhost | root | |
- | localhost.localdomain | root | |
- | 127.0.0.1 | root | |
- +-----------------------+------+----------+
- 3 rows in set (0.00 sec)
- mysql> set password for root@'localhost'=password('redhat'); #设定密码
- Query OK, 0 rows affected (0.00 sec)
- mysql> set password for root@'localhost.localdomain'=password('redhat');
- Query OK, 0 rows affected (0.00 sec)
- mysql> set password for root@'127.0.0.1'=password('redhat');
- Query OK, 0 rows affected (0.00 sec)
- mysql> flush privileges; #刷新一下
- Query OK, 0 rows affected (0.00 sec)
- mysql> select host,user,password from user;
- +-----------------------+------+------------------+
- | host | user | password |
- +-----------------------+------+------------------+
- | localhost | root | 27c30f0241a5b69f |
- | localhost.localdomain | root | 27c30f0241a5b69f |
- | 127.0.0.1 | root | 27c30f0241a5b69f |
- +-----------------------+------+------------------+
- 3 rows in set (0.00 sec)
- mysql>
此时就给mysql设置了密码,登录就需要使用mysql -u root -p 命令来登录数据库我们也可以通过一个图形界面工具phpMyadmin来管理我们的数据库。下面就安装并配置一下phpMyadmin。
配置phpMyadmin
phphpMyAdmin-2.11.10.1-all-languages.zip 此处使用的不是最新版本。 libmcrypt-2.5.7-5.el5.i386.rpm php-mcrypt-5.1.6-5.el5.i386.rpm 扩展需要用到的rpm包
- [root@localhost ~]# unzip phpMyAdmin-2.11.10.1-all-languages.zip
- [root@localhost ~]# mv phpMyAdmin-2.11.10.1-all-languages /var/www/html/phpmyadmin
- [root@localhost ~]# cd /var/www/html/phpmyadmin

出现错误信息是因为我们刚刚给mysql设置了密码,所以就进不去mysql,当没有给mysql设置密码的时候就直接进入管理页面,其实这也造成了数据库的不安全性,接下来就给mysql提供用户验证界面
- [root@localhost phpmyadmin]# ls |grep conf
- config.sample.inc.php
- show_config_errors.php
- [root@localhost phpmyadmin]# cp config.sample.inc.php config.inc.php
- [root@localhost phpmyadmin]# vim config.inc.php
- 17 $cfg['blowfish_secret'] = '123456'; /* YOU MUST FIHIS KIE AUTH! */
- [root@localhost phpmyadmin]# service httpd restart
代码效果,给mysql提供了用户验证界面

可以看见此时还无法载入mcrypt,通过安装刚刚提供的两个rpm包来解决这一难题,切记要使用yum localinstall 来安装,--nogpgcheck 不进行签名检查。
- [root@localhost ~]# yum localinstall --nogpgcheck libmcrypt-2.5.7-5.el5.i386.rpm php-mcrypt-5.1.6-5.el5.i386.rpm -y


此时输入了用户名和密码可以进入到管理图形界面,随意根据自己需要操作数据库

到此phpMyadmin已经配置完毕,下面来搭建phpwind
搭建phpwind
phpwind_GBK_8.3.zip
- [root@localhost ~]unzip phpwind_GBK_8.3.zip
- [root@localhost ~]# cd phpwind_GBK_8.3
- [root@localhost phpwind_GBK_8.3]# ls
- docs upload
- [root@localhost phpwind_GBK_8.3]# mv upload/ /var/www/html/
- [root@localhost phpwind_GBK_8.3]# cd /var/www/html/
- [root@localhost html]# ls
- phpmyadmin upload
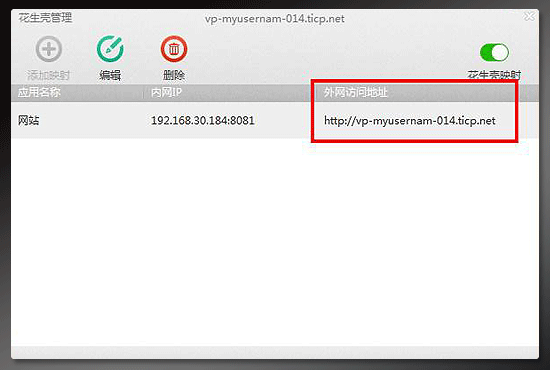
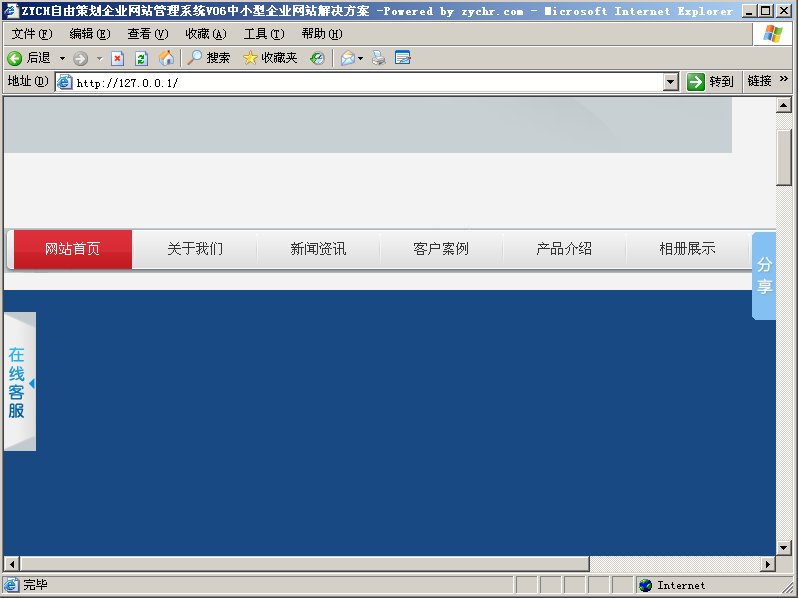
在浏览器中访问

- [root@localhost html]# vim /etc/httpd/conf/httpd.conf
- #AddDefaultCharset UTF-8 #禁用这一行
- [root@localhost ~]# service httpd restart

乱码的问题解决,根据要求修改一下目录文件属性为777,此处为了方便,就把文件夹下的所有文件都改为777了,建议不要这样做,而是根据要求吧每一项该为777就可以了。
- [root@localhost phpwind]# chmod -R 777 attachment/*
- [root@localhost phpwind]# chmod -R 777 html/*
- [root@localhost phpwind]# chmod -R 777 data/*


填写了相关信息并成功安装。

删除install.php
- [root@localhost phpwind]# rm install.php
- rm锛..??.??涓€?..浠??.nstall.php?. y #远程终端连接,有乱码滴
可以进入论坛喽。

进入后台页面,管理论坛

此时一个论坛就完美的建好了,很快吧,。下面再来给大家演示一下另一个经典的建站工具Discuz。
Discuz的搭建
Discuz_7.2_FULL_SC_GBK.zip
- [root@localhost ~]# unzip Discuz_7.2_FULL_SC_GBK.zip
- [root@localhost ~]# mv upload/* /var/www/html
在浏览器中进行配置


把上图中不可写都设置为可写
- [root@localhost html]# setfacl -m u:apache:rw config.inc.php
- [root@localhost html]# setfacl -m u:apache:rw attachments/
- [root@localhost html]# setfacl -m u:apache:rw ./forumdata/
- [root@localhost html]# setfacl -m u:apache:rw ./forumdata/cache/
- [root@localhost html]# setfacl -m u:apache:rw ./forumdata/templates/
- [root@localhost html]# setfacl -m u:apache:rw ./forumdata/threadcaches/
- [root@localhost html]# setfacl -m u:apache:rw ./forumdata/logs/
- [root@localhost html]# setfacl -m u:apache:rw uc_client/data/cache/

下面一步一步安装,此处不再贴图,最终效果图为

Discuz 就搭建完毕了,
在这里给大家演示了phpMyadmin的搭建与扩展 ,phpwind 以及Discuz的搭建,希望对大家有所帮助,错误之处请大家指正。。。继续推出精彩博文,希望大家关注。


![[狂顶]国内免费图片外链网站](http://static.oschina.net/uploads/img/201304/28225829_26Mu.jpg)

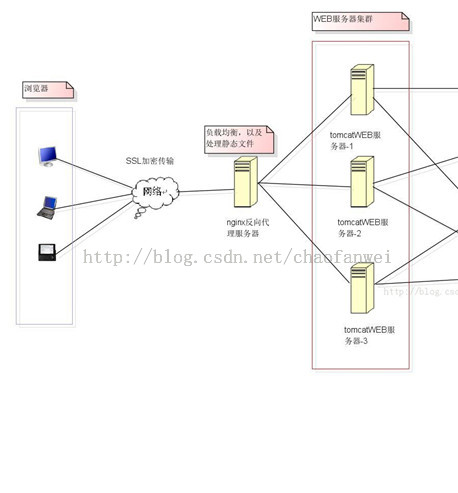


![LAMP环境搭建实现网站动静分离[转]](http://s3.51cto.com/wyfs02/M02/59/44/wKiom1TN8R6wAwxoAAHWnmBMxwU885.jpg)