目录
- 项目介绍和源码;
- 拿来即用的bootstrap模板;
- 服务器SSH服务配置与python中paramiko的使用;
- 用户登陆与session;
- 最简单的实践之修改服务器时间;
- 查看和修改服务器配置与数据库的路由;
- 基于websocket的实时日志实现;
- 查看服务器中的日志与前端的datatable的利用;
- 重启服务器进程。
前言
运维过程中,常常希望修改一些配置文件,文章用网站的功能替代登陆服务器修改文件,并不是十全十美,总得来说,实现了功能。文章主要分为两个部分,分别是数据库的路由和服务器配置的处理。这个功能页面如图1所示。

数据库的路由
一个django项目通常会有多个app,一般每个app的功能差异较大,造成models.py差异也较大,可以为每一个app设置一个单独的存储数据库。这个项目中server就有一个单独的数据库存储它有的一些表(图2 蓝框),其他的功能默认存储在mysql这个默认的数据库中(图2 红框)。要使用该功能需要修改项目的配置(settings.py)文件。

修改settings
# Database 配置
DATABASE_ROUTERS = ['WebTool.database_router.DatabaseAppsRouter']DATABASE_APPS_MAPPING = {# example:# 'app_name':'database_name',# 为server单独设置一个名字叫做server的数据库'server': 'server',
}DATABASES = {# 默认的数据库,未指定存放位置的表会建在这个数据库里面,也包含一些django自带的表'default': {'ENGINE': 'django.db.backends.mysql','NAME': 'mysql','USER': 'root','PASSWORD': 'root','HOST': '127.0.0.1','PORT': '',},# server的数据库'server': {'ENGINE': 'django.db.backends.mysql','NAME': 'server','USER': 'root','PASSWORD': 'root','HOST': '127.0.0.1','PORT': '',},
}
添加database_router.py文件
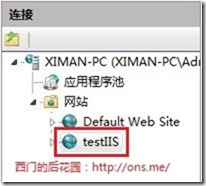
在WebTool/WebTool下添加一个py文件用来实现数据库路由功能,文件命名为database_router.py,如图3红框位置。

from django.conf import settingsDATABASE_MAPPING = settings.DATABASE_APPS_MAPPINGclass DatabaseAppsRouter(object):"""A router to control all database operations on models for differentdatabases.In case an app is not set in settings.DATABASE_APPS_MAPPING, the routerwill fallback to the `default` database.Settings example:DATABASE_APPS_MAPPING = {'app1': 'db1', 'app2': 'db2'}"""def db_for_read(self, model, **hints):""""Point all read operations to the specific database."""if model._meta.app_label in DATABASE_MAPPING:return DATABASE_MAPPING[model._meta.app_label]return Nonedef db_for_write(self, model, **hints):"""Point all write operations to the specific database."""if model._meta.app_label in DATABASE_MAPPING:return DATABASE_MAPPING[model._meta.app_label]return Nonedef allow_relation(self, obj1, obj2, **hints):"""Allow any relation between apps that use the same database."""db_obj1 = DATABASE_MAPPING.get(obj1._meta.app_label)db_obj2 = DATABASE_MAPPING.get(obj2._meta.app_label)if db_obj1 and db_obj2:if db_obj1 == db_obj2:return Trueelse:return Falsereturn Nonedef allow_syncdb(self, db, model):"""Make sure that apps only appear in the related database."""if db in DATABASE_MAPPING.values():return DATABASE_MAPPING.get(model._meta.app_label) == dbelif model._meta.app_label in DATABASE_MAPPING:return Falsereturn Nonedef allow_migrate(self, db, app_label, model=None, **hints):"""Make sure the auth app only appears in the 'auth_db'database."""if db in DATABASE_MAPPING.values():return DATABASE_MAPPING.get(app_label) == dbelif app_label in DATABASE_MAPPING:return Falsereturn None在model函数中建立映射
前篇文章最简单的实践之修改服务器时间中曾经设置过两个model函数分别是taskinbackground和modifytime,app_label就是用来区分该函数用来对应哪个数据库的,app_label = "server"是把表建立在server这个数据库里面。
class taskinbackground(models.Model):taskname = models.CharField(max_length=50)taskor = models.CharField(max_length=100)class Meta:db_table = 'task'app_label = "server"class modifytime(models.Model):modifyer = models.CharField(max_length=100)modifytime = models.CharField(max_length=200, default="")modifyservertime = models.CharField(max_length=200, default="")class Meta:db_table = 'modifytime'app_label = "server"初始化数据库
执行python manage.py makemigrations、python manage.py migrate、python manage.py migrate --database=server三条指令分别用来更新数据库、刷新默认的数据库和server的数据库。这样,一个数据库的路由就可以了,现在可以不同app对应不同的数据库了。
服务器配置
这个页面功能可以用下图4概括,其中的函数来自于服务器SSH服务配置与python中paramiko的使用中。实现这个些功能中会遇到一些小细节的处理。

这里直接给出页面的html代码:
{% extends "./base.html" %}{% block othercss %}{% endblock %}
{% block title %}{{ title }}{% endblock %}
{% block log %}{{ title }}{% endblock %}
{% block username %}{{ username }}{% endblock %}{% block mainbody %}
<section class="wrapper site-min-height"><h3><i class="fa fa-angle-right"></i> 服务器配置 <i class="fa fa-cog"></i></h3><div class="row mt"><div class="form-panel"><div class="col-lg-12 row mt"><div class="col-sm-6"><h4 class="mb" style="float:left;dispaly:block;">服务器配置</h4><button type="button" class="btn btn-theme02" id='getconfig' style="float:right;dispaly:block;">更新服务器配置</button></div><div class="col-sm-6"><div class="col-sm-12"><!--onkeyup="searchintable()" 当每次输入键盘弹起后就调用函数--><input type="text" class="form-control" onkeyup="searchintable()" id="search" placeholder="配置搜索"></div></div><div class="col-sm-12"><!-- 获取配置的时候出现的加载图标 --><div class="progress progress-striped active" style="display:none" id="loading"><div class="progress-bar" role="progressbar" aria-valuenow="100" aria-valuemin="0" aria-valuemax="100" style="width: 100%"></div></div></div></div><table class="table table-striped table-advance table-hover" id="configtable"><thead><tr><th style="width:15%;"><i class="fa fa-cog"></i> 配置文件</th><th style="width:55%;" class="hidden-phone"> <i class="fa fa-question-circle"></i> 配置描述</th><th><i class=" fa fa-edit"></i> 操作</th></tr></thead><tbody>{% for index,name,detail in name_list %}<tr><td style="vertical-align:middle;">{{ name }}</td>{% if detail == '' %}<td tyle="vertical-align:middle;"><div class="col-sm-8"><div class="input-group"><input type="text" class="form-control" placeholder='此处可以添加配置描述'><span class="input-group-btn"><button class="btn btn-default" onclick="write_detail(this, "{{name}}")" type="button">添加</button></span></div></div></td>{% else %}<td style="vertical-align:middle;"><div class="col-sm-8"><div class="input-group" style="display:none;"><input type="text" class="form-control" placeholder='此处可以添加配置描述'><span class="input-group-btn"><button class="btn btn-default" onclick="write_detail(this, "{{name}}")" type="button">添加</button></span></div><div>{{ detail }} <button onclick="modify_detail(this)" style="border:0;background:transparent;"><i class="fa fa-pencil"></i></button></div></div></td>{% endif %}<!-- 每一行配置的三个操作按钮 --><td style="vertical-align:middle;"><button class="btn btn-success btn-sm" data-toggle="modal" data-target="#readModal" onclick="readbutton("{{name}}")"><i class="fa fa-eye"></i></button><button class="btn btn-primary btn-sm" data-toggle="modal" data-target="#writeModal" onclick="writebutton("{{name}}")"><i class="fa fa-pencil"></i></button><button class="btn btn-danger btn-sm" onclick="deletebutton("{{name}}")"><i class="fa fa-trash-o"></i></button></td></tr>{% endfor %}</tbody></table></div></div>
</section>
<!-- 查看配置模态框 -->
<div class="modal fade" id="readModal" tabindex="-1" role="dialog" aria-labelledby="myModalLabel" aria-hidden="true"><div class="modal-dialog"><input type="hidden" name='modal' value=''><div class="modal-content"><div class="modal-header"><button type="button" class="close" data-dismiss="modal" aria-hidden="true">×</button><h4 class="modal-title" id="myModalLabelread">模态框(Modal)标题</h4></div><!--style="cursor:default" 设置只读状态--><textarea type="text" class="form-control modal-body-read" rows="35" placeholder="" readonly="readonly" style="cursor:default"> 在这里添加一些文本 </textarea><div class="modal-footer"><button type="button" class="btn btn-theme02" data-dismiss="modal">关闭</button></div></div></div>
</div>
<!-- 修改配置模态框 -->
<div class="modal fade" id="writeModal" tabindex="-1" role="dialog" aria-labelledby="myModalLabel" aria-hidden="true"><div class="modal-dialog"><input type="hidden" id='configname' name='modal' value=''><div class="modal-content"><div class="modal-header"><button type="button" class="close" id="closebtn1" data-dismiss="modal" aria-hidden="true">×</button><h4 class="modal-title" id="myModalLabelwrite">模态框(Modal)标题</h4></div><div class="progress progress-striped active" style="display:none;" id="writeloading"><div class="progress-bar" role="progressbar" aria-valuenow="100" aria-valuemin="0" aria-valuemax="100" style="width: 100%"></div></div><textarea type="text" class="form-control modal-body-write" rows="35" placeholder=""></textarea><div class="modal-footer"><button type="button" class="btn btn-theme03" id="putconfigbtn" onclick="putconfig()">提交</button><button type="button" class="btn btn-theme02" id="closebtn2" data-dismiss="modal">关闭</button></div></div></div>
</div>
{% endblock %}页面使用到的javascript函数:
{% block scripts %}
<script>
// 提交修改后的配置
function putconfig(){swal({  title: '提交新的配置?',type: 'warning',confirmButtonColor: '#DD6B55',confirmButtonText:"是的",  cancelButtonText:"不用",showLoaderOnConfirm: true, //加载按钮是否可见  showCancelButton: true,preConfirm: function() {  return new Promise(function(resolve) {  setTimeout(function(){$("#putconfigbtn").hide();$("#closebtn1").hide();$("#closebtn2").hide();$("#writeloading").show();resolve();  }, 3000);  });  },  allowOutsideClick: false, //弹框外是否可点}).then(function(res){  if(res) {  $.ajax({url:"writeconfig",type:'POST',data:{'name':$("#configname").val(), 'content':$(".modal-body-write").val()},success: function(arg){ret = eval(arg);if(ret.status){swal({  type: 'success',  title: '设置修改成功!',  confirmButtonText: '确定',  confirmButtonColor: '#4cd964',allowOutsideClick: false,}).then(function(){window.location.reload();});  }else{if(ret.error == '1'){swal({  type: 'error',  title: 'json格式错误,请重新修改!',  confirmButtonText: '确定',  confirmButtonColor: '#4cd964',allowOutsideClick: false,}).then(function(){window.location.reload();});  }else{swal({  type: 'error',  title: '设置修改失败!',  confirmButtonText: '确定',  confirmButtonColor: '#4cd964',allowOutsideClick: false,}).then(function(){window.location.reload();});  }}}});   }  });
}
// 只读按钮
function readbutton(configname){$("#myModalLabelread").html("<b>查看"+configname+"配置</b>");$.ajax({url:"readconfig",type:'POST',data:{'configname':configname},success: function(arg){ret = eval(arg);content = ret.content;var json = JSON.parse(content);$(".modal-body-read").html(JSON.stringify(json,null,4));}});
}
// 修改按钮
function writebutton(configname){$("#myModalLabelwrite").html("<b>修改"+configname+"配置</b>");// 模态框中添加一个属性用来记录配置的名字,方便提交配置取配置的名字$("#configname").val(configname);$.ajax({url:"readconfig",type:'POST',data:{'configname':configname},success: function(arg){ret = eval(arg);content = ret.content;var json = JSON.parse(content);// JSON.stringify(json,null,4)函数可以将字符串格式化成json格式$(".modal-body-write").html(JSON.stringify(json,null,4));}});
}
// 删除配置
function deletebutton(configname){swal({  title: '删除'+configname+'这个配置?',type: 'warning',confirmButtonColor: '#DD6B55',confirmButtonText:"是的",  cancelButtonText:"不用",showLoaderOnConfirm: true, //加载按钮是否可见  showCancelButton: true,preConfirm: function() {  return new Promise(function(resolve) {  setTimeout(function(){resolve();  }, 6000);  });  },  allowOutsideClick: false, //弹框外是否可点}).then(function(res){  if(res) {  $.ajax({url:"deleteconfig",type:'POST',data:{'name':configname },success: function(arg){ret = eval(arg);if(ret.status){if(ret.status){swal({  type: 'success',  title: '删除完成!',  confirmButtonText: '确定',  confirmButtonColor: '#4cd964'  }).then(function(){window.location.reload();});  }else{swal({  type: 'error',  title: '删除失败!',  confirmButtonText: '确定',  confirmButtonColor: '#4cd964'  }).then(function(){window.location.reload();});  }}}});   }  });
}
// 为配置添加描述
function write_detail(obj, name){var father_span = obj.parentNode;var input = $(father_span).prev(); var detail = input.val();$.ajax({url:"configdetail",type:'POST',data:{'name':name, 'detail':detail},success: function(arg){window.location.reload();}});
}
function modify_detail(obj){$(obj).parent().prev().show();$(obj).parent().hide();
}
</script>
<script>
// 查询函数
function searchintable(){input = document.getElementById("search");filter = input.value.toUpperCase();table = document.getElementById("configtable");tr = table.getElementsByTagName("tr");for(i = 0; i < tr.length; i++){td = tr[i].getElementsByTagName("td")[0];if (td){if (td.innerHTML.toUpperCase().indexOf(filter) > -1){tr[i].style.display = "";}else{tr[i].style.display = "none";}} }
}
</script>
<script>
$(document).ready(function(){//从服务器更新配置到数据库$("#getconfig").click(function(){swal({title: '您确定要重新获取游戏配置吗?',type: 'warning',confirmButtonColor: '#DD6B55',confirmButtonText:"是的!",  cancelButtonText:"让我再考虑一下…",showLoaderOnConfirm: true, //加载按钮是否可见  showCancelButton: true,preConfirm: function() {  return new Promise(function(resolve){  setTimeout(function(){$("#getconfig").hide();$("#search").hide();$("#loading").show();$('table > tbody').remove();resolve();  }, 3000);  });  },  allowOutsideClick: false, //弹框外是否可点}).then(function(res){if (res){$.ajax({url:"getconfig",type:'GET',success: function(arg){ret = eval(arg);if(ret.status){swal({  type: 'success',  title: '更新完成!',  confirmButtonText: '确定',  confirmButtonColor: '#4cd964'  }).then(function(){window.location.reload();});  }else{swal({  type: 'error',  title: '更新失败!',  confirmButtonText: '确定',  confirmButtonColor: '#4cd964'  }).then(function(){window.location.reload();});  }}});}})});
});
</script>
{% endblock %}
下面具体说下这些功能的交互。
显示界面
- 创建配置相关的model函数
# -*- coding: utf-8 -*-
from __future__ import unicode_literals
from django.db import modelsclass serverconfig(models.Model):id = models.AutoField(primary_key=True)# 配置的名字config_name = models.CharField(max_length=100)# 配置的内容content = models.TextField()# 配置的描述detail = models.CharField(max_length=200, default="")class Meta:# 别名(存储在数据库中的table名)db_table = 'serverconfig'# 使用server数据库app_label = "server" 依然,创建好之后需要更新django的数据表,执行python manage.py migrate --database=server。
- 添加渲染函数serverconfig的url(server/urls.py)
除了给出渲染函数serverconfig,这里的urls.py还写了所有后文中需要用到的相关功能url:获得配置、读取配置、修改配置、删除配置、添加配置的描述。
from django.conf.urls import url
import viewsurlpatterns = [url(r'^$', views.homepage),url(r'^home', views.homepage),url(r'^servertime', views.servertime),# 服务器配置的渲染函数url(r'^serverconfig', views.serverconfig),# 相关功能函数# 获得配置url(r'^getconfig', views.getconfig),# 读取配置url(r'^readconfig', views.readconfig),# 修改配置url(r'^writeconfig', views.writeconfig),# 删除配置url(r'^deleteconfig', views.deleteconfig),# 添加配置的描述url(r'^configdetail', views.configdetail),# 以下的url在前面的文章已经实现url(r'^settime', views.settime),url(r'^usingserver', views.usingserver),url(r'^restartserver', views.restartserver),url(r'^getservertime', views.getservertime),url(r'^recoverlocaltime', views.recoverlocaltime),url(r'^userlogout', views.userlogout),
]- 在views.py中(server/views.py)添加渲染函数servertime
页面渲染函数会将数据库中的配置通过字典传递给前端渲染,值得注意的是,这里传递给前端的只有配置的名字和它的相关描述。每个配置的展示交给前端的javascript中的getconfig单独通过ajax获取。上面给出的html中,前端页面通过模板语言,利用for循环添加到table中(tr元素)。
# -*- coding: utf-8 -*-
from __future__ import unicode_literalsfrom django.contrib.auth import logout
from django.shortcuts import render_to_response
from django.http import JsonResponse
from django.contrib.auth.decorators import login_required
import json
import time# 服务器的名字
htmltitle = '服务器工具'
@login_required(login_url='/loginpage')
def serverconfig(request):from server import modelsusername = request.session.get('username')name_list = []config_name = models.serverconfig.objects.all().values_list('id', 'config_name', 'detail')for name in config_name:name_list.append(name)pagedict = {'name_list': name_list, 'title': htmltitle, 'username': username}return render_to_response("servermaterial/serverconfig.html", pagedict)
添加这些功能后,就能够通过http://127.0.0.1:8888/server/serverconfig.html访问这个页面了,但是我们看到的表格中没有配置,是因为网站后台还没有从服务器读取相关的配置。
配置相关操作
获得/更新配置
要获得这些配置需要添加相关的view函数(server/views.py),这个view函数会对比服务器中最新的配置文件和mysql中存储的配置文件的差别进行增、删、改,这个函数是通过html中的id=getconfig的按钮触发的,它的javascript函数可以在上面找到,为$("#getconfig").click(function(){...}),url也已经在上面给出,其对应前端页面红框中的按钮,如图5。

# 获得服务器配置
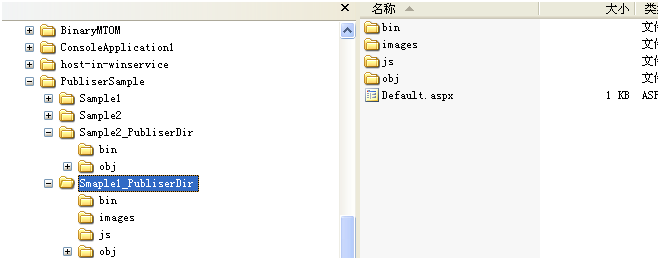
def getconfig(request):from server import modelsif request.method == 'GET':ret = {'status': False}from WebTool.functions import get_serverconfig_lists, read_serverconfig# 获得服务器中最新的配置文件名组成的列表newconfigs = get_serverconfig_lists()# 获得数据库中记录的未更新的老配置文件名列表name_list = models.serverconfig.objects.all().values('config_name')oldconfigs = []for name in name_list:oldconfigs.append(str(name['config_name']))# 服务器和数据库中配置名相同的文件名,对其更新一下配置内容common = [name for name in newconfigs if name in oldconfigs]for config in common:configcontent = read_serverconfig(config)models.serverconfig.objects.filter(config_name=config).update(content=configcontent)# 服务器中增加的配置文件名,数据库中增加一份add_con = [name for name in newconfigs if name not in oldconfigs]for config in add_con:configcontent = read_serverconfig(config)models.serverconfig.objects.create(config_name=config, content=configcontent)# 服务器已经不存在的配置文件名,数据库删除一份delete_con = [name for name in oldconfigs if name not in newconfigs]for config in delete_con:models.serverconfig.objects.filter(config_name=config).delete()ret['status'] = Truereturn JsonResponse(ret)所有的配置文件都放在如下图6所示的服务器目录中,网站后台通过调用funtions.py中的函数(这些paramiko函数在服务器SSH服务配置与python中paramiko的使用文章中已经封装好了)获得这些配置的名字。

- 前端实现配置搜索
如果要实现键盘弹起就进行搜索可以参考这里,在input中加入onkeyup这个性质,图7中红色的搜索框的html代码如下:
<input type="text" class="form-control" onkeyup="searchintable()" id="search" placeholder="配置搜索">

searchintable()函数如下,加入函数之后便可以实现在搜索框中一边输入一边搜索配置。
<script>
// 查询函数
function searchintable(){input = document.getElementById("search");filter = input.value.toUpperCase();table = document.getElementById("configtable");tr = table.getElementsByTagName("tr");for(i = 0; i < tr.length; i++){td = tr[i].getElementsByTagName("td")[0];if (td){if (td.innerHTML.toUpperCase().indexOf(filter) > -1){tr[i].style.display = "";}else{tr[i].style.display = "none";}} }
}
</script>
前端读取配置
读取、修改、删除的按钮在图8的红框中。

点击绿色的查看按钮会弹出只读的模态框,如图9所示。

读取配置的模态框,配置文件写在textarea中,readonly="readonly"可将其设置为只读模式:
<div class="modal fade" id="readModal" tabindex="-1" role="dialog" aria-labelledby="myModalLabel" aria-hidden="true"><div class="modal-dialog"><input type="hidden" name='modal' value=''><div class="modal-content"><div class="modal-header"><button type="button" class="close" data-dismiss="modal" aria-hidden="true">×</button><h4 class="modal-title" id="myModalLabelread">模态框(Modal)标题</h4></div><!--style="cursor:default" 设置只读状态--><textarea type="text" class="form-control modal-body-read" rows="35" placeholder="" readonly="readonly" style="cursor:default"> 在这里添加一些文本 </textarea><div class="modal-footer"><button type="button" class="btn btn-theme02" data-dismiss="modal">关闭</button></div></div></div>
</div>读取配置的view函数,函数直接在数据库中按名字查找配置的具体内容。
# get config content
def readconfig(request):ret = {'status': False, 'content': ''}if request.method == 'POST':from server import modelsname = request.POST.get('configname')content = models.serverconfig.objects.get(config_name=name).contentret['status'] = Trueret['content'] = contentreturn JsonResponse(ret)return JsonResponse(ret)
前端修改配置
点击蓝色的修改按钮会弹出修改配置的模态框,如下图10。

读取配置的模态框,配置文件写在textarea中,并为其添加一个提交按钮:
<div class="modal fade" id="writeModal" tabindex="-1" role="dialog" aria-labelledby="myModalLabel" aria-hidden="true"><div class="modal-dialog"><input type="hidden" id='configname' name='modal' value=''><div class="modal-content"><div class="modal-header"><button type="button" class="close" id="closebtn1" data-dismiss="modal" aria-hidden="true">×</button><h4 class="modal-title" id="myModalLabelwrite">模态框(Modal)标题</h4></div><div class="progress progress-striped active" style="display:none;" id="writeloading"><div class="progress-bar" role="progressbar" aria-valuenow="100" aria-valuemin="0" aria-valuemax="100" style="width: 100%"></div></div><textarea type="text" class="form-control modal-body-write" rows="35" placeholder=""></textarea><div class="modal-footer"><button type="button" class="btn btn-theme03" id="putconfigbtn" onclick="putconfig()">提交</button><button type="button" class="btn btn-theme02" id="closebtn2" data-dismiss="modal">关闭</button></div></div></div>
</div>点击提交按钮会出现swal风格(插件在文章用户登陆与session中介绍过)的二次确认框,如上图9。ajax请求经过server/urls.py中的url找到server/views.py中的writeconfig函数。因为文中的配置都是json格式的,如果格式不符合json要求会无法修改。这里有个缺点,修改服务器配置的函数generate_config_upload_file实际上只是在本地生成一个字符串然后上传覆盖掉服务器的同文件名的配置,并不是局部修改,所以对于大的配置文件修改效率低,但是为了方便就直接这样做了。
# write config
def writeconfig(request):ret = {'status': False, 'error': '', 'oldcontent': ''}if request.method == 'POST':from server import modelsfrom WebTool.functions import generate_config_upload_filename = request.POST.get('name')newcontent = request.POST.get('content')try:json.loads(newcontent)except ValueError:oldcontent = models.serverconfig.objects.get(config_name=name).contentret['oldcontent'] = oldcontentret['error'] = '1'return JsonResponse(ret)rtn = generate_config_upload_file(name, newcontent)if rtn == 'Successful Upload':models.serverconfig.objects.filter(config_name=name).update(content=newcontent)ret['status'] = Truereturn JsonResponse(ret)else:oldcontent = models.serverconfig.objects.get(config_name=name).contentret['oldcontent'] = oldcontentret['error'] = '2'return JsonResponse(ret)
删除配置配置
删除配置就更简单了,点击红色的按钮可以唤出二次确认框,如图11,然后ajax请求经过server/urls.py中的url找到server/views.py中的deleteconfig函数执行删除。

# delete config
def deleteconfig(request):ret = {'status': False}if request.method == 'POST':from server import modelsfrom WebTool.functions import delete_configname = request.POST.get('name')try:models.serverconfig.objects.filter(config_name=name).delete()delete_config(name)ret['status'] = Truereturn JsonResponse(ret)except Exception:ret['status'] = Falsereturn JsonResponse(ret)
添加描述
每个配置都需要添加响应的描述,如下图12的红框中的input框和描述。

关于该行表格是显示描述还是input框是由数据库serverconfig表中detail字段是否有内容决定的。
{% if detail == '' %}
<td tyle="vertical-align:middle;"><div class="col-sm-8"><div class="input-group"><input type="text" class="form-control" placeholder='此处可以添加配置描述'><span class="input-group-btn"><button class="btn btn-default" onclick="write_detail(this, "{{name}}")" type="button">添加</button></span></div></div>
</td>
{% else %}
<td style="vertical-align:middle;"><div class="col-sm-8"><div class="input-group" style="display:none;"><input type="text" class="form-control" placeholder='此处可以添加配置描述'><span class="input-group-btn"><button class="btn btn-default" onclick="write_detail(this, "{{name}}")" type="button">添加</button></span></div><div>{{ detail }} <button onclick="modify_detail(this)" style="border:0;background:transparent;"><i class="fa fa-pencil"></i></button></div></div>
</td>
{% endif %} 把javascript代码单独拿出来,write_detail函数是添加配置中的按钮,点击按钮之后需要获得前面input框中的值,这里是分别通过javascript和jquery的parentNode,prev()这些节点关系函数来拿到,modify_detail函数是描述后面的修改笔
$(obj).parent().prev().show();是让描述的字消失,$(obj).parent().hide();是让input框重新出现然后修改描述。
<script>
function write_detail(obj, name){var father_span = obj.parentNode;var input = $(father_span).prev(); var detail = input.val();$.ajax({url:"configdetail",type:'POST',data:{'name':name, 'detail':detail},success: function(arg){window.location.reload();}});
}
function modify_detail(obj){$(obj).parent().prev().show();$(obj).parent().hide();
}
</script>
ajax请求经过server/urls.py中的url找到server/views.py中的configdetail函数执行添加描述到数据库。
# 添加配置描述
def configdetail(request):ret = {'status': False}if request.method == 'POST':detail = request.POST.get('detail')name = request.POST.get('name')from server import modelsmodels.serverconfig.objects.filter(config_name=name).update(detail=detail)ret['status'] = Truereturn JsonResponse(ret)
结语
服务器配置文件修改基本上就实现了,下篇文章会说说websocket原理以及怎么利用websocket执行实时日志的查看。