FundMe lesson 的 示例 本质上是一个合约上对 eth 接收和发送的演示,但这个演示增加了前端 ethers 的交互,以及对 chainlink 预言机喂价的使用。
总体来说是一些 Defi 项目上的某一块功能的缩影,不过总体来说还是挺简单的。
若不会 chainlink 喂价的使用可以去看我这篇文 《预言机chainlink的使用——喂价、VRF》。
本节内容完全参照 Patrick 在课程中的代码,其课程链接为:https://github.com/smartcontractkit/full-blockchain-solidity-course-js
一、library 解读
我们先从合约块开始讲,毕竟合约可以脱离前端而单独存在,也就是一个 api,写好后可以简单的进行测试。
1.1 library 库简单了解
其中 library 库代码如下:
//价格转化器 主要是调用 chainlink 的喂价
//价格转化器 主要是调用 chainlink 的喂价
library PriceConverter {//传入一个 AggregatorV3Interface 的对象,AggregatorV3Interface 是chainlink 中的 interface 对象function getPrice(AggregatorV3Interface priceFeed)internal view returns (uint256){//得到交易对价(, int256 answer, , , ) = priceFeed.latestRoundData();// 整数位单位得到每个 eth 价钱return uint256(answer/100000000);//answer * 10000000000}// 1000000000// call it get fiatConversionRate, since it assumes something about decimals// It wouldn't work for every aggregatorfunction getConversionRate(uint256 ethAmount, AggregatorV3Interface priceFeed)internal view returns (uint256){//传入 AggregatorV3Interface 对消得到当前的 eth 价uint256 ethPrice = getPrice(priceFeed);//价钱单价乘上数量,由于是 wei 单位,直接除个 10 的18次方使其为总的 eth 个数价钱uint256 ethAmountInUsd = (ethPrice * ethAmount) / 1000000000000000000;// the actual ETH/USD conversation rate, after adjusting the extra 0s.return ethAmountInUsd;}
}
虽然以上的代码已经写了注释,但是在这里还是需要解释一下。
库 PriceConverter 主要是用于对 chainlink 预言机进行价格获取,获取的交易对价格是 eth 与 usd,这个库中有俩个方法:
- getPrice
- getConversionRate
其中 getConversionRate 调用了 getPrice 获取价格。
1.2 getPrice 方法
getPrice 方法接收一个参数 AggregatorV3Interface 类型的 priceFeed,AggregatorV3Interface 就是我们需要获取交易对价钱的预言机类型,而 priceFeed 你可以理解为这个类型的对象(虽然说我们在传值的时候给的是地址)。
那么,接下来只需要使用 priceFeed 调用 latestRoundData 即可获得交易对价钱(不会的去看我上面提到的那篇文)。
接下来有关 eth 与 usd 交易对的价钱我跟原本的做了一下改变,本来是:
获取之后由于位数的问题(主要是接下来需要通过这个值转化为 wei,与wei 的值做对比),所以在这里乘上一个值并做返回:
return uint256(answer * 10000000000);
然后我改成了 return uint256(answer/100000000); 这样就刚好得到了对应美元上的价钱(chainlink 返回价钱的单位是啥一下子忘记了,这是我测试出来的结果)。
这样就完成了一个取价的方法。
1.3 getConversionRate
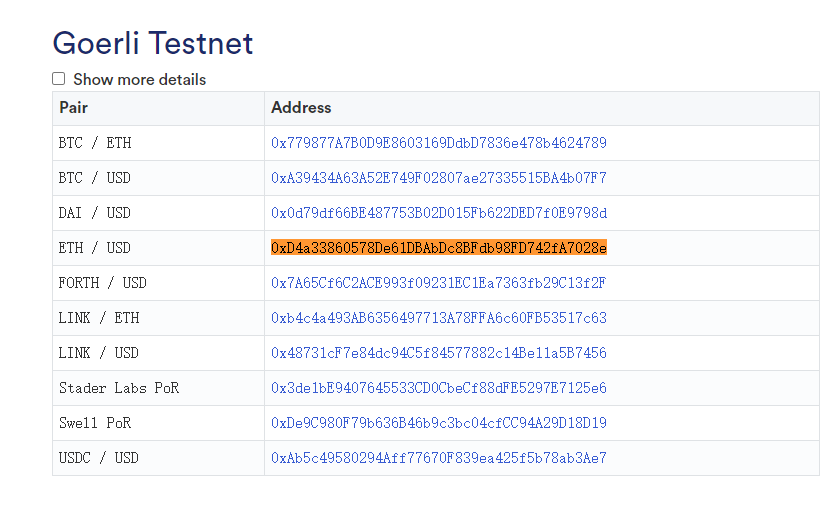
在 getConversionRate 方法中,主要是对传入过来的 eth 数量 与 单价 相乘,最后除 10 的 18 次方,这样就得到了捐赠者捐赠的总额 eth 的美元总价:uint256 ethAmountInUsd = (ethPrice * ethAmount) / 1000000000000000000;,其中 uint256 ethPrice = getPrice(priceFeed); 是获取单价,priceFeed 则是你获取什么交易对的地址,在 https://docs.chain.link/docs/data-feeds/price-feeds/addresses/ 中可以查看得到:
二、fundme 合约解读
2.1 状态变量
在 fundme 合约中状态变量给与 uint256 “附带方法”:using PriceConverter for uint256;,该作用是为了使 uint256 的值可以直接通过 点 “.” 运算符操作 library 方法(不会的可以去看看 library for 的用法)。
接着我改写了 最小捐赠美元数:uint256 public constant MINIMUM_USD =1;,在此我直接设置为 1 美元起就可以捐赠。
接着创建了一个可声明后再初始化的 immutable 修饰“常量”:address private immutable i_owner;,以及用于记录未提现捐助人、捐赠记录、预言机接口的状态变量,如下所示:
//把这个库给到一个 uint256类型,方便操作
using PriceConverter for uint256;// State variables
//最少 1 个 usd
uint256 public constant MINIMUM_USD =1;
//immutable 可以在声明或构造函数中再初始化
address private immutable i_owner;
//未提现的捐赠记录捐赠人
address[] public s_funders;
//捐赠记录
mapping(address => uint256) private s_addressToAmountFunded;
// chainlink 预言机 的 interface 接口对象
AggregatorV3Interface private s_priceFeed;
2.2 方法
2.2.1 onlyOwner
接下来在代码中定义了一个 Modifiers,方便做权限设置:
// Modifiers 前置操作
modifier onlyOwner() {// require(msg.sender == i_owner);if (msg.sender != i_owner) revert FundMe__NotOwner();_;
}
此方法的作用是,如果不是 owner 那就不给提现,毕竟随便来个人提现就出问题了。
2.2.2 constructor 构造函数
构造函数接收一个 priceFreed,这个参数就是在部署合约时,对合约进行传入一个你用 chainlink 预言机喂价的地址,并且设置 owner 为 msg.sender:
constructor(address priceFeed) {s_priceFeed = AggregatorV3Interface(priceFeed);//初始化预言机i_owner = msg.sender;//设置 owner
}
2.2.3 fund 主要的捐赠方法
fund 方法时一个接收 eth 的方法,捐赠就是使用该方法。
在该方法中使用了 payable 使其能够接收调用方法时 附带 的 eth,并且设置了最小捐赠额。
检查捐赠额时使用了require:
require(//由于在上面写了 PriceConverter for uint256 所以可以进行操作 getConversionRate//接着传入 s_priceFeed ,判断此时的价钱是否大于 最小金额的设置 MINIMUM_USDmsg.value.getConversionRate(s_priceFeed) >= MINIMUM_USD,"You need to spend more ETH!"
);
在 require 中能够直接使用 msg.value 调用 getConversionRate 的原因是在这个合约中,直接使用了 library for 的方式给与了 uint256 类型附带了 getConversionRate 方法所在的 library;此时msg.value.getConversionRate(s_priceFeed) 所得到的就是捐赠者所捐赠的金额总数,那么这个总数只需要大于我设置的最小金额数即可。
接着就直接把当前捐赠地址和金额记录在捐赠记录和未提现的数组之中:
//记录一下哪个地址捐赠了多少钱 捐赠记录
s_addressToAmountFunded[msg.sender] += msg.value;
//把当前这个人添加到 s_funders 捐赠人数组之中
s_funders.push(msg.sender);
该方法完整代码:
function fund() public payable {require(//由于在上面写了 PriceConverter for uint256 所以可以进行操作 getConversionRate//接着传入 s_priceFeed ,判断此时的价钱是否大于 最小金额的设置 MINIMUM_USDmsg.value.getConversionRate(s_priceFeed) >= MINIMUM_USD,"You need to spend more ETH!");// require(PriceConverter.getConversionRate(msg.value) >= MINIMUM_USD, "You need to spend more ETH!");//记录一下哪个地址捐赠了多少钱s_addressToAmountFunded[msg.sender] += msg.value;//把当前这个人添加到 s_funders 捐赠人数组之中s_funders.push(msg.sender);
}
2.2.4 withdraw 提现方法
提现方法也比较简单,直接 for 循环设置捐赠记录里面的人余额记录清空,并且清空未体现记录的数组 s_funders,该方法代码如下:
//提现方法 onlyOwner Modff
function withdraw() public onlyOwner {//从捐赠人数组里面进行循环for (uint256 funderIndex = 0;funderIndex < s_funders.length;funderIndex++) {//找到当前的捐赠地址address funder = s_funders[funderIndex];//设置捐赠人的 map 余额为0s_addressToAmountFunded[funder] = 0;}//设置捐赠人数组的值为0s_funders = new address[](0);// Transfer vs call vs Send// payable(msg.sender).transfer(address(this).balance);//调用 call 方法转账提现当前合约的全部的捐赠(bool success, ) = i_owner.call{value: address(this).balance}("");require(success);
}
循环的逻辑是循环 未提现记录的数组 s_funders,从中取到地址,给与到 s_addressToAmountFunded 对应地址的记录捐赠为 0,最后s_funders 清空,并且 使用 i_owner 调用 call 去转账当前合约的所有余额,其中 address(this).balance 就表示当前合约的所有余额,并且转账给 i_owner,这样就完成了提现操作。
2.2.5 withdraw 提现方法的改动
由于我个人不是特别理解 Patrick 为什么要这么做,所以我自己写了一个方法:
//我自己写的提现方法 主要是捐赠记录不归零
//我自己写的提现方法 主要是捐赠记录不归零
function customWithdraw()public onlyOwner{s_funders = new address[](0);(bool success, ) = i_owner.call{value: address(this).balance}("");require(success);
}
直接对应的删除未体现的记录数组内容,随后直接提现所有余额即可,这样也减少了状态变量的改动,并且不用 for 循环,也省 gas。
最后剩下的几个方法都是比较简单的了,在此不再赘述,完整合约代码如下(我自己添加了一些,并且为了方便直接 library 放一起了):
// SPDX-License-Identifier: MIT
// 1. Pragma
pragma solidity ^0.8.7;
// 2. Imports
import "@chainlink/contracts/src/v0.8/interfaces/AggregatorV3Interface.sol";//价格转化器 主要是调用 chainlink 的喂价
library PriceConverter {//传入一个 AggregatorV3Interface 的对象,AggregatorV3Interface 是chainlink 中的 interface 对象function getPrice(AggregatorV3Interface priceFeed)internal view returns (uint256){//得到交易对价(, int256 answer, , , ) = priceFeed.latestRoundData();// 整数位单位得到每个 eth 价钱return uint256(answer/100000000);//answer * 10000000000}// 1000000000// call it get fiatConversionRate, since it assumes something about decimals// It wouldn't work for every aggregatorfunction getConversionRate(uint256 ethAmount, AggregatorV3Interface priceFeed)internal view returns (uint256){//传入 AggregatorV3Interface 对消得到当前的 eth 价uint256 ethPrice = getPrice(priceFeed);//价钱单价乘上数量,由于是 wei 单位,直接除个 10 的18次方使其为总的 eth 个数价钱uint256 ethAmountInUsd = (ethPrice * ethAmount) / 1000000000000000000;// the actual ETH/USD conversation rate, after adjusting the extra 0s.return ethAmountInUsd;}
}// 3. Interfaces, Libraries, Contracts//自定义错误error FundMe__NotOwner();/**@title A sample Funding Contract* @author Patrick Collins* @notice This contract is for creating a sample funding contract* @dev This implements price feeds as our library*/
contract FundMe {// Type Declarations //把这个库给到一个 uint256类型,方便操作using PriceConverter for uint256;// State variables//最少 1 个 usduint256 public constant MINIMUM_USD =1;//immutable 可以在声明或构造函数中再初始化address private immutable i_owner;//未提现的捐赠记录捐赠人address[] public s_funders;//捐赠记录mapping(address => uint256) private s_addressToAmountFunded;// chainlink 预言机 的 interface 接口对象AggregatorV3Interface private s_priceFeed;// Events (we have none!)// Modifiers 前置操作modifier onlyOwner() {// require(msg.sender == i_owner);if (msg.sender != i_owner) revert FundMe__NotOwner();_;}// Functions Order: constructor receive fallback external public internal private view / pureconstructor(address priceFeed) {s_priceFeed = AggregatorV3Interface(priceFeed);//初始化预言机i_owner = msg.sender;//设置 owner}/// @notice Funds our contract based on the ETH/USD price//根据以太币/美元价格为我们的合同提供资金function fund() public payable {require(//由于在上面写了 PriceConverter for uint256 所以可以进行操作 getConversionRate//接着传入 s_priceFeed ,判断此时的价钱是否大于 最小金额的设置 MINIMUM_USDmsg.value.getConversionRate(s_priceFeed) >= MINIMUM_USD,"You need to spend more ETH!");// require(PriceConverter.getConversionRate(msg.value) >= MINIMUM_USD, "You need to spend more ETH!");//记录一下哪个地址捐赠了多少钱s_addressToAmountFunded[msg.sender] += msg.value;//把当前这个人添加到 s_funders 捐赠人数组之中s_funders.push(msg.sender);}//提现方法 onlyOwner Modfffunction withdraw() public onlyOwner {//从捐赠人数组里面进行循环for (uint256 funderIndex = 0;funderIndex < s_funders.length;funderIndex++) {//找到当前的捐赠地址address funder = s_funders[funderIndex];//设置捐赠人的 map 余额为0s_addressToAmountFunded[funder] = 0;}//设置捐赠人数组的值为0s_funders = new address[](0);// Transfer vs call vs Send// payable(msg.sender).transfer(address(this).balance);//调用 call 方法转账提现当前合约的全部的捐赠(bool success, ) = i_owner.call{value: address(this).balance}("");require(success);}//这个便宜的提现方法,没有用到过多的状态遍历function cheaperWithdraw() public onlyOwner {address[] memory funders = s_funders;//这里是 memory// mappings can't be in memory, sorry!for (uint256 funderIndex = 0;funderIndex < funders.length;funderIndex++) {address funder = funders[funderIndex];s_addressToAmountFunded[funder] = 0;}s_funders = new address[](0);// payable(msg.sender).transfer(address(this).balance);(bool success, ) = i_owner.call{value: address(this).balance}("");require(success);}//我自己写的提现方法 主要是捐赠记录不归零function customWithdraw()public onlyOwner{s_funders = new address[](0);(bool success, ) = i_owner.call{value: address(this).balance}("");require(success);}/** @notice Gets the amount that an address has funded*  @param fundingAddress the address of the funder*  @return the amount funded*///获取捐助人的钱function getAddressToAmountFunded(address fundingAddress)public view returns (uint256){return s_addressToAmountFunded[fundingAddress];}//chainlink 预言机的版本function getVersion() public view returns (uint256) {return s_priceFeed.version();}//查看function getFunder(uint256 index) public view returns (address) {return s_funders[index];}//ownerfunction getOwner() public view returns (address) {return i_owner;}//返回 AggregatorV3Interface 预言机对象function getPriceFeed() public view returns (AggregatorV3Interface) {return s_priceFeed;}//返回当前 eth/usd价钱function getETHUSEDPrice() public view returns(int){(/*uint80 roundID*/,int price,/*uint startedAt*/,/*uint timeStamp*/,/*uint80 answeredInRound*/)=s_priceFeed.latestRoundData();return price/100000000;}
}
三、前端解读
这里需要对 metamask 操作,我写了另外一篇放在外面了,放一起内容太多不好看,地址是:https://i1bit.blog.csdn.net/article/details/127349452
3.1一般操作
前端代码主要解释 js 代码,html 内容是很基础的,所以就不再赘述。
在 js 代码中,首先引入对应的 ethers 和一个合约地址:
import { ethers } from "ethers";
//合约地址
export const contractAddress = "0xe65d94905f5BFaa0Ec382e8652d4E39E41E83205";
接着是 abi,abi 太长在此不在贴出,不过在此介绍另外一种使用函数签名的方式编写 abi(只需要将 函数声明放过来就ok了,构造函数若没有参数则不需要添加,用啥接口就添加啥 abi):
//函数签名的方式 编写abi
export const abi = ["constructor(address priceFeed)","function fund() public payable","function withdraw() public onlyOwner","function customWithdraw()public onlyOwner",
];
接着获取 html 代码中的所有元素:
//获取元素对象
const connectButton = document.getElementById("connectButton")
const withdrawButton = document.getElementById("withdrawButton")
const fundButton = document.getElementById("fundButton")
const balanceButton = document.getElementById("balanceButton")
再接着为此绑定事件:
//绑定事件
connectButton.onclick = connect
withdrawButton.onclick = withdraw
fundButton.onclick = fund
balanceButton.onclick = getBalance
3.2 connect 链接钱包
接着是 connect 方法,connect 方法中 if (typeof window.ethereum !== "undefined") 是判断当前浏览器是否安装了 metamask 插件,对 metamask 的操作可以参考 metamask 文档:https://docs.metamask.io/guide/#why-metamask
接着是一个 try catch 的异常检测:
try {//连接账户await ethereum.request({ method: "eth_requestAccounts" });
} catch (error) {console.log(error);
}
其中代码 await ethereum.request({ method: "eth_requestAccounts" }); 为通过 ethereum.request 对metamask 进行链接,在一般情况下若 webpage 没有执行链接 metamask,将会显示 未连接状态:
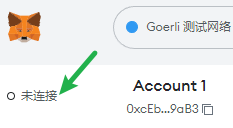
接着更改提示,更改提示完毕后再请求一下 eth_accounts 获得当前选择账户的地址:
//更改提示
connectButton.innerHTML = "Connected";
//得到当前用户的 address
const accounts = await ethereum.request({ method: "eth_accounts" });
console.log(accounts);
3.3 提现 withdraw
withdraw 方法我们主要看判断 metamask 后的代码,因为大致都与 connect 相同的。
首先查看:
const provider = new ethers.providers.Web3Provider(window.ethereum);
此时 ethers.providers.Web3Provider 表示直接链接现有的 web3 网络,此时指定的是 window.ethereum,你可以理解为 metamask 所提供的网络。
接着通过 await provider.send('eth_requestAccounts', []); 发送一个请求链接的请求,也就是代码 await ethereum.request({ method: "eth_requestAccounts" });
此时你可能想,为什么这里直接用 provider 就可以了?我们可以直接看源码,右键到实现:
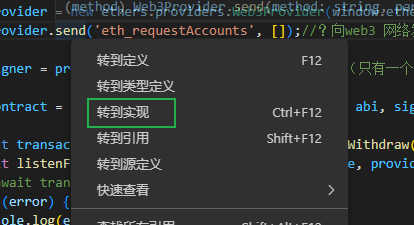
此时找到了 send 方法:
此时发现这个 方法属于 Web3Provider 类中,并且查看构造函数:
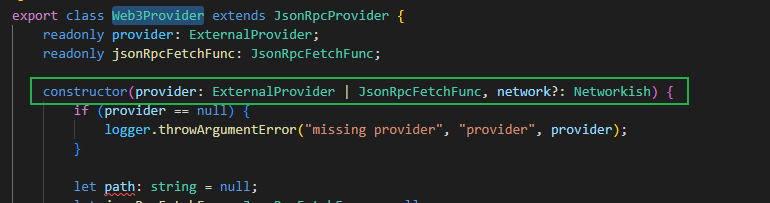
之前我们有使用 Web3Provider 指定一个 web3 网络,指定的是 metamask 所提供的网络,之前的 window.ethereum 也表示 metamask 的网络,这点我们要明白。
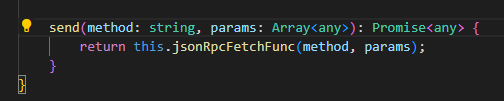
接着查看使用 send 后调用的是 jsonRpcFetchFunc 方法:
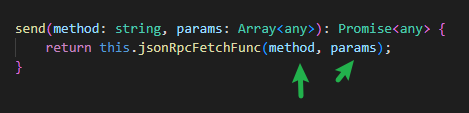
此时看这里就知道了这个 jsonRpcFetchFunc 就是 window.ethereum :
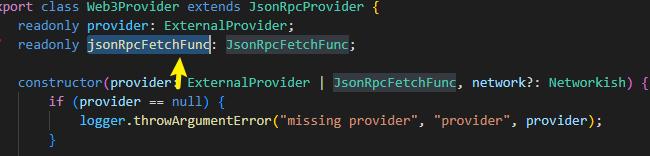
那么当然可以这样写了:await provider.send('eth_requestAccounts', []);
接着调用 provider.getSigner(); 获取当前选中的账户并且当做操作合约的账户:
//当前登录的账户(只有一个被选择)
const signer = provider.getSigner();
//当做钱包用
const contract = new ethers.Contract(contractAddress, abi, signer);
最后我们直接通过这个 contract 合约的“对象”操作自己的方法提现即可(此时使用的是我自己写的 customWithdraw):
try {//调用合约方法提现const transactionResponse = await contract.customWithdraw();await listenForTransactionMine(transactionResponse, provider);// await transactionResponse.wait(1)
} catch (error) {console.log(error);
}
接着剩下的其他代码都很类似了,也都是获取账户,然后调用合约,本质上没什么区别,所以就不再赘述了。
3.4 判断是否确认完毕 listenForTransactionMine
接下来查看 listenForTransactionMine 的 Promise内的代码。
provider.once 主要是等待一次,监听交易是否完成,原型如下(找了半天 once 接口,都没查到,去文档也没看见,竟然眼花了):
once(eventName: EventType, listener: Listener)
代码如下:
provider.once(transactionResponse.hash, (transactionReceipt) => {console.log(`Completed with ${transactionReceipt.confirmations} confirmations. `)resolve();
});
此时等待交易完成,transactionResponse.hash 得到了那么就结束 once。
once 文档说明为:https://docs.ethers.io/v5/api/providers/provider/
带注释的说明代码如下(abi 我改掉了,建议用原版的):
import { ethers } from "ethers";//合约地址
export const contractAddress = "0xe65d94905f5BFaa0Ec382e8652d4E39E41E83205";
//函数签名的方式 编写abi
export const abi = ["constructor(address priceFeed)","function fund() public payable","function withdraw() public onlyOwner","function customWithdraw()public onlyOwner",
];//获取元素对象
const connectButton = document.getElementById("connectButton")
const withdrawButton = document.getElementById("withdrawButton")
const fundButton = document.getElementById("fundButton")
const balanceButton = document.getElementById("balanceButton")
//绑定事件
connectButton.onclick = connect
withdrawButton.onclick = withdraw
fundButton.onclick = fund
balanceButton.onclick = getBalance
//链接 metamask
async function connect() {//判断是否安装 metamaskif (typeof window.ethereum !== "undefined") {try {//连接账户await ethereum.request({ method: "eth_requestAccounts" });} catch (error) {console.log(error);}//更改提示connectButton.innerHTML = "Connected";//得到当前用户的 addressconst accounts = await ethereum.request({ method: "eth_accounts" });console.log(accounts);} else {connectButton.innerHTML = "Please install MetaMask";}
}//调用合约的提现方法
async function withdraw() {console.log(`Withdrawing...`);if (typeof window.ethereum !== "undefined") {//ethers.providers.Web3Provider 连接到现有的 web3 网络提供者const provider = new ethers.providers.Web3Provider(window.ethereum);//向web3 网络发送 eth_requestAccounts api 请求await provider.send('eth_requestAccounts', []);//当前登录的账户(只有一个被选择)const signer = provider.getSigner();//当做钱包用const contract = new ethers.Contract(contractAddress, abi, signer);try {//调用合约方法提现const transactionResponse = await contract.customWithdraw();await listenForTransactionMine(transactionResponse, provider);// await transactionResponse.wait(1)} catch (error) {console.log(error);}} else {withdrawButton.innerHTML = "Please install MetaMask";}
}//捐赠
async function fund() {const ethAmount = document.getElementById("ethAmount").value;console.log(`Funding with ${ethAmount}...`);if (typeof window.ethereum !== "undefined") {const provider = new ethers.providers.Web3Provider(window.ethereum);const signer = provider.getSigner();const contract = new ethers.Contract(contractAddress, abi, signer);try {//传入捐赠的 ethconst transactionResponse = await contract.fund({value: ethers.utils.parseEther(ethAmount),})await listenForTransactionMine(transactionResponse, provider);} catch (error) {console.log(error);}} else {fundButton.innerHTML = "Please install MetaMask";}
}async function getBalance() {if (typeof window.ethereum !== "undefined") {const provider = new ethers.providers.Web3Provider(window.ethereum);try {const balance = await provider.getBalance(contractAddress);console.log(ethers.utils.formatEther(balance));} catch (error) {console.log(error);}} else {balanceButton.innerHTML = "Please install MetaMask";}
}function listenForTransactionMine(transactionResponse, provider) {console.log(`Mining ${transactionResponse.hash}`);return new Promise((resolve, reject) => {try {provider.once(transactionResponse.hash, (transactionReceipt) => {console.log(`Completed with ${transactionReceipt.confirmations} confirmations. `)resolve();});} catch (error) {reject(error);}})
}