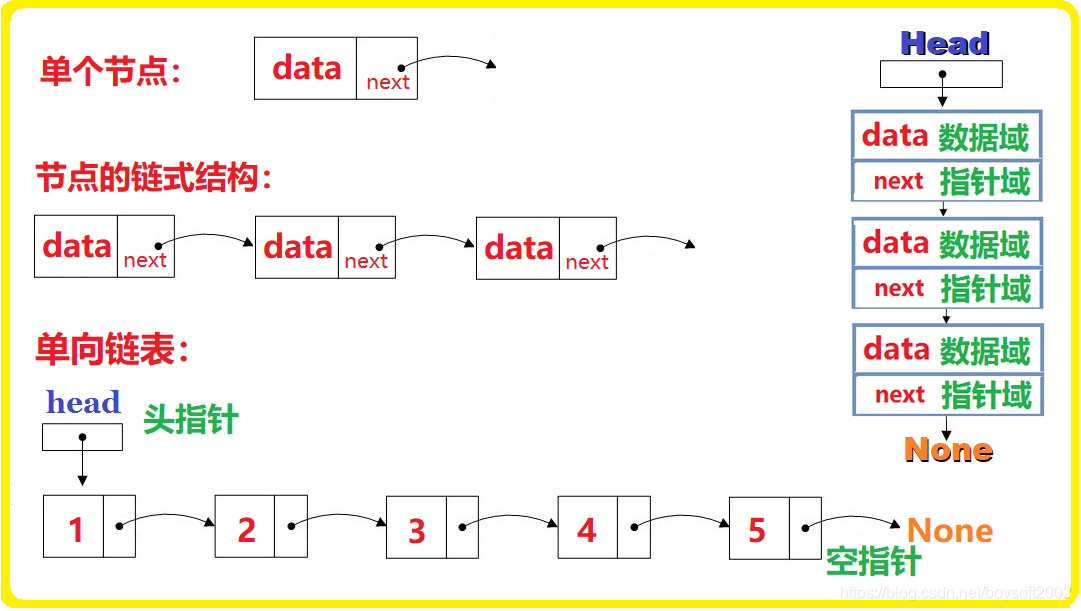
单链表
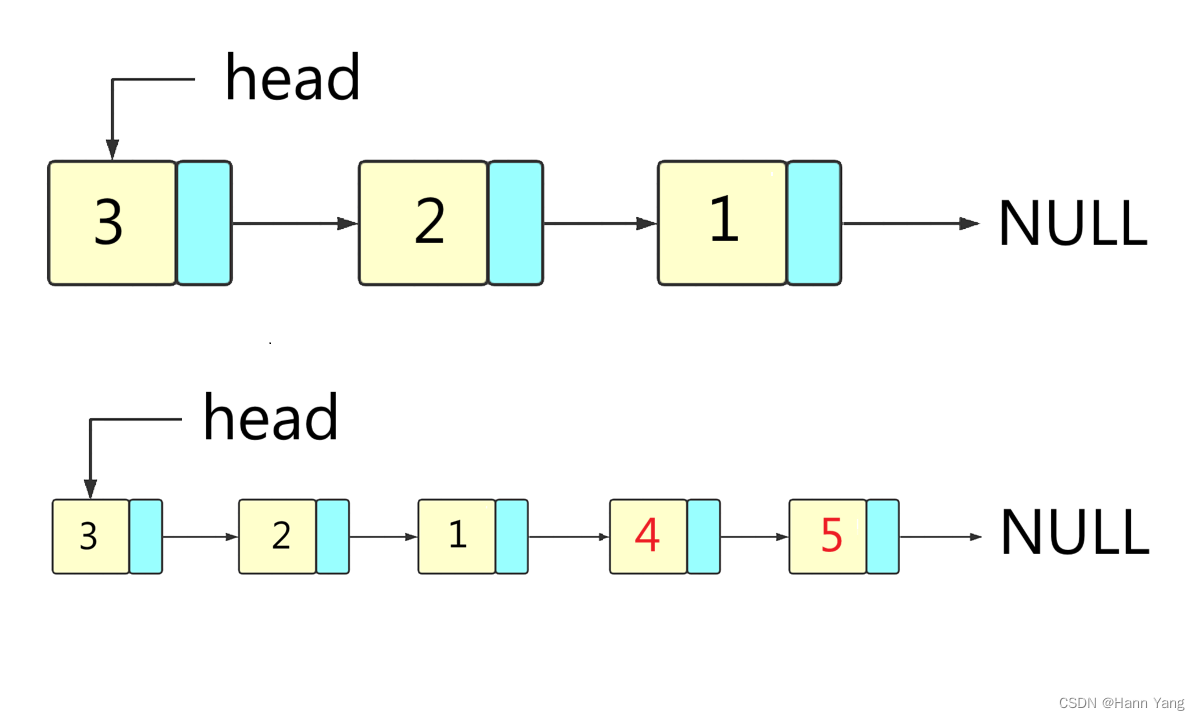
是一种链式数据结构,由一个头节点和一些指向下一个节点的指针组成。每个节点包含一个数据元素和指向下一个节点的指针。头节点没有数据,只用于表示链表的开始位置。
单链表的主要操作包括:
- 添加元素:在链表的头部添加新元素,需要修改头节点的指针。
- 删除元素:删除链表中的元素,需要修改头节点和其他节点的指针。
- 查找元素:在链表中查找某个元素,需要遍历整个链表。
- 遍历链表:按照链表的顺序依次访问每个元素,需要遍历整个链表。
单链表相对于数组的优点是插入和删除元素时不需要移动其他元素,时间复杂度为O(1)。但是,在查找元素时,单链表比数组要慢,时间复杂度为O(n)。
本文总结了 C++、Java、Python、Go、Rust 五种语言的单链表的表达:
C++
c++语言既可以用struct也能用class来表示链表节点,类可以定义方法调用相对方便。另外C++类需要自定义析构函数用以退出时释放节点所占空间,其它语言有自动的垃圾回收机制。
struct
// 定义结构体 Node,表示链表中的节点
struct Node {
int data; // 节点的数据
Node* next; // 指向下一个节点的指针
};
// 定义类 LinkedList,表示链表
class LinkedList {
private:
Node* head; // 指向链表头节点的指针
}
代码:
#include <iostream>using namespace std;// 定义结构体 Node,表示链表中的节点
struct Node {int data;  // 节点的数据Node* next;  // 指向下一个节点的指针
};// 定义类 LinkedList,表示链表
class LinkedList {
private:Node* head;  // 指向链表头节点的指针public:// 构造函数,初始化链表为空链表LinkedList() {head = NULL;}// 析构函数,释放链表中的所有节点~LinkedList() {Node* curr = head;while (curr != NULL) {Node* next = curr->next;delete curr;curr = next;}}// 在链表头部添加一个新节点void add(int value) {Node* newNode = new Node;newNode->data = value;newNode->next = head;head = newNode;}// 在链表尾部添加一个新节点void push(int value) {Node* newNode = new Node;newNode->data = value;newNode->next = NULL;if (head == NULL) {head = newNode;} else {Node* curr = head;while (curr->next != NULL) {curr = curr->next;}curr->next = newNode;}}// 删除最后一个节点,并返回该节点的数据 int pop() {if (head == NULL) {return -1;} else if (head->next == NULL) {int data = head->data;delete head;head = NULL;return data;} else {Node* curr = head;while (curr->next->next != NULL) {curr = curr->next;}int data = curr->next->data;delete curr->next;curr->next = NULL;return data;}}// 遍历链表,打印每个节点的数据void traverse() {Node* curr = head;while (curr != NULL) {cout << curr->data << "->";curr = curr->next;}cout << "nil" << endl;}
};int main() {LinkedList list;list.traverse();  // 打印空链表 nillist.add(1);  // 在链表头部添加节点 1list.traverse();  // 打印链表 1->nillist.add(2);  // 在链表头部添加节点 2list.traverse();  // 打印链表 2->1->nillist.add(3);  // 在链表头部添加节点 3list.traverse();  // 打印链表 3->2->1->nillist.push(4);  // 在链表尾部添加节点 4list.traverse();  // 打印链表 3->2->1->4->nillist.push(5);  // 在链表尾部添加节点 5list.traverse();  // 打印链表 3->2->1->4->5->nilcout << list.pop() << endl;  // 删除尾节点,并输出节点数据list.traverse();  // 打印链表 3->2->1->4->nilcout << list.pop() << endl;  // 删除尾节点,并输出节点数据list.traverse();  // 打印链表 3->2->1->nilreturn 0;
}
class
// 定义类 Node,表示链表中的节点
class Node {
public:
int data;
Node* next;
Node(int value) {
data = value;
next = NULL;
}
};
// 定义类 LinkedList,表示链表
class LinkedList {
private:
Node* head; // 指向链表头节点的指针
};
代码:
#include <iostream>using namespace std;// 定义类 Node,表示链表中的节点
class Node {
public:int data;Node* next;Node(int value) {data = value;next = NULL;}
};// 定义类 LinkedList,表示链表
class LinkedList {
private:Node* head;  // 指向链表头节点的指针public:// 构造函数,初始化链表为空链表LinkedList() {head = NULL;}// 析构函数,释放链表中的所有节点~LinkedList() {Node* curr = head;while (curr != NULL) {Node* next = curr->next;delete curr;curr = next;}}// 在链表头部添加一个新节点void add(int value) {Node* newNode = new Node(value);newNode->next = head;head = newNode;}// 在链表尾部添加一个新节点void push(int value) {Node* newNode = new Node(value);newNode->next = NULL;if (head == NULL) {head = newNode;} else {Node* curr = head;while (curr->next != NULL) {curr = curr->next;}curr->next = newNode;}}// 删除最后一个节点,并返回该节点的数据 int pop() {if (head == NULL) {return -1;} else if (head->next == NULL) {int data = head->data;delete head;head = NULL;return data;} else {Node* curr = head;while (curr->next->next != NULL) {curr = curr->next;}int data = curr->next->data;delete curr->next;curr->next = NULL;return data;}}// 遍历链表,打印每个节点的数据void traverse() {Node* curr = head;while (curr != NULL) {cout << curr->data << "->";curr = curr->next;}cout << "nil" << endl;}
};int main() {LinkedList list;list.traverse();  // 打印空链表 nillist.add(1);  // 在链表头部添加节点 1list.traverse();  // 打印链表 1->nillist.add(2);  // 在链表头部添加节点 2list.traverse();  // 打印链表 2->1->nillist.add(3);  // 在链表头部添加节点 3list.traverse();  // 打印链表 3->2->1->nillist.push(4);  // 在链表尾部添加节点 4list.traverse();  // 打印链表 3->2->1->4->nillist.push(5);  // 在链表尾部添加节点 5list.traverse();  // 打印链表 3->2->1->4->5->nilcout << list.pop() << endl;  // 删除尾节点,并输出节点数据list.traverse();  // 打印链表 3->2->1->4->nilcout << list.pop() << endl;  // 删除尾节点,并输出节点数据list.traverse();  // 打印链表 3->2->1->nilreturn 0;
}
Java
Java没有跟C或Go类似的struct结构体,只有用类class来表达。
class
public class LinkedList {
public class Node {
public int data;
public Node next;
public Node(int value) {
data = value;
next = null;
}
}
public LinkedList() {
head = null;
}
}
代码:
public class LinkedList {public class Node {public int data;public Node next;public Node(int value) {data = value;next = null;}}public LinkedList() {head = null;}private Node head;// 在链表头部添加一个新的节点public void add(int value) {Node newNode = new Node(value);newNode.next = head;head = newNode;}// 在链表尾部添加一个新的节点public void push(int value) {Node newNode = new Node(value);if (head == null) {head = newNode;} else {Node curr = head;while (curr.next != null) {curr = curr.next;}curr.next = newNode;}}// 删除尾节点,并返回该节点的数据public int pop() {if (head == null) {return -1;} else if (head.next == null) {int data = head.data;head = null;return data;} else {Node curr = head;while (curr.next.next != null) {curr = curr.next;}Node tail = curr.next;curr.next = null;return tail.data;}}// 遍历链表,打印每个节点的数据public void traverse() {Node curr = head;while (curr != null) {System.out.print(curr.data + "->");curr = curr.next;}System.out.println("nil");}public static void main(String[] args) {LinkedList list = new LinkedList();list.traverse();  // 打印空链表 nillist.add(1);  // 在链表头部添加节点 1list.traverse();  // 打印链表 1->nillist.add(2);  // 在链表头部添加节点 2list.traverse();  // 打印链表 2->1->nillist.add(3);  // 在链表头部添加节点 3list.traverse();  // 打印链表 3->2->1->nillist.push(4);  // 在链表尾部添加节点 4list.traverse();  // 打印链表 3->2->1->4->nillist.push(5);  // 在链表尾部添加节点 5list.traverse();  // 打印链表 3->2->1->4->5->nilSystem.out.println(list.pop());  // 删除尾节点,并输出节点数据list.traverse();  // 打印链表 3->2->1->4->nilSystem.out.println(list.pop());  // 删除尾节点,并输出节点数据list.traverse();  // 打印链表 3->2->1->nil}
}
Python
Python也没有struct结构体,只能用类class来表达。而且python是动态类型语言,变量在创建时无需显式指定类型,也没有指针概念。

class
class Node:
def __init__(self, data):
self.data = data # 节点的数据
self.next = None # 节点的下一个指针,初始为空
class LinkedList:
def __init__(self):
self.head = None # 链表的头指针,初始为空
代码:
class Node:def __init__(self, data):self.data = data # 节点的数据self.next = None # 节点的下一个指针,初始为空class LinkedList:def __init__(self):self.head = None # 链表的头指针,初始为空def add(self, data):# 在链表头部插入一个新节点newNode = Node(data)newNode.next = self.headself.head = newNodedef push(self, data):# 在链表尾部添加一个新节点newNode = Node(data)if self.head is None:self.head = newNodeelse:curr = self.headwhile curr.next is not None:curr = curr.nextcurr.next = newNodedef pop(self):# 删除尾节点,并返回该节点的值if self.head is None:return Noneif self.head.next is None:data = self.head.dataself.head = Nonereturn datacurr = self.headwhile curr.next.next is not None:curr = curr.nexttail = curr.nextcurr.next = Nonereturn tail.datadef traverse(self):# 遍历链表,打印每个节点的数据curr = self.headwhile curr is not None:print(curr.data, end='->')curr = curr.nextprint('nil')if __name__ == '__main__':head = LinkedList() # 创建链表head.traverse() # 遍历空链表head.add(1) # 在链表头部添加节点 1head.traverse() # 遍历链表 1->nilhead.add(2) # 在链表头部添加节点 2head.traverse() # 遍历链表 2->1->nilhead.add(3) # 在链表头部添加节点 3head.traverse() # 遍历链表 3->2->1->nilhead.push(4) # 在链表尾部添加节点 4head.traverse() # 遍历链表 3->2->1->4->nilhead.push(5) # 在链表尾部添加节点 5head.traverse() # 遍历链表 3->2->1->4->5->nilprint(head.pop()) # 删除尾节点,并输出节点数据head.traverse() # 打印链表 3->2->1->4->nilprint(head.pop()) # 删除尾节点,并输出节点数据head.traverse() # 打印链表 3->2->1->nil
Golang
Go没有class类,使用结构体 struct 来代替类。结构体可以包含字段(成员变量),并且可以定义方法(成员函数)来操作结构体的数据。

struct
type Node struct {
data int
next *Node
}
type LinkedList struct {
head *Node
}
// 创建一个新的节点
func new(value int) *Node {
return &Node{
data: value,
next: nil,
}
}
代码:
package mainimport "fmt"type Node struct {data intnext *Node
}type LinkedList struct {head *Node
}// 创建一个新的节点
func new(value int) *Node {return &Node{data: value,next: nil,}
}// 在链表头部添加一个新节点
func (list *LinkedList) add(value int) {newNode := new(value)newNode.next = list.headlist.head = newNode
}// 在链表尾部添加一个新节点
func (list *LinkedList) push(value int) {newNode := new(value)if list.head == nil {list.head = newNode} else {curr := list.headfor curr.next != nil {curr = curr.next}curr.next = newNode}
}// 删除尾节点,并返回该节点的值
func (list *LinkedList) pop() int {if list.head == nil {return -1} else if list.head.next == nil {data := list.head.datalist.head = nilreturn data} else {curr := list.headfor curr.next.next != nil {curr = curr.next}tail := curr.nextcurr.next = nilreturn tail.data}
}// 遍历链表,打印每个节点的数据
func (list *LinkedList) traverse() {curr := list.headfor curr != nil {fmt.Printf("%d->", curr.data)curr = curr.next}fmt.Println("nil")
}func main() {list := LinkedList{}list.traverse()         // 打印空链表 nillist.add(1)             // 在链表头部添加节点 1list.traverse()         // 打印链表 1->nillist.add(2)             // 在链表头部添加节点 2list.traverse()         // 打印链表 2->1->nillist.add(3)             // 在链表头部添加节点 3list.traverse()         // 打印链表 3->2->1->nillist.push(4)            // 在链表尾部添加节点 4list.traverse()         // 打印链表 3->2->1->4->nillist.push(5)            // 在链表尾部添加节点 5list.traverse()         // 打印链表 3->2->1->4->5->nilfmt.Println(list.pop()) // 删除尾节点,并打印数据list.traverse()         // 打印链表 3->2->1->4->nilfmt.Println(list.pop()) // 删除尾节点,并打印数据list.traverse()         // 打印链表 3->2->1->nil
}
Rust
Rust中也没有类的概念,但它提供了结构体 struct 和 trait 两种重要的机制来实现面向对象的编程风格。结构体用于定义数据结构,而 trait 则用于定义方法集合。
另外在Rust中,一般不使用unsafe指针std::ptr来操作链表,而是 Option 类型来表示链表指针,它代表的值可以存在(Some)也可以不存在(None)。Option 类型被广泛用于处理可能为空的值,以避免出现空指针异常。

struct
struct Node {
data: i32,
next: Option<Box<Node>>,
}
impl Node {
fn new(value: i32) -> Node {
Node { data: value, next: None }
}
}
struct LinkedList {
head: Option<Box<Node>>,
}
impl LinkedList {
fn new() -> LinkedList {
LinkedList { head: None }
}
}
代码:
struct Node {data: i32,next: Option<Box<Node>>,
}impl Node {fn new(value: i32) -> Node {Node { data: value, next: None }}
}struct LinkedList {head: Option<Box<Node>>,
}impl LinkedList {fn new() -> LinkedList {LinkedList { head: None }}// 在链表头部添加一个新节点fn add(&mut self, value: i32) {let mut new_node = Box::new(Node::new(value));new_node.next = self.head.take();self.head = Some(new_node);}// 在链表尾部添加一个新节点fn push(&mut self, value: i32) {let new_node = Box::new(Node::new(value));let mut curr = &mut self.head;while let Some(node) = curr {curr = &mut node.next;}*curr = Some(new_node);}// 删除尾节点,并返回该节点的数据fn pop(&mut self) -> Option<i32> {if self.head.is_none() {return None;}if self.head.as_ref().unwrap().next.is_none() {let data = self.head.take().unwrap().data;return Some(data);}let mut curr = self.head.as_mut().unwrap();while curr.next.as_ref().unwrap().next.is_some() {curr = curr.next.as_mut().unwrap();}let data = curr.next.take().unwrap().data;Some(data)}// 遍历链表,打印每个节点的数据fn traverse(&self) {let mut curr = &self.head;while let Some(node) = curr {print!("{}->", node.data);curr = &node.next;}println!("nil");}
}fn main() {let mut list = LinkedList::new();list.traverse();  // 打印空链表 nillist.add(1);  // 在链表头部添加节点 1list.traverse();  // 打印链表 1->nillist.add(2);  // 在链表头部添加节点 2list.traverse();  // 打印链表 2->1->nillist.add(3);  // 在链表头部添加节点 3list.traverse();  // 打印链表 3->2->1->nillist.push(4);  // 在链表尾部添加节点 4list.traverse();  // 打印链表 3->2->1->4->nillist.push(5);  // 在链表尾部添加节点 5list.traverse();  // 打印链表 3->2->1->4->5->nilprintln!("{}", list.pop().unwrap());  // 删除尾节点,并输出节点数据list.traverse();  // 打印链表 3->2->1->4->nilprintln!("{}", list.pop().unwrap());  // 删除尾节点,并输出节点数据list.traverse();  // 打印链表 3->2->1->nil
}
struct unsafe
struct Node {
data: i32,
next: *mut Node,
}
impl Node {
fn new(value: i32) -> Node {
Node { data: value, next: std::ptr::null_mut() }
}
}
struct LinkedList {
head: *mut Node,
}
impl LinkedList {
fn new() -> LinkedList {
LinkedList { head: std::ptr::null_mut() }
}
}
代码:
struct Node {data: i32,next: *mut Node,
}impl Node {fn new(value: i32) -> Node {Node { data: value, next: std::ptr::null_mut() }}
}struct LinkedList {head: *mut Node,
}impl LinkedList {fn new() -> LinkedList {LinkedList { head: std::ptr::null_mut() }}fn add(&mut self, value: i32) {let mut new_node = Box::new(Node::new(value));new_node.next = self.head;self.head = Box::into_raw(new_node);}fn push(&mut self, value: i32) {let new_node = Box::new(Node::new(value));let mut curr = &mut self.head;while !(*curr).is_null() {curr = unsafe { &mut (**curr).next };}*curr = Box::into_raw(new_node);}fn pop(&mut self) -> Option<i32> {if self.head.is_null() {return None;}let mut curr = self.head;let mut prev = std::ptr::null_mut();while unsafe { !(*curr).next.is_null() } {prev = curr;curr = unsafe { (*curr).next };}let data = unsafe { Box::from_raw(curr) }.data;if prev.is_null() {self.head = std::ptr::null_mut();} else {unsafe { (*prev).next = std::ptr::null_mut(); }}Some(data)}fn traverse(&self) {let mut curr = self.head;while !curr.is_null() {unsafe {print!("{}->", (*curr).data);curr = (*curr).next;}}println!("nil");}fn cleanup(&mut self) {let mut curr = self.head;while !curr.is_null() {let next = unsafe { (*curr).next };unsafe { Box::from_raw(curr) };curr = next;}}
}fn main() {let mut list = LinkedList::new();list.traverse();  // 打印空链表 nillist.add(1);list.traverse();list.add(2);list.traverse();list.add(3);list.traverse();list.push(4);list.traverse();list.push(5);list.traverse();println!("{}", list.pop().unwrap());list.traverse();println!("{}", list.pop().unwrap());list.traverse();list.cleanup();
}
cleanup()相当于析构函数,用于释放链表所占空间。
以上所有示例代码的输出都相同:
nil
1->nil
2->1->nil
3->2->1->nil
3->2->1->4->nil
3->2->1->4->5->nil
5
3->2->1->4->nil
4
3->2->1->nil
其中,Rust的节点值有点特殊,使用了Some类型。比如:
使用println!("{:?}", list.pop()); 不需要pop()后面的.unwrap(),返回Some(n);当链表为空时,直接返回None。
完