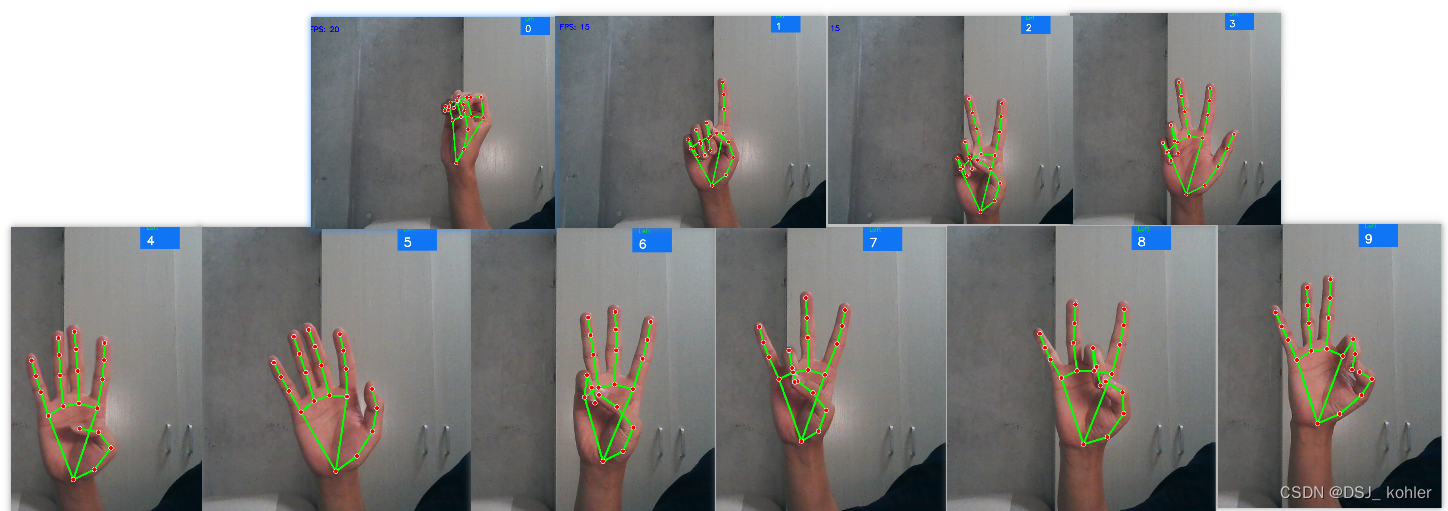
mediapipe手指数字识别
本文是从0开始创建一个识别手势的机器学习模型,为了识别手势,采用mediapipe模型,这个模型会返回手指的位置,之后再通过训练一个模型将这些位置分类得到手势
一、导入依赖
import cv2
import numpy as np
import pandas as pd
from matplotlib import pyplot as plt
import seaborn as sns
import mediapipe as mp
import time
import pyautogui
import warnings
%matplotlib inline
二、定义mediapipe识别手指的模型
mpHands = mp.solutions.hands
#参数1:是否是静态图片  参数2:最多检测几只手,默认2   参数3:模型的复杂度(0,1)   参数4:最低检测的置信度[0,1]   参数5:最低追踪的置信度
hands = mpHands.Hands(max_num_hands=1)
mpDraw = mp.solutions.drawing_utils  # 将坐标值画在手上handLmsStytle = mpDraw.DrawingSpec(color=(0, 0, 255), thickness=5)  # 点的样式
handConStytle = mpDraw.DrawingSpec(color=(0, 255, 0), thickness=3)  # 线的样式
三、定义获取手指的坐标
通过mediapipe中的hand获取手指的坐标,一共21个点,每个手指有4个点,手掌上一个点
def get_points(frame,imgWidth,imgHeight):output_points = []imgRGB = cv2.cvtColor(frame, cv2.COLOR_BGR2RGB)result = hands.process(imgRGB)if result.multi_hand_landmarks:for handLms in result.multi_hand_landmarks:# 参数1:目标图像 参数2:识别的坐标值 参数3[可选]:可以将识别的坐标连接起来 参数4:设置点的样式 参数5:设置线的样式# mpDraw.draw_landmarks(frame, handLms, mpHands.HAND_CONNECTIONS, handLmsStytle,# handConStytle) # 将识别的坐标值画在img图像上# 打印所有点的坐标for i, lm in enumerate(handLms.landmark):# print(i, lm.x, lm.y) #lm.x是图像的x比例,lm.y是图像的y比例[例如x=0.29 y=0.34 则坐标为[0.29*图像宽,0.34*图像高]]xPos = int(lm.x * imgWidth)yPos = int(lm.y * imgHeight)output_points.append(xPos)output_points.append(yPos)# print(i, xPos, yPos)else:output_points = [None] * 42return output_points
定义图像处理(如果想进行其他操作,可以在此处添加代码)
def process_image(frame):frameWidth = frame.shape[1]frameHeight = frame.shape[0]return get_points(frame,frameHeight,frameWidth)
四、图像处理
数据集下载地址:https://github.com/ardamavi/Sign-Language-Digits-Dataset/tree/master/Dataset
为了处理数据集中的所有图像,我们可以遍历“数字手势”文件夹中的所有文件夹。然后循环遍历这些文件夹中的所有图像。使用’process_image’方法,逐个处理这些图像。将输出数组添加到 array 中。
from IPython.display import clear_output
import osfolder = '../Dataset'array = []
a = 0# iterate through all folders
for subfolder in os.listdir(folder):sub = folder +'/'+ subfoldersubfolder_size = len(os.listdir(sub))i = 0# iterate through all subfoldersfor file in os.listdir(sub):frame = cv2.imread(sub + '/' + file)points = process_image(frame)a = max(a,len(points))points_gesture = np.append(points, subfolder, axis=None)array.append(points_gesture)print("processing: " + subfolder)i += 1print((i/subfolder_size) * 100, '%')clear_output(wait=True)
五、转为dataframe
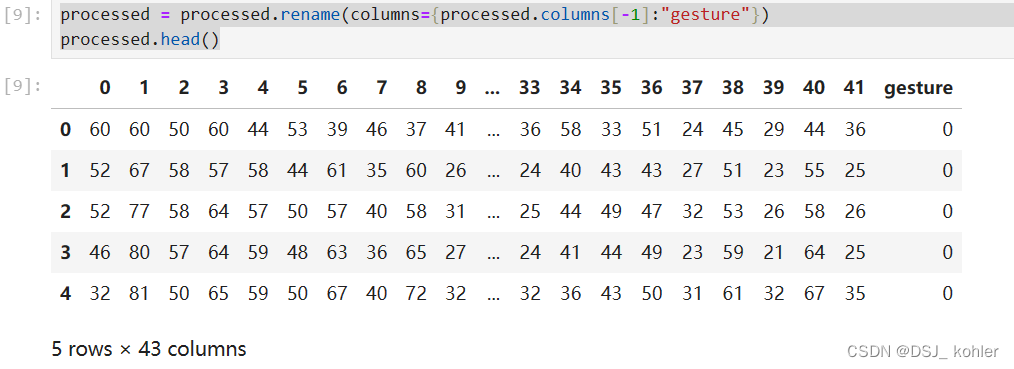
在处理所有图像后,该阵列可以转换为一个 dataframe。前 42 列是点是位置。例如,列’0’和’1’表示第一个点,'3’和’4’表示第二个点,等等。最后一栏是手势的含义
processed = pd.DataFrame(array)
processed = processed.rename(columns={processed.columns[-1]:"gesture"})
processed.head()
输出的结果:
将数据写入csv格式,下次直接读取csv格式的文件即可
processed.to_csv('../model/dataframes/gesture-points-raw.csv', index=None)
processed = pd.read_csv('../model/dataframes/gesture-points-raw.csv')
六、修复none值
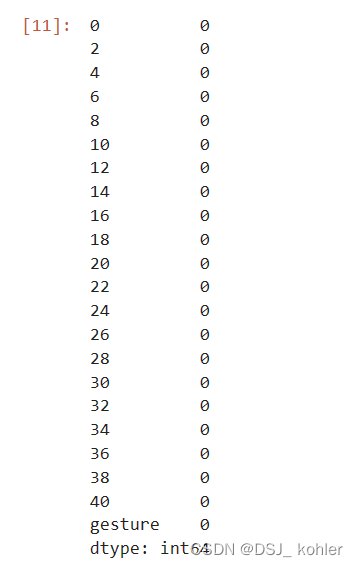
查看是否有none值
processed[processed.columns[::2]].isnull().sum()
我的没有none值,如果有none值,则需要填充该姿态中的平均值
填充平均值代码:
for name, group in processed.groupby(["gesture"]):# loop through each columnfor label, content in group.items():av = content.loc[content.notna()].mean()form = processed['gesture'] == name processed.loc[form, label] = processed.loc[form, label].fillna(int(av))
print('There are {} missing values'.format(processed.isnull().sum().sum()))
七、标准化
在接下来的步骤中,需要将数据帧分割成点和手势数据帧。
gesture_points = processed.drop(['gesture'], axis=1)
gesture_meaning = processed['gesture']
由于手指里摄像头远近等影响,导致手指的坐标不能真实代表其手势,所以需要标准话
按照比例表示:
(value - min) / (max - min)
for index, row in gesture_points.iterrows():reshape = np.asarray([row[i::2] for i in range(2)])min = reshape.min(axis=1, keepdims=True)max = reshape.max(axis=1, keepdims=True)normalized = np.stack((reshape-min)/(max-min), axis=1).flatten()gesture_points.iloc[[index]] = [normalized]
gesture_points.head(3)
结果如下:

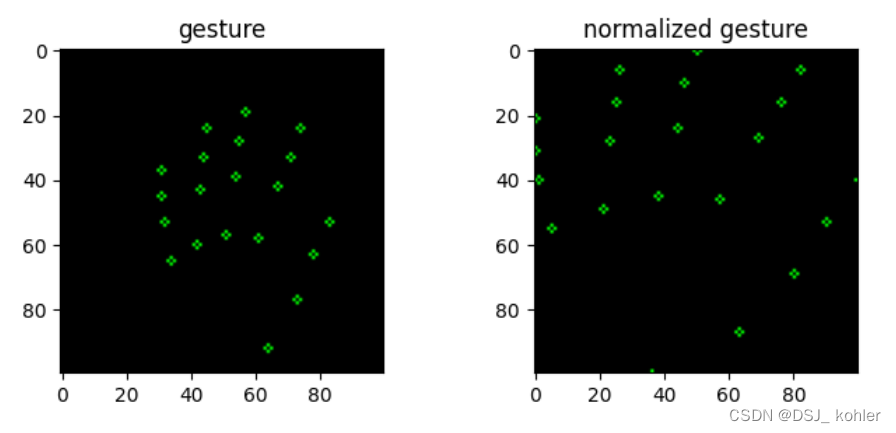
可以看一下处理后的手势是如何进行拉伸的
blank = np.zeros((100,100,3), np.uint8)
index = 1100
copy, copy_norm = np.copy(blank), np.copy(blank)
for n, m in zip(np.reshape(processed.drop(['gesture'], axis=1).iloc[[index]].values, (-1, 2)), np.reshape(gesture_points.iloc[[index]].values, (-1, 2))):cv2.circle(copy, (int(n[0]), int(n[1])), 1, (0, 255, 0))cv2.circle(copy_norm, (int(m[0]*100), int(m[1]*100)), 1, (0, 255, 0))fig, axes = plt.subplots(1, 2, figsize=(8, 3))
axes[0].imshow(copy)
axes[0].set_title('gesture')
axes[1].imshow(copy_norm)
axes[1].set_title('normalized gesture')
plt.show()
拉伸后的结果:
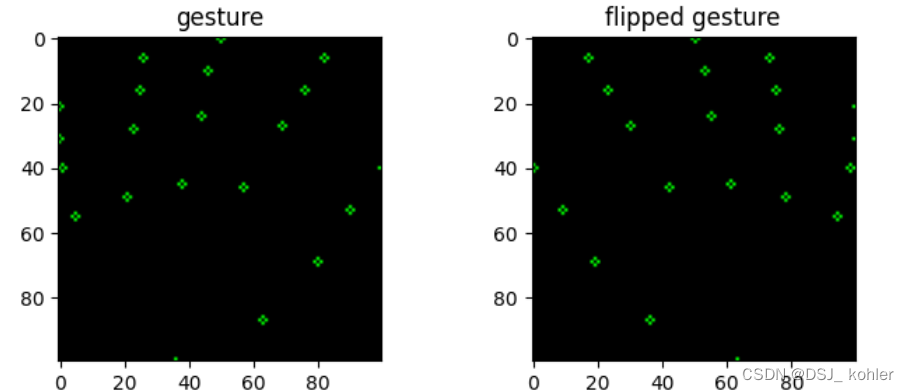
八、反转手势
flipped_gesture_points = gesture_points.copy()
for c in flipped_gesture_points.columns.values[::2]:flipped_gesture_points.loc[:, c] = (1 - flipped_gesture_points.loc[:, c])
flipped_gesture_points.head(3)
copy, copy_flipped = np.copy(blank), np.copy(blank)
for n, f in zip(np.reshape(gesture_points.iloc[[index]].values, (-1, 2)),  np.reshape(flipped_gesture_points.iloc[[index]].values, (-1, 2))):cv2.circle(copy, (int(n[0]*100), int(n[1]*100)), 1, (0, 255, 0))cv2.circle(copy_flipped, (int(f[0]*100), int(f[1]*100)), 1, (0, 255, 0))fig, axes = plt.subplots(1, 2, figsize=(8, 3))
axes[0].imshow(copy)
axes[0].set_title('gesture')
axes[1].imshow(copy_flipped)
axes[1].set_title('flipped gesture')
翻转后的结果
gestures = pd.concat([gesture_points, gesture_meaning], axis=1)
reverse_gestures = pd.concat([flipped_gesture_points, gesture_meaning], axis=1)
gesture_dataframe = pd.concat([gestures,reverse_gestures], ignore_index=True)
#结果保存csv
gesture_dataframe.to_csv('../dataframes/gesture-points-processed.csv', index=None)
gesture_dataframe = pd.read_csv('../dataframes/gesture-points-processed.csv')
九、建模
首先,我们需要准备好数据。为了训练模型,需要一个训练和测试集。训练集用于训练模型,测试集用于验证模型。训练和测试都有一个X和y坐标系。x数据是点数据。y数据是标签数据。
from sklearn.model_selection import train_test_splitX_train, X_test, y_train, y_test = train_test_split(gesture_dataframe.drop('gesture', axis=1), gesture_dataframe['gesture'],test_size = 0.2, random_state=42)
为了选择正确的算法,我们将使用 Sklearn 的这张图表。不同的算法更适合于不同类型的数据和不同的问题。所以,我们将按照这个图表。首先,我们必须检查数据集是否有超过 50 个样本,因为我们有超过 4000 行。它问我们是否在预测一个类别/标签,我们试图预测一个手势的标签/含义,所以这将是一个“是”。然后我们必须检查我们的数据是否有标签。是的,因为最后一列有手势的意思。然后,我们需要检查数据集的样本是否小于100000。最后我们得到了 ‘LinearSVC’ 估计量。
训练:
from sklearn.svm import SVC
import timestart = time.time()
#Training model
svm_model = SVC(kernel='poly', random_state=42, C=1.0, probability=True)
svm_model.fit(X_train, y_train)#Calculating elapsed time
stop = time.time()
elapsed_time = ((stop - start) / 60)
print('Training time: {} minutes and {} seconds'
.format(int(elapsed_time), int(((elapsed_time % 1) * 60))))#Calculating score
print('Score:',svm_model.score(X_test, y_test).round(2))
训练结果:可以看到准确率在99%

十、输出模型
import joblib
joblib.dump(svm_model, '../model/gesture_model_media.pkl', compress=9)
十一、模型调用
import cv2
import mediapipe as mp
import time
import joblib
import numpy as np
import warningsmpHands = mp.solutions.hands
#参数1:是否是静态图片  参数2:最多检测几只手,默认2   参数3:模型的复杂度(0,1)   参数4:最低检测的置信度[0,1]   参数5:最低追踪的置信度
hands = mpHands.Hands()
mpDraw = mp.solutions.drawing_utils  # 将坐标值画在手上handLmsStytle = mpDraw.DrawingSpec(color=(0, 0, 255), thickness=5)  # 点的样式
handConStytle = mpDraw.DrawingSpec(color=(0, 255, 0), thickness=3)  # 线的样式# 求帧数需要
preTime = 0
curTime = 0# cap = cv2.VideoCapture(0)
cap = cv2.VideoCapture(cv2.CAP_DSHOW)
# cap = cv2.VideoCapture('D:\\360\\renshenglubushou.mp4')# 从磁盘中加载模型文件
gesture_model = joblib.load(r'..\model\gesture_model_media.pkl')#获取预测结果
def getPre(xPos,yPos):if len(xPos) != 0 and len(yPos) != 0:points = np.asarray([xPos, yPos])min = points.min(axis=1, keepdims=True)max = points.max(axis=1, keepdims=True)normalized = np.stack((points - min) / (max - min), axis=1).flatten()  #对数据归一化处理predicted_gesture = gesture_model.predict([normalized])return predicted_gesture[0]   #返回预测结果def getHandWay(result, imgWidth, imgHeight, hand):for idx, handLms in enumerate(result.multi_hand_landmarks):# 判断是左右手if result.multi_handedness[idx].classification[0].label == hand:xPos = []yPos = []# 打印所有点的坐标for i, lm in enumerate(handLms.landmark):xPos.append(int(lm.x * imgWidth))yPos.append(int(lm.y * imgHeight))pre = getPre(xPos=xPos, yPos=yPos)# print(hand + ' ' + str(pre))warnings.filterwarnings("ignore")if(hand == 'Left'):figureShow(img, int(490*1.5), 0, int(555*1.5), 60, hand, pre)if(hand == 'Right'):figureShow(img, int(555*1.5), 0, int(640*1.5), 60, hand, pre)# figureShow(img, 490, 0, 640, 60, hand, pre)def figureShow(image, l_u, l_d, r_u, r_d, hand, pre_value):cv2.rectangle(image, (l_u, l_d), (r_u, r_d), (245, 117, 16), -1)# Rep datacv2.putText(image, hand, (l_u + 15, l_d + 12),cv2.FONT_HERSHEY_SIMPLEX, 0.5, (0, 255, 0), 1, cv2.LINE_AA)cv2.putText(image, str(pre_value),(l_u + 15, l_d + 50),cv2.FONT_HERSHEY_SIMPLEX, 1, (255, 255, 255), 2, cv2.LINE_AA)while True:ret, img = cap.read()if ret:img = cv2.resize(img, (0, 0), fx=1.5, fy=1.5)imgRGB = cv2.cvtColor(img, cv2.COLOR_BGR2RGB)  # mediapipe处理的事RGB格式的数据result = hands.process(imgRGB)  # 引用识别手的函数处理图像imgHeight = img.shape[0]imgWidth = img.shape[1]  # 获取图像的长和宽if result.multi_hand_landmarks:for handLms in result.multi_hand_landmarks:# 参数1:目标图像  参数2:识别的坐标值  参数3[可选]:可以将识别的坐标连接起来  参数4:设置点的样式  参数5:设置线的样式mpDraw.draw_landmarks(img, handLms, mpHands.HAND_CONNECTIONS, handLmsStytle,handConStytle)  # 将识别的坐标值画在img图像上getHandWay(result,imgWidth,imgHeight,'Left')getHandWay(result,imgWidth,imgHeight,'Right')curTime = time.time()fps = 1 / (curTime - preTime)preTime = curTimecv2.putText(img, f"FPS: {int(fps)}", (30, 50), cv2.FONT_HERSHEY_SIMPLEX, 0.8, (255, 0, 0), 2)cv2.imshow('img', img)# cv2.imshow('imgRGB',imgRGB)if cv2.waitKey(1) == ord('q'):break
识别结果: