boost搜索引擎
01 项目演示
done
02 讲解思路

03 项目背景
公司:百度、搜狗、360搜索、头条新闻客户端 - 我们自己实现是不可能的!
站内搜索:搜索的数据更垂直,数据量其实更小
boost的官网是没有站内搜索的,需要我们自己做一个

04 项目宏观原理
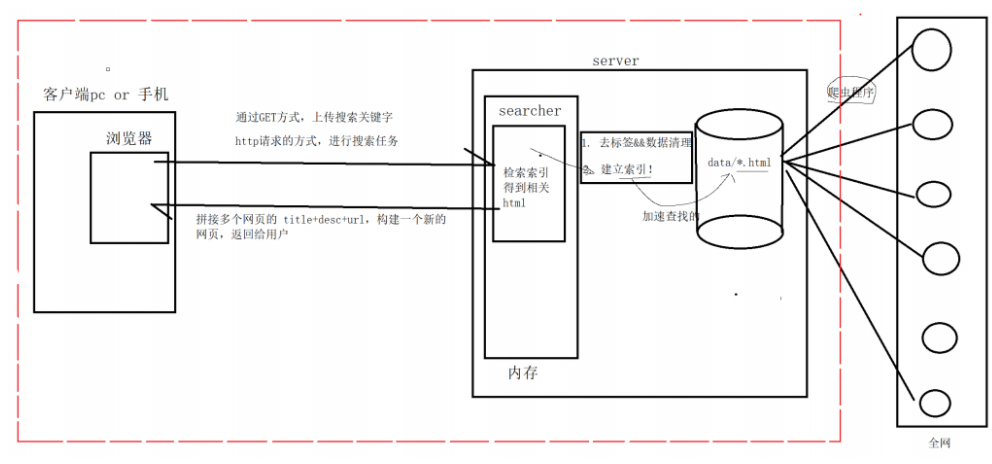
首先在用户进行搜索之前,在公司的服务器server上,内存上有一个searcher服务,而我们想进行搜索的话,服务器的第一件事情就是在全网抓取网页放在date目录下(各种爬虫从程序),然后我们需要对网页进行 1. (保留网页标题,内容,url)和 2.(建立索引—为了加速网页查找) 两步。(搜索引擎写的好还是坏取决于数据量多大和索引建立的好不好),所以这两个工作做好之后,搜索就可以借助我们的搜索引擎进行搜索了。不过我们还要明确的就是服务器一但启用,浏览器就需要通过http请求的方式,进行搜索任务,就相当于发送了一次http请求(http请求是一定含有关键字),通过GET方式上传我们的搜索关键字,然后我们的searcher就开始检索索引得到相关html,然后将网页信息返回给浏览器(拼接多个网页title+desc+url,构建一个新的网页返回给用户(浏览器))。
05 技术栈和项目环境
技术栈: C/C++ C++11, STL,准标准库Boost(进行一些文件操作),jsoncpp(浏览器和服务器进行数据交互),cppjieba(进行分词),cpp-httplib(直接构建http服务器)选学: html5,css,js、jQuery、Ajax
项目环境: Centos 7云服务器,vim/gcc(g++)/Makefile , vs2019 or vs code
06 正排和倒排原理
文档1: 雷军买了四斤小米
文档2: 雷军发布了小米手机
正排索引:就是从文档ID找到文档内容(文档内的关键字)
| 文档ID | 文档内容 |
|---|---|
| 1 | 雷军买了四斤小米 |
| 2 | 雷军发布了小米手机 |
目标文档进行分词(目的:方便建立倒排索引和查找):
文档1[雷军买了四斤小米 ]: 雷军/买/四斤/小米/四斤小米
文档2[雷军发布了小米手机]:雷军/发布/小米/小米手机
停止词:了,的,吗,a,the,一般我们在分词的时候可以不考虑
倒排索引:根据文档内容,分词,整理不重复的各个关键字,对应联系到文档ID的方案
| 关键字(具有唯一性) | 文档ID, weight(权重) |
|---|---|
| 雷军 | 文档1, 文档2 |
| 买 | 文档1 |
| 四斤 | 文档1 |
| 小米 | 文档1, 文档2 |
| 四斤小米 | 文档1 |
| 发布 | 文档2 |
| 小米手机 | 文档2 |
模拟一次查找的过程:
用户输入:小米 -> 倒排索引中查找 -> 提取出文档ID(1,2) -> 根据正排索引 -> 找到文档的内容 ->
title+conent(desc)+url 文档结果进行摘要->构建响应结果。
07 认识标签与去标签
boost 官网: https://www.boost.org///目前只需要boost_1_78_0/doc/html目录下的html文件,用它来进行建立索引
- mkdir boost_searcher 进入此次目录,此后为根目录
- rz / rz -E 下载的boost库 – 就有了对应的网页信息(html) 然后 tar xzf name

-
mkdir -p date/input

就可以把boost库删掉了
- 根目录下创建 parser.cc(解析 – 对网页信息进行去标签)
什么是标签
//原始数据 -> 去标签之后的数据
<!DOCTYPE html PUBLIC "-//W3C//DTD HTML 4.01 Transitional//EN"
"http://www.w3.org/TR/html4/loose.dtd">
<html> <!--这是一个标签-->
<head>
<meta http-equiv="Content-Type" content="text/html; charset=UTF-8">
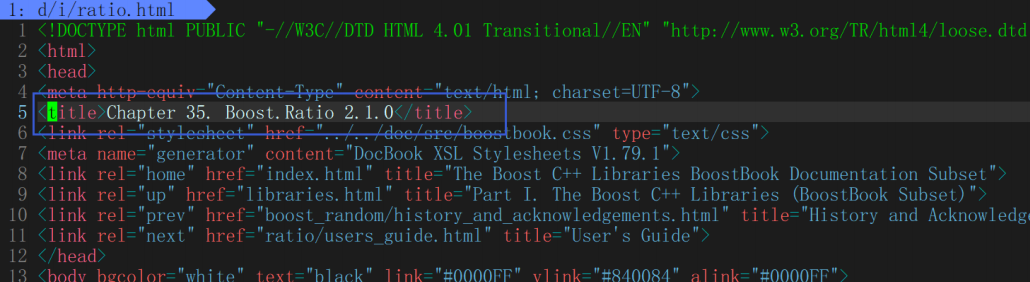
<title>Chapter 30. Boost.Process</title>
<link rel="stylesheet" href="../../doc/src/boostbook.css" type="text/css">
<meta name="generator" content="DocBook XSL Stylesheets V1.79.1">
<link rel="home" href="index.html" title="The Boost C++ Libraries BoostBook Documentation
Subset">
<link rel="up" href="libraries.html" title="Part I. The Boost C++ Libraries (BoostBook
Subset)">
<link rel="prev" href="poly_collection/acknowledgments.html" title="Acknowledgments">
<link rel="next" href="boost_process/concepts.html" title="Concepts">
</head>
<body bgcolor="white" text="black" link="#0000FF" vlink="#840084" alink="#0000FF">
<table cellpadding="2" width="100%"><tr>
<td valign="top"><img alt="Boost C++ Libraries" width="277" height="86"
src="../../boost.png"></td>
<td align="center"><a href="../../index.html">Home</a></td>
<td align="center"><a href="../../libs/libraries.htm">Libraries</a></td>
<td align="center"><a href="http://www.boost.org/users/people.html">People</a></td>
<td align="center"><a href="http://www.boost.org/users/faq.html">FAQ</a></td>
<td align="center"><a href="../../more/index.htm">More</a></td>
</tr></table>
.........
// <> : html的标签,这个标签对我们进行搜索是没有价值的,需要去掉这些标签,一般标签都是成对出现的!
- 在date目录下 mkdir raw_html(把处理后的内容放到里面)
:ls -Rl | grep -E '*.html' | wc -l
8141
目标:把每个文档都去标签,然后写入到同一个文件中!每个文档内容不需要任何\n!文档和文档之间用 \3 区分
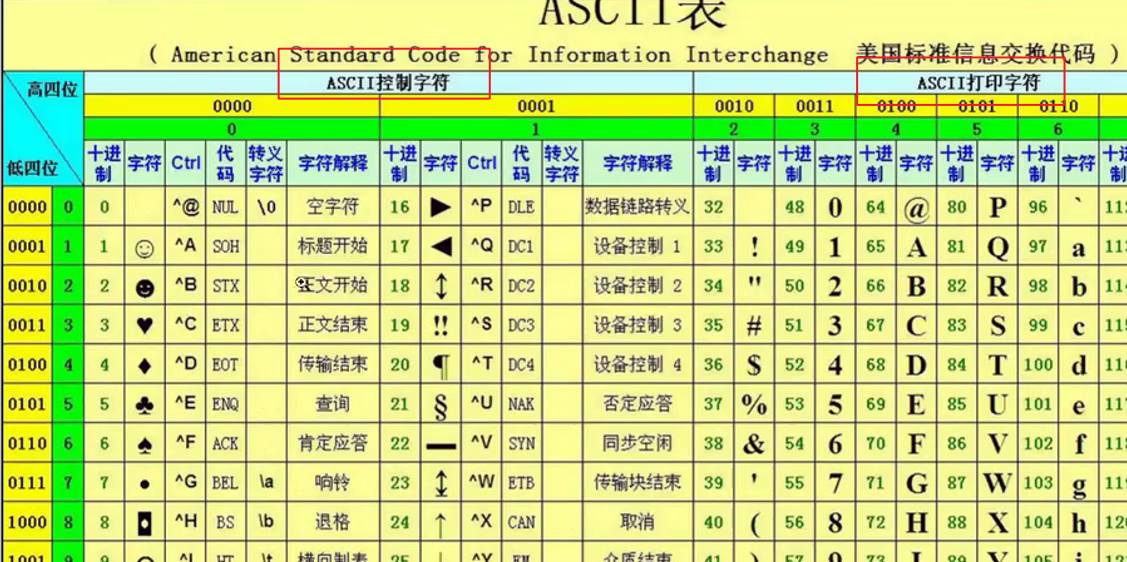
为什么用/3?
因为我们知道文档里面都是可显字符(打印字符),而/3(其他控制字符一样)是控制字符是不可显示的,所以就不会污染我们的新的文档。
version1:
类似:XXXXXXXXXXXXXXXXX\3YYYYYYYYYYYYYYYYYYYYY\3ZZZZZZZZZZZZZZZZZZZZZZZZZ\3
采用下面的方案:
version2: 写入文件中,一定要考虑下一次在读取的时候,也要方便操作!
类似:title\3content\3url \n title\3content\3url \n title\3content\3url \n ...
方便我们getline(ifsream, line),直接获取文档的全部内容:title\3content\3url
08 parser代码基本结构
- cd raw_html
touch raw.text
开始编写 parser.cc
基本结构
//代码的基本结构:
#include <iostream>
#include <string>
#include <vector>
//是一个目录,下面放的是所有的html网页
const std::string src_path = "data/input/";
const std::string output = "data/raw_html/raw.txt";
typedef struct DocInfo{std::string title; //文档的标题std::string content; //文档内容std::string url; //该文档在官网中的url
}DocInfo_t;
//const &: 输入
//*: 输出
//&:输入输出
bool EnumFile(const std::string &src_path, std::vector<std::string> *files_list);
bool ParseHtml(const std::vector<std::string> &files_list, std::vector<DocInfo_t>*results);
bool SaveHtml(const std::vector<DocInfo_t> &results, const std::string &output);
int main()
{std::vector<std::string> files_list;//第一步: 递归式的把每个html文件名带路径,保存到files_list中,方便后期进行一个一个的文件进行读取if(!EnumFile(src_path, &files_list)){std::cerr << "enum file name error!" << std::endl;return 1;}//第二步: 按照files_list读取每个文件的内容,并进行解析std::vector<DocInfo_t> results;if(!ParseHtml(files_list, &results)){std::cerr << "parse html error" << std::endl;return 2;}//第三步: 把解析完毕的各个文件内容,写入到output,按照\3作为每个文档的分割符if(!SaveHtml(results, output)){std::cerr << "sava html error" << std::endl;return 3;}return 0;
}
bool EnumFile(const std::string &src_path, std::vector<std::string> *files_list)
{return true;
}
bool ParseHtml(const std::vector<std::string> &files_list, std::vector<DocInfo_t> *results)
{return true;
}
bool SaveHtml(const std::vector<DocInfo_t> &results, const std::string &output)
{return true;
}
boost 开发库的安装
$ sudo yum install -y boost-devel //是boost 开发库
PS:我们用的是1.53 , 做的项目是boost库(1.78)的搜索引擎,两者并不冲突。
parser.cc #include<boost/filesystem.hpp>
EnumFile
bool EnumFile(const std::string &src_path, std::vector<std::string> *files_list)
{namespace fs = boost::filesystem;//还可以这样定义  作用域fs::path root_path(src_path);//定义了一个path对象root_path,意味着接下来遍历就从这个路径开始//判断路径是否存在,不存在,就没有必要再往后走了if(!fs::exists(root_path)){std::cerr << src_path << " not exists" << std::endl;return false;}//定义一个空的迭代器,用来进行判断递归结束fs::recursive_directory_iterator end;//boost库提供的递归遍历for(fs::recursive_directory_iterator iter(root_path); iter != end; iter++){//判断文件是否是普通文件,html都是普通文件if(!fs::is_regular_file(*iter)){ continue;}if(iter->path().extension() != ".html"){ //判断文件路径名的后缀是否符合要求continue;}//std::cout << "debug: " << iter->path().string() << std::endl;//当前的路径一定是一个合法的,以.html结束的普通网页文件files_list->push_back(iter->path().string()); //将所有带路径的html保存在files_list,方便后续进行文本分析    iter->path()获取到的是一个路径对象}return true;
}
测试结果

10 解析html代码结构编写
在根目录下 touch util.hpp – 是一个工具集,把所有工具的内容写到这里面
ParseHtml
bool ParseHtml(const std::vector<std::string> &files_list, std::vector<DocInfo_t> *results)
{for(const std::string &file : files_list){//1. 读取文件,Read();std::string result;if(!ns_util::FileUtil::ReadFile(file, &result)){continue;}DocInfo_t doc;//2. 解析指定的文件,提取titleif(!ParseTitle(result, &doc.title)){continue;}//3. 解析指定的文件,提取content,就是去标签if(!ParseContent(result, &doc.content)){continue;}//4. 解析指定的文件路径,构建urlif(!ParseUrl(file, &doc.url)){continue;}//done,一定是完成了解析任务,当前文档的相关结果都保存在了doc里面results->push_back(std::move(doc)); //bug:todo;细节,本质会发生拷贝,效率可能会比较低//for debug//ShowDoc(doc);//break;}return true;
}
因为那四个函数都只想在本文件内有效,所以都加了static
提取title
提取content,本质是进行去标签

util.hpp
写了个 return true
11 编写html文件读取代码
util.hpp
ReadFile
static bool ReadFile(const std::string &file_path, std::string *out){//输入流 std::ifstream in(file_path, std::ios::in/*表示读取*/);if(!in.is_open()){std::cerr << "open file " << file_path << " error" << std::endl;return false;}std::string line;while(std::getline(in, line)){ //如何理解getline读取到文件结束呢??getline的返回值是一个&,while(bool), 本质是因为重载了强制类型转化。就是返回特定的引用对象当中本质是重载了强制类型转化。即while判断这个对象结果是否合理的时候,对象的内容重载了强制类型转化,变成了bool值。*out += line;}in.close();return true;}
12 编写获取title代码
parser.cc
ParseTitle
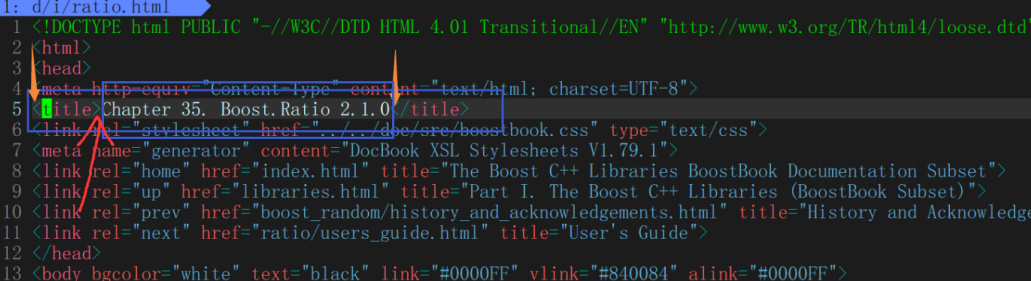
static bool ParseTitle(const std::string &file, std::string *title)
{std::size_t begin = file.find("<title>");if(begin == std::string::npos){return false;}std::size_t end = file.find("</title>");if(end == std::string::npos){return false;}//因为这里+size了的,所以下面直接begin开始提取begin += std::string("<title>").size();if(begin > end){return false;}*title = file.substr(begin, end - begin);return true;
}
13 编写去标签代码
parser.cc
ParseContent
static bool ParseContent(const std::string &file, std::string *content)
{//我们在进行读取的时候,那么是读取标签的内容,要么是读取文档的内容//去标签,基于一个简易的状态机enum status{LABLE,CONTENT};enum status s = LABLE;for( char c : file){switch(s){//在进行遍历的时候,只要碰到了 > ,就意味着,当前的标签被处理完毕. 只要碰到了 < 意味	     着新的标签开始了case LABLE:if(c == '>') s = CONTENT;break;case CONTENT://先判断是因为可能连着的标签if(c == '<') s = LABLE;else {//我们不想保留原始文件中的\n,因为我们想用\n作为html解析之后文本的分隔符if(c == '\n') c = ' ';content->push_back(c);}break;default:break;}}return true;
}
14 编写构建url代码并测试(注意)
构建URL
boost库的官方文档,和我们下载下来的文档,是有路径的对应关系的官网URL样例: https://www.boost.org/doc/libs/1_78_0/doc/html/accumulators.html我们下载下来的url样例(files_list的file):boost_1_78_0/doc/html/accumulators.html我们拷贝到我们项目中的样例:data/input/accumulators.html
//我们把下载下来的boost库 doc/html/* copy   data/input///就是说官方的html是在这个路径下的
url_head = "https://www.boost.org/doc/libs/1_78_0/doc/html";
//我们要从我们读取的文件名加路径下取出对应的html
url_tail = [data/input](删除) /accumulators.html ->
url_tail = /accumulators.html
然后相当于拼接成官网连接
url = url_head + url_tail ;
parser.cc
ParseUrl
static bool ParseUrl(const std::string &file_path, std::string *url)
{std::string url_head = "https://www.boost.org/doc/libs/1_78_0/doc/html";std::string url_tail = file_path.substr(src_path.size());//截取:/xxx.html*url = url_head + url_tail;return true;
}
15 编写写入文件代码
parser.cc
SaveHtml
bool SaveHtml(const std::vector<DocInfo_t> &results, const std::string &output)
{
#define SEP '\3'//按照二进制方式进行写入(文本也可以,但是二进制的好处是你写入的是什么(这里有\3),读取的就是什么,文档不会给你做自动转化)//因为是输出所以是ofstream,要把是数据写到out流中          std::ofstream out(output, std::ios::out | std::ios::binary);//因为我们上面传入了output会默认打开if(!out.is_open()){std::cerr << "open " << output << " failed!" << std::endl;return false;}//就可以进行文件内容的写入了//按我们之前的写入规则进行写入(title\3content\3url\n)//title\3content\3url\ntitle\3content\3url\n ...//方便我们getline(ifstream,line) 直接获取文档全部内容:title\3content\3urlfor(auto &item : results){std::string out_string;out_string = item.title;out_string += SEP;out_string += item.content;out_string += SEP;out_string += item.url;out_string += '\n';out.write(out_string.c_str(), out_string.size());}out.close();return true;
}
//boost库 对于文件操作提供了很多接口
16 搭建索引代码结构
index.hpp
//inidex.hpp基本结构
#pragma once#include <iostream>
#include <string>
#include <vector>
#include <unordered_map>namespace ns_index{struct DocInfo{std::string title; //文档的标题std::string content; //文档对应的去标签之后的内容std::string url; //官网文档urluint64_t doc_id; //文档的ID,暂时先不做过多理解};struct InvertedElem{ //倒排对应的节点/元素	uint64_t doc_id;//某一个关键字对应的idstd::string word;int weight;//权重,未了呈现文档的先后顺序};//倒排拉链typedef std::vector<InvertedElem> InvertedList;class Index{private://正排索引的数据结构用数组,数组的下标天然是文档的IDstd::vector<DocInfo> forward_index; //正排索引//倒排索引一定是一个关键字和一组(个)InvertedElem对应[关键字和倒排拉链的映射关系]std::unordered_map<std::string, InvertedList> inverted_index;public:Index(){}~Index(){}public://根据doc_id找到找到文档内容DocInfo *GetForwardIndex(uint64_t doc_id){return nullptr;}//根据关键字string,获得倒排拉链InvertedList *GetInvertedList(const std::string &word){return nullptr;}//根据去标签,格式化之后的文档,构建正排和倒排索引//data/raw_html/raw.txtbool BuildIndex(const std::string &input) //parse处理完毕的数据交			 给我{return true;}};
}
17 编写索引代码准备工作
index.hpp
GetForwardIndex
//根据doc_id找到找到文档内容DocInfo *GetForwardIndex(uint64_t doc_id){if(doc_id >= forward_index.size()){std::cerr << "doc_id out range, error!" << std::endl;return nullptr;}return &forward_index[doc_id];}
GetInvertedList
//根据关键字string,获得倒排拉链InvertedList *GetInvertedList(const std::string &word){auto iter = inverted_index.find(word);if(iter == inverted_index.end()){std::cerr << word << " have no InvertedList" << std::endl;return nullptr;}return &(iter->second);}
BuildIndex框架

//正排索引就是把一个一个html的数据解析push到vector就可以了
//倒排是要通过jieba对每一个文档的title,content分词
18 编写正排索引
index.hpp
BuildForwardIndex
DocInfo *BuildForwardIndex(const std::string &line){//1. 解析line,字符串切分//line -> 3 string, title, content, urlstd::vector<std::string> results;const std::string sep = "\3"; //行内分隔符ns_util::StringUtil::Split(line, &results, sep);//ns_util::StringUtil::CutString(line, &results, sep);if(results.size() != 3){return nullptr;}//2. 字符串进行填充到DocIinfoDocInfo doc;doc.title = results[0]; //titledoc.content = results[1]; //contentdoc.url = results[2]; ///urldoc.doc_id = forward_index.size(); //先进行保存id,在插入,对应的id就是当前doc在vector中的下标!//3. 插入到正排索引的vectorforward_index.push_back(std::move(doc)); //doc,html文件内容,所以一般比较大,不想要他发生拷贝,就movereturn &forward_index.back();}
Utill.hpp
StringUtil
#include <boost/algorithm/string.hpp>
    class StringUtil{public:static void Split(const std::string &target/*切谁*/, std::vector<std::string> *out, const std::string &sep){//boost splitboost::split(*out, target, boost::is_any_of(sep), boost::token_compress_on);
//第一个参数就是切分的结果,第二个是数据源,第三个是分隔符,第四个是分隔符和分隔符之间是否需要压缩(比如:aaa/3vv/3nn/3/3/3/3gggg/3)(boost::token_compress_on(默认是off)就是要不要把中间的\3压缩为一个就是这个意思,如果不加,就会有很多空的数据)}};
//18提出来的 19实现的
19 切分字符串
PS:文件框架提示

20 建立倒排索引原理
//这下面是我们目前有的数据
//原理:
struct InvertedElem{uint64_t doc_id;std::string word;int weight;
};
//倒排拉链
typedef std::vector<InvertedElem> InvertedList;
//倒排索引一定是一个关键字和一组(个)InvertedElem对应[关键字和倒排拉链的映射关系]
std::unordered_map<std::string, InvertedList> inverted_index;//我们拿到的文档内容
struct DocInfo{std::string title; //文档的标题std::string content; //文档对应的去标签之后的内容std::string url; //官网文档urluint64_t doc_id; //文档的ID,暂时先不做过多理解
};
//文档:
title : 吃葡萄
content: 吃葡萄不吐葡萄皮
url: http://XXXX
doc_id: 123
根据文档内容,形成一个或者多个InvertedElem(倒排拉链)
因为当前我们是一个一个文档进行处理的,一个文档会包含多个”词“, 都应当对应到当前的doc_id1. 需要对 title && content都要先分词 --使用jieba分词
title: 吃/葡萄/吃葡萄(title_word)
content:吃/葡萄/不吐/葡萄皮(content_word)词和文档的相关性(词频:在标题中出现的词,可以认为相关性更高一些,在内容中出现相关性低一些)
2. 词频统计
struct word_cnt{title_cnt;content_cnt;
}
unordered_map<std::string/*词*/, word_cnt> word_cnt;
for &word : title_word{word_cnt[word].title_cnt++; //吃(1(出现次数))/葡萄(1)/吃葡萄(1)
}
for &word : content_word {word_cnt[word].content_cnt++; //吃(1)/葡萄(1)/不吐(1)/葡萄皮(1)
}
知道了在文档中,标题和内容每个词出现的次数3. 自定义相关性
for &word : word_cnt{//具体一个词和123文档的对应关系,当有多个不同的词,指向同一个文档的时候,此时该优先显示谁??相关性!struct InvertedElem elem;elem.doc_id = 123;elem.word = word.first;elem.weight = 10*word.second.title_cnt + word.second.content_cnt ; //相关性,我们这里拍着脑门写了inverted_index[word.first].push_back(elem);//这里是倒排索引理解最重要的!!!//这个就是有一个map(inverted_index),key就是关键字(上面分的如‘吃’),然后inverted_index[word.first]就是一个关键字(上面分的如‘吃’),这个类型是InvertedList(vector)//倒排拉链//typedef std::vector<InvertedElem> InvertedList;
//是一个vector,vecctor里面就是//struct InvertedElem{//uint64_t doc_id;//std::string word;//int weight;
//};//!!!注意这里有两个map,一个是词频统计的map,一个是倒排拉链的map,遍历词频统计的map去构建一个个elem(不同词对应同一个id),然后push到倒排拉链的map里面(会push到不同文章的同一个词对应的vector中),使得在倒排拉链的map中,同一个词会对应不同的文章(map<string,vector>)。!!!//里面就是说这个词(word)在这篇文章(id)所占的权重(weight),搜索就是找到这个词,然后找到权重大的,再通过id找到不同的url,再按权重排列//这上面是对一个文档的数据进行处理,对于不同文档,可能有同样的词出现,这样也可以通过key(inverted_index[word.first]),push到同一张vector当中,这样一个词就对应了多个url了!
}//这上面是我们拿着一个文档的数据,进行分析,然后把分析(分析时就是去填充elem)的数据填充到InvertedElem(倒排拉链),最后push_back进inverted_index。
21 jieba的安装和使用
//jieba的使用--cppjieba
获取链接: git clone https://gitcode.net/mirrors/yanyiwu/cppjieba.git
如何使用:注意细节,我们需要自己执行: cd cppjieba; cp -rf deps/limonp include/cppjieba/, 不然会编译报错
注意包含Jieba.hpp时要改路径(软连接)和词库(软连接),使我们的程序能找到这个库和这个词库
按上编译会发现如下问题

我们需要再无脑做这么一件事情来解决


这样就可以在limop里面找到各种头文件,就没有刚才的错误了(编译错误)(Logging.hpp)
下面我们主要是用这个


22 引入jieba到项目
util.hpp
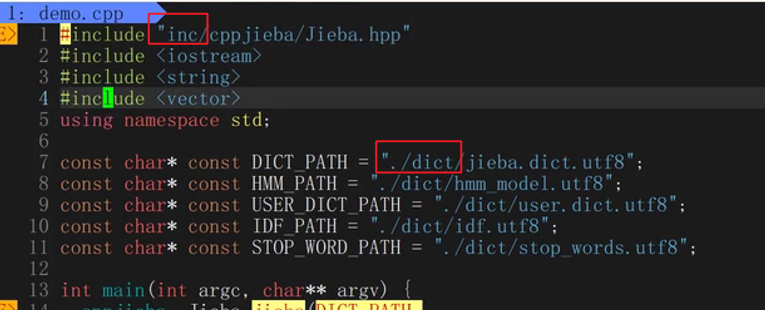
    const char* const DICT_PATH = "./dict/jieba.dict.utf8";const char* const HMM_PATH = "./dict/hmm_model.utf8";const char* const USER_DICT_PATH = "./dict/user.dict.utf8";const char* const IDF_PATH = "./dict/idf.utf8";const char* const STOP_WORD_PATH = "./dict/stop_words.utf8";
class JiebaUtil{private:static cppjieba::Jieba jieba;public:static void CutString(const std::string &src, std::vector<std::string> *out){jieba.CutForSearch(src, *out);//这块代码是22写的 但是后面要改的}
cppjieba::Jieba JiebaUtil::jieba(DICT_PATH, HMM_PATH, USER_DICT_PATH, IDF_PATH, STOP_WORD_PATH);//静态成员在类外定义
23 编写倒排索引代码
index.hpp
BuildInvertedIndex
bool BuildInvertedIndex(const DocInfo &doc){//DocInfo{title, content, url, doc_id}//word -> 倒排拉链struct word_cnt{int title_cnt;int content_cnt;word_cnt():title_cnt(0), content_cnt(0){}};std::unordered_map<std::string, word_cnt> word_map; //用来暂存词频的映射表//对标题进行分词std::vector<std::string> title_words;ns_util::JiebaUtil::CutString(doc.title, &title_words);//if(doc.doc_id == 1572){//    for(auto &s : title_words){//        std::cout << "title: " << s << std::endl;//    }//}//对标题进行词频统计for(std::string /*不想修改原内容,所以不&*/s : title_words){boost::to_lower(s); //需要统一转化成为小写,因为搜索的时候是忽略大小写的,所以我们统计的时候也都转换为小写去保存word_map[s].title_cnt++; //如果存在就获取,如果不存在就新建}//对文档内容进行分词std::vector<std::string> content_words;ns_util::JiebaUtil::CutString(doc.content, &content_words);//if(doc.doc_id == 1572){//    for(auto &s : content_words){//        std::cout << "content: " << s << std::endl;//    }//}//对内容进行词频统计for(std::string s : content_words){boost::to_lower(s);word_map[s].content_cnt++;}#define X 10
#define Y 1//Hello,hello,HELLOfor(auto &word_pair : word_map){InvertedElem item;item.doc_id = doc.doc_id;item.word = word_pair.first;item.weight = X*word_pair.second.title_cnt + Y*word_pair.second.content_cnt; //相关性InvertedList &/*引用倒排拉链*/inverted_list = inverted_index[word_pair.first];//这个和之前【】是一样的,把关键字插入进倒排索引,没有就创建,有就返回数组的地址inverted_list.push_back(std::move(item));//然后利用这个地址,插入item}//这样我们就把一个倒排拉链中的一个节点,插入到特定词映射之后的倒排拉链当中对应的vector里面了。这一个文档,就会建立各种key值对应的倒排拉链,只不过每个倒排拉链里存在的元素值只有一个,因为他们映射的是同一个文档。所以当重复调用各种文档数据时,也有可能会有同样的词,那么这个倒排拉链里面就会有其他文档的id。return true;}//下面这个是全局的写在类中最上面的//倒排拉链//typedef std::vector<InvertedElem> InvertedList;//倒排索引一定是一个关键字和一组(个)InvertedElem对应[关键字和倒排拉链的映射关系]//        std::unordered_map<std::string, InvertedList> inverted_index;
24 编写searcher代码基本结构
touch searcher.hpp

#include "index.hpp"namespace ns_searcher{class Searcher{private:ns_index::Index *index; //供系统进行查找的索引   单例public:Searcher(){}~Searcher(){}public:void InitSearch(const std::string &input){//1. 获取或者创建index对象//2. 根据index对象建立索引}//query:搜索关键字//json_string:返回给用户浏览器的数据/搜索结果void Search(const std::string &query,std::string *json_string){//1.[分词]:对我们的query进行按照searcher的要求进行分词//2.[触发]:就是根据分词的各个'词',进行index查找//3.[合并排序]:汇总查找结果,按照相关性(weight)降序排序//4.[构建]:根据查找出来的结果,构建json串 -- jsoncpp}};
}
25 boost搜索引擎_编写index单例
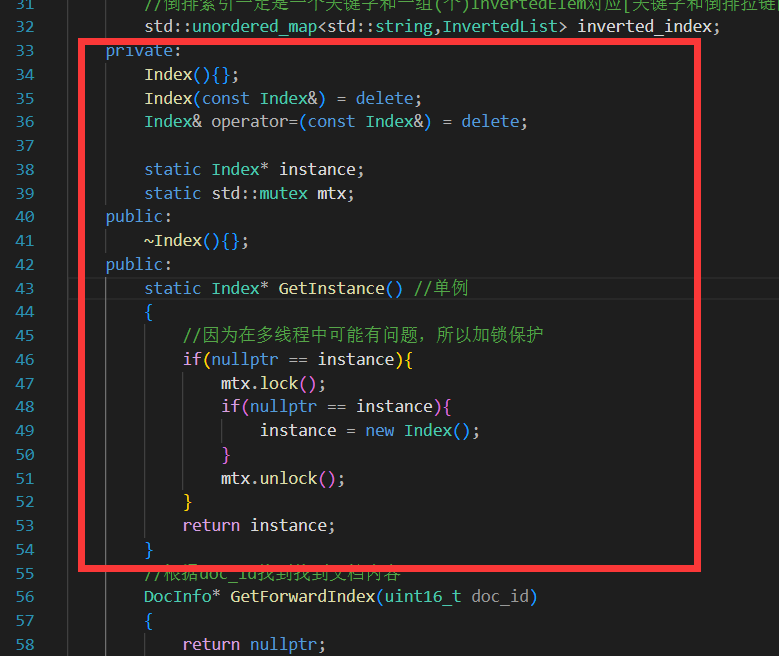
#include "index.hpp"namespace ns_searcher{class Searcher{private:ns_index::Index *index; //供系统进行查找的索引   单例public:Searcher(){}~Searcher(){}public:void InitSearch(const std::string &input){//1. 获取或者创建index对象index = ns_index::Index::GetInstance();//2. 根据index对象建立索引index->BuildIndex(input);}//query:搜索关键字//json_string:返回给用户浏览器的数据/搜索结果void Search(const std::string &query,std::string *json_string){//1.[分词]:对我们的query进行按照searcher的要求进行分词//2.[触发]:就是根据分词的各个'词',进行index查找//3.[合并排序]:汇总查找结果,按照相关性(weight)降序排序//4.[构建]:根据查找出来的结果,构建json串 -- jsoncpp}};
}
26 boost搜索引擎_编写查找代码一
searcher.hpp 整体结构
#include "index.hpp"
#include "util.hpp"
#include <algorithm>namespace ns_searcher{class Searcher{private:ns_index::Index *index; //供系统进行查找的索引   单例public:Searcher(){}~Searcher(){}public:void InitSearch(const std::string &input){//1. 获取或者创建index对象index = ns_index::Index::GetInstance();//2. 根据index对象建立索引index->BuildIndex(input);}//query:搜索关键字//json_string:返回给用户浏览器的数据/搜索结果void Search(const std::string &query,std::string *json_string){//1.[分词]:对我们的query进行按照searcher的要求进行分词std::vector<std::string> words;ns_util::JiebaUtil::CutString(query,&words);//2.[触发]:就是根据分词的各个'词',进行index查找,建立index是忽略大小写了的,所以搜索也要ns_index::InvertedList inverted_list_all;//内部是InvertedElemfor(std::string word : words){boost::to_lower(word);ns_index::InvertedList *inverted_list = index->GetInwertedList(word);if(nullptr == inverted_list){continue;}inverted_list_all.insert(inverted_list_all.end(),inverted_list.begin(),inverted_list.end());}//3.[合并排序]:汇总查找结果,按照相关性(weight)降序排序std::sort(inverted_list_all.begin(),inverted_list_all.end(),[](const ns_index::InvertedElem &e1,const ns_index::InvertedElem &e2){return e1.weight > e2.weight;});//4.[构建]:根据查找出来的结果,构建json串 -- jsoncpp}};
}
27 boos搜索引擎_编写查找代码二
安装 jsoncpp

json中有三个重要的类
Value Reader Writer
Value :处于序列化和反序列化中间转换的一个类。
Reader :是做反序列化的。
Writer(一般有FastWriter和StyledWriter(一般用/好看/方便调试)):是做序列化的。
如何用:

g++ test.cc -ljsoncpp

这里的[]就类似数组,里面是两个对象({},也就是一个json)
searcher.hpp
Search
//query:搜索关键字//json_string:返回给用户浏览器的数据/搜索结果void Search(const std::string &query,std::string *json_string){//1.[分词]:对我们的query进行按照searcher的要求进行分词std::vector<std::string> words;ns_util::JiebaUtil::CutString(query,&words);//2.[触发]:就是根据分词的各个'词',进行index查找,建立index是忽略大小写了的,所以搜索也要ns_index::InvertedList inverted_list_all;//内部是InvertedElemfor(std::string word : words){boost::to_lower(word);ns_index::InvertedList *inverted_list = index->GetInwertedList(word);if(nullptr == inverted_list){continue;}inverted_list_all.insert(inverted_list_all.end(),inverted_list.begin(),inverted_list.end());}//3.[合并排序]:汇总查找结果,按照相关性(weight)降序排序std::sort(inverted_list_all.begin(),inverted_list_all.end(),[](const ns_index::InvertedElem &e1,const ns_index::InvertedElem &e2){return e1.weight > e2.weight;});//4.[构建]:根据查找出来的结果,构建json串 -- jsoncpp -- 通过jsoncpp完成序列化和反序列化Json::Value root;for(auto &item : inverted_list_all){ns_index::DocInfo *doc = index->GetForwardIndex(item.doc_id);if(nullptr == doc){continue;}Json::Value elem;elem["title"] = doc->title;elem["desc"] = doc->content;//content是文档去标签的结果,我们要的是摘要//TODOelem["url"] = doc->url;root.append(elem);}Json::StyledWriter writer;*json_string = writer.write(root);//将我们的root进行序列化}
28 boost搜索引擎_编写测试server
touch server.cc
makefile
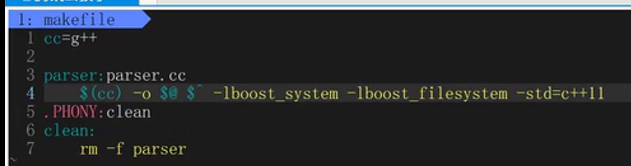
PARSER=parser
SSVR=search_server
cc=g++.PHONY:all
all:$(PARSER) $(SSVR)$(PARSER):parser.cc$(cc) -o $@ $^ -lboost_system -lboost_filesystem -std=c++11 #注意 $@和$^有空格
$(SSVR):server.cc$(cc) -o $@ $^ -ljsoncpp -std=c++11
.PHONY:clean
clean:rm -rf parser
server.cc
for test
#include "searcher.hpp"
#include <iostream>
#include <string>const std::string input = "date/raw_html/raw.txt";int main()
{//forr testns_searcher::Searcher *search = new ns_searcher::Searcher();search->InitSearch(input);std::string query;std::string json_string;while(true){std::cout<<"Please Enter You Search Query# ";std::cin>>query;search->Search(query,&json_string);std::cout<<json_string<<std::endl;}return 0;
}
29 boost搜索引擎_编写获取摘要代码
searcher.hpp
GetDesc
//获取摘要std::string GetDesc(const std::string &html_content, const std::string &word){//找到word在html_content中的首次出现,然后往前找50byte(begin),往后100byte(end)const std::size_t prev_step = 50;const std::size_t next_step = 100;//1. 找到首次出现std::size_t pos = html_content.find(word);if(pos == std::string::npos){return "None";//这种情况是不存在的}//2. 获取start,endstd::size_t start = 0;std::size_t end = html_content.size()-1;//如果之前有50+byte,就更新开始位置if(pos - prev_step > start) start = pos;if(pos + next_step < end) end = pos + next_step;//3. 截取子串,returnif(start >= end) return "None";return html_content.substr(start, end - start);}
30 boost搜索引擎_综合调试(一)
31 boost搜索引擎_综合调试(二)
1 size_t -> int
2 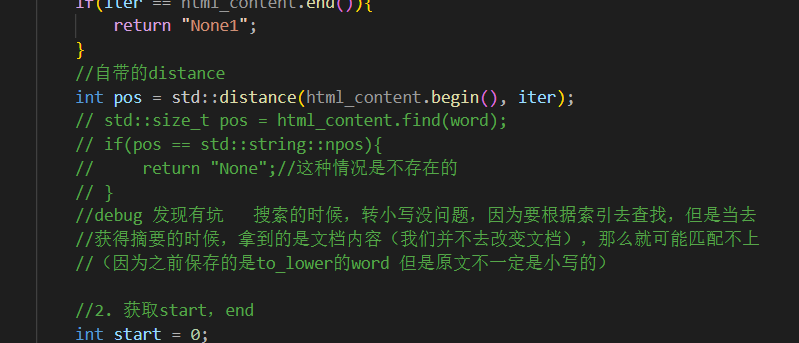
3 关于调试
把整个文件读到内存
先拿到标题,取到了标题。
对整个文件进行去标签,其中是包括标签的!!!!
实际如果一个词在title中出现,一定会被当标题 和 当内容分别被统计一次!!!
32 boost搜索引擎_引入cpp-httplib库
编写http_server 模块
cpp-httplib库:https://gitee.com/zhangkt1995/cpp-httplib?_from=gitee_search
注意:cpp-httplib在使用的时候需要使用较新版本的gcc,centos 7下默认gcc 4.8.5
gcc -v 查看
用老的编译器,要么编译不通过,要么直接运行报错
升级gcc
搜索:scl gcc devsettool升级gcc
//安装scl
sudo yum install centos-release-scl scl-utils-build
//安装新版本gcc
sudo yum install -y devtoolset-7-gcc devtoolset-7-gcc c++
就可以用了
安装好后,工具集所在位置
ls /opt/rh/
//启动: 细节,命令行启动只能在本会话有效
scl enable devtoolset-7 bash
gcc -v
//可选:如果想每次登陆的时候,都是较新的gcc
vim ~/.bash_profile
这个是你登录的时候会执行的一个登录脚本

安装 cpp**-**httplib
最新的cpp-httplib在使用的时候,如果gcc不是特别新的话有可能会有运行时错误的问题
建议:cpp-httplib 0.7.15
下载zip安装包,上传到服务器即可
33 boost搜索引擎_练习使用cpp-httplib库
基本使用测试
//#include "searcher.hpp"
#include "cpp-httplib/httplib.h"
int main()
{httplib::Server svr;svr.Get("/hi", [](const httplib::Request &req, httplib::Response &rsp){rsp.set_content("你好,世界!", "text/plain; charset=utf-8");});svr.listen("0.0.0.0", 8081);return 0;
}

#include "searcher.hpp"
#include "cc_httplib.h"//cpp-httplib-v0.7.15/httplib.hconst std::string root_path = "./wwwroot";int main()
{httplib::Server svr; //设置wwwroot(网页)根目录svr.set_base_dir(root_path.c_str());//获取网页资源svr.Get("/hi",[](const httplib::Request &req, httplib::Response &rsp){rsp.set_content("你好,世界!","texy/plain; charset=utf-8");});svr.listen("0.0.0.0",8081);return 0;
}
wwwroot:index.html(默认网页/首页)
<!DOCTYPE html>
<html>
<head>
<meta charset="UTF-8">
<title>for test</title>
</head>
<body>
<h1>你好,世界</h1>
<p>这是一个httplib的测试网页</p>
</body>
</html>
34 boost搜索引擎_完成http调用
http_server.cc
#include "searcher.hpp"
#include "cc_httplib.h"//cpp-httplib-v0.7.15/httplib.hconst std::string input = "date/raw_html/raw.txt";
const std::string root_path = "./wwwroot";int main()
{ns_searcher::Searcher search;search.InitSearch(input);httplib::Server svr; //设置wwwroot(网页)根目录svr.set_base_dir(root_path.c_str());//获取网页资源svr.Get("/s",[&search](const httplib::Request &req, httplib::Response &rsp){//Getif(!req.has_param("word"/*参数名字*/)/*表面用户是否有参数*/){rsp.set_content("必须要有搜索关键字!","text/plain; charset=utf-8"/*Content-Type对照表,就是返回的不同内容,你想要他是什么类型,plain就是普通文本*/);return;}std::string word = req.get_param_value("word");/*这两word不是一个东西哈*/std::cout<<"用户当前在搜索:"<<word<<std::endl;std::string json_string;search.Search(word,&json_string);rsp.set_content(json_string,"application/json");//rsp.set_content("你好,世界!","texy/plain; charset=utf-8");});//Getsvr.listen("0.0.0.0",8081);return 0;
}
后端代码done
35 boost搜素引擎_使用vscode远程连接Linux
了解 vscode
编辑器
下载
官网:https://code.visualstudio.com/
下载慢:https://www.zhihu.com/search?type=content&q=vscode%20%E4%B8%8B%E8%BD%BD%E6%85%A2
安装插件
Chinese (Simplified) (简体中文) Language Pack for Visual Studio Code
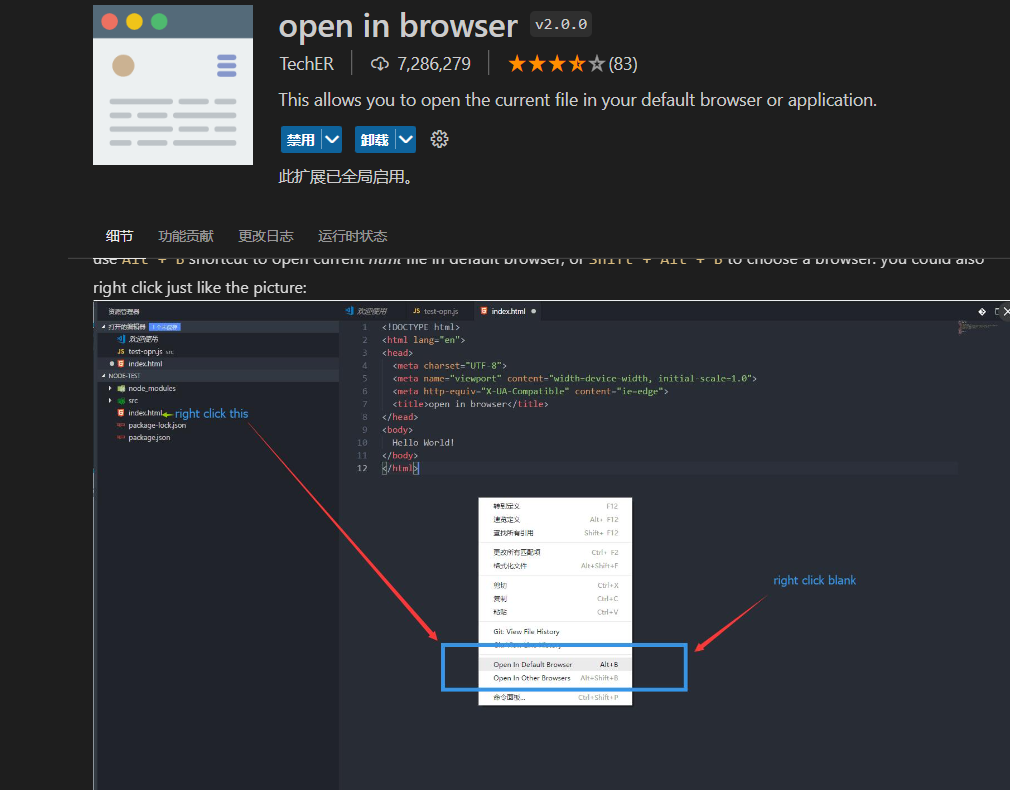
Open in Browser
远程链接Linux
安装插件: Remote SSH
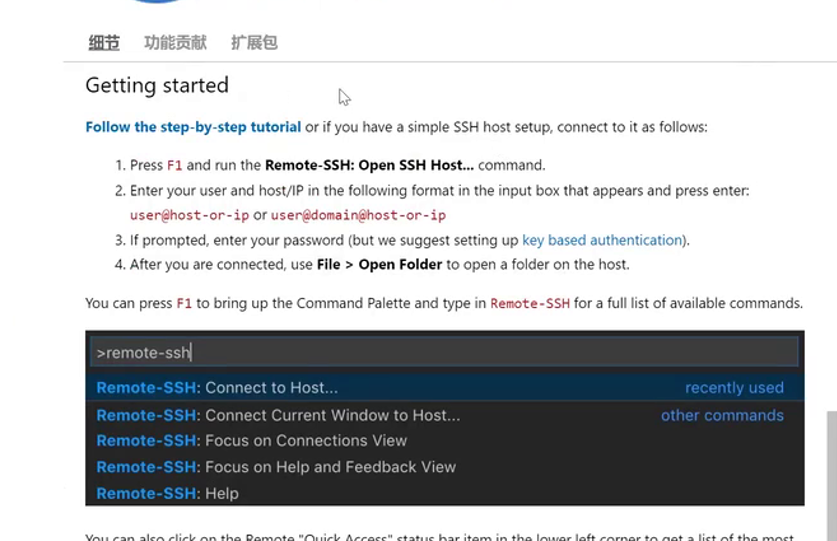
我们linux也是可以:ssh name@你的ip
然后去配置你的config
36 boost搜索引擎_html编写网页结构
编写前端模块
-
!tab
-
由标签构成:单标签,双标签

了解 html**,css,**js
html: 是网页的骨骼 – 负责网页结构
css:网页的皮肉 – 负责网页美观的
js(javascript):网页的灵魂—负责动态效果,和前后端交互
教程: https://www.w3school.com.cn/
html 基本代码
<!DOCTYPE html>
<html lang="en">
<head><meta charset="UTF-8"><meta http-equiv="X-UA-Compatible" content="IE=edge"><meta name="viewport" content="width=device-width, initial-scale=1.0"><title>boost 搜索引擎</title>
</head>
<body><div class="container"><div class="search"><input type="text" value="输入搜索关键字..."><button>搜索一下</button></div><div class="result"><div class="item"><a href="#">这是标题</a><p>这是摘要这是摘要这是摘要这是摘要这是摘要这是摘要</p><i>zhes url</i></div><div class="item"><a href="#">这是标题</a><p>这是摘要这是摘要这是摘要这是摘要这是摘要这是摘要</p><i>zhes url</i></div><div class="item"><a href="#">这是标题</a><p>这是摘要这是摘要这是摘要这是摘要这是摘要这是摘要</p><i>zhes url</i></div><div class="item"><a href="#">这是标题</a><p>这是摘要这是摘要这是摘要这是摘要这是摘要这是摘要</p><i>zhes url</i></div><div class="item"><a href="#">这是标题</a><p>这是摘要这是摘要这是摘要这是摘要这是摘要这是摘要</p><i>zhes url</i></div></div></div>
</body>
</html>
html 效果
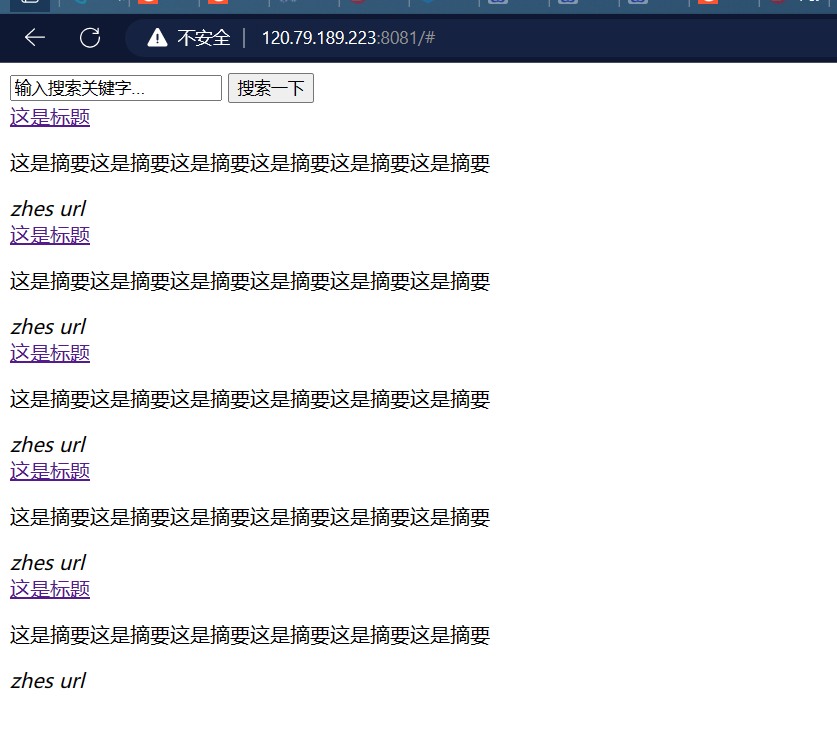
太丑了,所以我们去用 css 美化
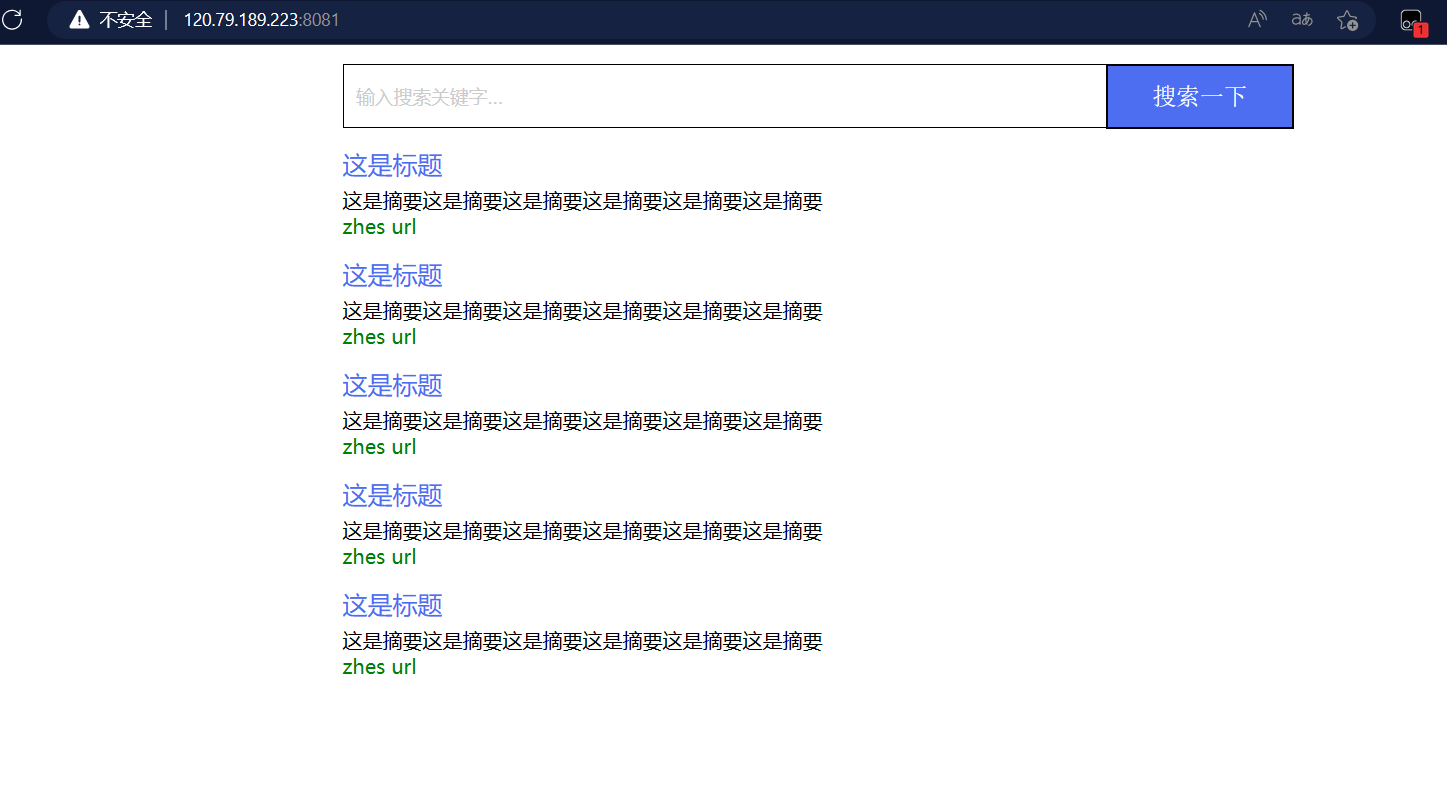
37 boost搜索引擎_html编写CSS样式
css 基本代码
设置样式的本质:找到要设置的标签,设置它的属性
-
选择特定的标签:类选择器,标签选择器,复合选择器
-
设置指定标签的属性:见代码
<style>/* 去掉网页中的所有的默认内外边距,html的盒子模型 */* {/* 设置外边距 */margin: 0;/* 设置内边距 */padding: 0;}/* 将我们的body内的内容100%和html的呈现吻合 */html,body {height: 100%;}/* 类选择器.container */.container {/* 设置div的宽度 */width: 800px;/* 通过设置外边距达到居中对齐的目的 */margin: 0px auto;/* 设置外边距的上边距,保持元素和网页的上部距离 */margin-top: 15px;}/* 复合选择器,选中container 下的 search */.container .search {/* 宽度与父标签保持一致 */width: 100%;/* 高度设置为52px */height: 52px;}/* 先选中input标签, 直接设置标签的属性,先要选中, input:标签选择器*//* input在进行高度设置的时候,没有考虑边框的问题 */.container .search input {/* 设置left浮动 */float: left;width: 600px;height: 50px;/* 设置边框属性:边框的宽度,样式,颜色 */border: 1px solid black;/* 去掉input输入框的有边框 */border-right: none;/* 设置内边距,默认文字不要和左侧边框紧挨着 */padding-left: 10px;/* 设置input内部的字体的颜色和样式 */color: #CCC;font-size: 15px;}/* 先选中button标签, 直接设置标签的属性,先要选中, button:标签选择器*/.container .search button {/* 设置left浮动 */float: left;width: 150px;height: 52px;/* 设置button的背景颜色,#4e6ef2 */background-color: #4e6ef2;/* 设置button中的字体颜色 */color: #FFF;/* 设置字体的大小 */font-size: 19px;font-family: Georgia, 'Times New Roman', Times, serif;}.container .result {width: 100%;}.container .result .item {margin-top: 15px;}.container .result .item a {/* 设置为块级元素,单独站一行 */display: block;/* a标签的下划线去掉 */text-decoration: none;/* 设置a标签中的文字的字体大小 */font-size: 20px;/* 设置字体的颜色 */color: #4e6ef2;}.container .result .item a:hover {/*设置鼠标放在a之上的动态效果*/text-decoration: underline;}.container .result .item p {margin-top: 5px;font-size: 16px;font-family: 'Lucida Sans', 'Lucida Sans Regular', 'Lucida Grande', 'Lucida SansUnicode', Geneva, Verdana, sans-serif;}.container .result .item i {/* 设置为块级元素,单独站一行 */display: block;/* 取消斜体风格 */font-style: normal;color: green;}</style>
css 效果
38 boost搜索引擎_编写前后端交互JS代码
js 基本代码
如果直接使用原生的js成本会比较高(xmlhttprequest),我们推荐使用JQuery(有点像cpp和STL的关系).
JQuery CDN: https://www.jq22.com/cdn/
<script>function Search() {// 是浏览器的一个弹出框// alert("hello js!");// 1. 提取数据, $可以理解成就是JQuery的别称let query = $(".container .search input").val();console.log("query = " + query); //console是浏览器的对话框,可以用来进行查看js数据//2. 发起http请求,ajax: 属于一个和后端进行数据交互的函数,JQuery中的$.ajax({type: "GET",url: "/s?word=" + query,success: function (data) {console.log(data);BuildHtml(data);}});}function BuildHtml(data) {// 获取html中的result标签let result_lable = $(".container .result");// 清空历史搜索结果result_lable.empty();for (let elem of data) {// console.log(elem.title);// console.log(elem.url);let a_lable = $("<a>", {text: elem.title,href: elem.url,// 跳转到新的页面target: "_blank"});let p_lable = $("<p>", {text: elem.desc});let i_lable = $("<i>", {text: elem.url});let div_lable = $("<div>", {class: "item"});a_lable.appendTo(div_lable);p_lable.appendTo(div_lable);i_lable.appendTo(div_lable);div_lable.appendTo(result_lable);}}</script>
前后端基本完成,只有一点优化了
39 boost搜索引擎_解决搜索结果出现重复文档的问题
存在搜到重复内容
searcher.hpp
Search
//query:搜索关键字//json_string:返回给用户浏览器的数据/搜索结果void Search(const std::string &query,std::string *json_string){//1.[分词]:对我们的query进行按照searcher的要求进行分词std::vector<std::string> words;ns_util::JiebaUtil::CutString(query,&words);//2.[触发]:就是根据分词的各个'词',进行index查找,建立index是忽略大小写了的,所以搜索也要//ns_index::InvertedList inverted_list_all;//内部是InvertedElemstd::vector<InvertedElemPrint> inverted_list_all;//只用来保存不重复的倒排拉链节点std::unordered_map<uint16_t,InvertedElemPrint> tokens_map;for(std::string word : words){boost::to_lower(word);ns_index::InvertedList *inverted_list = index->GetInwertedList(word);if(nullptr == inverted_list){continue;}//比如 你是一个好人 -> 你/是/一个/好人 原来是搜出四条一模一样的 现在去重了//inverted_list_all.insert(inverted_list_all.end(),inverted_list->begin(),inverted_list->end());for(const auto &elem:*inverted_list){auto &item = tokens_map[elem.doc_id];//[]:如果存在直接获取,不存在就新建//item一定是一doc_id相同的print节点item.doc_id = elem.doc_id;item.weight += elem.weight;item.words.push_back(elem.word);}}for(const auto &item:tokens_map){inverted_list_all.push_back(std::move(item.second));}//3.[合并排序]:汇总查找结果,按照相关性(weight)降序排序// std::sort(inverted_list_all.begin(),inverted_list_all.end(),[](// const ns_index::InvertedElem &e1,const ns_index::InvertedElem &e2){// return e1.weight > e2.weight;// });std::sort(inverted_list_all.begin(),inverted_list_all.end(),[](const InvertedElemPrint &e1,const InvertedElemPrint &e2){return e1.weight > e2.weight;});//4.[构建]:根据查找出来的结果,构建json串 -- jsoncpp -- 通过jsoncpp完成序列化和反序列化Json::Value root;for(auto &item : inverted_list_all){ns_index::DocInfo *doc = index->GetForwardIndex(item.doc_id);if(nullptr == doc){continue;}Json::Value elem;elem["title"] = doc->title;elem["desc"] = GetDesc(doc->content, item.words[0]);//content是文档去标签的结果,我们要的是摘要elem["url"] = doc->url;//for debug , for deleteelem["id"] = (int)item.doc_id;elem["weight"] = item.weight; //int -> stringroot.append(elem);}Json::StyledWriter writer;*json_string = writer.write(root);//将我们的root进行序列化}
40 boost搜索引擎_添加日志与部署到Linux中
添加日志
log.hpp
#pragma once#include<iostream>
#include<string>
#include<ctime>#define NORMAL  1
#define WARNING 2
#define DEBUG   3
#define FATAL   4#define LOG(LEVEL,MESSAGE) log(#LEVEL,MESSAGE,__FILE__,__LINE__);//#把宏转换成字符串void log(std::string level,std::string message,std::string file,int line){std::cout<< "[" << level << "]" << "[" << time(nullptr) << "]" << "["<<message<<"]" << "[" << file << ":" << line << "]" <<std::endl;
}
部署服务到 linux 上
nohup
nohup是一个调用,他可以在启动我们程序的时候,以守护进程的形式去启动(把我们的服务部署到linux上了)。
$:nohup ./http_server &
并且生成nohup.out把我们的日志信息打印进去
想停掉就 ps axg | grep http_server 然后用pid kill -9
也可以创建一个log文件夹,把日志信息和标准错误里面的信息也显示到标准输出上
[外链图片转存失败,源站可能有防盗链机制,建议将图片保存下来直接上传(img-0xjJsQoH-1686038975905)(C:\Users\27771\AppData\Roaming\Typora\typora-user-images\image-20230225191758614.png)]
41 boost搜索引擎_结项与项目扩展方向
项目扩展方向
-
建立整站搜索
-
设计一个在线更新的方案,信号,爬虫,完成整个服务器的设计
-
不使用组件,而是自己设计一下对应的各种方案(有时间,有精力)
-
在我们的搜索引擎中,添加竞价排名(强烈推荐)
-
热次统计,智能显示搜索关键词(字典树,优先级队列)(比较推荐)
-
设置登陆注册,引入对mysql的使用(比较推荐的)
42 去掉暂停词
util.hpp
#pragma once
#include<iostream>
#include<string>
#include <unordered_map>
#include<fstream>
#include <boost/algorithm/string.hpp>
#include <mutex>
#include "ccjieba/Jieba.hpp"
#include "log.hpp"namespace ns_util{class FileUtil{public:static bool ReadFile(const std::string &file_path,std::string *out){//输入流std::ifstream in(file_path,std::ios::in/*表示读取*/);if(!in.is_open()){std::cerr<<"open file "<<file_path<<" error"<<std::endl;return false;}std::string line;while(std::getline(in,line)){*out+=line;//如何理解getline读取到文件结束呢??//getline的返回值是一个&,while(bool), 本质是因为重载了强制类型转化。//就是返回特定的引用对象当中//即while判断这个对象结果是否合理的时候,//对象的内容重载了强制类型转化,变成了bool值。}in.close();return true;}};class StringUtil{public:static void Split(const std::string &target,std::vector<std::string> *out,const std::string &sep){ //boost splitboost::split(*out, target, boost::is_any_of(sep), boost::token_compress_on);//第一个参数就是切分的结果,第二个是数据源,第三个是分隔符,第四个是分隔符和分隔符之间是否需要压//缩(比如:aaa/3vv/3nn/3/3/3/3gggg/3)(boost::token_compress_on(默认是off)就是要不要//把中间的\3压缩为一个就是这个意思,如果不加,就会有很多空的数据)}};const char* const DICT_PATH = "./dict/jieba.dict.utf8";const char* const HMM_PATH = "./dict/hmm_model.utf8";const char* const USER_DICT_PATH = "./dict/user.dict.utf8";const char* const IDF_PATH = "./dict/idf.utf8";const char* const STOP_WORD_PATH = "./dict/stop_words.utf8";class JiebaUtil{private://static cppjieba::Jieba jieba;cppjieba::Jieba jieba;std::unordered_map<std::string,bool> stop_words;private:JiebaUtil():jieba(DICT_PATH, HMM_PATH, USER_DICT_PATH, IDF_PATH, STOP_WORD_PATH){}JiebaUtil(const JiebaUtil&) = delete;static JiebaUtil *instance;public:static JiebaUtil* get_instance(){static std::mutex mtx;if(nullptr == instance){mtx.lock();if(nullptr == instance){instance = new JiebaUtil();instance->InitJiebaUtil();}mtx.unlock();}return instance;}//把暂停词加载进来void InitJiebaUtil(){std::ifstream in(STOP_WORD_PATH);if(!in.is_open()){LOG(FATAL, "load stop words file error");return;}std::string line;while(std::getline(in, line)){stop_words.insert({line, true});}in.close();}void CutStringHelper(const std::string &src, std::vector<std::string> *out){jieba.CutForSearch(src, *out);for(auto iter = out->begin(); iter != out->end(); ){auto it = stop_words.find(*iter);if(it != stop_words.end()){//说明当前的string 是暂停词,需要去掉iter = out->erase(iter);}else{iter++;}}}public:static void CutString(const std::string &src,std::vector<std::string> *out){ns_util::JiebaUtil::get_instance()->CutStringHelper(src, out);//jieba.CutForSearch(src,*out);}};JiebaUtil *JiebaUtil::instance = nullptr;//cppjieba::Jieba JiebaUtil::jieba(DICT_PATH, HMM_PATH, USER_DICT_PATH, IDF_PATH, STOP_WORD_PATH);//静态成员在类外定义
}
项目描述
这个项目基于c/cpp写的,主要的技术栈有stl,boost库,jsoncpp(进行序列化反序列化),cppjieba(分词),cpp-httplib(搭建服务器)等。
项目的重点是倒排索引和正牌索引。项目的实现是先从boost官网得到要查找的html文档,然后进行解析存储,其中就包括得到html的标题,正文,url,然后将数据按特定格式进行存储,我就是把他们按/3进行分割,/n进行文章的分离,保存到文件,方便后续读取。
然后建立正牌和倒排索引,倒排索引就是文章关键字和文档id的关系,正牌索引就是文档id和之前保存的数据建立的对应关系,我们查找的时候就是先把搜索词进行切分,切分就是用了jieba分词,然后一个词一个词去搜索,然后把搜索到的结果进行整合返回给用户。