1、简介
GUI的核心技术:Swing、 AWT
1、外观不太美观,组件数量偏少
2、运行需要JRE环境
为什么我们要学习?
- 组件(JTable,JList等)很多都是MVC的经典示范,学习也可以了解mvc架构。
- 工作时,也有可能遇见需要维护N年前awt/swing写的软件 (可能性极小)
- 可以写一些自己使用的软件
2、AWT
2.1 AWT介绍
- AWT(Abstract Window Toolkit),中文译为抽象窗口工具包。包括了很多类和接口,用于Java Application的GUI(Graphics User Interface 图形用户界面)编程。
- GUI的各种元素(如:窗口,按钮,文本框等)由Java类来实现。
- 使用AWT所涉及的类一般在Java.AWT包及其子包中。
- Container和Component是AWT中的两个核心类。
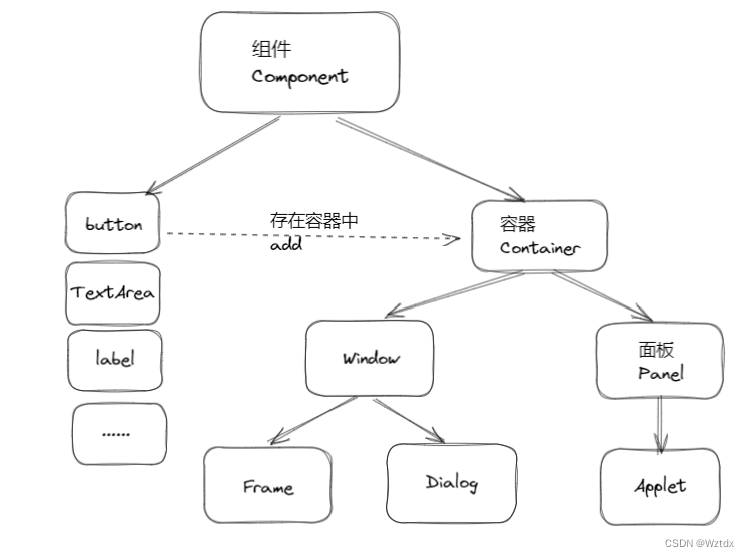
2.2 组件和容器
//GUI的第一个界面
public class TestFrame {public static void main(String[] args) {//这里只是在内存里面创建了一个窗口对象 还不能真正显示出来然我们看到Frame frame = new Frame("My First Java GUI");frame.setVisible(true);frame.setSize(400,400);frame.setBackground(new Color(229, 106, 106));//设置窗体出现时的位置,如果不设置则默认在左上角(0,0)位置显示frame.setLocation(200,200);//窗口大小固定frame.setResizable(false);}
}
此时是无法通过窗口的叉来关闭窗口的,需要手动关闭程序运行
我们进行封装,一次new出多个窗口
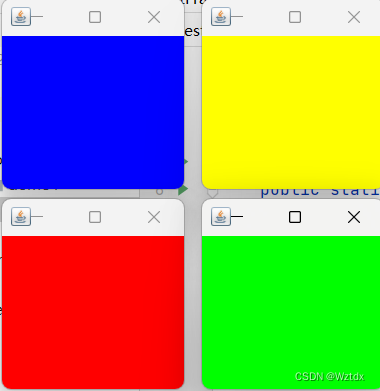
public class TestFrame2 {public static void main(String[] args) {MyFrame myFrame1 = new MyFrame(100, 100, 200, 200, Color.blue);MyFrame myFrame2 = new MyFrame(300, 100, 200, 200, Color.yellow);MyFrame myFrame3 = new MyFrame(100, 300, 200, 200, Color.red);MyFrame myFrame4 = new MyFrame(300, 300, 200, 200, Color.green);}
}class MyFrame extends Frame{//可能存在多个窗口,需要一个计数器static int id=0;public MyFrame(int x,int y,int w,int h,Color color){super("MyFrame "+(++id));setBounds(x,y,w,h);setVisible(true);setBackground(color);}
}
2.3 Panel
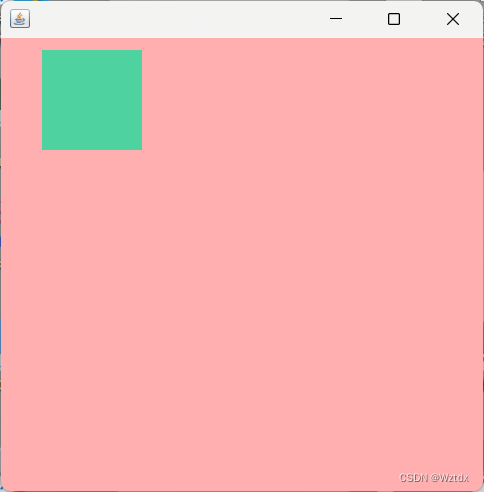
//Panel可以看成是一个空间,但是不能单独存在
public class TestPanel {public static void main(String[] args) {Frame frame=new Frame();Panel panel = new Panel();//设置布局frame.setLayout(null);frame.setBounds(300,300,500,500);frame.setBackground(Color.pink);frame.setVisible(true);//panel设置坐标,相对于framepanel.setBounds(50,50,100,100);panel.setBackground(new Color(78, 210, 159));frame.add(panel);frame.setVisible(true);//监听事件,监听窗口关闭事件//适配器模式frame.addWindowListener(new WindowAdapter() {//窗口点击关闭时要做的事情@Overridepublic void windowClosing(WindowEvent e) {System.exit(0);}});}
}
2.4 布局管理器
- 流式布局
- 东南西北中
- 表格布局
2.4.1 流式布局
public class TestFlowLayout {public static void main(String[] args) {Frame frame = new Frame();Button button1 = new Button("button1");Button button2 = new Button("button2");Button button3 = new Button("button3");//设置为流式布局  默认居中frame.setLayout(new FlowLayout());//frame.setLayout(new FlowLayout(FlowLayout.LEFT));//frame.setLayout(new FlowLayout(FlowLayout.RIGHT));frame.setSize(200,200);frame.setVisible(true);frame.add(button1);frame.add(button2);frame.add(button3);}
}
2.4.2 东南西北中
public class TestBorderLayout {public static void main(String[] args) {Frame frame = new Frame("TestBorderLayout");Button east = new Button("East");Button west = new Button("West");Button south = new Button("South");Button north = new Button("North");Button center = new Button("Center");frame.add(east,BorderLayout.EAST);frame.add(west,BorderLayout.WEST);frame.add(south,BorderLayout.SOUTH);frame.add(north,BorderLayout.NORTH);frame.add(center,BorderLayout.CENTER);frame.setSize(300,300);frame.setVisible(true);frame.addWindowListener(new WindowAdapter(){@Overridepublic void windowClosing(WindowEvent e) {System.exit(0);}});}
}
2.4.3 表格布局
public class TestGridLayout {public static void main(String[] args) {Frame frame = new Frame("TestGridLayout");Button button1 = new Button("button1");Button button2 = new Button("button2");Button button3 = new Button("button3");Button button4 = new Button("button4");Button button5 = new Button("button5");Button button6 = new Button("button6");frame.setLayout(new GridLayout(3,2));frame.add(button1);frame.add(button2);frame.add(button3);frame.add(button4);frame.add(button5);frame.add(button6);frame.setSize(200,200);frame.setVisible(true);}
}
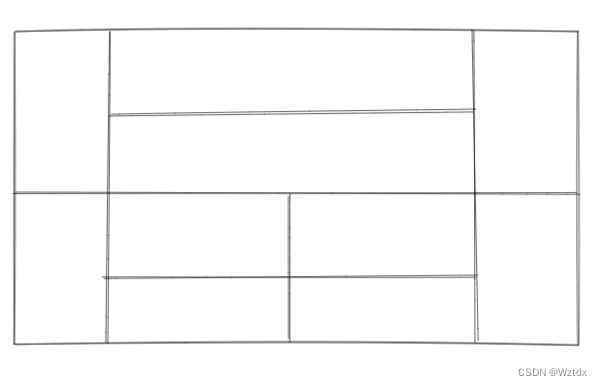
现在学会了这三个布局和面板,检验一下,完成这个案例
import java.awt.*;
import java.awt.event.WindowAdapter;
import java.awt.event.WindowEvent;public class Test {public static void main(String[] args) {Frame frame=new Frame();frame.setVisible(true);frame.setSize(400,400);frame.setBackground(Color.pink);frame.setLocation(300,400);frame.setLayout(new GridLayout(2,1));//4个面板Panel p1 = new Panel(new BorderLayout());Panel p2 = new Panel(new GridLayout(2, 1));Panel p3 = new Panel(new BorderLayout());Panel p4= new Panel(new GridLayout(2, 2));p1.add(new Button("East-1"),BorderLayout.EAST);p1.add(new Button("West-1"),BorderLayout.WEST);p2.add(new Button("p2-Button1"));p2.add(new Button("p2-Button2"));p1.add(p2,BorderLayout.CENTER);p3.add(new Button("East-2"),BorderLayout.EAST);p3.add(new Button("West-2"),BorderLayout.WEST);p4.add(new Button("p4-Button1"));p4.add(new Button("p4-Button2"));p4.add(new Button("p4-Button3"));p4.add(new Button("p4-Button4"));p3.add(p4,BorderLayout.CENTER);frame.add(p1);frame.add(p3);frame.addWindowListener(new WindowAdapter() {@Overridepublic void windowClosing(WindowEvent e) {System.exit(0);}});}}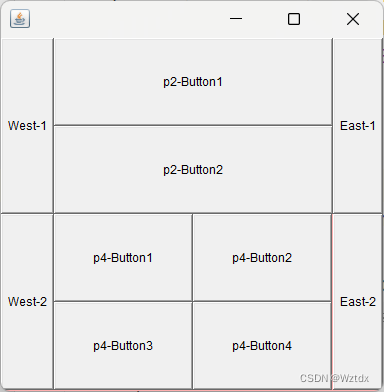
2.5 事件监听
import java.awt.*;
import java.awt.event.ActionEvent;
import java.awt.event.ActionListener;
import java.awt.event.WindowAdapter;
import java.awt.event.WindowEvent;public class TestActionEvent {public static void main(String[] args) {//按下按钮,触发一些事件Frame frame = new Frame();Button button = new Button("Button");//addActionListener() 需要一个ActionListener,所以我们需要构造一个ActionListenerbutton.addActionListener(new MyActionListener());frame.add(button,BorderLayout.CENTER);frame.pack();frame.setVisible(true);//关闭窗口windowClose(frame);}//关闭窗体的事件private static void windowClose(Frame frame){frame.addWindowListener(new WindowAdapter() {@Overridepublic void windowClosing(WindowEvent e) {System.exit(0);}});}
}class MyActionListener implements ActionListener{@Overridepublic void actionPerformed(ActionEvent e) {System.out.println("Button");}
}
可以看到当我们点击Button的时候,会触发事件,这个事件正是我们重写的actionPerformed方法中的内容

import java.awt.*;
import java.awt.event.ActionEvent;
import java.awt.event.ActionListener;
import java.awt.event.WindowAdapter;
import java.awt.event.WindowEvent;public class TestActionEvent2 {public static void main(String[] args) {Frame frame = new Frame();Button button1 = new Button("start");Button button2 = new Button("stop");button1.setActionCommand("开始");button2.setActionCommand("停止");button1.addActionListener(new ActionListener() {@Overridepublic void actionPerformed(ActionEvent e) {System.out.println("msg: "+e.getActionCommand());}});button2.addActionListener(new ActionListener() {@Overridepublic void actionPerformed(ActionEvent e) {System.out.println("msg: "+e.getActionCommand());}});frame.setLayout(new GridLayout(2,1));frame.add(button1);frame.add(button2);frame.pack();frame.setVisible(true);//关闭窗口windowClose(frame);}//关闭窗体的事件private static void windowClose(Frame frame) {frame.addWindowListener(new WindowAdapter() {@Overridepublic void windowClosing(WindowEvent e) {System.exit(0);}});}
}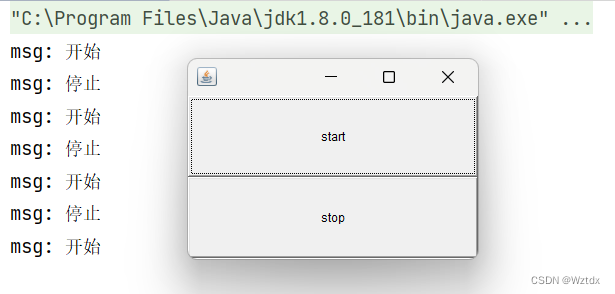
这里也可以写一个实现类来实现ActionListener,两个按钮 实现同一个监听
2.6 TextField事件监听
package com.demo2;import java.awt.*;
import java.awt.event.ActionEvent;
import java.awt.event.ActionListener;public class TestTextField {public static void main(String[] args) {new MyFrame();}
}
class MyFrame extends Frame{public MyFrame(){TextField textField = new TextField();add(textField);//监听这个文本框输入的文字//按下enter,就会触发这个事件textField.addActionListener(new MyActionListener2());//设置替换编码textField.setEchoChar('*');setVisible(true);pack();}
}class MyActionListener2 implements ActionListener{@Overridepublic void actionPerformed(ActionEvent e) {//获得一些资源 返回一个对象TextField field = (TextField) e.getSource();//获取输入框的文本System.out.println(field.getText());//设置为空字符串field.setText("");}
}
2.7 简易计数器
初始版本
import java.awt.*;
import java.awt.event.ActionEvent;
import java.awt.event.ActionListener;
import java.awt.event.WindowAdapter;
import java.awt.event.WindowEvent;public class TestCalc {public static void main(String[] args) {new Calculator();}
}//计算器类
class Calculator extends Frame{public Calculator(){TextField num1 = new TextField(10);TextField num2 = new TextField(10);TextField sum = new TextField(20);Button button = new Button("Calc");button.addActionListener(new MyCalculatorListener(num1,num2,sum));Label label1 = new Label("+");Label label2 = new Label("=");setLayout(new FlowLayout());add(num1);add(label1);add(num2);add(label2);add(sum);add(button);pack();setVisible(true);exit();}private void exit(){addWindowListener(new WindowAdapter() {@Overridepublic void windowClosing(WindowEvent e) {System.exit(0);}});}
}//监听器类
class MyCalculatorListener implements ActionListener{private TextField num1,num2,sum;public MyCalculatorListener(TextField num1,TextField num2,TextField sum){this.num1=num1;this.num2=num2;this.sum=sum;}@Overridepublic void actionPerformed(ActionEvent e) {int n1 = Integer.parseInt(num1.getText());int n2 = Integer.parseInt(num2.getText());int n3=n1+n2;sum.setText(String.valueOf(n3));num1.setText("");num2.setText("");}
}
改造为面向对象
import java.awt.*;
import java.awt.event.ActionEvent;
import java.awt.event.ActionListener;
import java.awt.event.WindowAdapter;
import java.awt.event.WindowEvent;public class TestCalc {public static void main(String[] args) {new Calculator().loadFrame();}
}//计算器类
class Calculator extends Frame {TextField num1, num2, sum;public void loadFrame() {num1 = new TextField(10);num2 = new TextField(10);sum = new TextField(20);Button button = new Button("Calc");Label label1 = new Label("+");Label label2 = new Label("=");button.addActionListener(new MyCalculatorListener(this));setLayout(new FlowLayout());add(num1);add(label1);add(num2);add(label2);add(sum);add(button);pack();setVisible(true);exit();}private void exit() {addWindowListener(new WindowAdapter() {@Overridepublic void windowClosing(WindowEvent e) {System.exit(0);}});}
}//监听器类
class MyCalculatorListener implements ActionListener {//获取计算机这个对象,在一个类中组合另一个类Calculator calculator = null;public MyCalculatorListener(Calculator calculator) {this.calculator = calculator;}@Overridepublic void actionPerformed(ActionEvent e) {int n1 = Integer.parseInt(calculator.num1.getText());int n2 = Integer.parseInt(calculator.num2.getText());calculator.sum.setText(String.valueOf(n1 + n2));calculator.num1.setText("");calculator.num2.setText("");}
}
改造为内部类
import java.awt.*;
import java.awt.event.ActionEvent;
import java.awt.event.ActionListener;
import java.awt.event.WindowAdapter;
import java.awt.event.WindowEvent;public class TestCalc {public static void main(String[] args) {new Calculator().loadFrame();}
}//计算器类
class Calculator extends Frame {TextField num1, num2, sum;public void loadFrame() {num1 = new TextField(10);num2 = new TextField(10);sum = new TextField(20);Button button = new Button("Calc");Label label1 = new Label("+");Label label2 = new Label("=");button.addActionListener(new MyCalculatorListener());setLayout(new FlowLayout());add(num1);add(label1);add(num2);add(label2);add(sum);add(button);pack();setVisible(true);exit();}private void exit() {addWindowListener(new WindowAdapter() {@Overridepublic void windowClosing(WindowEvent e) {System.exit(0);}});}//监听器类//内部类最大的好长就是可以畅通无阻的访问外部类的属性和方法private class MyCalculatorListener implements ActionListener {@Overridepublic void actionPerformed(ActionEvent e) {int n1 = Integer.parseInt(num1.getText());int n2 = Integer.parseInt(num2.getText());sum.setText(String.valueOf(n1 + n2));num1.setText("");num2.setText("");}}
}
2.8 画笔
每个Component都有一个paint(Graphics g)用于实现绘图目的,每次重画该Component时都自动调用paint方法。
import java.awt.*;public class TestPaint {public static void main(String[] args) {//在main()方法里面并没有显示调用paint(Graphics g)方法new MyPaint().loadFrame();}
}class MyPaint extends Frame {public void loadFrame(){setBounds(200,200,600,400);setVisible(true);}@Overridepublic void paint(Graphics graphics){graphics.setColor(Color.red);graphics.drawOval(100,100, 100,100);graphics.fillOval(200,100,100,100);graphics.setColor(Color.BLUE);graphics.fillRect(100,200,100,100);// 养成习惯,画笔用完 还原为最初的颜色graphics.setColor(Color.BLACK);}
}
2.9 鼠标监听事件
抽象类java.awt.event.MouseAdapter实现了MouseListener接口,可以使用其子类作为MouseEvent的监听器,只要重写其相应的方法即可。
import java.awt.*;
import java.awt.event.MouseAdapter;
import java.awt.event.MouseEvent;
import java.awt.event.MouseListener;
import java.util.ArrayList;
import java.util.Iterator;public class TestMouseListener {public static void main(String[] args) {new MyFrame("画图");}
}class MyFrame extends Frame {//存储坐标private ArrayList points;//画画需要画笔,需要监听鼠标当前位置,需要集合来存储这个点public MyFrame(String title){super(title);setVisible(true);setBounds(200,200,400,300);//存储坐标points=new ArrayList<>();//鼠标监听器,对这个窗口addMouseListener(new MyMouseListener());}@Overridepublic void paint(Graphics g) {//画画,监听鼠标的事件Iterator iterator = points.iterator();while(iterator.hasNext()){Point point = (Point) iterator.next();g.setColor(Color.BLUE);g.fillOval(point.x,point.y,10,10);}}public void addPaint(Point point){points.add(point);}private class MyMouseListener extends MouseAdapter {//鼠标按压@Overridepublic void mousePressed(MouseEvent e) {//获取被监听的对象MyFrame myFrame =(MyFrame) e.getSource();//鼠标的坐标myFrame.addPaint( new Point(e.getX(),e.getY()));//每次点击鼠标都需要重新画一次myFrame.repaint();//刷新}}
}
2.10 窗口监听
import java.awt.*;
import java.awt.event.WindowAdapter;
import java.awt.event.WindowEvent;public class TestWindow {public static void main(String[] args) {new WindowFrame();}
}
class WindowFrame extends Frame {public WindowFrame(){setBackground(Color.pink);setBounds(100,100,200,200);setVisible(true);//addWindowListener(new MyWindowListener());//使用内部类addWindowListener(new WindowAdapter() {//关闭窗口@Overridepublic void windowClosing(WindowEvent e) {System.out.println("退出");System.exit(0);}//激活窗口@Overridepublic void windowActivated(WindowEvent e) {WindowFrame frame =(WindowFrame) e.getSource();frame.setTitle("被激活");System.out.println("windowActivated");}});}class MyWindowListener extends WindowAdapter{@Overridepublic void windowClosing(WindowEvent e) {//隐藏窗口setVisible(false);System.exit(0);//正常退出}}
}
2.11 键盘监听
import java.awt.*;
import java.awt.event.KeyAdapter;
import java.awt.event.KeyEvent;public class TestKeyListener {public static void main(String[] args) {new KeyFrame();}
}class KeyFrame extends Frame {public KeyFrame(){setBounds(100,100,200,200);setVisible(true);addKeyListener(new KeyAdapter() {@Overridepublic void keyPressed(KeyEvent e) {//KeyEvent.VK_UP表示取得up键的虚拟码//键盘中的每一个键都对应有一个虚拟码这些虚拟码在KeyEvent类里面都被定义为静态常量//使用“类名.静态常量名”的形式访问得到这些静态常量System.out.println(e.getKeyCode());//获取键盘的码if ( e.getKeyCode()==KeyEvent.VK_UP){System.out.println("按下了上键");}}});}
}


](https://img-blog.csdnimg.cn/58e8ee1bf154438eb23c866886ac54d6.png)