python实现图像的平移、镜像、旋转(不调用CV库)
老师布置的作业。。。。。
平移图像
图像的平移在几何变换中算是最简单的变换之一,话不多说,直奔主题
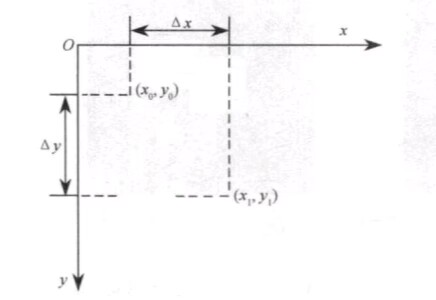
由图可知,在opencv中图像的原点一般为左上角,设初始坐标为(x0,x0)(x_{0}, x_{0})(x0,x0)的经过平移(△x,△y)(\bigtriangleup x, \bigtriangleup y)(△x,△y)后,坐标变为(x1,y1)(x_{1}, y_{1})(x1,y1)
则很容易得出两点之间的位置关系:
{x1=x0+△xy1=y0+△y\begin{cases} x_{1} = x_{0} + \bigtriangleup x \\y_{1} = y_{0} + \bigtriangleup y \end{cases} {x1=x0+△xy1=y0+△y
在python中我们可以使用简单for循环实现:
import cv2 as cv
import numpy as npdef show_Img(name, img):cv.imshow(name, img)cv.waitKey(0)cv.destroyAllWindows()def translate_img(img, move_y, move_x):h, w, c = img.shapetranslated_img = np.zeros((h, w, c), dtype=np.uint8)for i in range(h):for j in range(w):if i >= move_y and j >= move_x:translated_img[i, j] = img[i - move_y, j - move_x]return translated_imgimg = cv.imread("images/cat.jpg")
h, w, c = img.shape
translated_img = translate_img(img, h // 3, w // 3)
img_all = np.hstack((img, translated_img))
show_Img("img", img_all)

而通常我们一般是用矩阵形式表示:
[x1,y1,1]=[x0,y0,1][100010△x△y1]\left [ x_{1} , y_{1}, 1\right ] = \left [ x_{0} , y_{0} , 1 \right ] \begin{bmatrix} 1 & 0 & 0\\ 0 & 1 & 0\\ \bigtriangleup x & \bigtriangleup y&1 \end{bmatrix} [x1,y1,1]=[x0,y0,1]10△x01△y001
python实现为:
def translate_image(image, move_x, move_y):# 平移矩阵translation_matrix = np.array([[1, 0, 0], [0, 1, 0], [move_x, move_y, 1]])height, width = image.shape[:2]translated_image = np.zeros([height, width, 3], dtype=np.uint8)for y in range(height):for x in range(width):translated_x, translated_y, _ = np.dot([x, y, 1], translation_matrix)if 0 <= translated_x < width and 0 <= translated_y < height:translated_image[translated_y, translated_x] = image[y, x]return translated_image
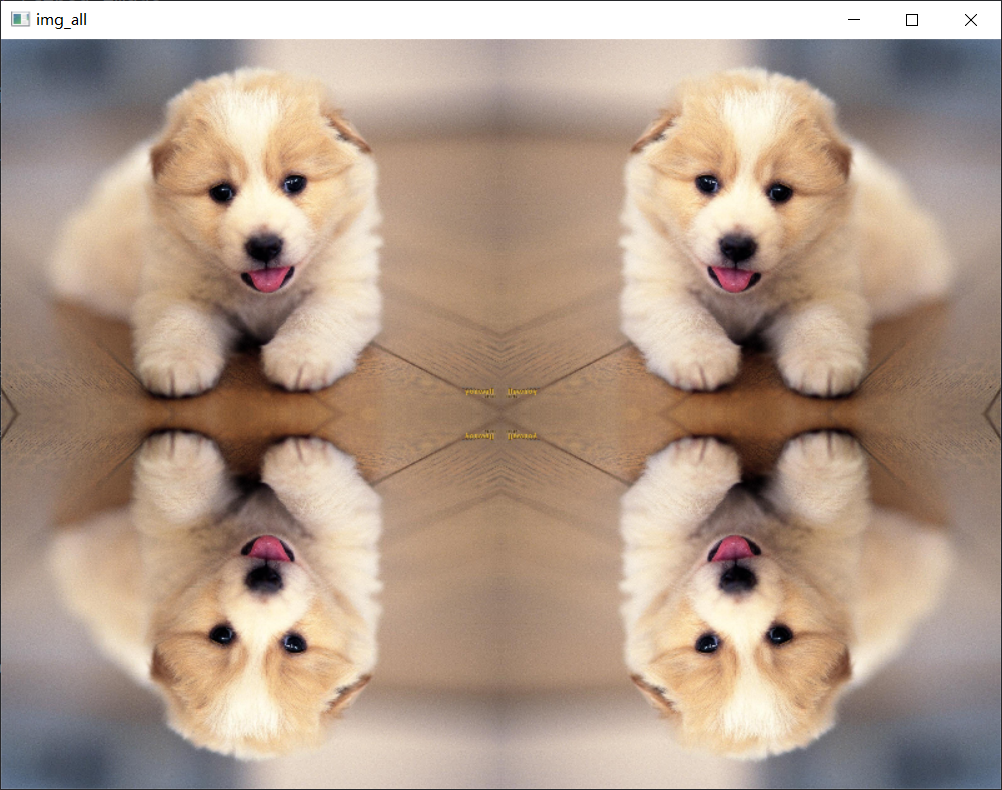
镜像图像
图像镜像也是最为常用的一种变换,镜像就是相对某一参照面旋转180°的图像,又通常成为对称变换。
这里主要介绍三种镜像方式:
- 水平镜像
- 垂直镜像
- 斜对角线镜像
水平镜像

经数学分析得水平镜像后的x1与x0和为图像宽度,而y点不变,所以:
{x1=w−x0y1=y0\begin{cases} x_{1} = w - x_{0}\\ y_{1} = y_{0} \end{cases} {x1=w−x0y1=y0
转换为矩阵得:
[x1,y1,1]=[x0,y0,1][−100010w01]\left [ x_{1}, y_{1}, 1 \right ] = \left[x_{0}, y_{0}, 1 \right]\begin{bmatrix} -1 & 0 & 0\\ 0 & 1 & 0 \\ w & 0 & 1 \end{bmatrix} [x1,y1,1]=[x0,y0,1]−10w010001
垂直镜像
同理:
[x1,y1,1]=[x0,y0,1][1000−100y1]\left [ x_{1}, y_{1}, 1 \right ] = \left[x_{0}, y_{0}, 1 \right]\begin{bmatrix} 1 & 0 & 0\\ 0 & -1 & 0 \\ 0 & y & 1 \end{bmatrix} [x1,y1,1]=[x0,y0,1]1000−1y001
斜对角线镜像
同理:
[x1,y1,1]=[x0,y0,1][−1000−10wy1]\left [ x_{1}, y_{1}, 1 \right ] = \left[x_{0}, y_{0}, 1 \right]\begin{bmatrix} -1 & 0 & 0\\ 0 & -1 & 0 \\ w & y & 1 \end{bmatrix} [x1,y1,1]=[x0,y0,1]−10w0−1y001
综上所述,用python实现为:
def flip_image(image, flip):h, w = image.shape[:2]fliped_image = np.zeros((h, w, 3), dtype=np.uint8)# 矩阵的w-1和y-1是防止图片的索引值超出范围if flip == "x":flip_matrix = np.array([[-1, 0, 0], [0, 1, 0], [w - 1, 0, 1]])elif flip == "y":flip_matrix = np.array([[1, 0, 0], [0, -1, 0], [0, h - 1, 1]])elif flip == "x-y":flip_matrix = np.array([[-1, 0, 0], [0, -1, 0], [w - 1, h - 1, 1]])else:flip_matrix = np.array([[1, 0, 0], [0, 1, 0], [0, 0, 1]])for y in range(h):for x in range(w):flip_x, flip_y, _ = np.dot([x, y, 1], flip_matrix)fliped_image[flip_y, flip_x] = image[y, x]return fliped_image
img = cv.imread("images/dog2.jpg")
h, w, c = img.shape
img = cv.resize(img, (w // 4, h // 4))
fliped_img_x = flip_image(img, "x")
fliped_img_y = flip_image(img, "y")
fliped_img_x_y = flip_image(img, "x-y")
img_up = np.hstack((img, fliped_img_x))
img_down = np.hstack((fliped_img_y, fliped_img_x_y))
img_all = np.vstack((img_up, img_down))
show_Img("img_all", img_all)
旋转图像
图像的选装相比平移和镜像就稍微复杂了一些
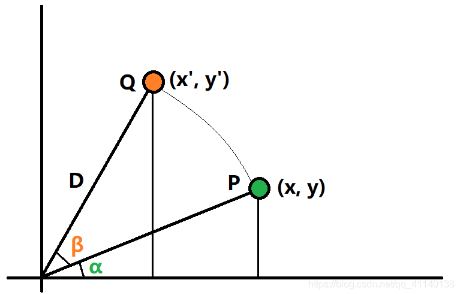
如图可知,初始点为(x,y)(x, y)(x,y)逆时针旋转β\betaβ角度后为(x′,y′)(x', y')(x′,y′)
数学分析:
{x=Dcosαy=Dsinα\begin{cases} x = Dcos\alpha \\y = Dsin\alpha \end{cases} {x=Dcosαy=Dsinα
{x′=Dcos(α+β)=D(cosαcosβ−sinαsinβ)=xcosβ−ysinβy′=Dsin(α+β)=D(sinαcosβ+cosαsinβ)=ycosβ+xsinβ\begin{cases} x'=Dcos(\alpha+\beta)=D(cos\alpha cos\beta - sin\alpha sin\beta) = xcos\beta - ysin\beta\\ y'=Dsin(\alpha+\beta)=D(sin\alpha cos\beta + cos\alpha sin\beta) = ycos\beta + xsin\beta \end{cases} {x′=Dcos(α+β)=D(cosαcosβ−sinαsinβ)=xcosβ−ysinβy′=Dsin(α+β)=D(sinαcosβ+cosαsinβ)=ycosβ+xsinβ
用矩阵表示为:
[x′,y′,1]=[x,y,1][cosβsinβ0−sinβcosβ0001]\left [ x', y', 1 \right ] = \left[x, y, 1\right]\begin{bmatrix} cos\beta & sin\beta & 0\\ -sin\beta & cos\beta & 0\\ 0 & 0 & 1 \end{bmatrix} [x′,y′,1]=[x,y,1]cosβ−sinβ0sinβcosβ0001
但这并不是整个图像旋转的原理,因为还要指定旋转点,这里假设图像旋转点为图像的中心,即(w/2,h/2)(w/2, h/2)(w/2,h/2),则在旋转时需要将图像的坐标系移动到原本图像的中心上:
[x′,y′,1]=[x,y,1][100010−w/2−y/21]\left [ x' , y', 1\right ] = \left [ x , y , 1 \right ] \begin{bmatrix} 1 & 0 & 0\\ 0 & 1 & 0\\ -w/2 & -y/2&1 \end{bmatrix} [x′,y′,1]=[x,y,1]10−w/201−y/2001
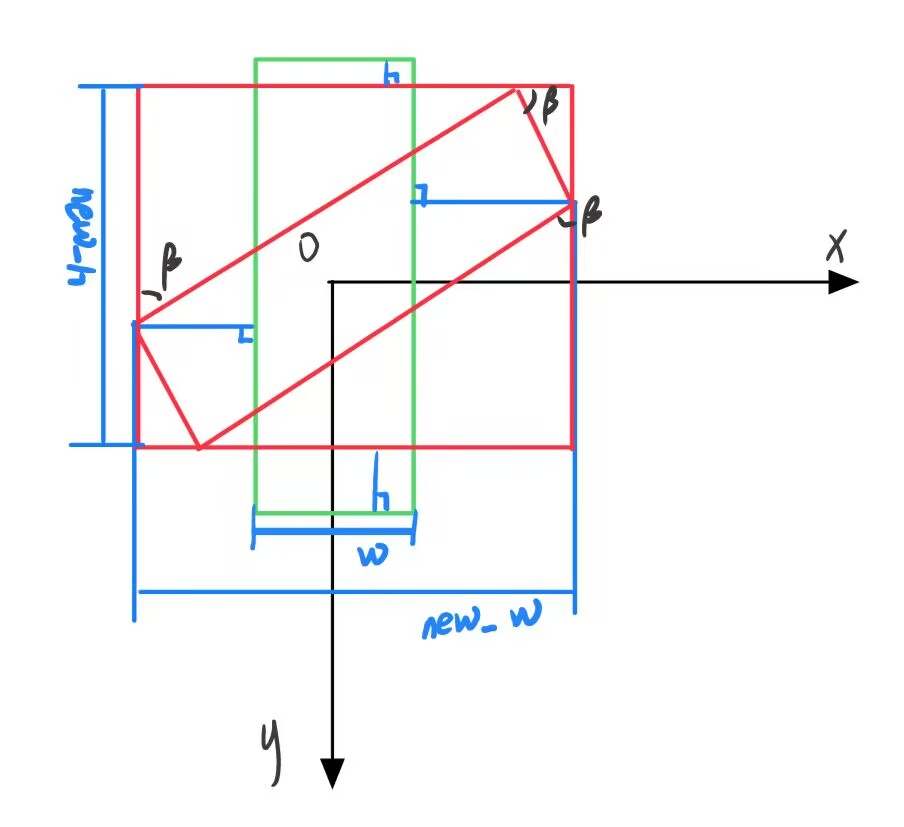
由上图可知,旋转时,整个图像的大小也随之改变,新的高度与宽度为:
{w′=w∗∣cosβ∣+h∗∣sinβ∣h′=h∗∣cosβ∣+w∗∣sinβ∣\begin{cases} w' = w*|cos\beta|+ h*|sin\beta| \\ h' = h * |cos\beta| + w * |sin\beta| \end{cases} {w′=w∗∣cosβ∣+h∗∣sinβ∣h′=h∗∣cosβ∣+w∗∣sinβ∣
旋转完后的图像在需要平移到原来的位置:
{△x=(w′−w)∗0.5+(w/2−1)△y=(h′−h)∗0.5+(h/2−1)\begin{cases} \bigtriangleup x = (w' - w) * 0.5 + (w/2 - 1) \\ \bigtriangleup y = (h'- h) * 0.5 + (h/2 - 1) \end{cases} {△x=(w′−w)∗0.5+(w/2−1)△y=(h′−h)∗0.5+(h/2−1)
总的矩阵为:
[x′,y′,1]=[x,y,1][100010−w/2−y/21][cosβsinβ0−sinβcosβ0001][100010△x△y1]\left [ x' , y', 1\right ] = \left [ x , y , 1 \right ] \begin{bmatrix} 1 & 0 & 0\\ 0 & 1 & 0\\ -w/2 & -y/2&1 \end{bmatrix}\begin{bmatrix} cos\beta & sin\beta & 0\\ -sin\beta & cos\beta & 0\\ 0 & 0 & 1 \end{bmatrix} \begin{bmatrix} 1 & 0 & 0\\ 0 & 1 & 0\\ \bigtriangleup x & \bigtriangleup y&1 \end{bmatrix} [x′,y′,1]=[x,y,1]10−w/201−y/2001cosβ−sinβ0sinβcosβ000110△x01△y001
前向映射
import cv2 as cv
import numpy as npdef show_Img(name, img):cv.imshow(name, img)cv.waitKey(0)cv.destroyAllWindows()# 前向映射旋转
def front_rotate_image(image, angle):# 将角度转换为弧度radians = np.deg2rad(-angle)# 计算旋转矩阵cos_theta = np.around(np.cos(radians), decimals=4)sin_theta = np.around(np.sin(radians), decimals=4)rotation_matrix = np.array([[-cos_theta, -sin_theta, 0], [sin_theta, -cos_theta, 0], [0, 0, 1]])# 计算旋转后的图像大小height, width = image.shape[:2]new_width = int(np.round(width * abs(cos_theta) + height * abs(sin_theta)))new_height = int(np.round(height * abs(cos_theta) + width * abs(sin_theta)))print(new_width, new_height)# 创建新图像rotated_image = np.zeros((new_height, new_width, 3), dtype=np.uint8)# 计算旋转中心点center_x = width / 2center_y = height / 2# 将坐标系平移回原来的位置,加上自定义旋转点的偏移量x_step = (new_width - width) * (center_x / width) + (center_x - 1)y_step = (new_height - height) * (center_y / height) + (center_y - 1)translation_matrix1 = np.array([[1, 0, 0], [0, 1, 0], [-center_x, -center_y, 1]])translation_matrix2 = np.array([[1, 0, 0], [0, 1, 0], [x_step, y_step, 1]])# 遍历每个像素并进行变换for y in range(height):for x in range(width):# 将坐标系平移至中心点translated_x, translated_y, _ = np.dot([x, y, 1], translation_matrix1)# 计算旋转后的坐标rotated_x, rotated_y, _ = np.dot([translated_x, translated_y, 1], rotation_matrix)rotated_x, rotated_y, _ = np.dot([rotated_x, rotated_y, 1], translation_matrix2)# 如果旋转后的坐标在原图像范围内,则将该像素复制到新图像中if 0 <= rotated_x < new_width and 0 <= rotated_y < new_height:rotated_image[int(np.round(rotated_y)), int(np.round(rotated_x))] = image[y, x]return rotated_imageimg = cv.imread("images/kunkun.jpg")
theta = 60
h, w, c = img.shape
img = cv.resize(img, (w // 2, h // 2))
img_rotated = front_rotate_image(img, theta)
show_Img("img_rotated", img_rotated)
原图:

结果:
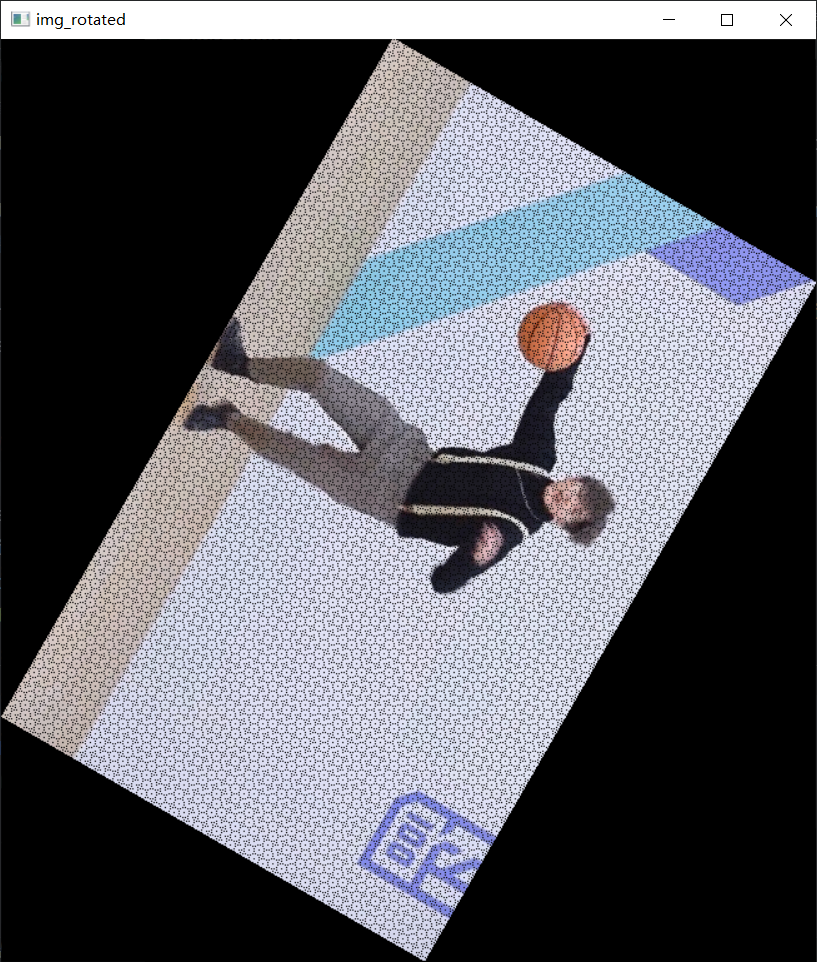
从上面看来,使用前向映射会造成许多网格状,这是因为有原图到旋转后的图,会生成小数坐标,导致丢失一部分像素,而后面会使用后向映射加线性插值的方法解决此问题。
后向映射
学业繁忙,后面慢慢更新。。。。。