文章主要针对11及13之后的导航变化进行总结,主要是设置透明度时对转场,包括标题,背景透明,图片,颜色等设置的影响。
每一个iOS版本的发布苹果最不稳写的可能就数这个导航条了吧,改了又改。
因此isTranslucent一套UI风格中用同一种属性实现,不要部份true部份false。
以NavigationBar的左上角(x,y)对齐屏幕(0,0)作为参考点
条件:
1、VC设置半透明为true时 (self.navigationController?.navigationBar.isTranslucent),APP默认情况下为True
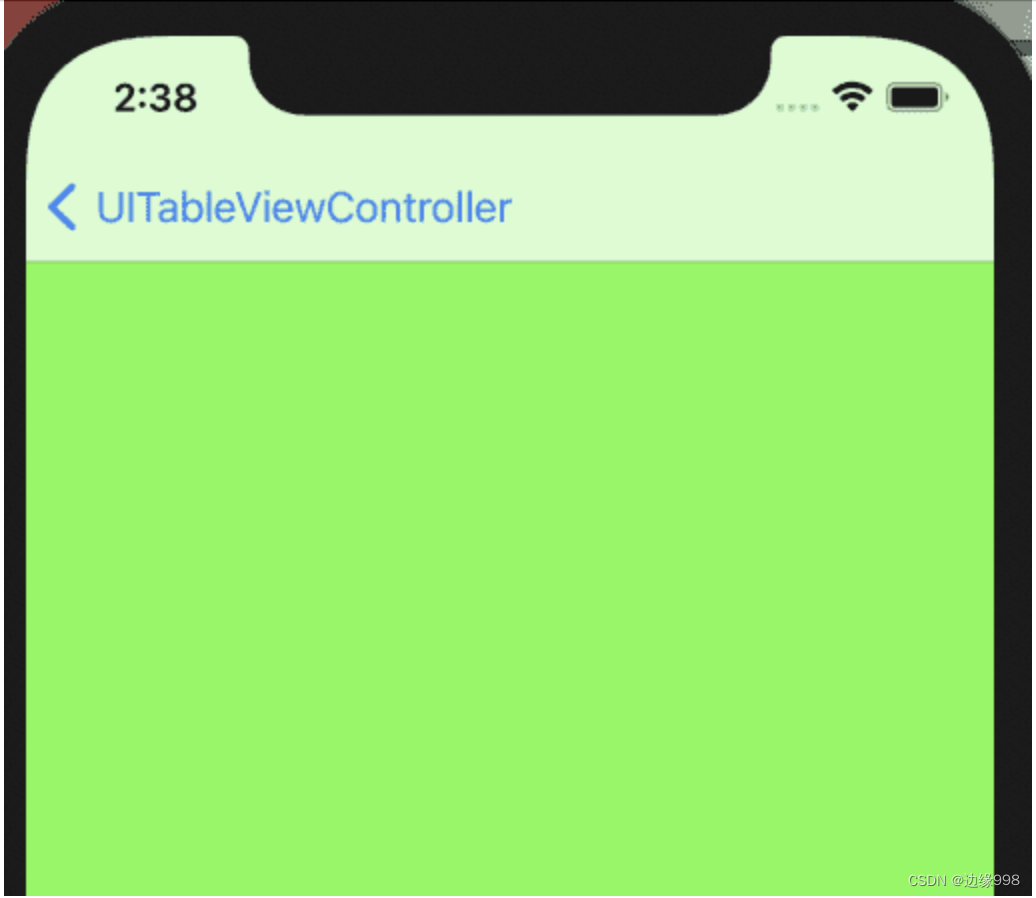

可以看到导航条半透明度毛玻璃效果穿透看到背景。ViewController中的View的(x,y)对齐屏幕(0,0)
2、VC设置半透明属性为False时。


可以看到导航条不能穿透看不到背景。ViewController中的View的(x,y)不对齐屏幕 (0,0)
iOS11中引入safearea来解决由于isTranslucent属性引起来的偏移问题。
1、正常的UIView非UIScrollView子类在布局时使用安全区域和不使用安全区域带来的影响。
不使用safearea的情况:
class DemoViewController: UIViewController {var radiusView = UIView()override func viewDidLoad() {super.viewDidLoad()self.view.backgroundColor = .green//        self.navigationController?.navigationBar.isTranslucent = falseview.addSubview(radiusView)radiusView.backgroundColor = .orangeradiusView.layer.cornerRadius = 40radiusView.clipsToBounds = trueradiusView.snp.makeConstraints { (make) inmake.top.equalTo(10) //这里不使用安全区域make.width.height.equalTo(80)make.centerX.equalToSuperview()}}
}

关闭半透明时效果。(isTranslucent = false)


重点来了iOS11引入了安全区。来看下效果。不受isTranslucent属性的景响。
class DemoViewController: UIViewController {var radiusView = UIView()override func viewDidLoad() {super.viewDidLoad()// Do any additional setup after loading the view.self.view.backgroundColor = .green///这里设置true或false不影响self.navigationController?.navigationBar.isTranslucent = falseview.addSubview(radiusView)radiusView.backgroundColor = .orangeradiusView.layer.cornerRadius = 40radiusView.clipsToBounds = trueradiusView.snp.makeConstraints { (make) inif #available(iOS 11.0, *) {make.top.equalTo(view.safeAreaLayoutGuide.snp.top).offset(10) //使用安全区} else {make.top.equalTo(10) //不使用安全区}make.width.height.equalTo(80)make.centerX.equalToSuperview()}}
}
设置透明时:


设置不透时时:


可以看到11之后使用安全区的效果明显的爽歪歪。不需要再为透明半透明的事烦恼。
那什么情况下需要设计半透明或不透明效果呢。建议11以后的app都使用半透明属性来设计UI。
在半透明开启情况下ScrollView的使用情况
默认情况下不设置以下代码时,是完全适配安全区的。
if #available(iOS 11.0, *) {//.never 用于处理如果导航条半透明状态下tableview的内容偏移度问题tableView.contentInsetAdjustmentBehavior = UIScrollView.ContentInsetAdjustmentBehavior.never
} else {self.automaticallyAdjustsScrollViewInsets = false
}
在不使用上述代码的情况下,在导航条设置透明或不透时,tableview或scrollview的左上解座标都能自动适应显示。
但如果开启之后,就可以看到偏移的效果。这一样来,有些tableview特别是新闻类的,想在滚动的时候能透过导航看到模糊效果。

ScrollView和TableView
针对VC中使用ScorllView或TableView时。谨慎根据UI需求进行设置使用。绿色条为正常显示的内容。主要考察是否被导航条或下面的tabbar拦住的情况。
样式一:
默认条件:
self.navigationController?.navigationBar.isTranslucent = true
...
view.addSubview(scrollview)
scrollview.snp.makeConstraints { (make) inmake.edges.equalTo(0) ///设置充满
}
其它均不设置


scrollview的在contentview能正常在安全区间内显示。即不会被navigationbar或tabbar拦到拖不动。
样式二:
默认条件:
self.navigationController?.navigationBar.isTranslucent = false
...
view.addSubview(scrollview)
scrollview.snp.makeConstraints { (make) inmake.edges.equalTo(0) ///设置充满
}
其它均不设置


这个配置会使透航条不透时,但并没景响安全区内容的显示。
样式三:self.navigationController?.navigationBar.isTranslucent = true
...
view.addSubview(scrollview)
scrollview.snp.makeConstraints { (make) inmake.edges.equalTo(0) ///设置充满
}///增加scrollview不自动适配
self.scrollview.contentInsetAdjustmentBehavior = UIScrollView.ContentInsetAdjustmentBehavior.never


可以看到scrollview内容的上下都被挡住了。
样式四:self.navigationController?.navigationBar.isTranslucent = false
...
view.addSubview(scrollview)
scrollview.snp.makeConstraints { (make) inmake.edges.equalTo(0) ///设置充满
}///增加scrollview不自动适配
self.scrollview.contentInsetAdjustmentBehavior = UIScrollView.ContentInsetAdjustmentBehavior.never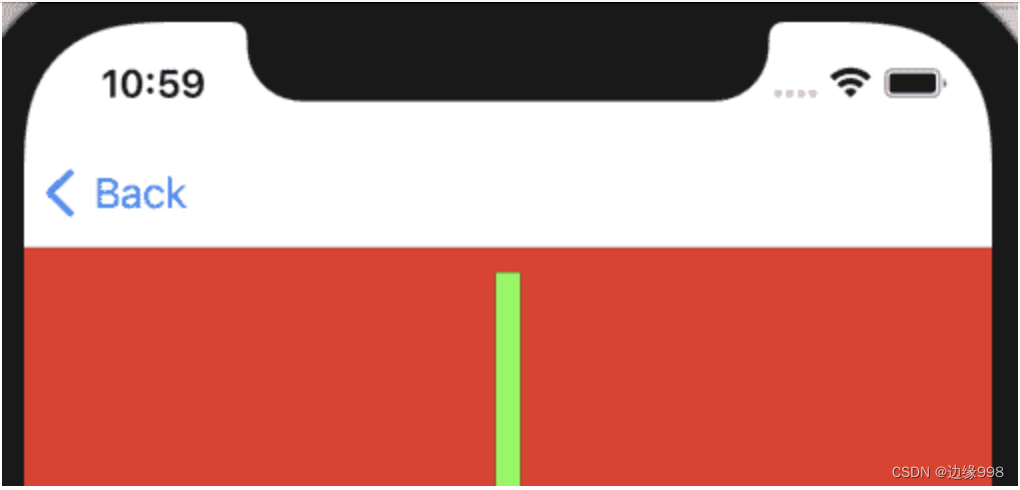

和样式三差不多,只是上部份不被挡到了。下面部份仍然是被挡住。
样式五:self.navigationController?.navigationBar.isTranslucent = falsescrollview.snp.makeConstraints { (make) inif #available(iOS 11.0, *) {//使用安全区上下对齐的方式make.top.equalTo(view.safeAreaLayoutGuide.snp.top)make.bottom.equalTo(view.safeAreaLayoutGuide.snp.bottom)make.leading.trailing.equalTo(0)} else {}
} 
下面是self.navigationController?.navigationBar.isTranslucent = true的样式
样式六:self.navigationController?.navigationBar.isTranslucent = falsescrollview.snp.makeConstraints { (make) inif #available(iOS 11.0, *) {//使用安全区上下对齐的方式make.top.equalTo(view.safeAreaLayoutGuide.snp.top)make.bottom.equalTo(view.safeAreaLayoutGuide.snp.bottom)make.leading.trailing.equalTo(0)} else {}
}///增加scrollview不自动适配
self.scrollview.contentInsetAdjustmentBehavior = UIScrollView.ContentInsetAdjustmentBehavior.never
此效果和样式五一样。
因此scrollview设置了安全区对齐的情况下,无论isTranslucent如何设置都能正常显示出contentview内容。也不受contentInsetAdjustmentBehavior的影响。因此在UI设的时候特别是需要用scrollview或tableview的布局时,就需要针对不同的样式做不同的选择。
isTransluucent = true,还是没有启作用,没有顶到(0,0)点,可能是有地方设置了:
if self.responds(to: #selector(setter: edgesForExtendedLayout)) {self.edgesForExtendedLayout = []
}
另IOS13以上 来设置导航透明
if #available(iOS 13.0, *) {//注意这个是全局影响的,不要在想要的地方就任意修改let appearance = UINavigationBarAppearance()appearance.configureWithOpaqueBackground()appearance.backgroundColor = .clearappearance.shadowColor = .clearnavigationController?.navigationBar.scrollEdgeAppearance = appearancenavigationController?.navigationBar.standardAppearance = appearance} else {self.navigationController?.navigationBar.setBackgroundImage(UIImage(),for: .default)self.navigationController?.navigationBar.shadowImage = UIImage()}正在上传…
重新上传