概述
安装Redis
安装
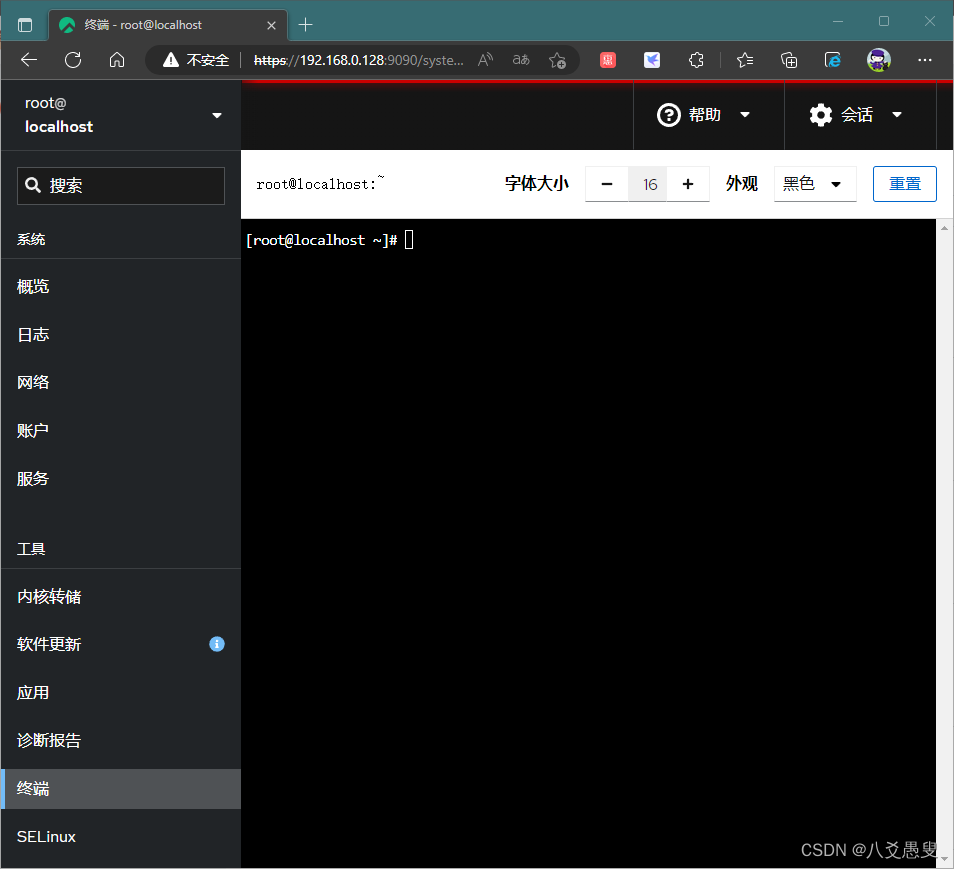
启动Rocky Linux 9.0,在浏览器中打开web console.
如果没有安装Web console,按以下步骤安装启用:
安装命令:
# dnf install cockpit
启用并运行服务
# systemctl enable --now cockpit.socket
开通防火墙:
# firewall-cmd --add-service=cockpit --permanent
# firewall-cmd --reload
rocky的软件仓库里自带了redis,直接yum安装就可以了。点击Web console左边菜单中的终端或Terminal,进入控制台模式。
然后敲入命令:
# dnf install redis -y
安装完成后,启用服务:
# systemctl enable --now redis
测试安装结果:
# redis-cli ping
如果返回PONG,说明安装成功。
配置
允许外部访问
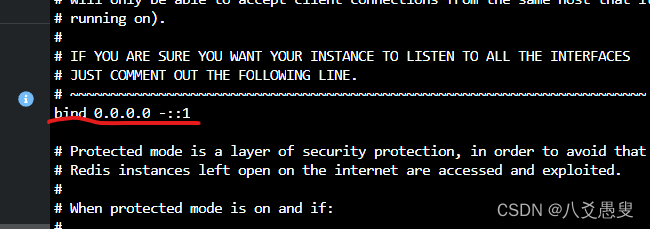
用vi打开配置文件:
# vi /etc/redis/redis.conf
修改ip4绑定地址为任意,即0.0.0.0
按Esc,输入:wq退出。重启Redis:
# systemctl restart redis
添加防火墙:
# firewall-cmd --add-port 6379/tcp --permanent
# firewall-cmd --reload
验证一下安装,找另外一台机器,打开命令行输入:
telnet 192.168.0.128 6379
如果屏幕被清空,说明连接成功,输入quit退出。
写个程序测试一下是否配置成功。
SpringBoot里的spring-boot-starter-data-redis里使用的是lettuce客户端,所以我们这里也用这个。
<dependency><groupId>io.lettuce</groupId><artifactId>lettuce-core</artifactId><version>6.2.1.RELEASE</version>
</dependency>
写段测试代码:
package redis;import java.time.LocalDateTime;import io.lettuce.core.RedisClient;
import io.lettuce.core.api.StatefulRedisConnection;
import io.lettuce.core.api.sync.RedisCommands;public class DemoMain {public static void main(String[] args) {RedisClient redisClient = RedisClient.create("redis://192.168.0.128:6379/0");StatefulRedisConnection<String, String> connection = redisClient.connect();RedisCommands<String, String> syncCommands = connection.sync();syncCommands.set("key", "Hello, Redis!"+LocalDateTime.now());connection.close();redisClient.shutdown();System.out.println("ok!");}}
进入服务器查下结果:
redis-cli get key
“Hello, Redis!2022-12-01T11:44:55.654705500”
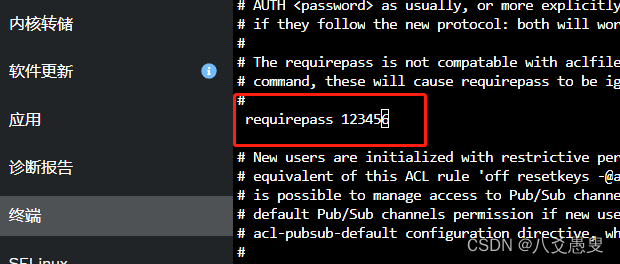
限制访问
为了不让别的应用随便接入redis,我们可以修改redis.conf加上访问密码,找到这一行改成这样:
保存后重启redis服务。此时运行上边的程序,发现报错,错误提示:
NOAUTH HELLO must be called with the client already authenticated,
otherwise the HELLO AUTH <user> <pass> option can be used to
authenticate the client and select the RESP protocol version at the
same time
大概意思就是没发起验证命令。然后我们修改一下,先加入错误的密码:
package redis;import java.time.LocalDateTime;import io.lettuce.core.RedisClient;
import io.lettuce.core.api.StatefulRedisConnection;
import io.lettuce.core.api.sync.RedisCommands;public class DemoMain {public static void main(String[] args) {RedisClient redisClient = RedisClient.create("redis://111111@192.168.0.128:6379/0");StatefulRedisConnection<String, String> connection = redisClient.connect();RedisCommands<String, String> syncCommands = connection.sync();syncCommands.set("key", "Hello, Redis!"+LocalDateTime.now());connection.close();redisClient.shutdown();System.out.println("ok!");}}
运行程序后提示无效的用户名密码:
WRONGPASS invalid username-password pair or user is disabled.
换成正确的密码后,程序正常执行。
启用加密传输
- 生成证书
生成密钥:
openssl genrsa -out server.key 4096
生成证书请求文件:
注意,证书需要配合域名使用。
openssl req -new -key server.key -out server.csr
生成CA证书:
openssl x509 -req -in server.csr -out server.crt -signkey server.key -days 3650
- 服务端配置
端口:
port 0
tls-port 6379
关闭客户端证书验证
tls-auth-clients no
指定证书路径:
tls-cert-file /etc/redis/server.crt
tls-key-file /etc/redis/server.key
tls-ca-cert-file /etc/redis/server.crt
- 客户端导入证书
keytool -import -alias demo -file server.crt -keystore E:\openjdk\jdk-17\lib\security\cacerts -storepass changeit
- 修改代码
package redis;import java.io.File;
import java.net.URL;
import java.time.LocalDateTime;import io.lettuce.core.ClientOptions;
import io.lettuce.core.RedisClient;
import io.lettuce.core.RedisURI;
import io.lettuce.core.SslOptions;
import io.lettuce.core.api.StatefulRedisConnection;
import io.lettuce.core.api.sync.RedisCommands;public class DemoMain {public static void main(String[] args) throws Throwable {RedisURI redisUri = RedisURI.Builder.redis("demo.com", 6379).withDatabase(0).withSsl(true).withPassword("123456").withVerifyPeer(false).build();RedisClient redisClient = RedisClient.create(redisUri);SslOptions sslOptions = SslOptions.builder().jdkSslProvider().protocols("TLSv1.2").truststore(new File("E:\\openjdk\\jdk-17\\lib\\security\\cacerts"), "changeit").build();ClientOptions clientOptions = ClientOptions.builder().sslOptions(sslOptions).build();redisClient.setOptions(clientOptions);StatefulRedisConnection<String, String> connection = redisClient.connect();RedisCommands<String, String> syncCommands = connection.sync();syncCommands.set("key", "Hello, Redis!" + LocalDateTime.now());connection.close();redisClient.shutdown();System.out.println("ok!");}}
项目实战
创建Springboot项目
先用IDE生成Maven项目,再往pom.xml里加入springboot的相关依赖。pom.xml内容如下:
<project xmlns="http://maven.apache.org/POM/4.0.0"xmlns:xsi="http://www.w3.org/2001/XMLSchema-instance"xsi:schemaLocation="http://maven.apache.org/POM/4.0.0 https://maven.apache.org/xsd/maven-4.0.0.xsd"><modelVersion>4.0.0</modelVersion><parent><groupId>java-demo</groupId><artifactId>root</artifactId><version>0.0.1-SNAPSHOT</version></parent><artifactId>redis-practice</artifactId><properties><project.build.sourceEncoding>UTF-8</project.build.sourceEncoding><project.reporting.outputEncoding>UTF-8</project.reporting.outputEncoding><maven.compiler.source>17</maven.compiler.source><maven.compiler.target>17</maven.compiler.target><lombok.version>1.18.24</lombok.version><spring-boot.version>2.7.4</spring-boot.version></properties><dependencyManagement><dependencies><dependency><groupId>org.springframework.boot</groupId><artifactId>spring-boot-dependencies</artifactId><version>${spring-boot.version}</version><type>pom</type><scope>import</scope></dependency><dependency><groupId>org.projectlombok</groupId><artifactId>lombok</artifactId><version>${lombok.version}</version><scope>provided</scope></dependency></dependencies></dependencyManagement><dependencies><dependency><groupId>org.springframework.boot</groupId><artifactId>spring-boot-devtools</artifactId><scope>runtime</scope><optional>true</optional></dependency><dependency><groupId>org.projectlombok</groupId><artifactId>lombok</artifactId></dependency><dependency><groupId>org.springframework.boot</groupId><artifactId>spring-boot-starter-test</artifactId></dependency><dependency><groupId>org.springframework.boot</groupId><artifactId>spring-boot-configuration-processor</artifactId></dependency><dependency><groupId>org.springframework.boot</groupId><artifactId>spring-boot-starter-web</artifactId><exclusions><exclusion><groupId>org.springframework.boot</groupId><artifactId>spring-boot-starter-tomcat</artifactId></exclusion></exclusions></dependency><dependency><groupId>org.springframework.boot</groupId><artifactId>spring-boot-starter-undertow</artifactId></dependency><dependency><groupId>org.springframework.boot</groupId><artifactId>spring-boot-starter-data-jdbc</artifactId></dependency><dependency><groupId>org.springframework.boot</groupId><artifactId>spring-boot-starter-data-redis</artifactId></dependency><dependency><groupId>org.postgresql</groupId><artifactId>postgresql</artifactId><scope>runtime</scope></dependency></dependencies><build><plugins><plugin><groupId>org.springframework.boot</groupId><artifactId>spring-boot-maven-plugin</artifactId><version>${spring-boot.version}</version><configuration><executable>true</executable></configuration><executions><execution><goals><goal>repackage</goal></goals></execution></executions></plugin></plugins></build>
</project>
配置redis
为了使用密码验证及启用加密传输,我们要自定义 Lettuce的配置类:
package demo;import java.io.File;
import java.time.Duration;
import java.util.Optional;import org.springframework.data.redis.connection.lettuce.LettuceClientConfiguration;import io.lettuce.core.ClientOptions;
import io.lettuce.core.ReadFrom;
import io.lettuce.core.SslOptions;
import io.lettuce.core.resource.ClientResources;public class LettuceSslClientConfiguration implements LettuceClientConfiguration {@Overridepublic boolean isUseSsl() {// TODO Auto-generated method stubreturn true;}@Overridepublic boolean isVerifyPeer() {// TODO Auto-generated method stubreturn false;}@Overridepublic boolean isStartTls() {// TODO Auto-generated method stubreturn false;}@Overridepublic Optional<ClientResources> getClientResources() {// TODO Auto-generated method stubreturn Optional.empty();}@Overridepublic Optional<ClientOptions> getClientOptions() {SslOptions sslOptions = SslOptions.builder().jdkSslProvider().protocols("TLSv1.2").truststore(new File("E:\\openjdk\\jdk-17\\lib\\security\\cacerts"), "changeit").build();ClientOptions clientOptions = ClientOptions.builder().sslOptions(sslOptions).build();return Optional.of(clientOptions);}@Overridepublic Optional<String> getClientName() {// TODO Auto-generated method stubreturn Optional.empty();}@Overridepublic Optional<ReadFrom> getReadFrom() {// TODO Auto-generated method stubreturn Optional.empty();}@Overridepublic Duration getCommandTimeout() {// TODO Auto-generated method stubreturn Duration.ZERO;}@Overridepublic Duration getShutdownTimeout() {// TODO Auto-generated method stubreturn Duration.ZERO;}@Overridepublic Duration getShutdownQuietPeriod() {// TODO Auto-generated method stubreturn Duration.ZERO;}}
然后配置实例Lettuce客户端实例:
package demo;import org.springframework.context.annotation.Bean;
import org.springframework.context.annotation.Configuration;
import org.springframework.data.redis.connection.RedisConnectionFactory;
import org.springframework.data.redis.connection.RedisStandaloneConfiguration;
import org.springframework.data.redis.connection.lettuce.LettuceConnectionFactory;
import org.springframework.data.redis.core.StringRedisTemplate;@Configuration
class AppConfig {@Beanpublic LettuceConnectionFactory redisConnectionFactory() {var conf = new RedisStandaloneConfiguration("demo.com", 6379);conf.setDatabase(0);conf.setPassword("123456");return new LettuceConnectionFactory(conf, new LettuceSslClientConfiguration());}@BeanStringRedisTemplate stringRedisTemplate(RedisConnectionFactory redisConnectionFactory) {StringRedisTemplate template = new StringRedisTemplate();template.setConnectionFactory(redisConnectionFactory);return template;}
}
编写测试代码:
package demo;import java.io.IOException;
import java.util.UUID;import org.springframework.beans.factory.annotation.Autowired;
import org.springframework.data.redis.core.StringRedisTemplate;
import org.springframework.jdbc.core.JdbcTemplate;
import org.springframework.web.bind.annotation.GetMapping;
import org.springframework.web.bind.annotation.PathVariable;
import org.springframework.web.bind.annotation.RequestMapping;
import org.springframework.web.bind.annotation.RestController;import com.fasterxml.jackson.databind.ObjectMapper;@RestController
@RequestMapping("/api/stat")
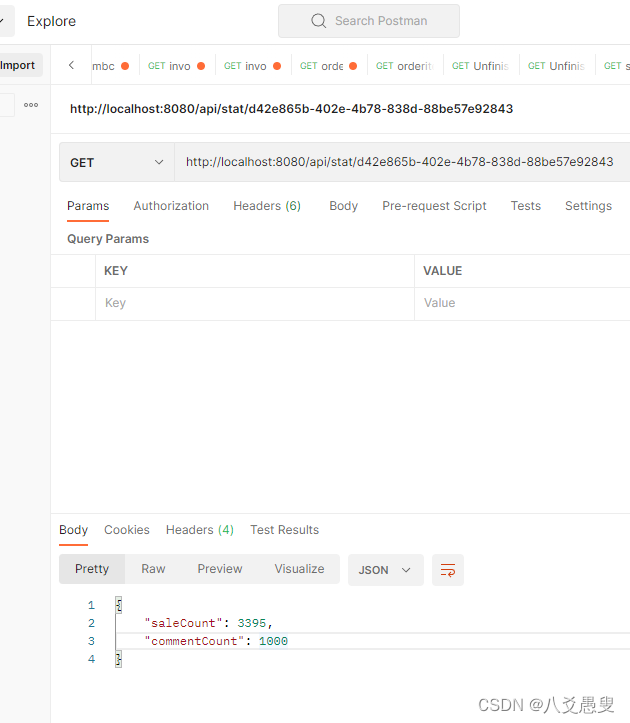
public class StatisticsController {@Autowiredprivate JdbcTemplate jdbcTemplate;@Autowiredprivate StringRedisTemplate redisTemplate;@GetMapping("{productId}")public ProductStat salesStat(@PathVariable UUID productId) throws IOException {ProductStat result = new ProductStat();var jsonStr = redisTemplate.opsForValue().get("product:" + productId);ObjectMapper mapper = new ObjectMapper();//从缓存中获取统计数据,如果没则云数据库中查询。if (jsonStr != null) {result = mapper.createParser(jsonStr).readValueAs(ProductStat.class);} else {int rowCount = this.jdbcTemplate.queryForObject("select count(*) from sale_order_item where product_id=?",Integer.class, productId);result.setSaleCount(rowCount);rowCount = this.jdbcTemplate.queryForObject("select count(*) from product_comment where product_id=?",Integer.class, productId);result.setCommentCount(rowCount);redisTemplate.opsForValue().set("product:" + productId, mapper.writeValueAsString(result));}return result;}
}Postman验证
总结
Redis本身概念不是很难,就是将一些数据放在内存中,这样可以避开一些耗时的磁盘IO操作,以提升应用程序的性能。其难点在于安装配置,以及框架集成。如果用的Linux,安装过程中涉及操作系统的一些基础命令,如果命令不熟的话,会造成一定的困扰。如果配置加密传输的话,对于证书操作不理解,也会提升安装的难度。同样,框架集成这块,像Springboot这种框架是做了高度封装的,隐藏了很多细节,如果对框架低层不熟的话,也会加高使用的难度。


![[附源码]计算机毕业设计的高校车辆租赁管理系统Springboot程序](https://img-blog.csdnimg.cn/8446bc8eadeb4699a046129b32333c53.png)


![代码详细教程+文档+PPT+源码等]SSM框架美妆商城全套|电商购物计算机专业毕业论文java毕业设计网站](https://img-blog.csdnimg.cn/img_convert/d05f4f507cce5002097e3f507da1dbb1.png)


![[附源码]计算机毕业设计的黄河文化科普网站Springboot程序](https://img-blog.csdnimg.cn/7945e02e761c44959b45dcc825e1ae0d.png)