流程
1.当通过开发HTTP模块来实现产品功能时,是可以完全享用Nginx的优秀设计所带来的、
与官方模块相同的高并发特性的。不过,如何开发一个充满异步调用、无阻塞的HTTP模块
呢
2. 需要把程序嵌入到Nginx中,也就是说,最终编译出的二进制程序Nginx要包含我
们的代码
3.个全新的HTTP模块要能介入到HTTP请求的处理流程中
4.我们的模块才能开始处理HTTP请求,但在开始处理请求前还需要先了解一些Nginx框架定义的数据结构
5.正式处理请求时,还要可以获得Nginx框架接收、解析后的用户请求信息
6.业务执行完毕后,则要考虑发送响应给用户
7包括将磁盘中的文 件以HTTP包体的形式发送给用户
调用模板
首先需要了解典型的HTTP模块是如何介入Nginx处理用户请求流 程的。下图是一个简化的时序图,这里省略了许多异步调用,忽略了多个不同的HTTP处理阶段,仅标识了在一个典型请求的处理过程中主要模块被调用的流程,以此帮助读者理解HTTP模块如何处理用户请求。
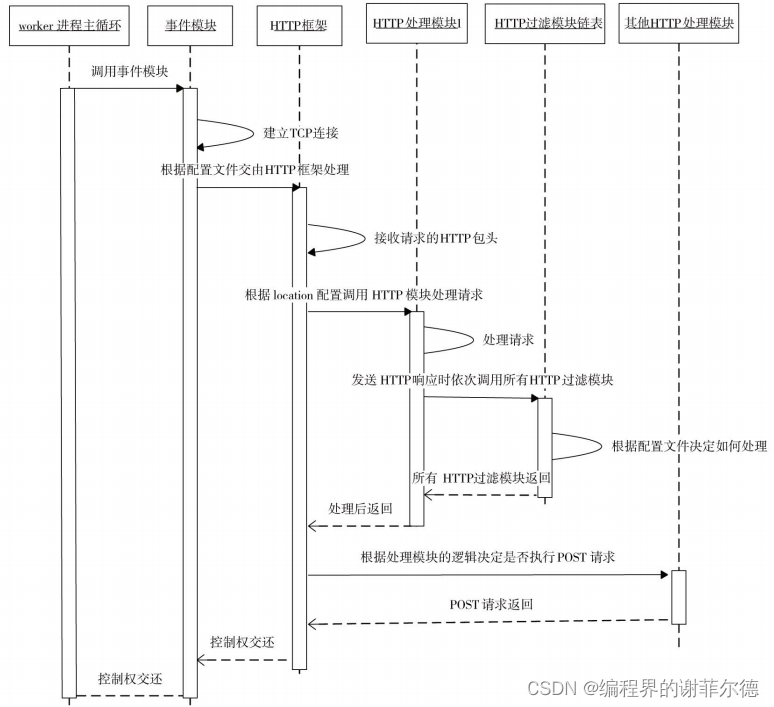
worker进程会在一个for循环语句里反复调用事件模块检测网络事件。
事件模块检测到某个客户端发起的TCP请求时(接收到SYN包),将会为它建立TCP连 接,
成功建立连接后根据nginx.conf文件中的配置会交由HTTP框架处理HTTP框架会试图接收完整的HTTP头部,并在接收到完整的HTTP头部后将请求分发到具体的HTTP模块中处理
处理策略:其中最常见的是根据请求的URI和nginx.conf里location配置项
的匹配度来决定如何分发
HTTP模块在处理请求的结束时,大多会向客户端发送响应,此时会自动地依次调
用所有的HTTP过滤模块,每个过滤模块可以根据配置文件决定自己的行为
准备工作
Nginx模块需要使用C(或者C++)语言编写代码来实现,每个模块都要有自己的名字。 按照Nginx约定俗成的命名规则,我们把第一个HTTP模块命名为ngx_http_mytest_module。由 于第一个模块非常简单,一个C源文件就可以完成
为了做到跨平台,Nginx定义、封装了一些基本的数据结构。由于Nginx对内存分配比较“吝啬”(只有保证低内存消耗,才可能实现十万甚至百万级别的同时并发连接数),所以 这些Nginx数据结构天生都是尽可能少占用内存。(看我nginx源码解析即可)
如何将自己的HTTP模块编译进Nginx
方法一 config文件
Nginx提供了一种简单的方式将第三方的模块编译到Nginx中。首先把源代码文件全部放
到一个目录下,同时在该目录中编写一个文件用于通知Nginx如何编译本模块,这个文件名
必须为config
config写法
config文件其实是一个可执行的Shell脚本。如果只想开发一个HTTP模块,那么config文 件中需要定义以下3个变量
·ngx_addon_name:仅在configure执行时使用,一般设置为模块名称。
·HTTP_MODULES:保存所有的HTTP模块名称,每个HTTP模块间由空格符相连。在
重新设置HTTP_MODULES变量时,不要直接覆盖它,因为configure调用到自定义的config脚
本前,已经将各个HTTP模块设置到HTTP_MODULES变量中了,因此,要像如下这样设
置
"$HTTP_MODULES ngx_http_mytest_module" NGX_ADDON_SRCS:用于指定新增模块的源代码,多个待编译的源代码间以空格
符相连。注意,在设置NGX_ADDON_SRCS时可以使用$ngx_addon_dir变量,它等价于
configure执行时--add-module=PATH的PATH参数
总的文件
ngx_addon_name=ngx_http_mytest_module
HTTP_MODULES="$HTTP_MODULES ngx_http_mytest_module"
NGX_ADDON_SRCS="$NGX_ADDON_SRCS $ngx_addon_dir/ngx_http_mytest_下面完整地解释一下configure上文提到的config文件配合起来把定制的 第三方模块加入到Nginx中的:
configure --add-module=PATh(config文件) "ngx_http_uwsgi_module","ngx_http_scgi_module","ngx_http_memcached_module","ngx_http_empty_gif_module","ngx_http_browser_module","ngx_http_upstream_hash_module","ngx_http_upstream_ip_hash_module","ngx_http_upstream_least_conn_module","ngx_http_upstream_keepalive_module","ngx_http_upstream_zone_module","ngx_http_mytest_mudule",//我们自己的"ngx_http_write_filter_module","ngx_http_header_filter_module","ngx_http_chunked_filter_module","ngx_http_range_header_filter_module","ngx_http_gzip_filter_module","ngx_http_postpone_filter_module","ngx_http_ssi_filter_module","ngx_http_charset_filter_module","ngx_http_userid_filter_module","ngx_http_headers_filter_module","ngx_http_copy_filter_module","ngx_http_range_body_filter_module","ngx_http_not_modified_filter_module",在执行configure--add-module=PATH命令时,PATH就是第三方模块所在的路径。在configure中,通过auto/options脚本设置了NGX_ADDONS变量
方法二 修改makefile
我们有时可能需要更灵活的方式,比如重新决定ngx_module_t*ngx_modules[]数组中各个
模块的顺序,或者在编译源代码时需要加入一些独特的编译选项,那么可以在执行完 configure后,对生成的objs/ngx_modules.c和objs/Makefile文件直接进行修改。
在修改objs/ngx_modules.c时,首先要添加新增的第三方模块的声明,如下所示:
extern ngx_module_t ngx_http_mytest_module;其次,在合适的地方将模块加入到ngx_modules数组中
ngx_module_t *ngx_modules[] = {
…
&ngx_http_upstream_ip_hash_module,
&ngx_http_mytest_module,
&ngx_http_write_filter_module,
…
NULL
};
note:
模块的顺序很重要。如果同时有两个模块表示对同一个请求感兴趣,那么只有顺
序在前的模块会被调用。
修改objs/Makefile时需要增加编译源代码的部分,例如:
objs/addon/httpmodule/ngx_http_mytest_module.o: $(ADDON_DEPS) \
../sample/httpmodule// ngx_http_mytest_module.c
$(CC) -c $(CFLAGS) $(ALL_INCS) \
-o objs/addon/httpmodule/ngx_http_mytest_module.o \
../sample/httpmodule// ngx_http_mytest_module.c还需要把目标文件链接到Nginx中,例如:
objs/nginx: objs/src/core/nginx.o \
...
objs/addon/httpmodule/ngx_http_mytest_module.o \
objs/ngx_modules.o
$(LINK) -o objs/nginx \
objs/src/core/nginx.o \
...
objs/addon/httpmodule/ngx_http_mytest_module.o \
objs/ngx_modules.o \
-lpthread -lcrypt -lpcre -lcrypto -lcrypto -lz推荐方法一:因为请慎用这种直接修改Makefile和ngx_modules.c的方法,不正确的修改可能导致Nginx工作 不正常。
拓展知识
关于利用configure过程中发生了什么
结果:
creating objs/Makefile
auto/make: line 420: syntax error near unexpected token `then'
auto/make: line 420: `        if{$ext="cpp"};then'Configuration summary+ using system PCRE library+ OpenSSL library is not used+ using system zlib librarynginx path prefix: "/usr/local/nginx"nginx binary file: "/usr/local/nginx/sbin/nginx"nginx modules path: "/usr/local/nginx/modules"nginx configuration prefix: "/usr/local/nginx/conf"nginx configuration file: "/usr/local/nginx/conf/nginx.conf"nginx pid file: "/usr/local/nginx/logs/nginx.pid"nginx error log file: "/usr/local/nginx/logs/error.log"nginx http access log file: "/usr/local/nginx/logs/access.log"nginx http client request body temporary files: "client_body_temp"nginx http proxy temporary files: "proxy_temp"nginx http fastcgi temporary files: "fastcgi_temp"nginx http uwsgi temporary files: "uwsgi_temp"nginx http scgi temporary files: "scgi_temp"
1 可以参照(Nginx源码解析--configure_编程界的谢菲尔德的博客-CSDN博客)添加进去
. auto/modules
. auto/make2.在configure命令执行到auto/modules脚本时,将在生成的ngx_modules.c文件中加入定制的
第三方模块
if test -n "$NGX_ADDONS"; then
echo configuring additional modules
for ngx_addon_dir in $NGX_ADDONS
do
echo "adding module in $ngx_addon_dir"
if test -f $ngx_addon_dir/config; then
#在这里执行自定义的
config脚本
. $ngx_addon_dir/config
echo " + $ngx_addon_name was configured"
else
echo "$0: error: no $ngx_addon_dir/config was found"
exit 1
fi
done
fi可以看到,$NGX_ADDONS可以包含多个目录,对于每个目录,如果其中存在config文
件就会执行,也就是说,在config中重新定义的变量都会生效。之后,auto/modules脚本开始
创建ngx_modules.c文件,这个文件的关键点就是定义了ngx_module_t*ngx_modules[]数组,这
个数组存储了Nginx中的所有模块。Nginx在初始化、处理请求时,都会循环访问ngx_modules
数组,确定该用哪一个模块来处理


![[附源码]计算机毕业设计springboot校园代取快递系统](https://img-blog.csdnimg.cn/ce6985b7ec244fbc804aa13dea88121d.png)

![[附源码]计算机毕业设计springboot疫情管理系统](https://img-blog.csdnimg.cn/4c372c0462ab4d11b590dc6b0f7fd793.png)