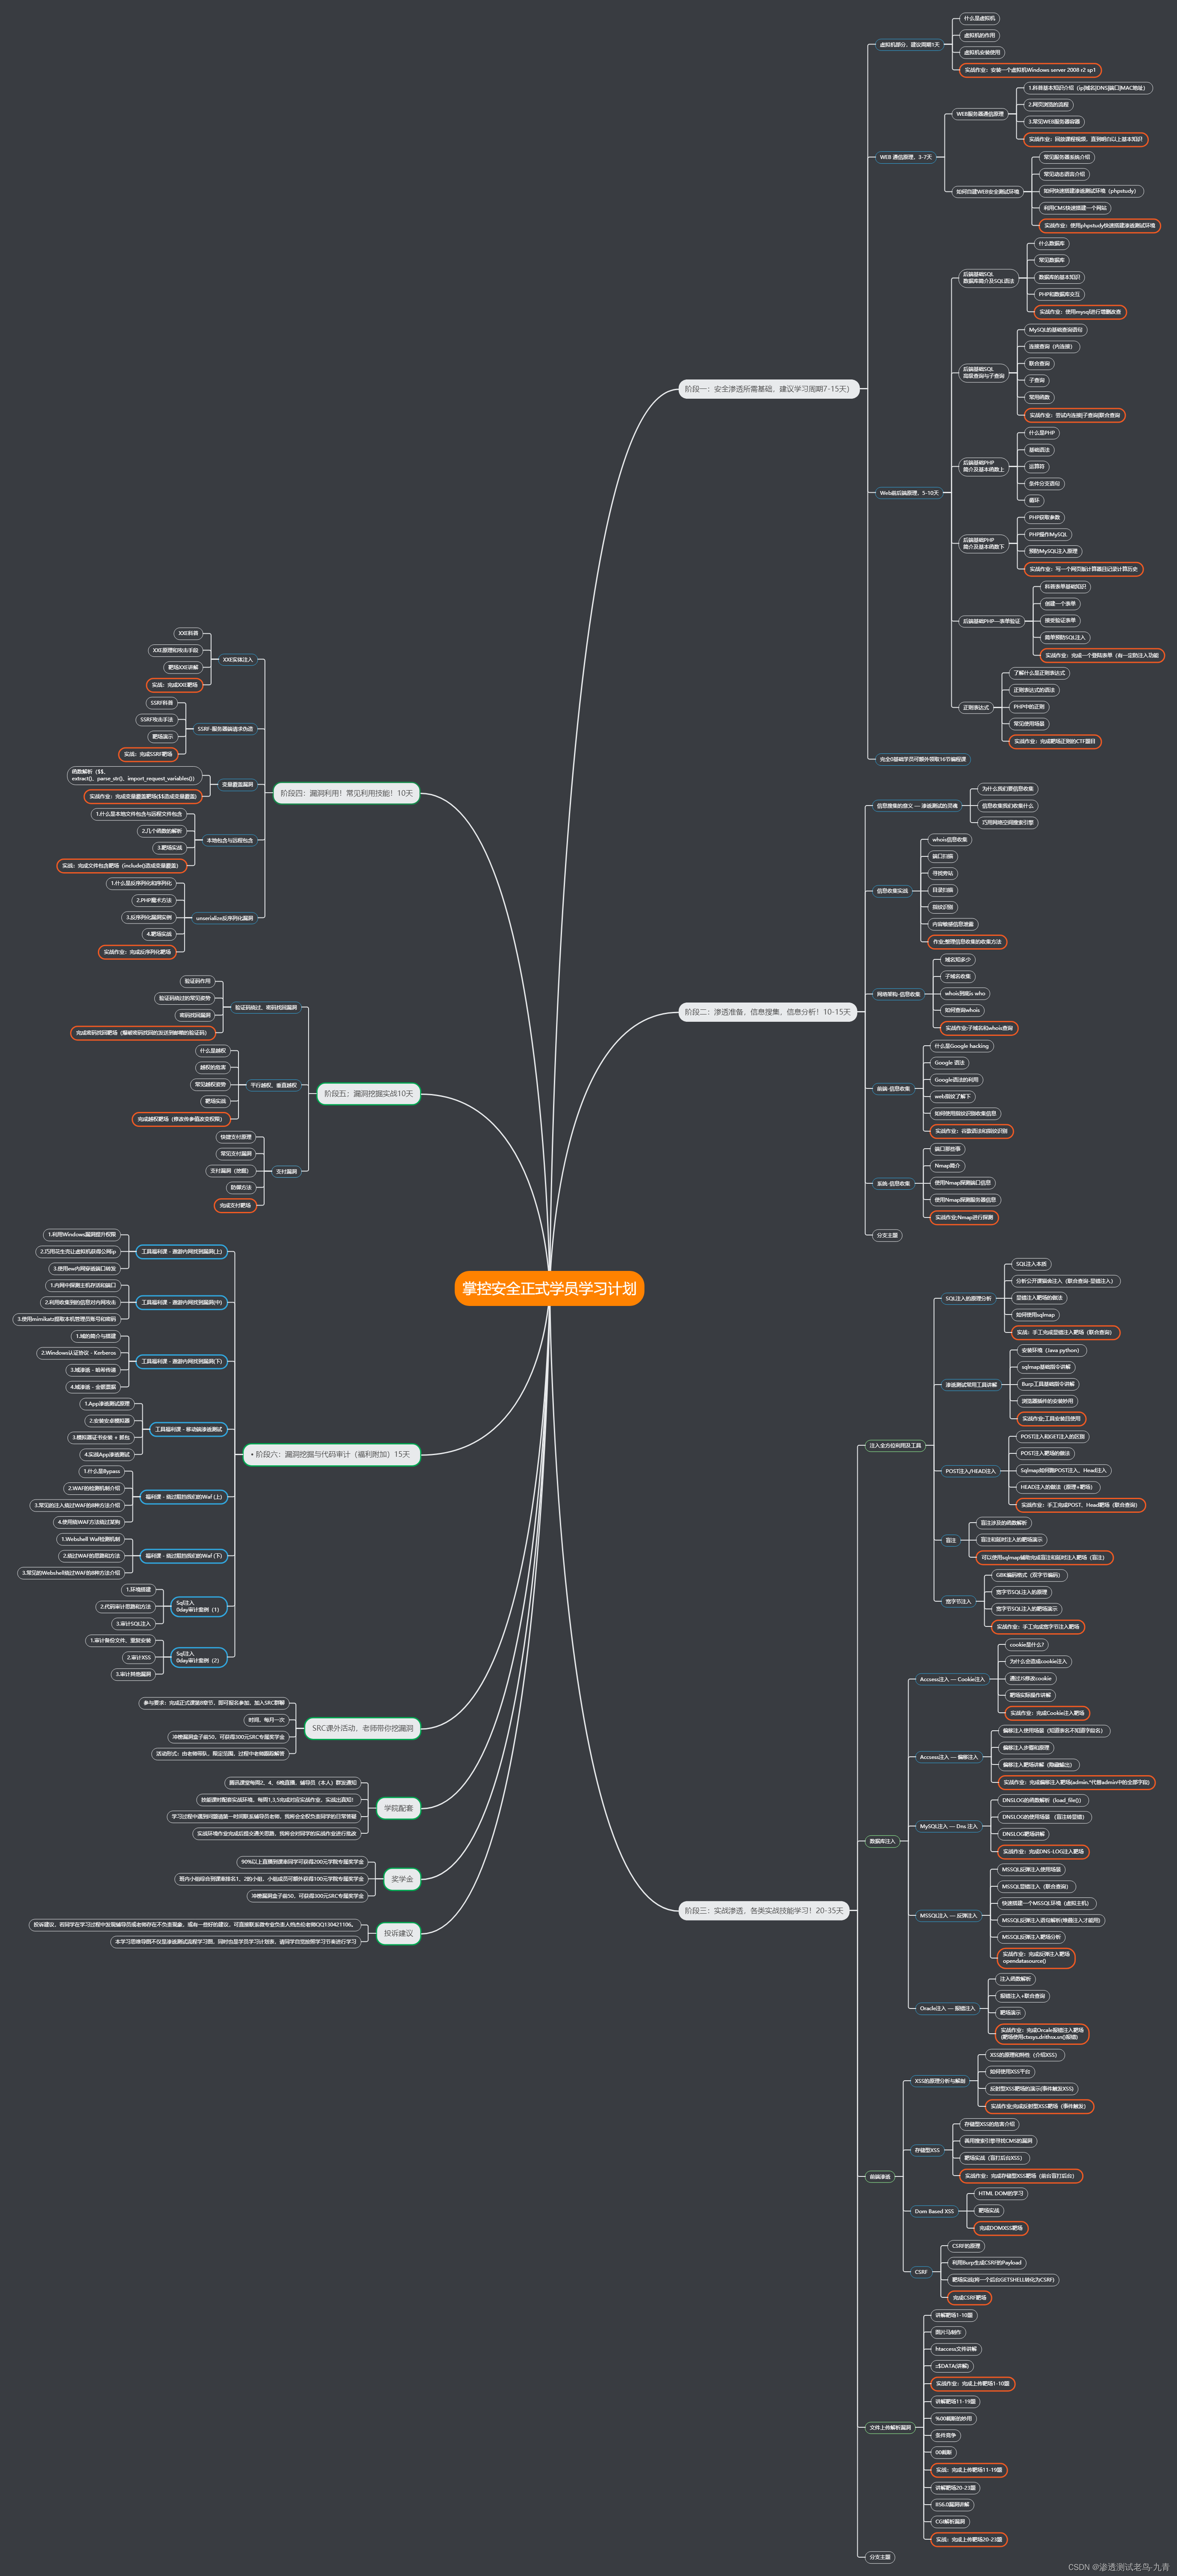
Linux启动之uboot分析
- uboot是什么?
- 一、补充存储器概念
- 1.存储器种类
- 1.norflash - 是非易失性存储器(也就是掉电保存)
- 2.nandflash - 是非易失性存储器(也就是掉电保存)
- 3.SRAM - 静态随机访问存储器 - Static Random Access Memory
- 4.SDRAM - 同步动态随机存取存储器 - Synchronous Dynamic Random Access Memory
- 5.DDR-Double Data Rate SDRAM(双倍速率 SDRAM)
- 2.存储器在ARM处理器上的作用
- 1.NOR Flash - 程序存储器
- 2.SRAM - 提供运行环境
- 3.SDRAM - 运行程序
- 二、 uboot启动流程分析
- 1.uboot.lds链接文件
- 2.入口函数_start
- 综上,start.S执行流程
- 补充:字节对齐
- 3. _main函数分析
- 1.为全局数据(malloc+gd)分配空间
- 2.设置完gd和malloc内存大小后,调用board_init_f_init_reserve函数
- 3.初始化 DDR,定时器,完成代码拷贝
- 4.uboot重定位 relocate_code函数实现
- 补充:链接地址与运行地址
- 补充:协处理器CP15介绍—MCR/MRC指令
- 补充:汇编指令-跳转指令B BEQ BNE BCC
- 5.重定位向量表
- 补充:LDR指令
参考自正点原子,uboot-imx-rel_mx_4.1.15_2.1.0_ga
uboot是什么?
Linux 系统要启动就必须需要一个 bootloader 程序,也就说芯片上电以后先运行一段bootloader程序。这段bootloader程序会先初始化DDR等外设,然后将Linux内核从flash(NAND,NOR FLASH,SD,MMC 等)拷贝到 DDR 中,最后启动 Linux 内核。
一、补充存储器概念
1.存储器种类
1.norflash - 是非易失性存储器(也就是掉电保存)
NOR flash带有SRAM接口,有足够的的地址引脚进行寻址,可以很容易地读取其内部的每一个字节(注意是 Read !因为flash不是任意写入,而是遵循 disable write protect -> erase -> write 。这是flash的特性决定的,其电路只能从 1->0,而不能 0->1翻转。擦除过程就是将flash中的某一个扇区恢复为 0xFFFFFFFF,然后再写入数据。另外,代码指令可以直接在norflash上运行。
(重要!!!上电后可以读取norflash中的数据但是不可以进行写操作)
2.nandflash - 是非易失性存储器(也就是掉电保存)
它也是非易失闪存(掉电不丢失)的一种,但是它虽然有数据总线,但是没有地址总线,所以cpu不能直接从nandflash中取指运行,由于它价格便宜,所以常常用来存储大量数据,和我们常说的硬盘类似。
3.SRAM - 静态随机访问存储器 - Static Random Access Memory
static 是指只要不掉电,存储在SRAM中的数据就不会丢失。这一点与DRAM不同,DRAM需要进行周期性刷新操作。然而,我们不应将SRAM和只读存储器(ROM)、Flash Memory相混淆,因为SRAM是一种易失性存储器,它只有在电源保持连续供应的情况下才能够保持数据。Random Access 指的是存储器的内容可以任意顺序进行访问,而不管前一次访问的是哪一个位置。
(重要!!!上电后就可以读写SRAM中的数据,而无需初始化操作)
4.SDRAM - 同步动态随机存取存储器 - Synchronous Dynamic Random Access Memory
需要不断的刷新,才能保存数据。而且是行列地址复用,许多都有页模式。
5.DDR-Double Data Rate SDRAM(双倍速率 SDRAM)
DDR 内存是 SDRAM 的升级版本,SDRAM 分为 SDR SDRAM、DDR SDRAM、DDR2 SDRAM、DDR3 SDRAM、DDR4 SDRAM。传输速率比SDRAM快一倍,SDRAM 在一个 CLK 周期传输一次数据,DDR 在一个 CLK 周期传输两次数据,也就是在上升沿和下降沿各传输一次数据,这个概念叫做预取(prefetch)。
SDRAM 速度一般是 133200MHz,对应的传输速度就是133200MT/s( MT/s,每秒多少兆次数据传输),DDR 的传输速度就变为了 266~400MT/S。同理,有DDR2、DDR3。
我们使用的是DDR3,DDR3又分多种,LPDDR3(低功耗1.2V)、DDR3 (1.5V)和 DDR3L(低压1.35V);一片DDR3通常有8个扇区,以据 NT5CC256M16ER-EK为例,列地址为 A0~A9,共 10 根,行地址为 A0~A14,共 15 根,因此一个 BANK 的大小就是
2^15 x 2^10 x2 = 32MBx2 = 64MB(×2的原因是每根地址线16位宽,一次可以传输2个字节),8 个 BANK的容量是64*8=512MB。
(重要!!!需要对DDR控制器进行初始化<配置寄存器>,才能去读写SDRAM中的数据)
参考:原文链接:https://blog.csdn.net/shenwanjiang111/article/details/102798388
2.存储器在ARM处理器上的作用
1.NOR Flash - 程序存储器
作为ARM处理器的程序存储器。因为我们必须将程序保存在一个掉电后还能保存数据的地方。上电后,NOR Flash就相当于一个随机读取的只读存储器。
那么,既然NOR Flash可以运行程序,我们为什么不直接在其上运行程序呢?
一般情况下,我们编译的程序中,.text段,.rodata段都是只读的,这没有问题。但是,.data段(数据段)和 .bss(未初始化的全局变量和静态变量)在程序的运行过程中变量的值是需要改变的(改变一个变量的值,需要改变对应物理地址上
存储的内容),很可惜,NOR Flash只能直接读取,而无法进行写操作。
那么,为了解决这个问题,就需要SRAM了。
2.SRAM - 提供运行环境
其重要特性就是:容量小,512KB;运行程序速度快;价格贵。
可以作为程序运行时的堆栈空间。把ARM处理器的堆栈指针sp设置在SRAM中,为程序提供运行环境。
SRAM作为运行程序的场所是可以的,但是由于其昂贵的价格,极小的容量,而现在程序一般都非常庞大,所以满足不了我们的需求。正因为此,SDRAM应运而生。
3.SDRAM - 运行程序
它的重要特性是容量大:512M;程序运行速度快;价格便宜。
但是其掉电易失数据,上电后必须初始化DDR控制器,否则无法进行数据的读写。所以在运行系统内核之前必须对其进行初始化,这就是在NOR Flash 和 SRAM上搭建的程序的作用。
那它主要都完成什么工作呢?
1. 完成对处理器时钟的初始化2. DDR的初始化3. 给 gd_t *gd_ptr 赋值(用于存储uboot镜像的长度,重定位地址,重定位偏移量等信息)
在uboot搬运到DDR中运行前进行最小系统的初始化,之后就将uboot搬运到DDR中运行。那么,此时NOR Flash和SRAM的任务就完成了(也就是没有用了)。
————————————————
至此解释了开发板uboot启动过程中要初始化DDR外设这件事。
二、 uboot启动流程分析
流程概要
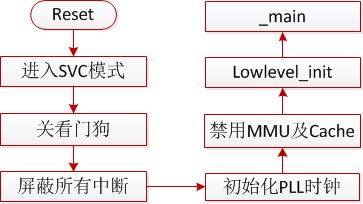
第一阶段,start.S
1.从uboot的链接文件可以看到image的起始地址为flash的0x0处,从uboot.map文件中可以看到image_copy_start的运行地址为0x87800000,代码的起始位置为_start处(将处理器设为SVC模式、关闭FIQ、IRQ中断);
2.重定位向量表,设置向量表的起始地址为0x87800000,然后设置cp15寄存器的值,关闭MMU、cache、分支预测等,
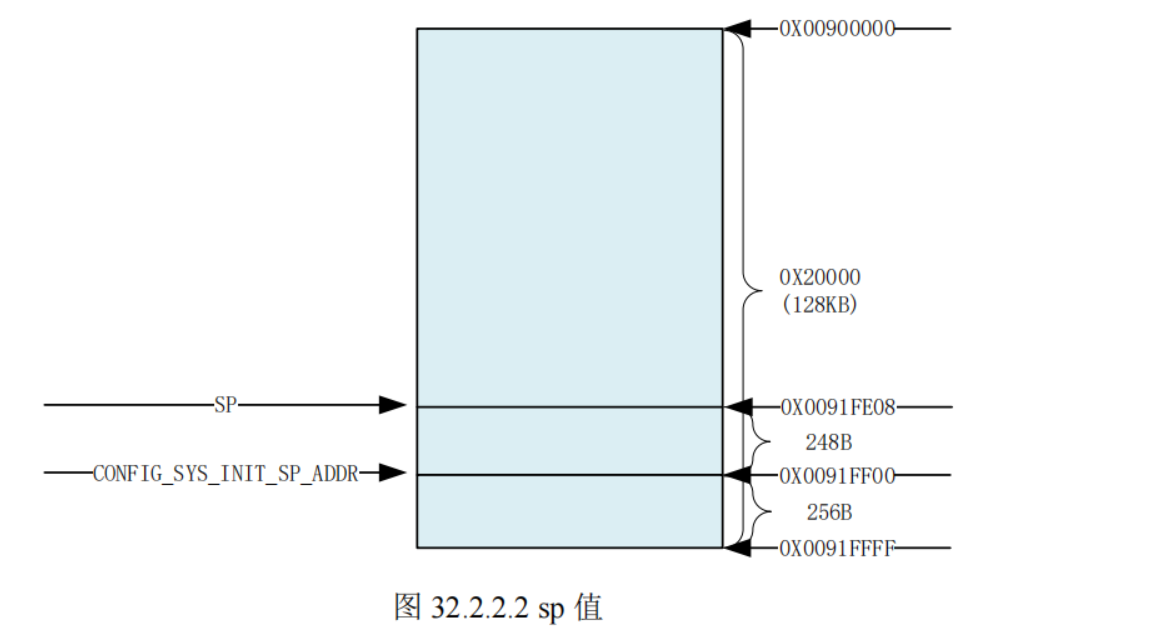
3.设置临时堆栈地址(sp寄存器的值)为0X0091FF00,为全局变量分配内存空间
4.创建一个临时的stack(为调用c函数准备),用于存储全局数据,设置sp指针指向IMX6ULL内部ocram起始地址,RAM的起始地址是 0X91FF00,再设置GD_SIZE 大小为248b,(设置系统时钟)
第二阶段,_main函数
1.首先设置sp入口地址为0x0091FA00,设置gd和malloc内存大小
2.初始化gd、初始化 DDR,定时器及其它外设,完成代码拷贝
3.uboot重定位、重定位向量表、继续初始化外设,最后进入主循环,解析uboot指令、启动Linux内核
1.uboot.lds链接文件
路径:arch/arm/cpu/u-boot.lds
它规定了编译后的代码各个段是如何分配的。程序的链接是由链接脚本来决定的,所以通过链接脚本可以找到**程序的入口**。
/** Copyright (c) 2004-2008 Texas Instruments** (C) Copyright 2002* Gary Jennejohn, DENX Software Engineering, <garyj@denx.de>** SPDX-License-Identifier:	GPL-2.0+*/#include <config.h>OUTPUT_FORMAT("elf32-littlearm", "elf32-littlearm", "elf32-littlearm")/*指定输出可执行文件是elf格式,32位ARM指令,小端*/
OUTPUT_ARCH(arm)  /*指定输出可执行文件的platform为ARM*/
ENTRY(_start)   /*指定输出可执行文件的起始地址为_start*/
SECTIONS
{
#if defined(CONFIG_ARMV7_SECURE_BASE) && defined(CONFIG_ARMV7_NONSEC)/** If CONFIG_ARMV7_SECURE_BASE is true, secure code will not* bundle with u-boot, and code offsets are fixed. Secure zone* only needs to be copied from the loading address to* CONFIG_ARMV7_SECURE_BASE, which is the linking and running* address for secure code.** If CONFIG_ARMV7_SECURE_BASE is undefined, the secure zone will* be included in u-boot address space, and some absolute address* were used in secure code. The absolute addresses of the secure* code also needs to be relocated along with the accompanying u-boot* code.** So DISCARD is only for CONFIG_ARMV7_SECURE_BASE.*//DISCARD/ : { *(.rel._secure*) }
#endif/* 指定可执行文件(image)的全局入口点,通常这个地址都放在ROM(flash)0x0位置。*//* 必须使编译器知道这个地址,通常都是修改此处来完成 */. = 0x00000000;. = ALIGN(4); /*4字节对齐*/.text :{*(.__image_copy_start) /*从__image_copy_start处开始*/*(.vectors)/*将 arch/arm/cpu/armv7/start.s 编译出来的代码放到中断向量表后面。*/CPUDIR/start.o (.text*)*(.text*)}#ifdef CONFIG_ARMV7_NONSEC#ifndef CONFIG_ARMV7_SECURE_BASE
#define CONFIG_ARMV7_SECURE_BASE
#endif.__secure_start : {. = ALIGN(0x1000);*(.__secure_start)}.secure_text CONFIG_ARMV7_SECURE_BASE :AT(ADDR(.__secure_start) + SIZEOF(.__secure_start)){*(._secure.text)}. = LOADADDR(.__secure_start) +SIZEOF(.__secure_start) +SIZEOF(.secure_text);__secure_end_lma = .;.__secure_end : AT(__secure_end_lma) {*(.__secure_end)LONG(0x1d1071c);	/* Must output something to reset LMA */}
#endif. = ALIGN(4);.rodata : { *(SORT_BY_ALIGNMENT(SORT_BY_NAME(.rodata*))) }. = ALIGN(4);.data : {*(.data*)}. = ALIGN(4);. = .;. = ALIGN(4);.u_boot_list : {KEEP(*(SORT(.u_boot_list*)));}. = ALIGN(4);.image_copy_end :{*(.__image_copy_end)}.rel_dyn_start :{*(.__rel_dyn_start)}.rel.dyn : {*(.rel*)}.rel_dyn_end :{*(.__rel_dyn_end)}.end :{*(.__end)}_image_binary_end = .;/** Deprecated: this MMU section is used by pxa at present but* should not be used by new boards/CPUs.*/. = ALIGN(4096);.mmutable : {*(.mmutable)}/** Compiler-generated __bss_start and __bss_end, see arch/arm/lib/bss.c* __bss_base and __bss_limit are for linker only (overlay ordering)*/.bss_start __rel_dyn_start (OVERLAY) : {KEEP(*(.__bss_start));__bss_base = .;}.bss __bss_base (OVERLAY) : {*(.bss*). = ALIGN(4);__bss_limit = .;}.bss_end __bss_limit (OVERLAY) : {KEEP(*(.__bss_end));}.dynsym _image_binary_end : { *(.dynsym) }.dynbss : { *(.dynbss) }.dynstr : { *(.dynstr*) }.dynamic : { *(.dynamic*) }.plt : { *(.plt*) }.interp : { *(.interp*) }.gnu.hash : { *(.gnu.hash) }.gnu : { *(.gnu*) }.ARM.exidx : { *(.ARM.exidx*) }.gnu.linkonce.armexidx : { *(.gnu.linkonce.armexidx.*) }
}
从第三行可以看到代码的入口为_start ,_start定义在文件 arch/arm/lib/vectors.S中,部分code如下
/**************************************************************************** Symbol _start is referenced elsewhere, so make it global***************************************************************************/.globl _start/**************************************************************************** Vectors have their own section so linker script can map them easily***************************************************************************/.section ".vectors", "ax"/**************************************************************************** Exception vectors as described in ARM reference manuals** Uses indirect branch to allow reaching handlers anywhere in memory.***************************************************************************/_start:#ifdef CONFIG_SYS_DV_NOR_BOOT_CFG.word	CONFIG_SYS_DV_NOR_BOOT_CFG
#endifb	resetldr	pc, _undefined_instructionldr	pc, _software_interruptldr	pc, _prefetch_abortldr	pc, _data_abortldr	pc, _not_usedldr	pc, _irqldr	pc, _fiq
从代码可以看出,_start 后面就是中断向量表,从“.section “.vectors”, "ax”可以得到,此代码存放在.vectors 段里面。
再回到lds文件中,可以看到第一个代码段起始位置为__image_copy_start,显然这是一个函数名,可以通过grep命令查找到
grep -nR "__image_copy_start"
也可以在uboot.map文件中看到(u-boot.map 是 uboot 的映射文件,可以从此文件看到某个文件或者函数链接到了哪个地址)
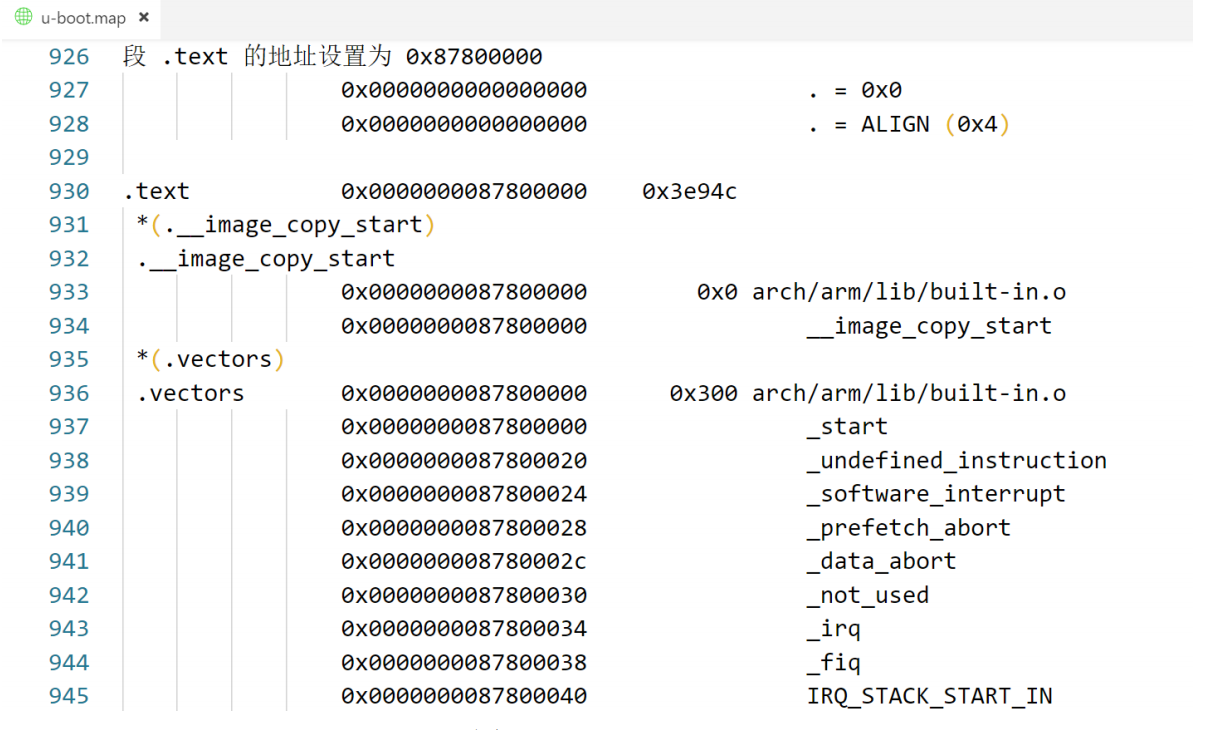
**可以看出,__image_copy_start 为 0X87800000,而.text 的起始地址也是0X87800000。*下面是vectors 段,vectors 段保存中断向量表,vectors 段的起始地址也是 0X87800000,说明整个 uboot 的起始地址就是 0X87800000。
总结:从uboot链接文件uboot.lds中我们可以知道,uboot的运行起始地址为0x87800000; uboot的代码起始位置定义在vectors.S文件中(_start为入口);
2.入口函数_start
reset函数在start.S中,定义1如下:
/*************************************************************************** Startup Code (reset vector)** Do important init only if we don't start from memory!* Setup memory and board specific bits prior to relocation.* Relocate armboot to ram. Setup stack.**************************************************************************/.globl reset.globl save_boot_params_retreset:/* Allow the board to save important registers */b save_boot_params //跳转到save_boot_params可以看出,进入reset函数中又跳转到了save_boot_params函数中,
*************************************************************************** void save_boot_params(u32 r0, u32 r1, u32 r2, u32 r3)*	__attribute__((weak));** Stack pointer is not yet initialized at this moment* Don't save anything to stack even if compiled with -O0**************************************************************************/
ENTRY(save_boot_params)b	save_boot_params_ret		@ back to my caller
ENDPROC(save_boot_params).weak	save_boot_params
save_boot_params 函数也是只有一句跳转语句,跳转到 save_boot_params_ret 函数:
save_boot_params_ret:/** disable interrupts (FIQ and IRQ), also set the cpu to SVC32 mode,* except if in HYP mode already*/mrs r0, cpsr @将特殊寄存器cpsr的值复制到r0中and r1, r0, #0x1f @ mask mode bits r0的值与0x1F与运算取低五位,这 5 位为 M4 M3 M2 M1 M0,M[4:0]这五 @ 位用来设置处理器的工作模式,然后赋值给r1teq r1, #0x1a @ test for HYP mode 判断r1是否与0x1a(hyp模式)相等bicne r0, r0, #0x1f @ clear all mode bitsorrne r0, r0, #0x13 @ set SVC modeorr r0, r0, #0xc0 @ disable FIQ and IRQmsr cpsr,r0
ARM处理器的模式有以下:
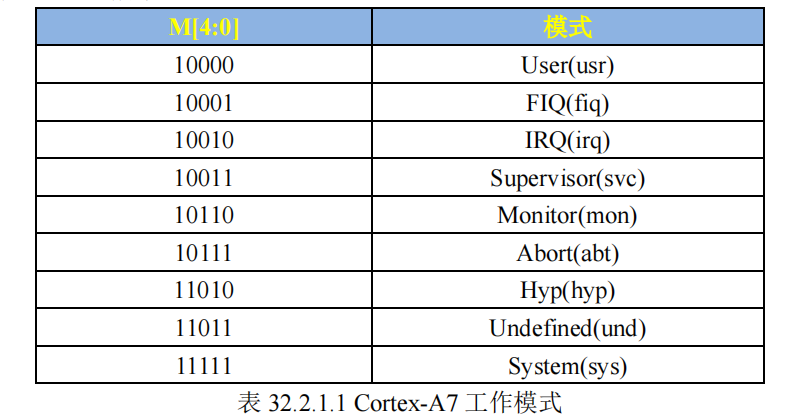
在save_boot_params_ret函数将处理器设为SVC模式、关闭FIQ、IRQ中断后将数据写回cpsr保存
继续执行代码:
1.读取CP15寄存器的c1的值,使用宏CR_V(#define (CR_V 1<<13))清除除 SCTLR 寄存器的bit13,
2.向量表重定位。bit13 为 V 位,此位是向量表控制位,当为 0 的时候向量表基地址为 0X00000000,软件可以重定位向量表。为 1 的时候向量表基地址为 0XFFFF0000,软件不能重定位向量表。这里将 V 清零,目的就是为了接下来的向量表重定位。
3.设置向量表的起始地址
/** Setup vector:* (OMAP4 spl TEXT_BASE is not 32 byte aligned.* Continue to use ROM code vector only in OMAP4 spl)*/
#if !(defined(CONFIG_OMAP44XX) && defined(CONFIG_SPL_BUILD))/* Set V=0 in CP15 SCTLR register - for VBAR to point to vector */mrc	p15, 0, r0, c1, c0, 0	@ Read CP15 SCTLR Registerbic	r0, #CR_V		@ V = 0mcr	p15, 0, r0, c1, c0, 0	@ Write CP15 SCTLR Register/*设置r0寄存器的值为_start,_start就是整个uboot的入口地址,其值为0X87800000,相当于 uboot 的起始地址,因此 0x87800000 也是向量表的起始地址*//* Set vector address in CP15 VBAR register */ldr	r0, =_startmcr	p15, 0, r0, c12, c0, 0	@Set VBAR
#endif
接下来:
/* the mask ROM code should have PLL and others stable */
#ifndef CONFIG_SKIP_LOWLEVEL_INITbl	cpu_init_cp15   /*使用bl跳转,保存了程序入口地址*/bl	cpu_init_crit
#endifbl	_main
1.跳转到cpu_init_cp15()函数,设置CP15寄存器得值,(cache, MMU, TLBs);
/*************************************************************************** cpu_init_cp15** Setup CP15 registers (cache, MMU, TLBs). The I-cache is turned on unless* CONFIG_SYS_ICACHE_OFF is defined.**************************************************************************/
ENTRY(cpu_init_cp15)/** Invalidate L1 I/D*/mov	r0, #0			@ set up for MCR/**禁止从TLB中取地址描述符,也就是禁止虚拟地址到物理地址的转换,因为刚开始操作的都是物理寄存器!*/*/mcr	p15, 0, r0, c8, c7, 0	@ invalidate TLBs /*关闭指令cache*/mcr	p15, 0, r0, c7, c5, 0	@ invalidate icache/*关闭分支预测*/mcr	p15, 0, r0, c7, c5, 6	@ invalidate BP array/*多核cpu之间进行数据同步*/mcr     p15, 0, r0, c7, c10, 4	@ DSB/*进行指令同步,放弃流水线中已经取到的指令,重新取指令*/mcr     p15, 0, r0, c7, c5, 4	@ ISB/** disable MMU stuff and caches*/
/*1、为什么要关闭mmu?因为MMU是把虚拟地址转化为物理地址得作用而我们现在是要设置控制寄存器,而控制寄存器本来就是实地址(物理地址),再使能MMU,不就是多此一举了吗?
********************************************************//*******************************************************
*2、为什么要关闭cache?catch和MMU是通过CP15管理的,刚上电的时候,CPU还不能管理他们。所以上电的时候MMU必须关闭,指令cache可关闭,可不关闭,但数据cache一定要关闭否则可能导致刚开始的代码里面,去取数据的时候,从catch里面取,而这时候RAM中数据还没有cache过来,导致数据预取异常
********************************************************/mrc	p15, 0, r0, c1, c0, 0/*设置成正常异常模式,即异常向量表的基地址为0x00000000*/bic	r0, r0, #0x00002000	@ clear bits 13 (--V-)/*关闭指令cache,关闭指令对齐检测,关闭mmu*/bic	r0, r0, #0x00000007	@ clear bits 2:0 (-CAM)/*使能对齐检测*/orr	r0, r0, #0x00000002	@ set bit 1 (--A-) Align/*使能分支预测*/orr	r0, r0, #0x00000800	@ set bit 11 (Z---) BTB/*....*/mov	pc, r5			@ back to my caller /*程序返回*/ENDPROC(cpu_init_cp15)
2.跳转到cpu_init_crit函数,调用了函数 lowlevel_init 路径:arch\arm\cpu\armv7\lowlevel_init.S
/** A lowlevel_init function that sets up the stack to call a C function to* perform further init.** (C) Copyright 2010* Texas Instruments, <www.ti.com>** Author :*	Aneesh V	<aneesh@ti.com>** SPDX-License-Identifier:	GPL-2.0+*/#include <asm-offsets.h>
#include <config.h>
#include <linux/linkage.h>ENTRY(lowlevel_init)/** Setup a temporary stack. Global data is not available yet.*//*设置临时堆栈地址 */ldr	sp, =CONFIG_SYS_INIT_SP_ADDR    /*伪指令:将CONFIG_SYS_INIT_SP_ADDR赋值给sp,sp寄存器的值为0X0091FF00*/bic	sp, sp, #7    /* 8-byte alignment for ABI compliance */
#ifdef CONFIG_SPL_DM /*Kconfig配置*/mov	r9, #0
#else/** Set up global data for boards that still need it. This will be* removed soon.*/
#ifdef CONFIG_SPL_BUILDldr	r9, =gdata
#else/*为全局变量分配内存空间、gd地址保存在r9寄存器 */sub	sp, sp, #GD_SIZE //sp = sp-GD_SIZE 设置GD_SIZE大小bic	sp, sp, #7  //8字节对齐mov	r9, sp      //将sp的值给r9
#endif
#endif/** Save the old lr(passed in ip) and the current lr to stack*//*入栈  ip:指令指针  lr:返回地址*/push	{ip, lr}/** Call the very early init function. This should do only the* absolute bare minimum to get started. It should not:** - set up DRAM* - use global_data* - clear BSS* - try to start a console** For boards with SPL this should be empty since SPL can do all of* this init in the SPL board_init_f() function which is called* immediately after this.*/bl	s_init  //跳转到s_init函数并保存入口地址pop	{ip, pc} //从栈中弹出ip和程序计数器pc的值
ENDPROC(lowlevel_init)
函数 lowlevel_init 的作用是创建一个临时的stack(为调用c函数准备),用于存储全局数据,设置sp指针指向CONFIG_SYS_INIT_SP_ADDR,即IMX6ULL内部ocram起始地址;
234 #define CONFIG_SYS_INIT_RAM_ADDR IRAM_BASE_ADDR   // ocram首地址 IRAM_BASE_ADDR = 0x00900000
235 #define CONFIG_SYS_INIT_RAM_SIZE IRAM_SIZE        // ocram大小 IRAM_SIZE=0X20000=128KB
236
237 #define CONFIG_SYS_INIT_SP_OFFSET \
238 (CONFIG_SYS_INIT_RAM_SIZE - GENERATED_GBL_DATA_SIZE)  //0x00020000 – 256 = 0x1FF00
239 #define CONFIG_SYS_INIT_SP_ADDR \
240 (CONFIG_SYS_INIT_RAM_ADDR + CONFIG_SYS_INIT_SP_OFFSET) //0x00900000 + 0X1FF00 = 0X0091FF00
sp指针结果:
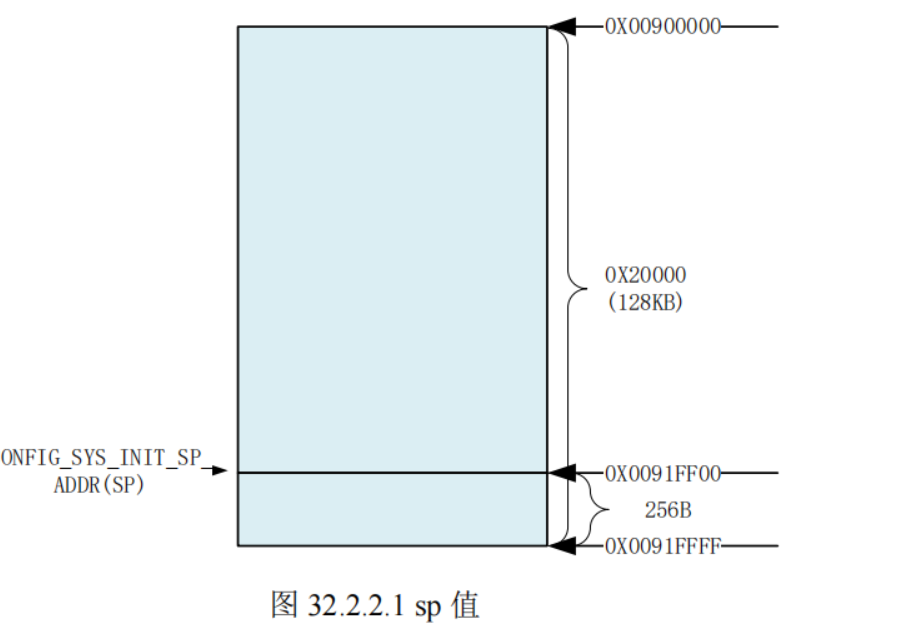
此时 sp 指向 0X91FF00,这属于 IMX6UL/IMX6ULL 的内部 ram。
接下来,指针指位于RAM区域,RAM的起始地址是 0X91FF00,再设置GD_SIZE 大小为248b
然后将ip和lr寄存器压入堆栈保存,调用s_init函数,(针对相应的平台设置系统时钟),IMX6ULL不需要此步骤,最后返回到 save_boot_params_ret函数,执行_main函数。
所以ocram大小为128k,ram在ocram内部
综上,start.S执行流程
补充:字节对齐
bic sp, sp, #7 /* 8-byte alignment for ABI compliance */
bic 命令:bit clear 清除位,8字节对齐就是将sp的低三位(#7 :立即数 0b0111 )清0
3. _main函数分析
_main函数代码(main 函数定义在文件 arch/arm/lib/crt0.S 中 ):
/** entry point of crt0 sequence*/ENTRY(_main)/** Set up initial C runtime environment and call board_init_f(0).设置初始化C运行环境并且调用函数board_init_f(0)*/
/*设置sp指针位置CONFIG_SYS_INIT_SP_ADDR = 0x0091FF00
*/
#if defined(CONFIG_SPL_BUILD) && defined(CONFIG_SPL_STACK)ldr	sp, =(CONFIG_SPL_STACK)
#elseldr	sp, =(CONFIG_SYS_INIT_SP_ADDR)
#endif
#if defined(CONFIG_CPU_V7M)	/* v7M forbids using SP as BIC destination */mov	r3, spbic	r3, r3, #7 mov	sp, r3
#elsebic	sp, sp, #7	/* 8-byte alignment for ABI compliance */
#endifmov	r0, spbl	board_init_f_alloc_reserve /*1.为全局数据(malloc+gd)分配空间,并返回分配空间的底部地址*/mov	sp, r0/* set up gd here, outside any C code *//*将 r0 寄存器的值写到寄存器 r9 里面,因为 r9 寄存器存放着全局变量 gd 的地址 gd = 0x0091FA00*//*uboot 中定义了一个指向 gd_t 的指针 gd,gd 存放在寄存器 r9 里面的,因此 gd 是个全局变量。gd_t 是个结构体,		在 include/asm-generic/global_data.h 里面有定义*/mov	r9, r0bl	board_init_f_init_reserve /*2.初始化gd,设置 early malloc 的起始地址。*/mov	r0, #0bl	board_init_f /*3.初始化 DDR,定时器,完成代码拷贝*/#if ! defined(CONFIG_SPL_BUILD)/** Set up intermediate environment (new sp and gd) and call* relocate_code(addr_moni). Trick here is that we'll return* 'here' but relocated.*/ldr	sp, [r9, #GD_START_ADDR_SP]	/* sp = gd->start_addr_sp */
#if defined(CONFIG_CPU_V7M)	/* v7M forbids using SP as BIC destination */mov	r3, spbic	r3, r3, #7mov	sp, r3
#elsebic	sp, sp, #7	/* 8-byte alignment for ABI compliance */
#endif/*将r9+GD_BD字地址的数据存入r9*/ldr	r9, [r9, #GD_BD]		/* r9 = gd->bd */ /*r9 = r9-GD_SIZE*/sub	r9, r9, #GD_SIZE		/* new GD is below bd *//*计算 relocate_code 函数的新地址,并跳转到该函数。*/adr	lr, here    /*lr为返回地址,设置返回地址为此处  */ldr	r0, [r9, #GD_RELOC_OFF]		/* r0 = gd->reloc_off  r0 = r9+GD_RELOC_OFF */add	lr, lr, r0  /*lr = lr+r0*/
#if defined(CONFIG_CPU_V7M)orr	lr, #1				/* As required by Thumb-only */
#endifldr	r0, [r9, #GD_RELOCADDR]		/* r0 = gd->relocaddr */b	relocate_code /*4.uboot重定位*/
here:
/** now relocate vectors*//*5.重定位向量表*/bl	relocate_vectors/* Set up final (full) environment */bl	c_runtime_cpu_setup	/* we still call old routine here */
#endif
#if !defined(CONFIG_SPL_BUILD) || defined(CONFIG_SPL_FRAMEWORK)
# ifdef CONFIG_SPL_BUILD/* Use a DRAM stack for the rest of SPL, if requested */bl	spl_relocate_stack_gdcmp	r0, #0movne	sp, r0movne	r9, r0
# endifldr	r0, =__bss_start	/* this is auto-relocated! */#ifdef CONFIG_USE_ARCH_MEMSETldr	r3, =__bss_end		/* this is auto-relocated! */mov	r1, #0x00000000		/* prepare zero to clear BSS */subs	r2, r3, r0		/* r2 = memset len */bl	memset
#elseldr	r1, =__bss_end		/* this is auto-relocated! */mov	r2, #0x00000000		/* prepare zero to clear BSS */clbss_l:cmp	r0, r1			/* while not at end of BSS */
#if defined(CONFIG_CPU_V7M)itt	lo
#endifstrlo	r2, [r0]		/* clear 32-bit BSS word */addlo	r0, r0, #4		/* move to next */blo	clbss_l
#endif#if ! defined(CONFIG_SPL_BUILD)bl coloured_LED_initbl red_led_on
#endif/* call board_init_r(gd_t *id, ulong dest_addr) */mov     r0, r9                  /* gd_t */ldr	r1, [r9, #GD_RELOCADDR]	/* dest_addr *//* call board_init_r */
#if defined(CONFIG_SYS_THUMB_BUILD)ldr	lr, =board_init_r	/* this is auto-relocated! */bx	lr
#elseldr	pc, =board_init_r	/* this is auto-relocated! */
#endif/* we should not return here. */
#endifENDPROC(_main)
接下来执行main函数,main函数中首先设置sp入口地址,然后调用了三个函数分别实现了一下三个功能:
1.为全局数据(malloc+gd)分配空间
1.设置sp指针 跳转到board_init_f_alloc_reserve函数, 此函数定义在文件 common/init/board_init.c 中
 /*为全局数据(malloc+gd)分配空间,并返回分配空间的底部地址*/
ulong board_init_f_alloc_reserve(ulong top)
{/* Reserve early malloc arena */
#if defined(CONFIG_SYS_MALLOC_F)top -= CONFIG_SYS_MALLOC_F_LEN; //CONFIG_SYS_MALLOC_F_LEN = 0x400  早期的 malloc 内存区域 0x0091FF00 - 0x400 = 0x0091FB00
#endif/* LAST : reserve GD (rounded up to a multiple of 16 bytes) 0x0091FB00 - 0x100(248+8 B) =  0x0091FA00*/top = rounddown(top-sizeof(struct global_data), 16); //sizeof(struct global_data) = GD_SIZE 248 B  gd 内存区域 16字节对齐 return top;/*0x0091FA00*/
}
执行完board_init_f_alloc_reserve函数后内存分配如下
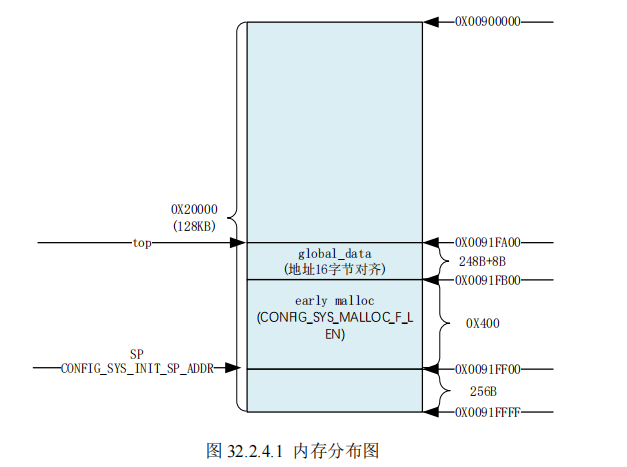
2.设置完gd和malloc内存大小后,调用board_init_f_init_reserve函数
初始化gd,设置gd->malloc_base 为 gd 基地址+gd 大小=0X0091FA00+248=0X0091FAF8 ,再做 16 字节对齐,最终 gd->malloc_base=0X0091FB00,这就是早期的malloc地址。
void board_init_f_init_reserve(ulong base)
{struct global_data *gd_ptr;
#ifndef _USE_MEMCPYint *ptr;
#endif/** clear GD entirely and set it up.* Use gd_ptr, as gd may not be properly set yet.*/gd_ptr = (struct global_data *)base;/* zero the area */
#ifdef _USE_MEMCPY memset(gd_ptr, '\0', sizeof(*gd));
#else/*初始化清除全局数据区*/for (ptr = (int *)gd_ptr; ptr < (int *)(gd_ptr + 1); )*ptr++ = 0;
#endif/* set GD unless architecture did it already */
#if !defined(CONFIG_ARM)arch_setup_gd(gd_ptr);
#endif/* next alloc will be higher by one GD plus 16-byte alignment */base += roundup(sizeof(struct global_data), 16);//内存对齐/** record early malloc arena start.* Use gd as it is now properly set for all architectures.*/#if defined(CONFIG_SYS_MALLOC_F)/* go down one 'early malloc arena' */gd->malloc_base = base;/* next alloc will be higher by one 'early malloc arena' size */base += CONFIG_SYS_MALLOC_F_LEN;
#endif
}
3.初始化 DDR,定时器,完成代码拷贝
board_init_f函数完成(common\board_f.c),如下:
void board_init_f(ulong boot_flags)
{/*初始化全局区数据,这里没用到*/
#ifdef CONFIG_SYS_GENERIC_GLOBAL_DATA/** For some archtectures, global data is initialized and used before* calling this function. The data should be preserved. For others,* CONFIG_SYS_GENERIC_GLOBAL_DATA should be defined and use the stack* here to host global data until relocation.*/gd_t data;gd = &data;/** Clear global data before it is accessed at debug print* in initcall_run_list. Otherwise the debug print probably* get the wrong vaule of gd->have_console.*/zero_global_data();
#endif/*从此处开始,先设置标志位*/gd->flags = boot_flags;gd->have_console = 0;//有一个串口控制终端/*利用initcall_run_list函数初始化init_sequence_f列表中的函数*/if (initcall_run_list(init_sequence_f))hang();//无限空循环#if !defined(CONFIG_ARM) && !defined(CONFIG_SANDBOX) && \!defined(CONFIG_EFI_APP)/* NOTREACHED - jump_to_copy() does not return */hang();
#endif
}#if defined(CONFIG_X86) || defined(CONFIG_ARC)
/** For now this code is only used on x86.** init_sequence_f_r is the list of init functions which are run when* U-Boot is executing from Flash with a semi-limited 'C' environment.* The following limitations must be considered when implementing an* '_f_r' function:*  - 'static' variables are read-only*  - Global Data (gd->xxx) is read/write** The '_f_r' sequence must, as a minimum, copy U-Boot to RAM (if* supported).  It _should_, if possible, copy global data to RAM and* initialise the CPU caches (to speed up the relocation process)** NOTE: At present only x86 uses this route, but it is intended that* all archs will move to this when generic relocation is implemented.*/
static init_fnc_t init_sequence_f_r[] = {init_cache_f_r,NULL,
};
initcall_run_list函数用于初始化下面函数列表中的各个函数模块
int initcall_run_list(const init_fnc_t init_sequence[])
{/*定义一个const init_fnc_t型常量指针*/const init_fnc_t *init_fnc_ptr;/*遍历函数列表*/for (init_fnc_ptr = init_sequence; *init_fnc_ptr; ++init_fnc_ptr) {unsigned long reloc_ofs = 0;int ret;if (gd->flags & GD_FLG_RELOC)reloc_ofs = gd->reloc_off;
#ifdef CONFIG_EFI_APPreloc_ofs = (unsigned long)image_base;
#endifdebug("initcall: %p", (char *)*init_fnc_ptr - reloc_ofs);if (gd->flags & GD_FLG_RELOC)debug(" (relocated to %p)\n", (char *)*init_fnc_ptr);elsedebug("\n");ret = (*init_fnc_ptr)();if (ret) {printf("initcall sequence %p failed at call %p (err=%d)\n",init_sequence,(char *)*init_fnc_ptr - reloc_ofs, ret);return -1;}}/*如果初始化成功则返回0*/return 0;
}
函数列表以及相关的函数
static init_fnc_t init_sequence_f[] = {
#ifdef CONFIG_SANDBOXsetup_ram_buf,
#endif/*setup_mon_len 函数设置 gd 的 mon_len 成员变量,此处为__bss_end -_start,也就
是整个代码的长度。0X878A8E74-0x87800000=0XA8E74,这个就是代码长度*/setup_mon_len,
#ifdef CONFIG_OF_CONTROLfdtdec_setup,
#endif
#ifdef CONFIG_TRACEtrace_early_init,
#endif/*initf_malloc 函数初始化 gd 中跟 malloc 有关的成员变量,比如 malloc_limit,此函
数会设置 gd->malloc_limit = CONFIG_SYS_MALLOC_F_LEN=0X400。malloc_limit 表示 malloc
内存池大小。*/initf_malloc,initf_console_record,
#if defined(CONFIG_MPC85xx) || defined(CONFIG_MPC86xx)/* TODO: can this go into arch_cpu_init()? */probecpu,
#endif
#if defined(CONFIG_X86) && defined(CONFIG_HAVE_FSP)x86_fsp_init,
#endifarch_cpu_init, /* basic arch cpu dependent setup */、/*驱动模型初始化*/initf_dm,arch_cpu_init_dm,mark_bootstage, /* need timer, go after init dm */
#if defined(CONFIG_BOARD_EARLY_INIT_F)board_early_init_f,
#endif/* TODO: can any of this go into arch_cpu_init()? */
#if defined(CONFIG_PPC) && !defined(CONFIG_8xx_CPUCLK_DEFAULT)get_clocks, /* get CPU and bus clocks (etc.) */
#if defined(CONFIG_TQM8xxL) && !defined(CONFIG_TQM866M) \&& !defined(CONFIG_TQM885D)adjust_sdram_tbs_8xx,
#endif/* TODO: can we rename this to timer_init()? */init_timebase,
#endif
#if defined(CONFIG_ARM) || defined(CONFIG_MIPS) || \defined(CONFIG_BLACKFIN) || defined(CONFIG_NDS32) || \defined(CONFIG_SPARC)/*初始化内核定时器 ,通过这个定时器来为 uboot 提供时间*/timer_init, /* initialize timer */
#endif
#ifdef CONFIG_SYS_ALLOC_DPRAM
#if !defined(CONFIG_CPM2)dpram_init,
#endif
#endif
#if defined(CONFIG_BOARD_POSTCLK_INIT)/*设置VDDSOC电压*/board_postclk_init,
#endif
#if defined(CONFIG_SYS_FSL_CLK) || defined(CONFIG_M68K)/*I.MX6ULL 获取的是 sdhc_clk 时钟,SD卡的外设时钟*/get_clocks,
#endif/*设置 gd 的成员变量 env_addr,也就是环境变量的保存地址。*/env_init, /* initialize environment */
#if defined(CONFIG_8xx_CPUCLK_DEFAULT)/* get CPU and bus clocks according to the environment variable */get_clocks_866,/* adjust sdram refresh rate according to the new clock */sdram_adjust_866,init_timebase,
#endifinit_baud_rate, /* initialze baudrate settings 初始化波特率*/serial_init, /* serial communications setup */console_init_f, /* stage 1 init of console */
#ifdef CONFIG_SANDBOXsandbox_early_getopt_check,
#endif
#ifdef CONFIG_OF_CONTROLfdtdec_prepare_fdt,
#endifdisplay_options, /* say that we are here */display_text_info, /* show debugging info if required */
#if defined(CONFIG_MPC8260)prt_8260_rsr,prt_8260_clks,
#endif /* CONFIG_MPC8260 */
#if defined(CONFIG_MPC83xx)prt_83xx_rsr,
#endif
#if defined(CONFIG_PPC) || defined(CONFIG_M68K)checkcpu,
#endifprint_cpuinfo, /* display cpu info (and speed) */
#if defined(CONFIG_MPC5xxx)prt_mpc5xxx_clks,
#endif /* CONFIG_MPC5xxx */
#if defined(CONFIG_DISPLAY_BOARDINFO)show_board_info,//打印板子信息
#endifINIT_FUNC_WATCHDOG_INIT //初始化看门狗
#if defined(CONFIG_MISC_INIT_F)misc_init_f,
#endifINIT_FUNC_WATCHDOG_RESET //复位看门狗
#if defined(CONFIG_HARD_I2C) || defined(CONFIG_SYS_I2C)init_func_i2c, //初始化 I2C
#endif
#if defined(CONFIG_HARD_SPI)init_func_spi, //初始化spi
#endifannounce_dram_init,/* TODO: unify all these dram functions? */
#if defined(CONFIG_ARM) || defined(CONFIG_X86) || defined(CONFIG_NDS32) || \defined(CONFIG_MICROBLAZE) || defined(CONFIG_AVR32)dram_init, /* configure available RAM banks 并非真正的初始化 DDR,只是设置 gd->ram_size 的值,对于正点原子 I.MX6ULL 开发板 EMMC 版本核心板来说就是 512MB。*/
#endif
#if defined(CONFIG_MIPS) || defined(CONFIG_PPC) || defined(CONFIG_M68K)init_func_ram,
#endif
#ifdef CONFIG_POSTpost_init_f,
#endifINIT_FUNC_WATCHDOG_RESET
#if defined(CONFIG_SYS_DRAM_TEST)testdram,
#endif /* CONFIG_SYS_DRAM_TEST */INIT_FUNC_WATCHDOG_RESET#ifdef CONFIG_POSTinit_post,
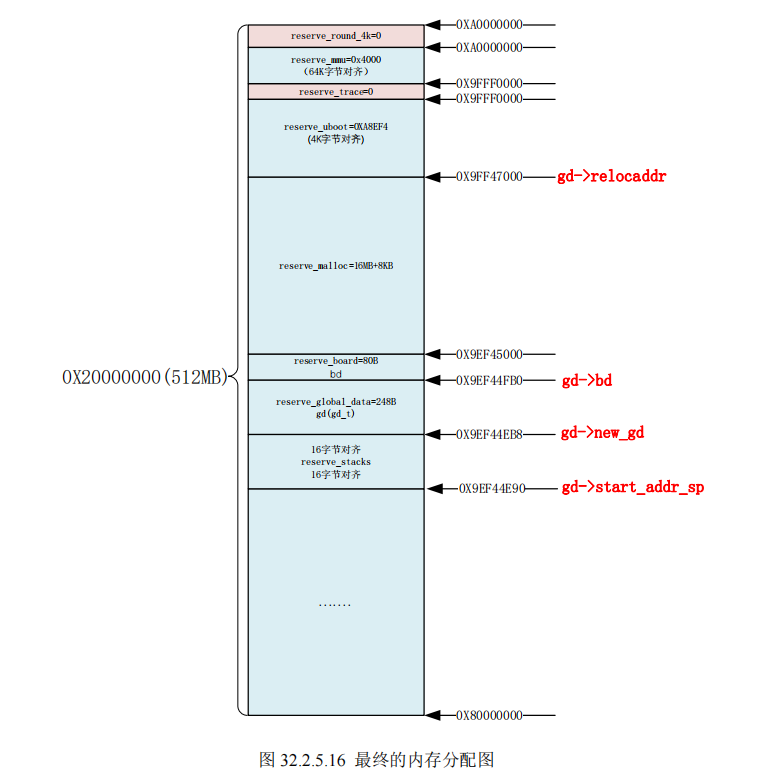
#endifINIT_FUNC_WATCHDOG_RESET/** Now that we have DRAM mapped and working, we can* relocate the code and continue running from DRAM.** Reserve memory at end of RAM for (top down in that order):* - area that won't get touched by U-Boot and Linux (optional)* - kernel log buffer* - protected RAM* - LCD framebuffer* - monitor code* - board info struct*//*,设置目的地址,设置gd->ram_size,gd->ram_top,gd->relocaddr这三个的值。*/setup_dest_addr,
#if defined(CONFIG_BLACKFIN)/* Blackfin u-boot monitor should be on top of the ram */reserve_uboot,
#endif
#if defined(CONFIG_SPARC)reserve_prom,
#endif
#if defined(CONFIG_LOGBUFFER) && !defined(CONFIG_ALT_LB_ADDR)reserve_logbuffer,
#endif
#ifdef CONFIG_PRAMreserve_pram,
#endifreserve_round_4k,//对gd->relocaddr 做 4KB 对 齐
#if !(defined(CONFIG_SYS_ICACHE_OFF) && defined(CONFIG_SYS_DCACHE_OFF)) && \defined(CONFIG_ARM)reserve_mmu,//留出 MMU 的 TLB 表的位置,分配 MMU 的 TLB 表内存以后会对 gd->relocaddr 做 64K 字节对齐
#endif
#ifdef CONFIG_DM_VIDEOreserve_video,
#else
# ifdef CONFIG_LCDreserve_lcd,
# endif/* TODO: Why the dependency on CONFIG_8xx? */
# if defined(CONFIG_VIDEO) && (!defined(CONFIG_PPC) || defined(CONFIG_8xx)) && \!defined(CONFIG_ARM) && !defined(CONFIG_X86) && \!defined(CONFIG_BLACKFIN) && !defined(CONFIG_M68K)reserve_legacy_video,
# endif
#endif /* CONFIG_DM_VIDEO */reserve_trace,
#if !defined(CONFIG_BLACKFIN)reserve_uboot,留出重定位后的 uboot 所占用的内存区域,uboot 所占用大小由gd->mon_len 所指定,留出 uboot 的空间以后还要对 gd->relocaddr 做 4K 字节对齐,并且重新设置 gd->start_addr_sp
#endif
#ifndef CONFIG_SPL_BUILDreserve_malloc,//留出 malloc 区域,调整 gd->start_addr_sp 位置,malloc 区域由宏TOTAL_MALLOC_LEN 定义reserve_board,//留出板子 bd 所占的内存区,bd 是结构体 bd_t,bd_t 大小为80 字节
#endifsetup_machine,//设置机器 ID,linux 启动的时候会和这个机器 ID 匹配,如果匹配的话 linux 就会启动正常。但是!!I.MX6ULL 不用这种方式了,这是以前老版本的 uboot 和linux 使用的,新版本使用设备树了,因此此函数无效reserve_global_data,//保留出 gd_t 的内存区域,gd_t 结构体大小为 248Breserve_fdt,//留出设备树相关的内存区域,I.MX6ULL 的 uboot 没有用到,因此此函数无效。reserve_arch,reserve_stacks,//留出栈空间,先对 gd->start_addr_sp 减去 16,然后做 16 字节对齐,如果使能 IRQ 的话还要留出 IRQ 相应的内存,具体工作是由 arch/arm/lib/stack.c 文件中的函数 arch_reserve_stacks 完成setup_dram_config,//设置 dram 信息,就是设置 gd->bd->bi_dram[0].start 和gd->bd->bi_dram[0].size,后面会传递给 linux 内核,告诉 linux DRAM 的起始地址和大小show_dram_config,
#if defined(CONFIG_PPC) || defined(CONFIG_M68K) || defined(CONFIG_MIPS)setup_board_part1,
#endif
#if defined(CONFIG_PPC) || defined(CONFIG_M68K)INIT_FUNC_WATCHDOG_RESETsetup_board_part2,
#endifdisplay_new_sp,
#ifdef CONFIG_SYS_EXTBDINFOsetup_board_extra,
#endifINIT_FUNC_WATCHDOG_RESETreloc_fdt,setup_reloc, //设置 gd 的其他一些成员变量,供后面重定位的时候使用,并且将以前的 gd 拷贝到 gd->new_gd 处
#if defined(CONFIG_X86) || defined(CONFIG_ARC)copy_uboot_to_ram, //拷贝uboot代码到新的内存clear_bss,do_elf_reloc_fixups,
#endif
#if !defined(CONFIG_ARM) && !defined(CONFIG_SANDBOX)jump_to_copy,
#endifNULL,
};最终内存分配:
4.uboot重定位 relocate_code函数实现
重定位就是 uboot 将自身拷贝到 DRAM 的另一个地放去继续运行(DRAM 的高地址处)。我们知道,一个可执行的 bin 文件,其链接地址和运行地址要相等,也就是链接到哪个地址,在运行之前就要拷贝到哪个地址去。
补充:链接地址与运行地址
1.基本概念
链接地址: 32位的处理器,它的每一条指令是4个字节顺序存储,CPU是顺序执行的,只要没发生什么跳转,它会顺序进行执行这些指令, 编译器对代码中的变量名、函数名等东西进行一个地址的编排,赋予这些抽象的东西一个地址,然后在程序中访问这些变量名、函数名就是在访问一些地址,这些地址我们称之为编译地址。
运行地址:是指程序指令真正运行的地址,是由用户指定的,用户将运行地址烧录到哪里,也就是PC当前执行指令所在的实际地址,就是运行的地址。
例如 一个u-boot反汇编有如下代码:
33f00000 <__image_copy_start>:
33f00000:	ea000013 	b	33f00054 <start_code>
假如__image_copy_start在链接文件中被指定为映像文件起始地址,33f00000就是链接地址,如果把这个u-boot.bin下载到CPU的0地址上,那么CPU启动执行的第一条指令(这里就是机器码ea000013)就是在0地址上(运行地址)的指令,这条指令的链接地址就是33f00000。
2.链接地址和运行地址如何计算
假设uboot上两条指令的链接地址为a=0x33000007和b=0x33000001,映像文件链接起始地址为0x33000000,现在要计算出他们对应的运行地址,假设运行地址的首地址是0x0,则a的运行地址为0x7,b为0x1。
3.总结
如果代码不是位置无关码,代码必须放在链接地址开始的地方才可以正常运行,否则的话当代码去访问、执行某个变量名、函数名对应地址上的代码时就会找不到,接着程序无疑就是跑飞。位置无关码相关内容在位置无关码介绍.
relocate_code 函数是用于代码拷贝的,此函数定义在文件 arch/arm/lib/relocate.S 中:
/** void relocate_code(addr_moni)** This function relocates the monitor code.** NOTE:* To prevent the code below from containing references with an R_ARM_ABS32* relocation record type, we never refer to linker-defined symbols directly.* Instead, we declare literals which contain their relative location with* respect to relocate_code, and at run time, add relocate_code back to them.*/ENTRY(relocate_code)/*源地址(uboot代码起始位置)写入r1 */ldr	r1, =__image_copy_start	/* r1 <- SRC &__image_copy_start *//*r0保存了目标地址,r4=r0-r1 r4保存偏移量*/subs	r4, r0, r1		/* r4 <- relocation offset *//*beq:跳转指令,1时跳转,当r4=0时,表示目标地址与源地址相同,则直接跳到relocate_done位置执行 */beq	relocate_done		/* skip relocation *//*uboot代码结束位置写入r2 */ldr	r2, =__image_copy_end	/* r2 <- SRC &__image_copy_end *//*拷贝代码循环,cmp:比较指令,当r1=r2时 uboot代码拷贝完成*/
copy_loop:/*从r1处开始读取代码保存到r10、r11中 */ldmia	r1!, {r10-r11}		/* copy from source address [r1]    *//*从r10、r11处读取代码保存到中r0中 */stmia	r0!, {r10-r11}		/* copy to   target address [r0]    */cmp	r1, r2			/* until source end address [r2]    */blo	copy_loop  //blo:跳转指令,0时跳转,当代码为拷贝完全时则循环执行copy_loop/**  重定位.rel.dyn 段*  重定位就是 uboot 将自身拷贝到 DRAM 的另一个地放去继续运行(DRAM 的高地址处) *  	   此处有个位置无关码的概念,由于bin文件执行的链接地址和运行地址必须一致,而uboot重定位操作改变了代码的位置,*  为了保证代码正常运行,在进行代码拷贝时记录了代码位置的偏移量(无关码),所以后续代码在运行时首先需要根据偏移量*  计算代码的实际运行地址。*      uboot 对于重定位后链接地址和运行地址不一致的解决方法就是采用位置无关码,*  在使用 ld 进行链接的时候使用选项“-pie”生成位置无关的可执行文件*//** fix .rel.dyn relocations*/ldr	r2, =__rel_dyn_start	/* r2 <- SRC &__rel_dyn_start */ldr	r3, =__rel_dyn_end	/* r3 <- SRC &__rel_dyn_end */
fixloop:/*从r2处开始,每次读取两个4字节数数据存放到r0、r1寄存器(r0存储Label地址、r1存储Label标志) */ldmia	r2!, {r0-r1}		/* (r0,r1) <- (SRC location,fixup) */and	r1, r1, #0xff  /*取r1的低八位 *//*判断r1是否等于23(0x17) 如果相等说明r1是Label*/cmp	r1, #23			/* relative fixup? */bne	fixnext /*bne:跳转指令,不相等时跳转*//*若相等则执行下面的操作,r1是Label *//* relative fix: increase location by offset */add	r0, r0, r4 /*r0=r0+r4 r0:Label地址、r4是重定位偏移量,计算了重定位后的Label地址*/ldr	r1, [r0] /*读取重定位后r0处(Label地址)的值写到r1中,注意,此时Label保存的变量值还是重定位之前的 */add	r1, r1, r4 /*r1 = r1+r4 r1存的是label标志,此处得到重定位后的变量地址  */str	r1, [r0]  /* 将重定位后的变量地址(r1的值)写入到重定位的Label地址处 */
fixnext:cmp	r2, r3 /*判断r2、r3是否相等以判断重定位是否成功 */blo	fixloop /*不成功则继续执行重定位操作 */relocate_done:#ifdef __XSCALE__/** On xscale, icache must be invalidated and write buffers drained,* even with cache disabled - 4.2.7 of xscale core developer's manual*//*关于协处理器CP15的补充*//*关闭icache*/mcr	p15, 0, r0, c7, c7, 0	/* invalidate icache *//*释放写缓冲区*/mcr	p15, 0, r0, c7, c10, 4	/* drain write buffer */
#endif/* ARMv4- don't know bx lr but the assembler fails to see that */#ifdef __ARM_ARCH_4__mov	pc, lr
#elsebx	lr
#endifENDPROC(relocate_code)
补充:协处理器CP15介绍—MCR/MRC指令
http://t.csdn.cn/IJjHk
补充:汇编指令-跳转指令B BEQ BNE BCC
http://t.csdn.cn/oocoH
5.重定位向量表
relocate_vectors 函数详解
/** Default/weak exception vectors relocation routine** This routine covers the standard ARM cases: normal (0x00000000),* high (0xffff0000) and VBAR. SoCs which do not comply with any of* the standard cases must provide their own, strong, version.*//*@.section :定义一个新的代码段  @.text.relocate_vectors 段名 @"ax" :属性,表示该段是可执行的(executable)并且可以重新定位(relocatable)的@%progbits:这是指定段的内容类型。%progbits表示段包含实际的程序代码或数据,而不是只包含符号表或调试信息等*/.section	.text.relocate_vectors,"ax",%progbits/*@.weak 声明了一个名为relocate_vectors的弱符号,意味着在链接过程中,如果存在其他具有相同名称的符号,则可以覆盖或重定义这个符号 */ .weak		relocate_vectorsENTRY(relocate_vectors)/*cotex-M内核,不执行 */
#ifdef CONFIG_CPU_V7M /** On ARMv7-M we only have to write the new vector address* to VTOR register.*/ldr	r0, [r9, #GD_RELOCADDR]	/* r0 = gd->relocaddr */ldr	r1, =V7M_SCB_BASEstr	r0, [r1, V7M_SCB_VTOR]
#else
/*向量表偏移 */
#ifdef CONFIG_HAS_VBAR/** If the ARM processor has the security extensions,* use VBAR to relocate the exception vectors.*//*r0 = gd->relocaddr 重定位后 uboot 的首地址,向量表是从这个地址开始存放的 */ldr	r0, [r9, #GD_RELOCADDR]	/* r0 = gd->relocaddr *//*将 r0 的值写入到 CP15 的 VBAR 寄存器中,即将新的向量表首地址写入到寄存器 VBAR 中,设置向量表偏移 */mcr     p15, 0, r0, c12, c0, 0  /* Set VBAR */
#else/** Copy the relocated exception vectors to the* correct address* CP15 c1 V bit gives us the location of the vectors:* 0x00000000 or 0xFFFF0000.*/ldr	r0, [r9, #GD_RELOCADDR]	/* r0 = gd->relocaddr */mrc	p15, 0, r2, c1, c0, 0	/* V bit (bit[13]) in CP15 c1 */ands	r2, r2, #(1 << 13)ldreq	r1, =0x00000000		/* If V=0 */ldrne	r1, =0xFFFF0000		/* If V=1 */ldmia	r0!, {r2-r8,r10}stmia	r1!, {r2-r8,r10}ldmia	r0!, {r2-r8,r10}stmia	r1!, {r2-r8,r10}
#endif
#endifbx	lrENDPROC(relocate_vectors)
c_runtime_cpu_setup函数
ENTRY(c_runtime_cpu_setup)
/** If I-cache is enabled invalidate it*/
#ifndef CONFIG_SYS_ICACHE_OFFmcr	p15, 0, r0, c7, c5, 0	@ invalidate icachemcr     p15, 0, r0, c7, c10, 4	@ DSBmcr     p15, 0, r0, c7, c5, 4	@ ISB
#endifbx	lrENDPROC(c_runtime_cpu_setup)
继续初始化外设,此处初始化完成后就再也不会回来了,之后会执行run_main_loop()循环
void board_init_r(gd_t *new_gd, ulong dest_addr)
{
#ifdef CONFIG_NEEDS_MANUAL_RELOCint i;
#endif#ifdef CONFIG_AVR32mmu_init_r(dest_addr);
#endif#if !defined(CONFIG_X86) && !defined(CONFIG_ARM) && !defined(CONFIG_ARM64)gd = new_gd;
#endif#ifdef CONFIG_NEEDS_MANUAL_RELOCfor (i = 0; i < ARRAY_SIZE(init_sequence_r); i++)init_sequence_r[i] += gd->reloc_off;
#endifif (initcall_run_list(init_sequence_r))hang();/* NOTREACHED - run_main_loop() does not return */hang();
}
初始化相关的函数列表
/** Over time we hope to remove these functions with code fragments and* stub funtcions, and instead call the relevant function directly.** We also hope to remove most of the driver-related init and do it if/when* the driver is later used.** TODO: perhaps reset the watchdog in the initcall function after each call?*/
init_fnc_t init_sequence_r[] = {initr_trace,initr_reloc,/* TODO: could x86/PPC have this also perhaps? */
#ifdef CONFIG_ARMinitr_caches,/* Note: For Freescale LS2 SoCs, new MMU table is created in DDR.*	 A temporary mapping of IFC high region is since removed,*	 so environmental variables in NOR flash is not availble*	 until board_init() is called below to remap IFC to high*	 region.*/
#endifinitr_reloc_global_data,
#if defined(CONFIG_SYS_INIT_RAM_LOCK) && defined(CONFIG_E500)initr_unlock_ram_in_cache,
#endifinitr_barrier,initr_malloc,initr_console_record,
#ifdef CONFIG_SYS_NONCACHED_MEMORYinitr_noncached,
#endifbootstage_relocate,
#ifdef CONFIG_DMinitr_dm,
#endifinitr_bootstage,
#if defined(CONFIG_ARM) || defined(CONFIG_NDS32)board_init,	/* Setup chipselects */
#endif/** TODO: printing of the clock inforamtion of the board is now* implemented as part of bdinfo command. Currently only support for* davinci SOC's is added. Remove this check once all the board* implement this.*/
#ifdef CONFIG_CLOCKSset_cpu_clk_info, /* Setup clock information */
#endifstdio_init_tables,initr_serial,initr_announce,INIT_FUNC_WATCHDOG_RESET
#ifdef CONFIG_NEEDS_MANUAL_RELOCinitr_manual_reloc_cmdtable,
#endif
#if defined(CONFIG_PPC) || defined(CONFIG_M68K)initr_trap,
#endif
#ifdef CONFIG_ADDR_MAPinitr_addr_map,
#endif
#if defined(CONFIG_BOARD_EARLY_INIT_R)board_early_init_r,
#endifINIT_FUNC_WATCHDOG_RESET
#ifdef CONFIG_LOGBUFFERinitr_logbuffer,
#endif
#ifdef CONFIG_POSTinitr_post_backlog,
#endifINIT_FUNC_WATCHDOG_RESET
#ifdef CONFIG_SYS_DELAYED_ICACHEinitr_icache_enable,
#endif
#if defined(CONFIG_PCI) && defined(CONFIG_SYS_EARLY_PCI_INIT)/** Do early PCI configuration _before_ the flash gets initialised,* because PCU ressources are crucial for flash access on some boards.*/initr_pci,
#endif
#ifdef CONFIG_WINBOND_83C553initr_w83c553f,
#endif
#ifdef CONFIG_ARCH_EARLY_INIT_Rarch_early_init_r,
#endifpower_init_board,
#ifndef CONFIG_SYS_NO_FLASHinitr_flash,
#endifINIT_FUNC_WATCHDOG_RESET
#if defined(CONFIG_PPC) || defined(CONFIG_M68K) || defined(CONFIG_X86) || \defined(CONFIG_SPARC)/* initialize higher level parts of CPU like time base and timers */cpu_init_r,
#endif
#ifdef CONFIG_PPCinitr_spi,
#endif
#ifdef CONFIG_CMD_NANDinitr_nand,
#endif
#ifdef CONFIG_CMD_ONENANDinitr_onenand,
#endif
#ifdef CONFIG_GENERIC_MMCinitr_mmc,
#endif
#ifdef CONFIG_HAS_DATAFLASHinitr_dataflash,
#endifinitr_env,
#ifdef CONFIG_SYS_BOOTPARAMS_LENinitr_malloc_bootparams,
#endifINIT_FUNC_WATCHDOG_RESETinitr_secondary_cpu,
#if defined(CONFIG_ID_EEPROM) || defined(CONFIG_SYS_I2C_MAC_OFFSET)mac_read_from_eeprom,
#endifINIT_FUNC_WATCHDOG_RESET
#if defined(CONFIG_PCI) && !defined(CONFIG_SYS_EARLY_PCI_INIT)/** Do pci configuration*/initr_pci,
#endifstdio_add_devices,initr_jumptable,
#ifdef CONFIG_APIinitr_api,
#endifconsole_init_r,		/* fully init console as a device */
#ifdef CONFIG_DISPLAY_BOARDINFO_LATEshow_board_info,
#endif
#ifdef CONFIG_ARCH_MISC_INITarch_misc_init,		/* miscellaneous arch-dependent init */
#endif
#ifdef CONFIG_MISC_INIT_Rmisc_init_r,		/* miscellaneous platform-dependent init */
#endifINIT_FUNC_WATCHDOG_RESET
#ifdef CONFIG_CMD_KGDBinitr_kgdb,
#endifinterrupt_init,
#if defined(CONFIG_ARM) || defined(CONFIG_AVR32)initr_enable_interrupts,
#endif
#if defined(CONFIG_MICROBLAZE) || defined(CONFIG_AVR32) || defined(CONFIG_M68K)timer_init,		/* initialize timer */
#endif
#if defined(CONFIG_STATUS_LED)initr_status_led,
#endif/* PPC has a udelay(20) here dating from 2002. Why? */
#ifdef CONFIG_CMD_NETinitr_ethaddr,
#endif
#ifdef CONFIG_BOARD_LATE_INITboard_late_init,
#endif
#ifdef CONFIG_FSL_FASTBOOTinitr_fastboot_setup,
#endif
#if defined(CONFIG_CMD_AMBAPP)ambapp_init_reloc,
#if defined(CONFIG_SYS_AMBAPP_PRINT_ON_STARTUP)initr_ambapp_print,
#endif
#endif
#ifdef CONFIG_CMD_SCSIINIT_FUNC_WATCHDOG_RESETinitr_scsi,
#endif
#ifdef CONFIG_CMD_DOCINIT_FUNC_WATCHDOG_RESETinitr_doc,
#endif
#ifdef CONFIG_BITBANGMIIinitr_bbmii,
#endif
#ifdef CONFIG_CMD_NETINIT_FUNC_WATCHDOG_RESETinitr_net,
#endif
#ifdef CONFIG_POSTinitr_post,
#endif
#if defined(CONFIG_CMD_PCMCIA) && !defined(CONFIG_CMD_IDE)initr_pcmcia,
#endif
#if defined(CONFIG_CMD_IDE)initr_ide,
#endif
#ifdef CONFIG_LAST_STAGE_INITINIT_FUNC_WATCHDOG_RESET/** Some parts can be only initialized if all others (like* Interrupts) are up and running (i.e. the PC-style ISA* keyboard).*/last_stage_init,
#endif
#ifdef CONFIG_CMD_BEDBUGINIT_FUNC_WATCHDOG_RESETinitr_bedbug,
#endif
#if defined(CONFIG_PRAM) || defined(CONFIG_LOGBUFFER)initr_mem,
#endif
#ifdef CONFIG_PS2KBDinitr_kbd,
#endif
#if defined(CONFIG_SPARC)prom_init,
#endif
#ifdef CONFIG_FSL_FASTBOOTinitr_check_fastboot,
#endif/*最后进入主循环,No return*/run_main_loop,
};
主循环
uboot 启动以后会进入 3 秒倒计时,如果在 3 秒倒计时结束之前按下按下回车键,那么就会进入 uboot 的命令模式,如果倒计时结束以后都没有按下回车键,那么就会自动启动 Linux 内核 , 这 个 功 能 就 是 由 run_main_loop 函 数 来 完 成 的 。
static int run_main_loop(void)
{
#ifdef CONFIG_SANDBOXsandbox_main_loop_init();
#endif/* main_loop() can return to retry autoboot, if so just run it again */for (;;)main_loop();return 0;
}
/* We come here after U-Boot is initialised and ready to process commands */
void main_loop(void)
{const char *s;/*打印进度*/bootstage_mark_name(BOOTSTAGE_ID_MAIN_LOOP, "main_loop");#ifndef CONFIG_SYS_GENERIC_BOARDputs("Warning: Your board does not use generic board. Please read\n");puts("doc/README.generic-board and take action. Boards not\n");puts("upgraded by the late 2014 may break or be removed.\n");
#endif#ifdef CONFIG_VERSION_VARIABLE/*打印uboot版本信息 输入version可以查看*/setenv("ver", version_string);  /* set version variable */
#endif /* CONFIG_VERSION_VARIABLE *//*cli_init 函数,跟命令初始化有关,初始化 hushshell 相关的变量。*/cli_init();/*获取环境变量 perboot 的内容,perboot是一些预启动命令,一般不使用这个环境变量。*/run_preboot_environment_command();#if defined(CONFIG_UPDATE_TFTP)update_tftp(0UL, NULL, NULL);
#endif /* CONFIG_UPDATE_TFTP *//*读取环境变量 bootdelay 和 bootcmd 的内容,然后将 bootdelay 的值赋值给全局变量 stored_bootdelay,返回值为环境变量 bootcmd 的值*/s = bootdelay_process();if (cli_process_fdt(&s))cli_secure_boot_cmd(s);/*检查倒计时有没有结束,有没有被终端输入打断*/autoboot_command(s);/*如果倒计时被打断,就会执行此函数,uboot 的命令行处理函数*/cli_loop();
}
//倒计时3s重启函数 去除了多余无关的条件编译
void autoboot_command(const char *s)
{debug("### main_loop: bootcmd=\"%s\"\n", s ? s : "<UNDEFINED>");/*倒计时在函数abortboot里面,如果在结束之前按下回车就会进入bootz指令操作*/if (stored_bootdelay != -1 && s && !abortboot(stored_bootdelay)) {run_command_list(s, -1, 0); //如果倒计时结束会执行该函数(解析bootcmd),启动Linux内核}
}
//如果倒计时没有结束则执行uboot命令行处理函数
void cli_loop(void)
{
#ifdef CONFIG_SYS_HUSH_PARSERparse_file_outer(); //hush shell 命令解释器,负责接收命令行输入,然后解析并执行相应的命令/* This point is never reached */for (;;);
#elsecli_simple_loop(); //uboot命令处理函数 核心函数cmd_process()
#endif /*CONFIG_SYS_HUSH_PARSER*/
}如果倒计时结束,则执行默认的bootcmd参数,如果条件满足则会启动Linux内核
/*
校验指令并拷贝到内存中
@cmd:终端uboot命令 bootcmd参数(s)
@len: -1
@flag:0
*/
int run_command_list(const char *cmd, int len, int flag)
{int need_buff = 1;char *buff = (char *)cmd;	/* cast away const */int rcode = 0;/**/if (len == -1) {len = strlen(cmd);/* the built-in parser will change our string if it sees \n */need_buff = strchr(cmd, '\n') != NULL;}if (need_buff) {buff = malloc(len + 1);if (!buff)return 1;memcpy(buff, cmd, len);buff[len] = '\0';}/** This function will overwrite any \n it sees with a \0, which* is why it can't work with a const char *. Here we are making* using of internal knowledge of this function, to avoid always* doing a malloc() which is actually required only in a case that* is pretty rare.*/rcode = cli_simple_run_command_list(buff, flag);/*释放内存*/if (need_buff)free(buff);return rcode;
}int cli_simple_run_command_list(char *cmd, int flag)
{char *line, *next;int rcode = 0;/** Break into individual lines, and execute each line; terminate on* error.*/next = cmd;line = cmd;while (*next) {if (*next == '\n') {*next = '\0';/* run only non-empty commands */if (*line) {debug("** exec: \"%s\"\n", line);if (cli_simple_run_command(line, 0) < 0) {rcode = 1;break;}}line = next + 1;}++next;}if (rcode == 0 && *line)rcode = (cli_simple_run_command(line, 0) < 0);return rcode;
}
bootdelay_process函数用于接收终端输入的命令并解析成bootcmd的值s
//读取环境变量 bootdelay 和 bootcmd 的内容,然后将 bootdelay 的值赋值给全局变量 stored_bootdelay,返回值为环境变量 bootcmd 的值
const char *bootdelay_process(void)
{char *s;int bootdelay;
#ifdef CONFIG_BOOTCOUNT_LIMITunsigned long bootcount = 0;unsigned long bootlimit = 0;
#endif /* CONFIG_BOOTCOUNT_LIMIT */#ifdef CONFIG_BOOTCOUNT_LIMITbootcount = bootcount_load();bootcount++;bootcount_store(bootcount);setenv_ulong("bootcount", bootcount);bootlimit = getenv_ulong("bootlimit", 10, 0);
#endif /* CONFIG_BOOTCOUNT_LIMIT */s = getenv("bootdelay");bootdelay = s ? (int)simple_strtol(s, NULL, 10) : CONFIG_BOOTDELAY;#if !defined(CONFIG_FSL_FASTBOOT) && defined(is_boot_from_usb)if (is_boot_from_usb()) {disconnect_from_pc();printf("Boot from USB for mfgtools\n");bootdelay = 0;set_default_env("Use default environment for \mfgtools\n");} else {printf("Normal Boot\n");}
#endif#ifdef CONFIG_OF_CONTROLbootdelay = fdtdec_get_config_int(gd->fdt_blob, "bootdelay",bootdelay);
#endifdebug("### main_loop entered: bootdelay=%d\n\n", bootdelay);#if defined(CONFIG_MENU_SHOW)bootdelay = menu_show(bootdelay);
#endifbootretry_init_cmd_timeout();#ifdef CONFIG_POSTif (gd->flags & GD_FLG_POSTFAIL) {s = getenv("failbootcmd");} else
#endif /* CONFIG_POST */
#ifdef CONFIG_BOOTCOUNT_LIMITif (bootlimit && (bootcount > bootlimit)) {printf("Warning: Bootlimit (%u) exceeded. Using altbootcmd.\n",(unsigned)bootlimit);s = getenv("altbootcmd");} else
#endif /* CONFIG_BOOTCOUNT_LIMIT */s = getenv("bootcmd");#if !defined(CONFIG_FSL_FASTBOOT) && defined(is_boot_from_usb)if (is_boot_from_usb()) {s = getenv("bootcmd_mfg");printf("Run bootcmd_mfg: %s\n", s);}
#endifprocess_fdt_options(gd->fdt_blob);stored_bootdelay = bootdelay;return s;
}__weak ulong bootcount_load(void)
{void *reg = (void *)CONFIG_SYS_BOOTCOUNT_ADDR;#if defined(CONFIG_SYS_BOOTCOUNT_SINGLEWORD)u32 tmp = raw_bootcount_load(reg);if ((tmp & 0xffff0000) != (BOOTCOUNT_MAGIC & 0xffff0000))return 0;elsereturn (tmp & 0x0000ffff);
#elseif (raw_bootcount_load(reg + 4) != BOOTCOUNT_MAGIC)return 0;elsereturn raw_bootcount_load(reg);
#endif /* defined(CONFIG_SYS_BOOTCOUNT_SINGLEWORD) */
}__weak ulong bootcount_load(void)
{/*地址*/void *reg = (void *)CONFIG_SYS_BOOTCOUNT_ADDR;//0xe0010000+0x10000000+0x0200+0x0008=0xF0010208???#if defined(CONFIG_SYS_BOOTCOUNT_SINGLEWORD)u32 tmp = raw_bootcount_load(reg);if ((tmp & 0xffff0000) != (BOOTCOUNT_MAGIC & 0xffff0000))return 0;elsereturn (tmp & 0x0000ffff);
#else/*字节序转换*/if (raw_bootcount_load(reg + 4) != BOOTCOUNT_MAGIC)return 0;elsereturn raw_bootcount_load(reg);
#endif /* defined(CONFIG_SYS_BOOTCOUNT_SINGLEWORD) */
}/******************************************************************************************************/
/*注意此处宏定义的意思,底层代码用了很多宏定义函数*/
/*这样做有什么好处?1.简化代码,避免了重复;2.性能优化,宏定义是在编译时进行替换而不是调用,避免了函数调用的开销3.编译器优化,宏定义在编译时展开,可以使编译器对展开后的代码进行更多的优化。编译器可以根据上下文对代码进行优		化,例如消除冗余计算、常量折叠等。这样可以生成更高效的机器代码。4.灵活
*/
/*## 连接运算符 如 a##b --> ab   */
#define in_arch(type, endian, a)	endian##_to_cpu(__raw_read##type(a))
#define be32_to_cpu(x)		uswap_32(x)
/*字节序转换函数 将高低位字节互换*/
#define uswap_32(x) \((((x) & 0xff000000) >> 24) | \(((x) & 0x00ff0000) >>  8) | \(((x) & 0x0000ff00) <<  8) | \(((x) & 0x000000ff) << 24))
//函数调用过程
raw_bootcount_load->in_be32(a)->in_arch(l,be32,a)//宏定义函数
--->be32_to_cpu(_raw_readl(a))//最后展开形式。/******************************************************************************************************/
/*static inline:表示该函数会在编译时被内联展开,且仅在当前文件可见*/  static inline u32 __raw_readl(const volatile void __iomem *addr)
{u32 w;/*__asm__表示内联汇编的开始,__volatile__表示代码具有副作用(不会被优化掉)*/__asm__ __volatile__("ld%U1	%0, %1\n": "=r" (w): "m" (*(volatile u32 __force *)addr): "memory");return w;
}
uboot命令解析函数
enum command_ret_t cmd_process(int flag, int argc, char * const argv[],int *repeatable, ulong *ticks)
{enum command_ret_t rc = CMD_RET_SUCCESS;cmd_tbl_t *cmdtp;/* Look up command in command table */cmdtp = find_cmd(argv[0]);if (cmdtp == NULL) {printf("Unknown command '%s' - try 'help'\n", argv[0]);return 1;}/* found - check max args */if (argc > cmdtp->maxargs)rc = CMD_RET_USAGE;#if defined(CONFIG_CMD_BOOTD)/* avoid "bootd" recursion */else if (cmdtp->cmd == do_bootd) {if (flag & CMD_FLAG_BOOTD) {puts("'bootd' recursion detected\n");rc = CMD_RET_FAILURE;} else {flag |= CMD_FLAG_BOOTD;}}
#endif/* If OK so far, then do the command */if (!rc) {if (ticks)*ticks = get_timer(0);rc = cmd_call(cmdtp, flag, argc, argv);if (ticks)*ticks = get_timer(*ticks);*repeatable &= cmdtp->repeatable;}if (rc == CMD_RET_USAGE)rc = cmd_usage(cmdtp);return rc;
}
补充:LDR指令
LDR R0,[R1]           ;将存储器地址为R1的字数据读入寄存器R0。
LDR R0,[R1,R2]       ;将存储器地址为R1+R2的字数据读入寄存器R0。
LDR R0,[R1,#8]       ;将存储器地址为R1+8的字数据读入寄存器R0。
LDR R0,[R1],R2        ;将存储器地址为R1的字数据读入寄存器R0,并将R1+R2的值存入R1。
LDR R0,[R1],#8        ;将存储器地址为R1的字数据读入寄存器R0,并将R1+8的值存入R1。
LDR R0,[R1,R2]!      ;将存储器地址为R1+R2的字数据读入寄存器R0,并将R1+R2的值存入R1。LDR R0,[R1,LSL #3]   ;将存储器地址为R1*8的字数据读入寄存器R0。LDR R0,[R1,R2,LSL #2]     ;将存储器地址为R1+R2*4的字数据读入寄存器R0。LDR R0,[R1,,R2,LSL #2]!   ;将存储器地址为R1+R2*4的字数据读入寄存器R0,并将R1+R2*4的值存入R1。LDR R0,[R1],R2,LSL #2      ;将存储器地址为R1的字数据读入寄存器R0,并将R1+R2*4的值存入R1。LDR R0,Label                ;Label为程序标号,Label必须是当前指令的-4~4KB范围内。要注意的是LDR Rd,[Rn],#0x04    ;这里Rd不允许是R15。另外LDRB 的指令格式与LDR相似,只不过它是将存储器地址中的8位(1个字节)读到目的寄存器中。LDRH的指令格式也与LDR相似,它是将内存中的16位(半字)读到目的寄存器中。LDR R0,=0xff这里的LDR不是arm指令,而是伪指令。这个时候与MOVE很相似,只不过MOV指令后的立即数是有限制的。这个立即数必须是0X00-OXFF范围内的数经过偶数次右移得到的数,所以MOV用起来比较麻烦,因为有些数不那么容易看出来是否合法。
————————————————
版权声明:本文为CSDN博主「tanyouliang」的原创文章,遵循CC 4.0 BY-SA版权协议,转载请附上原文出处链接及本声明。
原文链接:https://blog.csdn.net/tanyouliang/article/details/6767011


![[毕设记录]@开题调研:CAAI资源](https://img-blog.csdnimg.cn/6b680e1f39884a56877c3c75d982d4ed.png)