ftp 服务:
实现ftp功能的一个服务,安装vsftpd软件搭建一台ftp服务器
ftp协议:
文件传输协议 (file transfer protocol),在不同的机器之间实现文件传输功能,
例如
视频文件下载,源代码文件下载
公司内部:弄一个专门的文件服务器,将公司里的文档资料和视频都存放在服务器里面,所有的同事都可以去下载,起到集中存放文件的地方
一、检测安装vsftpd检查:
rpm -qa | gerp vsftpd
1. 创建仓库
cd /etc/yum.repos.d
vim haha.repo
[BaseOS]
name=BaseOS
baseurl=/mnt/BaseOS
gpgcheck=0
[AppStream]
name=AppStream
baseurl=/mnt/AppStream
gpgcheck=0
2. 挂载
[root@localhost ~]# mount /dev/sr0 /mnt
mount: /mnt: WARNING: device write-protected, mounted read-only.
注意非挂载情况下会出现:
Error: Some packages from local repository have incorrect checksum
3. yum在线安装
yum install vsftpd -y
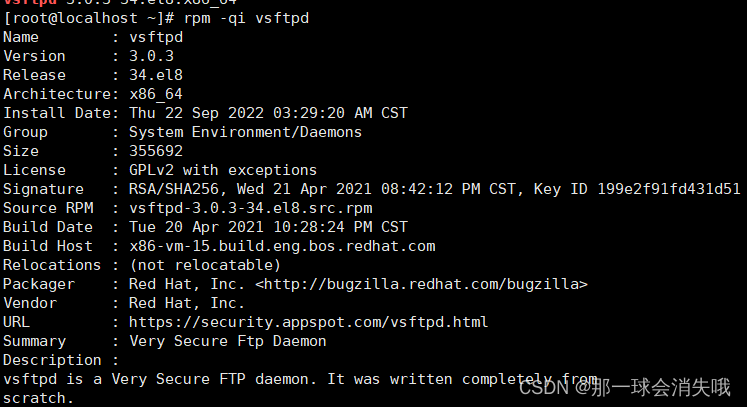
4. 查看vsftpd软件信息
rpm -qi vsftpd
二、启动服务
[root@localhost ~]# service vsftpd start
Redirecting to /bin/systemctl start vsftpd.service[root@localhost ~]# systemctl status vsftpd
三、如何知道一个进程已经启动?
1. 查看进程
ps aux | grep vsftpd
root 68196 0.0 0.0 27068 424 ? Ss 03:35 0:00 /usr/sbin/vsftpd /etc/vsftpd/vsftpd.conf
root 79374 0.0 0.0 221928 1152 pts/2 S+ 03:51 0:00 grep --color=auto vsftpd
2.查看端口号
netstat -anplut | grep vsftpd
#########################
四、登录ftp服务
1. 下载客户端工具ftp和lftp
yum install ftp lftp -y
ftp访问:
默认情况下不允许root用户登录
vsftpd 使用的用户名和密码就是linux系统里面使用分用户和密码,不需要单独新建
[
root@localhost ~]# lftp 192.168.10.130
lftp 192.168.10.130:~> ls
`ls' at 0 [530 Login incorrect.]
lftp 192.168.10.130:~> exit
我们可以新建一个用户来测试ftp服务
新建用户sc
[root@localhost ~]# useradd sc
[root@localhost ~]# echo jlq | passwd sc --stdin登录测试:[root@localhost ~]# lftp -u sc,jlq 192.168.10.130
lftp sc@192.168.10.130:~> pwd
ftp://sc:jlq@192.168.10.130
lftp sc@192.168.10.130:~> mkdir haha
mkdir ok, `haha' created
lftp sc@192.168.10.130:~> ls
drwxr-xr-x    2 1001     1001            6 Sep 21 20:01 haha
#######################
五、ftp服务上传下载文件
1. Put命令 上传文件到ftp服务器
[root@localhost ~]# ll
total 2968
-rw-r--r--. 1 root root     531 Sep 13 20:33 mysql_back_2022-09-13.sql.gz[root@localhost ~]# lftp -u sc,jlq 192.168.10.130
lftp sc@192.168.10.130:~> put mysql_back_2022-09-13.sql.gz
531 bytes transferred
lftp sc@192.168.10.130:~> ls
drwxr-xr-x    2 1001     1001            6 Sep 21 20:01 haha
-rw-r--r--    1 1001     1001          531 Sep 21 20:04 mysql_back_2022-09-13.sql.gz
2. mirror命令 下载文件夹到本地
lftp sc@192.168.10.130:~> mirror haha/
lftp sc@192.168.10.130:~> !ls  (查看本地目录)
7.0.4         Documents    haha              list.txt2                Public      Videos
anaconda-ks.cfg  Downloads    haha.sh              Music                redis-7.0.4
bin.log         dump.rdb    initial-setup-ks.cfg  mysql_back_2022-09-13.sql.gz  redis-server
Desktop         dump.rdb.back    list.txt          Pictures                Templates
六、使用ftp服务器在linux和windows传文件
1. 使用linux向windows传文件
搭建一个ftp服务
##########################
1)关闭防火墙
service firewalld stop
##########################
2)启动vsftpd 服务
service vsftpd restart
将 bin.log复制到 /var/ftp/pub 目录下面
[root@localhost ~]# cp bin.log /var/ftp/pub/
[root@localhost ~]# cd /var/ftp/pub/
[root@localhost pub]# ll
total 4
-rw-r--r--. 1 root root 482 Sep 22 04:14 bin.log
3)登录ftp服务
这里新建一个用户mei
登录lftp客户端
可以看到这是因为我们开启了设置用户只能在自己家目录下面
[root@localhost pub]# useradd mei
[root@localhost pub]# echo jlq | passwd --stdin mei
Changing password for user mei.
passwd: all authentication tokens updated successfully.[root@localhost pub]# lftp -u mei,jlq 192.168.10.130
lftp mei@192.168.10.130:~> ls
lftp mei@192.168.10.130:~> cd /var/ftp/pub
lftp mei@192.168.10.130:/var/ftp/pub> ls
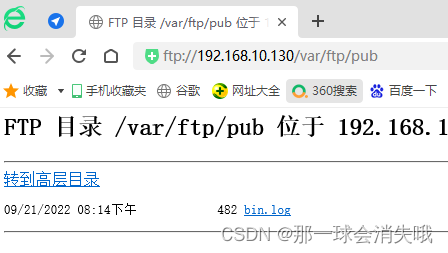
-rw-r--r-- 1 0 0 482 Sep 21 20:14 bin.log然后用在windows里面用浏览器访问ftp服务
注意:一定要关闭防火墙!
点击文件就可以下载了

########################
2. 使用windows向linux传文件
使用资源浏览器访问ftp服务器
ftp://192.168.10.130/
右击登录
cmd上传:
C:\Windows\System32>ftp
ftp> open 192.168.31.31
连接到 192.168.31.31。
220 (vsFTPd 3.0.2)
200 Always in UTF8 mode.
用户(192.168.31.31:(none)): YanXxx
331 Please specify the password.
密码:
230 Login successful.ftp> dir
200 PORT command successful. Consider using PASV.
150 Here comes the directory listing.
drwxr-xr-x    2 0        0               6 Mar 25 06:32 pub
drwxrwxrwx    2 14       50              6 Mar 25 08:24 upload
-rwxr-xr-x    1 0        0              28 Mar 25 06:32 welcome.txt
226 Directory send OK.
ftp: 收到 197 字节,用时 0.02秒 11.59千字节/秒。
ftp> lcd
目前的本地目录 C:\Windows\System32。
ftp> lcd D:\software\SERVU\test
目前的本地目录 D:\software\SERVU\test。#下载文件welcome.txt
ftp> get welcome.txt
200 PORT command successful. Consider using PASV.
150 Opening BINARY mode data connection for welcome.txt (28 bytes).
226 Transfer complete.
ftp: 收到 28 字节,用时 0.00秒 28.00千字节/秒。
ftp> ls
200 PORT command successful. Consider using PASV.
150 Here comes the directory listing.
pub
upload
welcome.txt
226 Directory send OK.
ftp: 收到 29 字节,用时 0.00秒 7.25千字节/秒。#上传文件
ftp> cd upload
250 Directory successfully changed.
ftp> ls
200 PORT command successful. Consider using PASV.
150 Here comes the directory listing.
226 Directory send OK.ftp> put a.txt
200 PORT command successful. Consider using PASV.
150 Ok to send data.
226 Transfer complete.
ftp: 发送 7 字节,用时 0.00秒 7000.00千字节/秒。
ftp> ls
200 PORT command successful. Consider using PASV.
150 Here comes the directory listing.
a.txt
226 Directory send OK.
ftp: 收到 10 字节,用时 0.00秒 10.00千字节/秒。
这样就实现了windows和linux里面互传文件。