在这篇文章中,我们将看看使用 Spring boot的R ole B ased A ccess Control ( RBAC )。
了解 RBAC
在 RBAC 模型中存在三个关键实体。他们是,
- 用户或主题 ——执行操作的系统参与者。它可以代表一个自然人、一个自动帐户,甚至是另一个应用程序。
- 角色 ——由职位、部门或职能层次结构定义的权限级别。
- 特权——执行操作的批准或许可
话虽如此,以下是这些实体如何相互映射的说明。
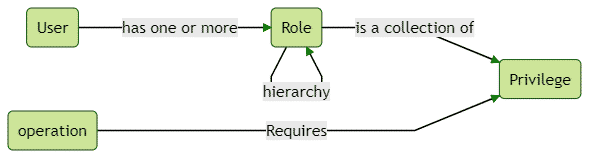
基本上,用户可以执行操作。要执行操作,他们需要具有一定的权限或特权。这就是为什么将权限分配给角色而将角色分配给用户的原因。让我们看看如何实现这些。
RBAC 实体
让我们创建上述对象以表示为数据库实体。
用户实体
@Data
@Entity
public class UserAccount {@Id@GeneratedValue(strategy = GenerationType.IDENTITY)private Integer id;@Column(unique = true)private String username;private String password;private boolean active;@OneToMany(mappedBy = "user")private List<UserToRole> userToRoles;
}
用户角色实体
@Data
@Entity
public class UserRole {@Id@GeneratedValue(strategy = GenerationType.IDENTITY)private Integer id;private String roleName;@OneToMany(mappedBy = "role")private List<UserRoleToPrivilege> userRoleToPrivileges;
}
UserPrivileges 实体
@Data
@Entity
public class UserPrivilege {@Id@GeneratedValue(strategy = GenerationType.IDENTITY)private Integer id;private String privilegeName;
}
UserRoleToPrivilege 实体
@Data
@Entity
public class UserRoleToPrivilege {@Id@GeneratedValue(strategy = GenerationType.IDENTITY)private Integer id;@ManyToOneprivate UserRole role;@ManyToOneprivate UserPrivilege privilege;
}
UserToRole 实体
@Data
@Entity
public class UserToRole {@Id@GeneratedValue(strategy = GenerationType.IDENTITY)private Integer id;@ManyToOneprivate UserAccount user;@ManyToOneprivate UserRole role;
}
填充数据库条目
有了上述实体,让我们用适当的角色和权限填充数据库。对于这个测试,我使用 data.sql 文件直接输入了条目。
insert into user_account(id, username, password, active) values (1, 'user1', '{noop}user1', 1);
insert into user_account(id, username, password, active) values (2, 'user2', '{noop}user2', 1);
insert into user_account(id, username, password, active) values (3, 'admin', '{noop}admin', 1);
insert into user_role(id, role_name) values (1, 'USER');
insert into user_role(id, role_name) values (2, 'ADMIN');
insert into user_to_role(id, user_id, role_id) values (1, 1, 1);
insert into user_to_role(id, user_id, role_id) values (2, 2, 1);
insert into user_to_role(id, user_id, role_id) values (3, 3, 2);
insert into user_privilege(id, privilege_name) values (1, 'canReadUser');
insert into user_privilege(id, privilege_name) values (2, 'canReadAdmin');
insert into user_role_to_privilege(id, role_id, privilege_id) values (1, 1, 1);
insert into user_role_to_privilege(id, role_id, privilege_id) values (2, 2, 1);
insert into user_role_to_privilege(id, role_id, privilege_id) values (3, 2, 2);
请注意,我使用的是
NoOpPasswordEncoder,因为密码前面带有{noop}.
Spring Security userDetailsService
在我们之前的帖子中,我们总是使用一个角色来调用 USER 系统中的所有用户。但是,我们需要进行更改以从数据库中选择这些角色和权限。这是一个如何做到这一点的粗略示例。
@Component
public class DatabaseUserDetailsService implements UserDetailsService {private finalUserAccountRepository userAccountRepository;public DatabaseUserDetailsService(UserAccountRepository userAccountRepository) {this.userAccountRepository = userAccountRepository;}@Overridepublic UserDetails loadUserByUsername(String username) throws UsernameNotFoundException {UserAccount userAccount = userAccountRepository.findByUsername(username);if (userAccount == null) {throw new UsernameNotFoundException("User with username [" + username + "] not found in the system");}Set<GrantedAuthority> authorities = new HashSet<>();for (UserToRole userToRole : userAccount.getUserToRoles()) {authorities.add(new SimpleGrantedAuthority("ROLE_" + userToRole.getRole().getRoleName()));for (UserRoleToPrivilege userRoleToPrivilege : userToRole.getRole().getUserRoleToPrivileges()) {authorities.add(new SimpleGrantedAuthority(userRoleToPrivilege.getPrivilege().getPrivilegeName()));}}return new CustomUserDetails(userAccount.getUsername(), userAccount.getPassword(), userAccount.isActive(), authorities);}
}
这里要注意的一件有趣的事情是,我们添加了角色和权限作为权限。但是,所有角色都以
ROLE_. 这种特定的方式是由于安全表达式的喜欢hasRole和hasAuthority工作方式。这样,开发人员可以使用表达式为 url 映射设置角色级别和权限级别设置,您将在下面看到。
保护 API 端点
使用 WebSecurityConfigurerAdapter,您可以自定义谁可以访问哪个 URL。看看这个配置片段。
@Configuration
public class SecurityConfig extends WebSecurityConfigurerAdapter {protected void configure(HttpSecurity http) throws Exception {http.authorizeRequests().antMatchers("/user").access("hasAuthority('canReadUser')").antMatchers("/admin").access("hasAuthority('canReadAdmin')").anyRequest().authenticated().and().httpBasic().and().formLogin();}
}
在这里, admin 用户可以同时访问 /user 和 /admin 因为 ADMIN 角色同时拥有 canReadUser 和 canReadAdmin 权限。但是, user1 或者 user2 无法访问 /admin ,因为他们会得到 403 Forbidden 响应。
有了以上所有内容,让我们测试结果。
$ curl -i -u "user1:user1" http://localhost:8080/user
HTTP/1.1 200
Set-Cookie: JSESSIONID=9BEC44655277BBDF6832817AFF4CAAA1; Path=/; HttpOnly
X-Content-Type-Options: nosniff
X-XSS-Protection: 1; mode=block
Cache-Control: no-cache, no-store, max-age=0, must-revalidate
Pragma: no-cache
Expires: 0
X-Frame-Options: DENY
Content-Type: text/plain;charset=UTF-8
Content-Length: 11
Date: Tue, 29 Dec 2020 15:16:57 GMTHello user!
$ curl -i -u "user1:user1" http://localhost:8080/admin
HTTP/1.1 403
Set-Cookie: JSESSIONID=0910F6115CB28A9DF914D22052396448; Path=/; HttpOnly
X-Content-Type-Options: nosniff
X-XSS-Protection: 1; mode=block
Cache-Control: no-cache, no-store, max-age=0, must-revalidate
Pragma: no-cache
Expires: 0
X-Frame-Options: DENY
Content-Type: application/json
Transfer-Encoding: chunked
Date: Tue, 29 Dec 2020 15:17:28 GMT{"timestamp" : "2020-12-29T15:17:28.537+00:00","status" : 403,"error" : "Forbidden","message" : "","path" : "/admin"
}如您所见,当 user1 尝试访问 /admin 端点时,他们会收到 403 - Forbidden 消息。
这是供您学习本教程的GitHub 存储库。