Python+Yolov5跌倒检测 摔倒检测 人物目标行为 人体特征识别
如需安装运行环境或远程调试,见文章底部个人QQ名片,由专业技术人员远程协助!
前言
这篇博客针对<<Python+Yolov5跌倒摔倒人体特征识别>>编写代码,代码整洁,规则,易读。 学习与应用推荐首选。
文章目录
一、所需工具软件
二、使用步骤
1. 引入库
2. 识别图像特征
3. 参数设置
4. 运行结果
三、在线协助
一、所需工具软件
1. Pycharm, Python
2. Qt, OpenCV
二、使用步骤
1.引入库
代码如下(示例):
import cv2
import torch
from numpy import randomfrom models.experimental import attempt_load
from utils.datasets import LoadStreams, LoadImages
from utils.general import check_img_size, check_requirements, check_imshow, non_max_suppression, apply_classifier, \scale_coords, xyxy2xywh, strip_optimizer, set_logging, increment_path
from utils.plots import plot_one_box
from utils.torch_utils import select_device, load_classifier, time_synchronized
2.识别图像特征
代码如下(示例):
defdetect(save_img=False):source, weights, view_img, save_txt, imgsz = opt.source, opt.weights, opt.view_img, opt.save_txt, opt.img_sizewebcam = source.isnumeric() or source.endswith('.txt') or source.lower().startswith(('rtsp://', 'rtmp://', 'http://'))# Directoriessave_dir = Path(increment_path(Path(opt.project) / opt.name, exist_ok=opt.exist_ok)) # increment run(save_dir / 'labels'if save_txt else save_dir).mkdir(parents=True, exist_ok=True) # make dir# Initializeset_logging()device = select_device(opt.device)half = device.type != 'cpu'# half precision only supported on CUDA# Load modelmodel = attempt_load(weights, map_location=device) # load FP32 modelstride = int(model.stride.max()) # model strideimgsz = check_img_size(imgsz, s=stride) # check img_sizeif half:model.half() # to FP16# Second-stage classifierclassify = Falseif classify:modelc = load_classifier(name='resnet101', n=2) # initializemodelc.load_state_dict(torch.load('weights/resnet101.pt', map_location=device)['model']).to(device).eval()# Set Dataloadervid_path, vid_writer = None, Noneif webcam:view_img = check_imshow()cudnn.benchmark = True# set True to speed up constant image size inferencedataset = LoadStreams(source, img_size=imgsz, stride=stride)else:save_img = Truedataset = LoadImages(source, img_size=imgsz, stride=stride)# Get names and colorsnames = model.module.names ifhasattr(model, 'module') else model.namescolors = [[random.randint(0, 255) for _ inrange(3)] for _ in names]# Run inferenceif device.type != 'cpu':model(torch.zeros(1, 3, imgsz, imgsz).to(device).type_as(next(model.parameters()))) # run oncet0 = time.time()for path, img, im0s, vid_cap in dataset:img = torch.from_numpy(img).to(device)img = img.half() if half else img.float() # uint8 to fp16/32img /= 255.0# 0 - 255 to 0.0 - 1.0if img.ndimension() == 3:img = img.unsqueeze(0)# Inferencet1 = time_synchronized()pred = model(img, augment=opt.augment)[0]# Apply NMSpred = non_max_suppression(pred, opt.conf_thres, opt.iou_thres, classes=opt.classes, agnostic=opt.agnostic_nms)t2 = time_synchronized()# Apply Classifierif classify:pred = apply_classifier(pred, modelc, img, im0s)# Process detectionsfor i, det inenumerate(pred): # detections per imageif webcam: # batch_size >= 1p, s, im0, frame = path[i], '%g: ' % i, im0s[i].copy(), dataset.countelse:p, s, im0, frame = path, '', im0s, getattr(dataset, 'frame', 0)p = Path(p) # to Pathsave_path = str(save_dir / p.name) # img.jpgtxt_path = str(save_dir / 'labels' / p.stem) + (''if dataset.mode == 'image'elsef'_{frame}') # img.txts += '%gx%g ' % img.shape[2:] # print stringgn = torch.tensor(im0.shape)[[1, 0, 1, 0]] # normalization gain whwhiflen(det):# Rescale boxes from img_size to im0 sizedet[:, :4] = scale_coords(img.shape[2:], det[:, :4], im0.shape).round()# Write resultsfor *xyxy, conf, cls inreversed(det):if save_txt: # Write to filexywh = (xyxy2xywh(torch.tensor(xyxy).view(1, 4)) / gn).view(-1).tolist() # normalized xywhline = (cls, *xywh, conf) if opt.save_conf else (cls, *xywh) # label formatwithopen(txt_path + '.txt', 'a') as f:f.write(('%g ' * len(line)).rstrip() % line + '\n')if save_img or view_img: # Add bbox to imagelabel = f'{names[int(cls)]}{conf:.2f}'plot_one_box(xyxy, im0, label=label, color=colors[int(cls)], line_thickness=3)# Print time (inference + NMS)print(f'{s}Done. ({t2 - t1:.3f}s)')# Save results (image with detections)if save_img:if dataset.mode == 'image':cv2.imwrite(save_path, im0)else: # 'video'if vid_path != save_path: # new videovid_path = save_pathifisinstance(vid_writer, cv2.VideoWriter):vid_writer.release() # release previous video writerfourcc = 'mp4v'# output video codecfps = vid_cap.get(cv2.CAP_PROP_FPS)w = int(vid_cap.get(cv2.CAP_PROP_FRAME_WIDTH))h = int(vid_cap.get(cv2.CAP_PROP_FRAME_HEIGHT))vid_writer = cv2.VideoWriter(save_path, cv2.VideoWriter_fourcc(*fourcc), fps, (w, h))vid_writer.write(im0)if save_txt or save_img:s = f"\n{len(list(save_dir.glob('labels/*.txt')))} labels saved to {save_dir / 'labels'}"if save_txt else''print(f"Results saved to {save_dir}{s}")print(f'Done. ({time.time() - t0:.3f}s)')print(opt)check_requirements()with torch.no_grad():if opt.update: # update all models (to fix SourceChangeWarning)for opt.weights in ['yolov5s.pt', 'yolov5m.pt', 'yolov5l.pt', 'yolov5x.pt']:detect()strip_optimizer(opt.weights)else:detect()
3.参数定义
代码如下(示例):
if __name__ == '__main__':parser = argparse.ArgumentParser()parser.add_argument('--weights', nargs='+', type=str, default='yolov5_best_road_crack_recog.pt', help='model.pt path(s)')parser.add_argument('--img-size', type=int, default=640, help='inference size (pixels)')parser.add_argument('--conf-thres', type=float, default=0.25, help='object confidence threshold')parser.add_argument('--iou-thres', type=float, default=0.45, help='IOU threshold for NMS')parser.add_argument('--view-img', action='store_true', help='display results')parser.add_argument('--save-txt', action='store_true', help='save results to *.txt')parser.add_argument('--classes', nargs='+', type=int, default='0', help='filter by class: --class 0, or --class 0 2 3')parser.add_argument('--agnostic-nms', action='store_true', help='class-agnostic NMS')parser.add_argument('--augment', action='store_true', help='augmented inference')parser.add_argument('--update', action='store_true', help='update all models')parser.add_argument('--project', default='runs/detect', help='save results to project/name')parser.add_argument('--name', default='exp', help='save results to project/name')parser.add_argument('--exist-ok', action='store_true', help='existing project/name ok, do not increment')opt = parser.parse_args()print(opt)check_requirements()with torch.no_grad():if opt.update: # update all models (to fix SourceChangeWarning)for opt.weights in ['yolov5s.pt', 'yolov5m.pt', 'yolov5l.pt', 'yolov5x.pt']:detect()strip_optimizer(opt.weights)else:detect()
运行结果如下
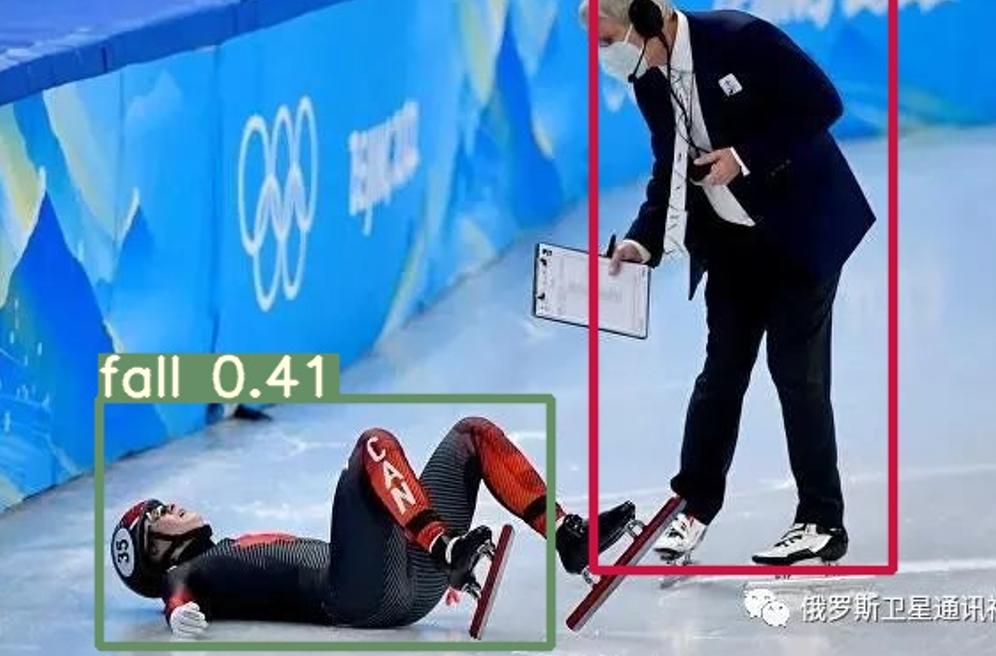
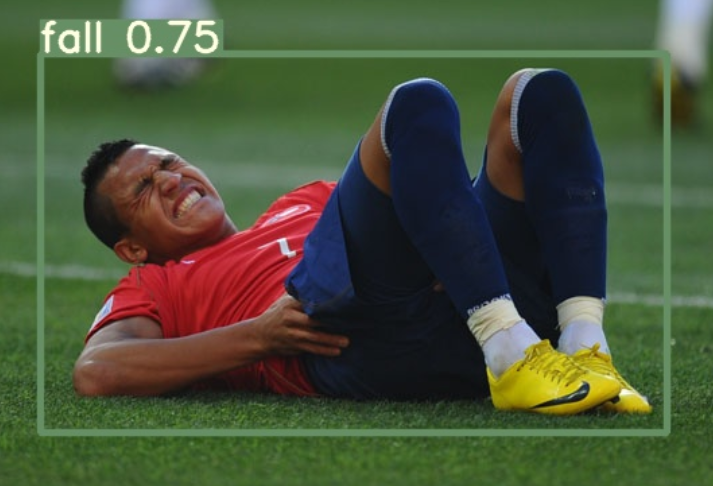
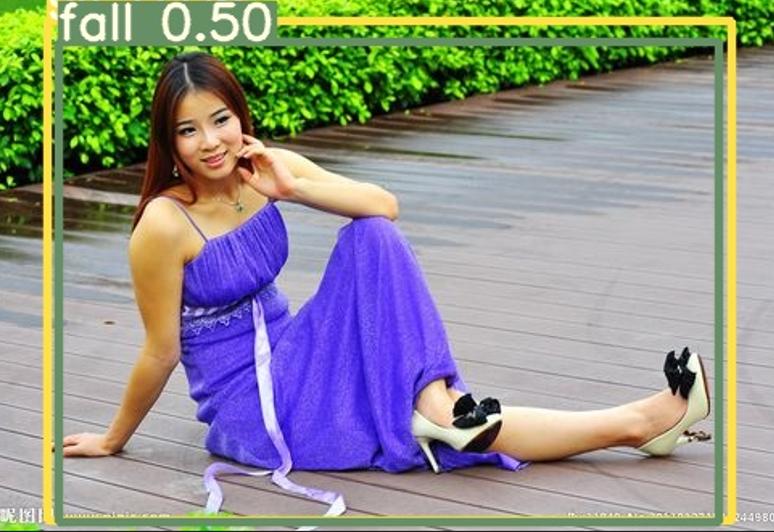
三、在线协助:
如需安装运行环境或远程调试,见文章底部个人QQ名片,由专业技术人员远程协助!
1)远程安装运行环境,代码调试
2)Qt, C++, Python入门指导
3)界面美化
4)软件制作
博主推荐文章:https://blog.csdn.net/alicema1111/article/details/123851014
个人博客主页:https://blog.csdn.net/alicema1111?type=blog
博主所有文章点这里:https://blog.csdn.net/alicema1111?type=blog


![“速通“ 老生常谈的HashMap [实现原理源码解读]](https://img-blog.csdnimg.cn/198fd6850c4f490b8ecd0ee15cf11c24.gif)

