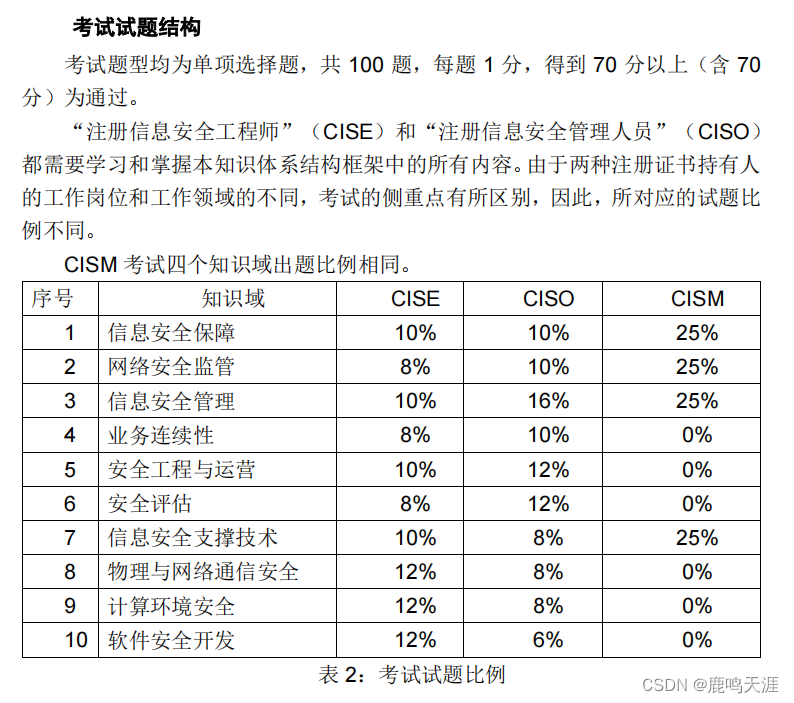
squid相关实验
1、squid的传统代理模式实验
实验规划:
- 准备三台服务器:
- 内网服务器(后端服务器):172.25.254.0/24
- 把网关只想默认路由就可以了
- 客户服务器(客户端、公网):192.168.75.0/24
- 最好是图形化界面;方便操作
- squid服务器:
- 双网卡:公网和内网
- 安装squid服务
- 内网服务器(后端服务器):172.25.254.0/24
实验过程:
- 内网服务器配置过程:
- 注意一定是内网网段172.25.254的网段
- 关闭selinux和防火墙
- 安装httpd服务
- 并且赋予权限
#内网服务器特别简单-->安装好httpd
[root@node1 ~]# yum -y install httpd#修改默认的页面
[root@node1 ~]# echo "this is 11.lala" > /var/www/html/index.html#启动httpd
[root@node1 ~]# service httpd start#测试
[root@node1 ~]# curl localhost
this is 11.lala
- squid服务器配置
- 双网卡:
- 192.168.75.110–>充当外网
- 172.25.254.110–>充当内网
- 开启路由转发功能
- 安装squid服务
- 双网卡:
#准备好两张网卡并且完成配置#复制网卡配置文件
[root@localhost ~]# cp /etc/sysconfig/network-scripts/ifcfg-eth0  /etc/sysconfig/network-scripts/ifcfg-eth1#直接修改eth1
[root@localhost ~]# vim /etc/sysconfig/network-scripts/ifcfg-eth1
DEVICE=eth1
TYPE=Ethernet
ONBOOT=yes
BOOTPROTO=static
IPADDR=172.25.254.110
NETMASK=255.255.255.0#拉起网卡-->并且查看
[root@localhost ~]# ifup ifcfg-eth1
[root@localhost ~]# ifconfig #开启路由转发功能
[root@localhost ~]# vim /etc/sysctl.conf
........7 net.ipv4.ip_forward = 1		#开启路由转发#安装squid服务
[root@localhost ~]# yum -y install squid#修改配置文件
[root@localhost ~]# cp -a /etc/squid/squid.conf{,.bak}
[root@localhost ~]# vim /etc/squid/squid.conf
........62 http_port 3128			#这个是指定的默认端口63 visible_hostname www.liangjiawei.net		#新添加这一行.......#其实,传统模式什么都不需要修改就可以使用了#然后启动squid服务[root@localhost ~]# service squid start
Starting squid: .                                          [  OK  ]
外网客户端配置:
- 这里可以直接使用图形化界面
- 只需要配置一下网关即可
#直接指向squid服务器
[root@linxuprobe ~]# route add default gw 192.168.75.110
[root@linxuprobe ~]# route -n
-
验证一下是否成功–>在客户端那边打开图形化界面
- 打凯浏览器–>
- 因为是传统模式–>需要手工填写代理服务器地址
-
打开浏览器–>设置–>Advanced–>Network–>connection
-
然后书写代理服务器的IP的
-
最后直接访问内网服务器看看
- 可以直接把后端服务器直接关闭–>数据就是squid服务器给出的
2、squid的透明代理模式实验
实验规划:
- 准备三台服务器:
- 内网服务器(后端服务器):172.25.254.0/24
- 安装httpd服务
- 客户服务器(客户端、公网):192.168.75.0/24
- 最好是图形化界面;方便操作
- 指定squid的ip地址是网关–>把数据包直接交给squid服务器
- squid服务器:
- 双网卡:公网和内网
- 安装squid服务
- 内网服务器(后端服务器):172.25.254.0/24
- 其实这个透明模式和传统模式相差不大,客户端需要手工填写代理服务器还是服务器自动帮你填写的问题而已
实验过程:
- 内网服务器配置过程:
- 注意一定是内网网段172.25.254的网段
- 关闭selinux和防火墙
- 安装httpd服务
- 并且赋予权限
#内网服务器特别简单-->安装好httpd
[root@node1 ~]# yum -y install httpd#修改默认的页面
[root@node1 ~]# echo "this is 11.lala" > /var/www/html/index.html#启动httpd
[root@node1 ~]# service httpd start#测试
[root@node1 ~]# curl localhost
this is 11.lala
- squid服务器配置
- 双网卡:
- 192.168.75.110–>充当外网
- 172.25.254.110–>充当内网
- 开启路由转发功能
- 安装squid服务
- 双网卡:
#准备好两张网卡并且完成配置#复制网卡配置文件
[root@localhost ~]# cp /etc/sysconfig/network-scripts/ifcfg-eth0  /etc/sysconfig/network-scripts/ifcfg-eth1#直接修改eth1
[root@localhost ~]# vim /etc/sysconfig/network-scripts/ifcfg-eth1
DEVICE=eth1
TYPE=Ethernet
ONBOOT=yes
BOOTPROTO=static
IPADDR=172.25.254.110
NETMASK=255.255.255.0#拉起网卡-->并且查看
[root@localhost ~]# ifup ifcfg-eth1
[root@localhost ~]# ifconfig #开启路由转发功能
[root@localhost ~]# vim /etc/sysctl.conf
........7 net.ipv4.ip_forward = 1		#开启路由转发#安装squid服务
[root@localhost ~]# yum -y install squid#修改配置文件
[root@localhost ~]# cp -a /etc/squid/squid.conf{,.bak}
[root@localhost ~]# vim /etc/squid/squid.conf
........
http_port 172.25.254.110:3128  transparent	#这里指定了使用的是透明模式
visible_hostname www.liangjiawei.net.......#透明模式需要借助IPTABLES来支持转发;#开启iptables
[root@localhost ~]# service  iptables start
iptables: Applying firewall rules:                         [  OK  ]#需要先清空其他的防火墙规则
[root@localhost ~]# iptables -F#添加防火墙规则-->注意一下这里的172.25.254.0是内网网段
[root@localhost ~]# iptables -t nat -A PREROUTING -i eth1 -s 172.25.254.0/24 -p tcp --dport 80 -j REDIRECT --to-ports 3128#查看防火墙规则
[root@localhost ~]# iptables -t nat -L
Chain PREROUTING (policy ACCEPT)
target     prot opt source               destination
REDIRECT   tcp  --  172.25.254.0/24      anywhere            tcp dpt:http redir ports 3128 #然后启动squid服务[root@localhost ~]# service squid start
Starting squid: .                                          [  OK  ]
外网客户端配置:
- 这里可以直接使用图形化界面
- 只需要配置一下网关即可
#直接指向squid服务器
[root@linxuprobe ~]# route add default gw 192.168.75.110
[root@linxuprobe ~]# route -n
- 验证一下是否成功–>在客户端那边打开图形化界面
- 打凯浏览器–>直接访问172.25.254.11
做一个限制实验
- squid服务器是可以限制大小的;
- 修改配置文件–>
- 然后客户端直接访问文件–>提示报错
#后端服务器准备一个200M的文件#注意发布路径
[root@node1 ~]# cd /var/www/html/
[root@node1 html]# dd if=/dev/zero of=1.txt bs=1M count=200#squid服务器修改配置文件
[root@localhost ~]# vim /etc/squid/squid.conf
............#添加如下这一行
reply_body_max_size 100 MB#然后重启服务
[root@localhost ~]# service squid restart#客户端直接访问-->浏览器
3、squid的反向代理模式实验
实验规划:
- 准备四台服务器:
- 两台外网服务器:192.168.75.11/12
- 两台设备都提供httpd服务
- 一台squid服务器:
- 双网卡:172.25.254.0/24和192.168.75.0/24
- 一台客户端(内网服务器)—>最好是图形化界面
- 并且把网关指定到squid服务器
- 两台外网服务器:192.168.75.11/12
实验过程
先调试简单的–>配置两台公网服务器
- 安装一下httpd服务;并且修改配置文件
#两台公网服务器都是一样的-->配置
[root@node2 ~]# yum -y install httpd#修改默认页面
[root@node2 ~]# echo "this is server12" > /var/www/html/index.html#启动服务
[root@node2 ~]# service httpd start#测试
[root@node2 ~]# curl localhost
this is server12#到这里就已经是配置完成了
squid服务器配置如下
- 双网卡–>公网和私网
- 192.168.75.110–>公网
- 172.25.254.110–>私网
- 安装squid服务
- 修改配置文件
#添加网络eth1-->充当内网网址
[root@localhost ~]# cd /etc/sysconfig/network-scripts/
[root@localhost network-scripts]# cp -a ifcfg-eth0 ifcfg-eth1
[root@localhost network-scripts]# vim ifcfg-eth1
DEVICE=eth1				#名字别忘记修改了
TYPE=Ethernet
ONBOOT=yes
BOOTPROTO=static
IPADDR=172.25.254.110		#ip也得改一下
NETMASK=255.255.255.0#启动eth1网卡
[root@localhost network-scripts]# ifup eth1
[root@localhost network-scripts]# ifconfig  eth1#开启路由转发功能--。内核
[root@localhost ~]# vim /etc/sysctl.conf
.............7 net.ipv4.ip_forward = 1
.............#刷新文件
[root@localhost ~]# sysctl -p#安装squid服务
[root@localhost ~]# yum -y install squid#修改配置文件
[root@localhost ~]# cp -a /etc/squid/squid.conf{,.bak}
[root@localhost ~]# vim /etc/squid/squid.conf
..........34 http_access allow all			#允许放行
..........62 http_port 172.25.254.110:80 vhost		#指定的是squid的地址,#vhost是代表反向代理模式#下面两行是需要自己添加的#指定两台外网的服务器地址-->parent就是squid服务器#0代表的是是否有其他的代理服务器;# originserver round-robin指定是轮询模式63 cache_peer 192.168.75.11 parent 80 0  originserver round-robin64 cache_peer 192.168.75.12 parent 80 0  originserver round-robin#重启服务
[root@localhost ~]# service squid start
内网服务器配置
- 把网关指向squid服务器
- 开启图形化–>打开浏览器验证
4、squid的ACL设置
简述:
访问控制列表:
- 根据源地址、目标URL、文件类型等等来定义列表
- 语法:acl 列表名称 列表类型 列表内容
- 你如果定义了ACL,如果不出现限制等于没有配置
- 配置的模板:http_access allow或者deny 列表名称 ….
squid ACL支持过滤的类型
- src:源地址
- url_regex 目标URL
- dst:目标地址
- port:目标端口
- dstdomain:目标域
- maxconn:最大的并发连接
- Urlpath_regex:整个目标URL路径
ACL的规则总结:
- 只有acl设定而没有http_access 设置–>等于没有配置;默认拒绝
- http_access deny all 未定义,并且自己定义了一个acl范围;默认使用最后一条规则的反向规则